
Are you looking to add a touch of creativity and artistry to your iPhone photography? Well, you’re in luck! With the latest software update on the iPhone, you now have the power to transform your live photos into stunning long-exposure photos. This exciting feature allows you to capture the motion and flow of time in a single image, creating beautiful and mesmerizing effects.
In this article, we will guide you through the step-by-step process of turning a live photo into a long-exposure masterpiece on your iPhone. We will explore the new tools and techniques that will help you unleash your creativity and make your photos stand out from the crowd. So, grab your iPhone, open your camera, and let’s dive into the world of long-exposure photography!
Inside This Article
- What is a Live Photo?
- Converting a Live Photo to a Long-Exposure Photo
- Using the Long-Exposure Effect in the Photos App
- Editing and Enhancing Long-Exposure Photos
- Conclusion
- FAQs
What is a Live Photo?
A Live Photo is a unique feature available on iPhones that captures a brief video clip along with a still image when you take a photo. This means that when you view a Live Photo, you not only see a single snapshot but also a few seconds of movement and sound.
The Live Photo feature essentially brings your pictures to life, adding a touch of motion and emotion to your memories. It captures the action just before and after you press the shutter button, giving you a glimpse of the moments leading up to the photo and extending beyond it.
Live Photos can be a lot of fun to revisit, as they capture the essence of the moment in a more immersive way. You can see the subtle movements, hear the sounds, and relive the experience as if you were right there.
However, the true magic of Live Photos lies in the ability to transform them into something more artistic and captivating. With the option to turn a Live Photo into a long-exposure photo, you can create stunning visual effects that were once only achievable with professional camera equipment.
Converting a Live Photo to a Long-Exposure Photo
Live Photos have become a beloved feature on the iPhone, allowing users to capture a few seconds of motion alongside their still images. But did you know that you can convert these Live Photos into stunning long-exposure photos? With just a few taps, you can unleash your creative side and transform your Live Photos into captivating, blur-filled masterpieces. In this guide, we’ll walk you through the process step by step, so let’s dive in!
To begin, make sure your iPhone’s camera settings have Live Photos enabled. Open the Camera app and look for the concentric circles icon at the top of the screen. If it’s yellow, Live Photos are already turned on. If not, tap it to activate the feature.
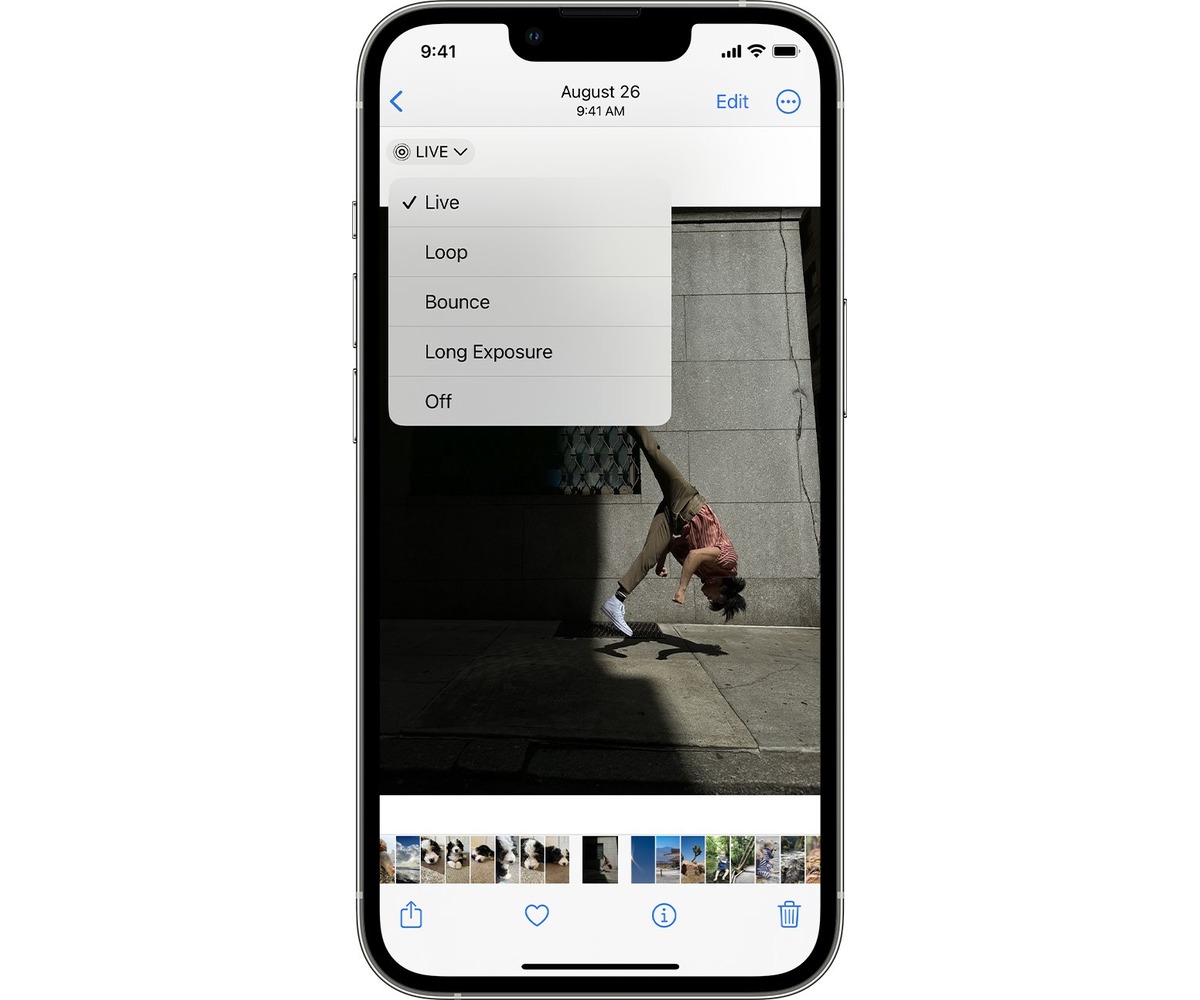
Once you have a Live Photo to work with, open the Photos app and find the image you want to convert. Then, tap on the photo to open it in full screen view. Swipe up on the image to reveal a variety of effects and editing options, one of which is Long Exposure.
Select the Long Exposure option, and within seconds, your Live Photo will be transformed into a mesmerizing long-exposure image. The effect simulates the appearance of a slow shutter speed, smoothening moving elements and creating a beautiful motion blur.
But the creativity doesn’t stop there. You can adjust the duration of the Long Exposure effect to further customize the final result. To do this, tap on the Edit button in the top right corner of the screen.
Once you’re in edit mode, you’ll see a timeline at the bottom of the screen representing the different frames of your Live Photo. Drag the slider left or right to adjust the duration of the long-exposure effect. Longer durations will create a more pronounced blur effect, while shorter durations will retain more detail and sharpness.
When you’re satisfied with the adjustments, tap Done to save your changes. Your long-exposure photo will now be ready to share with friends and family, or even to post on social media for the world to enjoy.
Sharing your long-exposure photo is as easy as sharing any other image on your iPhone. Simply tap the Share button, choose your desired sharing method, and send it off. Your friends and followers will be impressed by the unique and artistic touch you’ve added to your photos.
Converting a Live Photo to a long-exposure photo is a fantastic way to explore your creativity and experiment with different visual effects. Whether you’re capturing a bustling cityscape or the gentle flow of a waterfall, the Long Exposure effect will add a sense of drama and movement to your images. So, grab your iPhone, find a captivating subject, and start transforming your Live Photos into mesmerizing long-exposure photos today!
Using the Long-Exposure Effect in the Photos App
The Photos app on iPhone offers a powerful feature that allows you to transform your Live Photos into stunning long-exposure photos. This effect can add an artistic and dynamic touch to your images by blending together the different frames captured during the Live Photo recording.
To access the long-exposure effect, open the Photos app on your iPhone and select the Live Photo you want to edit. Tap on the photo to open it in fullscreen mode, then swipe up to reveal the Effects panel.
In the Effects panel, you will see various options available, such as Loop, Bounce, and Long Exposure. Tap on the “Long Exposure” option to apply the effect to your photo. The Photos app will automatically process the frames and create a stunning long-exposure image.
It’s important to note that the long-exposure effect works best with scenes that have elements in motion, such as flowing water, moving clouds, or bustling city streets. The effect creates a beautiful blur and smoothes out any movements, resulting in a dreamy and ethereal look.
Once the long-exposure effect is applied, you can further enhance your photo by adjusting the light and color settings. Tap on the “Edit” button located at the top-right corner of the screen. Here, you can fine-tune the exposure, brightness, contrast, and other parameters to achieve the desired look for your long-exposure photo.
If you’re not satisfied with the result or want to revert back to the original Live Photo, simply tap on the “Revert” button at the bottom-right corner of the screen. This will remove the long-exposure effect and restore the Live Photo with its original motion and frames.
Once you’re done editing your long-exposure photo, you can save it to your photo library or share it with others. Tap on the “Done” button to exit the editing mode, then tap on the “Share” button to choose your desired sharing method, such as AirDrop, Messages, or social media platforms.
Using the long-exposure effect in the Photos app is a fantastic way to unleash your creativity and transform ordinary Live Photos into stunning works of art. So go ahead, explore this feature, and impress your friends and followers with your unique and captivating long-exposure photos.
Editing and Enhancing Long-Exposure Photos
Long-exposure photos can capture stunning images, showcasing streaks of light, smooth waterfalls, and surreal light trails. However, capturing the perfect long-exposure shot is only the first step. To truly make your photo stand out, you need to do some editing and enhancements. Here are some tips to help you get the most out of your long-exposure photos.
1. Adjust the exposure: Long-exposure photos often have a darker overall tone, which can add drama to the image. However, you may need to adjust the exposure to achieve the desired level of brightness. Use photo editing software or apps to increase or decrease the exposure until you find the perfect balance.
2. Enhance the colors: Long-exposure photos can sometimes have muted or dull colors due to the extended exposure time. To make your photo more vibrant, try increasing the saturation or selectively adjusting the colors in post-processing. Experiment with different color settings to find the look that best suits your vision.
3. Reduce noise: Long exposures often result in more noise or graininess in the photo, especially in low-light conditions. Use noise reduction tools in your editing software to reduce the noise while preserving the details. Be careful not to overdo it, as excessive noise reduction can make the photo look soft.
4. Crop and straighten: Sometimes, the composition of a long-exposure photo may benefit from a bit of cropping and straightening. Look for distractions at the edges of the frame and consider cropping them out to improve the overall composition. Additionally, use the straighten tool to align any angled horizons or structures in the photo.
5. Add artistic effects: Long-exposure photos lend themselves well to artistic effects and creative edits. Experiment with different filters, textures, or overlays to give your photo a unique and captivating look. Remember to use these effects subtly and with intention, as excessive editing can make the photo appear unnatural.
6. Sharpen the details: In long-exposure photos, details may appear soft due to motion blur or camera shake. Use the sharpening tools in your editing software to enhance the fine details and bring more clarity to the image. Be careful not to oversharpen, as it can introduce artifacts and make the photo look unnatural.
7. Adjust the contrast: Long-exposure photos often benefit from increased contrast to make the subject stand out. Adjust the contrast sliders in your editing software to enhance the tonal range of the photo. Find the right balance, so the highlights and shadows are well-defined but maintain a natural and pleasing look.
8. Experiment with black and white: Long-exposure photos can look striking in black and white. Convert your photo to black and white and experiment with different tones and adjustments. This can help emphasize the textures and shapes captured in the long-exposure shot.
Remember, editing and enhancing a long-exposure photo is a creative process, and there are no strict rules. Play around with different techniques, trust your artistic instincts, and have fun bringing out the full potential of your long-exposure photos.
Conclusion
In conclusion, turning a live photo into a long-exposure photo on your iPhone is a simple and effective way to add a touch of creativity and uniqueness to your photography. With just a few steps, you can transform your ordinary snapshots into stunning images that capture motion and create a sense of drama and interest.
By using the Live Photos feature and the appropriate editing tools, you can achieve impressive long-exposure effects like light trails, motion blur, and silky smooth waterfalls. Whether you’re capturing the excitement of a bustling city street or the serenity of a peaceful landscape, experimenting with long-exposure photography on your iPhone opens up a whole new world of creative possibilities.
Remember, practice makes perfect, so don’t be afraid to experiment and try different settings and techniques. With time and experience, you’ll be able to master the art of long-exposure photography on your iPhone and create captivating images that truly stand out.
FAQs
1. Can I turn a Live Photo into a long-exposure photo on my iPhone?
Yes, you can! With the latest update in 2023, Apple has introduced a new feature that allows you to easily convert Live Photos into stunning long-exposure photos directly on your iPhone.
2. What is a Live Photo?
A Live Photo is a feature on iPhones that captures a few seconds of video and audio before and after you take a photo. It essentially adds a touch of motion and life to your still images, creating a more immersive and dynamic experience.
3. Why would I want to turn a Live Photo into a long-exposure photo?
Converting a Live Photo into a long-exposure photo can produce amazing effects, especially for capturing movement and creating a sense of motion blur. It’s great for photographing waterfalls, flowing streams, traffic trails, or any other scenes where you want to create a dramatic and artistic effect.
4. How do I turn a Live Photo into a long-exposure photo on my iPhone?
To transform a Live Photo into a long-exposure photo, follow these steps:
– Open the Live Photo you want to convert in the Photos app.
– Swipe up on the photo to reveal a selection of effects.
– Choose the “Long Exposure” option.
– Your Live Photo will now be transformed into a stunning long-exposure photo.
5. Can I adjust the intensity of the long-exposure effect on my iPhone?
Unfortunately, the built-in Photos app does not provide adjustable settings for the long-exposure effect. The intensity of the effect is automatically determined by the software. However, you can experiment with different Live Photos and compositions to achieve your desired results.