
The Sony Xperia is a popular line of smartphones known for their cutting-edge features and impressive performance. One crucial component that keeps these devices running smoothly is the battery. Over time, batteries tend to lose their capacity, requiring users to replace them. If you’re a Sony Xperia user faced with a dwindling battery life, don’t worry – changing the battery is a relatively simple process that you can do yourself. In this guide, we will walk you through the steps to successfully change the battery on your Sony Xperia device. Whether you’re a tech enthusiast or a novice smartphone user, this article will provide you with the information you need to keep your Sony Xperia powered up and ready to go.
Inside This Article
- Preparation – Gathering the necessary tools and materials – Backing up important data on the Sony Xperia
- Removing the Back Cover – Locating the small notch on the side of the device – Using a plastic opening tool to pry off the back cover
- Disconnecting the Battery – Identifying the battery connectors – Gently disconnecting the battery ribbon cables
- Installing the New Battery – Ensuring compatibility with the Sony Xperia model – Connecting the new battery to the device
- Securing the Back Cover – Aligning the back cover properly – Snapping it into place
- Testing the Battery – Powering on the Sony Xperia – Verifying that the new battery is functioning properly
- Additional Tips and Considerations – Avoiding damage to other components during battery replacement – Seeking professional assistance if unsure
- Troubleshooting – Addressing common issues that may arise
- Conclusion
- FAQs
Preparation – Gathering the necessary tools and materials – Backing up important data on the Sony Xperia
Before you embark on the process of changing the battery on your Sony Xperia, it is crucial to make adequate preparations. This ensures a smooth and hassle-free battery replacement experience. In this section, we will discuss the necessary tools and materials you will need, as well as the importance of backing up important data on your device.
To begin, let’s talk about the tools and materials you should gather before starting the battery replacement. You will need a plastic opening tool, a small screwdriver set, and a new replacement battery that is compatible with your specific Sony Xperia model. It’s important to ensure that the replacement battery is of high quality to ensure optimal performance.
Next, let’s emphasize the importance of backing up important data on your Sony Xperia before proceeding with the battery replacement. Changing the battery involves powering off your device and disconnecting the battery, which may result in data loss if precautions are not taken. By backing up your data, you can safeguard important files, contacts, messages, and applications.
To back up your data, you can use the built-in backup and restore feature on your Sony Xperia. This feature allows you to create a complete backup of your device, including photos, videos, documents, and app data. Alternatively, you can manually transfer your files to a computer or use cloud storage services for added convenience and accessibility.
By taking the time to gather the necessary tools and materials and backing up your data, you are ensuring that you are well-prepared for the battery replacement process. This will not only make the process smoother but also provide peace of mind knowing that your important data is safely stored. Let’s move on to the next section, where we will discuss the steps to remove the back cover of your Sony Xperia.
Removing the Back Cover – Locating the small notch on the side of the device – Using a plastic opening tool to pry off the back cover
One of the essential steps in changing the battery on a Sony Xperia is removing the back cover. To access the battery compartment, you need to locate the small notch on the side of the device. This notch serves as a starting point for the removal process. It’s usually located towards the bottom or the middle section of the phone.
Once you have identified the small notch, you will need a plastic opening tool to pry off the back cover. Insert the opening tool gently into the notch and apply slight pressure to separate the back cover from the main body of the Sony Xperia. Be cautious not to apply excessive force to avoid damaging either the back cover or the device.
As you pry off the back cover, you may need to move the opening tool along the edges of the device, carefully releasing the clips that hold the cover in place. Take your time and work your way around the phone until the back cover is completely loose.
It’s important to note that Sony Xperia models may vary in design, so the location of the small notch and the method for removing the back cover may differ slightly. In some cases, you may need to remove screws or use other specialized tools. Consult the user manual or online resources specific to your Sony Xperia model for detailed instructions.
Once the back cover is successfully removed, you can proceed to the next steps in the battery replacement process. Remember to handle the back cover with care and keep it in a safe place to avoid any damage.
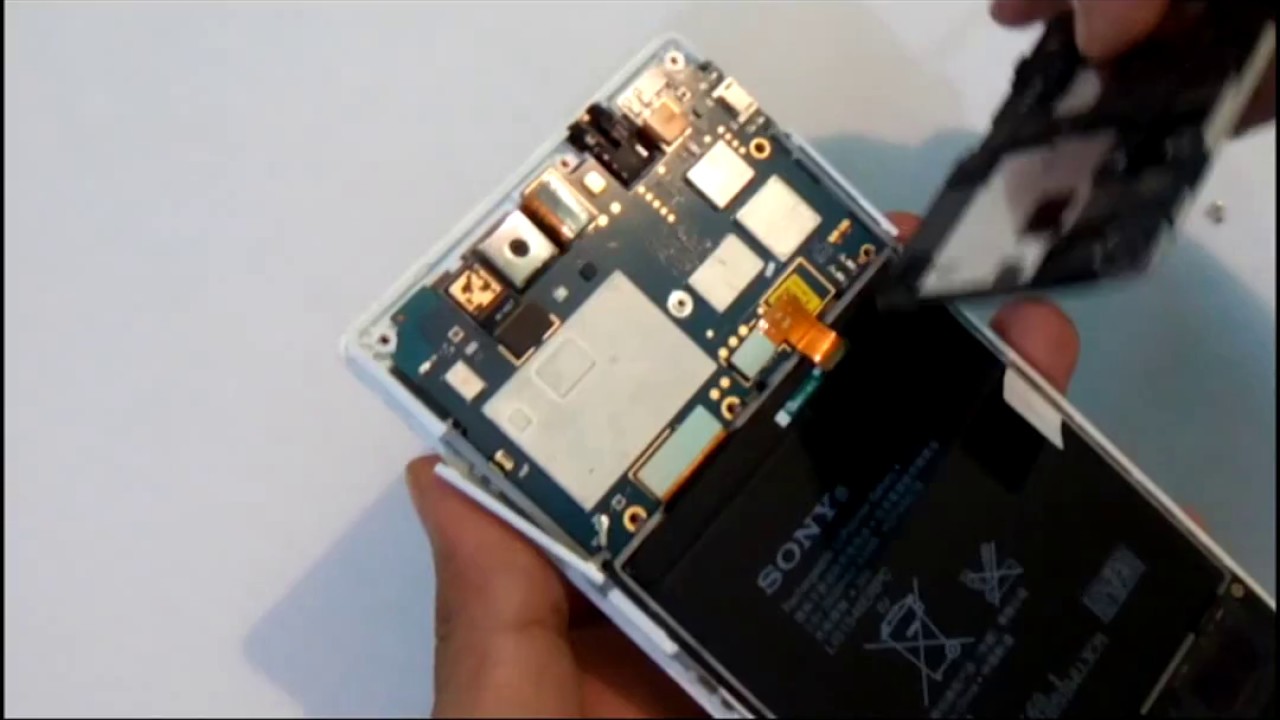
Disconnecting the Battery – Identifying the battery connectors – Gently disconnecting the battery ribbon cables
When it comes to changing the battery on your Sony Xperia, the first step is disconnecting the old battery. This process involves identifying the battery connectors and gently disconnecting the battery ribbon cables. Here’s a step-by-step guide to help you through the process:
1. Start by locating the battery connectors on your Sony Xperia. These connectors are typically situated near the battery and may vary in appearance depending on the model of your device. They are small, rectangular connectors with ribbon cables attached to them.
2. Take a moment to familiarize yourself with the connectors and their placement on the device. Make sure you have a clear view of both the battery connectors and the corresponding connectors on the motherboard.
3. With the connectors identified, approach the disconnection process with caution. Use your fingertips or a pair of small, non-metallic tweezers to gently lift the connectors from their sockets. It’s important to handle these connectors delicately to avoid causing any damage to the ribbon cables or the connectors themselves.
4. Slowly pull the battery ribbon cables away from the connectors, taking care to avoid putting excessive force on them. The cables should disconnect smoothly without any resistance. If you encounter any resistance, double-check that you are properly lifting the connectors and not the cables themselves.
5. Once the battery ribbon cables are fully disconnected, set them aside. Be mindful of their position to ensure ease of reconnection when installing the new battery.
By following these instructions and exercising caution, you should be able to disconnect the battery from your Sony Xperia without any issues. Remember, taking your time and being gentle during this process is crucial to avoid any unnecessary damage.
Installing the New Battery – Ensuring compatibility with the Sony Xperia model – Connecting the new battery to the device
One of the most crucial steps in changing the battery on your Sony Xperia is ensuring compatibility with the device model. Sony Xperia smartphones have different battery sizes and connectors depending on the specific model. It is important to double-check that the new battery you have purchased is specifically designed for your Sony Xperia model. Installing an incompatible battery can result in damage to the device and may void the warranty.
Once you have confirmed the compatibility of the new battery, it’s time to connect it to your Sony Xperia. Carefully locate the battery connectors on the device. These connectors are typically located near the bottom of the phone, close to where the original battery was connected.
Before connecting the new battery, make sure your Sony Xperia is powered off. This will prevent any potential damage to the device during the installation process. Take the new battery and align the connectors with the corresponding slots on the phone. Gently press the battery into place until it is securely connected.
It is essential to handle the battery and connectors with care, as they are delicate components. Apply even pressure when connecting the battery to avoid any bending or damage to the connectors. Be cautious, as using excessive force can lead to breakage and render the battery useless.
Once the new battery is securely connected, you can proceed with reassembling your Sony Xperia. Follow the steps outlined in the previous section to carefully snap the back cover into place.
After you have successfully installed the new battery and reassembled the device, it’s time to test its functionality. Power on your Sony Xperia and verify that the battery is charging and holding a charge properly. Check the battery indicator to ensure it is displayed correctly. If you notice any inconsistencies, such as the battery percentage dropping rapidly or the device not charging at all, you may need to reconnect or replace the battery.
By following these steps, you can install a new battery in your Sony Xperia, ensuring compatibility and proper connection. It is always recommended to refer to the device’s user manual or consult with a professional if you have any doubts or concerns during the process.
Securing the Back Cover – Aligning the back cover properly – Snapping it into place
Once you have successfully disconnected the battery of your Sony Xperia, it’s time to secure the back cover. This step is crucial to ensure the protection of the internal components and maintain the device’s overall integrity. To properly secure the back cover, you need to focus on aligning it correctly and snapping it into place.
Start by taking a close look at the back cover of your Sony Xperia. You will notice that it has small tabs and notches that fit into corresponding slots on the device’s frame. These tabs and slots ensure a secure and snug fit for the back cover. It is important to align these tabs and slots properly to avoid any gaps or loose fit.
To align the back cover, hold it in your hands and carefully position it over the device’s frame. Ensure that all the edges and corners of the back cover are aligned with the corresponding areas on the device. Take your time and make small adjustments if needed to ensure a perfect fit.
Once you are confident that the back cover is properly aligned, it’s time to snap it into place. Apply even pressure on the back cover, starting from one side and working your way around the edges. You may hear a satisfying click as the tabs on the back cover engage with the slots on the device.
Continue pressing down gently but firmly along the entire perimeter of the back cover until it is securely attached to the device. Pay extra attention to the corners and edges to ensure there are no gaps or loose areas. A properly secured back cover will provide protection and prevent any dust or debris from entering the device.
Once you have snapped the back cover into place, give it a gentle wiggle to ensure that it is securely attached and does not move or come loose. If you feel any slight movement or hear any clicking sounds, it may indicate that the back cover is not fully secured. In such cases, gently press on the areas that seem loose until you hear a click and feel the back cover securely in place.
Finally, visually inspect the back cover to check for any gaps or misalignment. If you notice any issues, gently remove the back cover and repeat the alignment and snapping process. It is better to spend a few extra moments ensuring a proper fit than risking damage or improper functioning of your Sony Xperia.
By following these steps and taking the time to align the back cover properly and snap it into place, you can ensure the safety and integrity of your Sony Xperia device. Now that the back cover is secured, you can move on to the next step in the battery replacement process or power on your device to enjoy its renewed performance.
Testing the Battery – Powering on the Sony Xperia – Verifying that the new battery is functioning properly
Once you have successfully installed the new battery in your Sony Xperia, it’s time to test it and ensure that it is functioning properly. Follow the steps below to power on your device and verify the battery’s performance:
1. Powering on the Sony Xperia:
Press and hold the power button located on the side or top of your Sony Xperia device. After a few seconds, the device should vibrate, and the manufacturer’s logo will appear on the screen. Release the power button once the logo appears.
2. Verifying battery performance:
Once your Sony Xperia has booted up, pay attention to the battery indicator icon on the screen. Look for the battery percentage or icon, which should display the current charge level. If the battery is functioning properly, you should see an increase in the charge level compared to when the old battery was installed.
Additionally, observe the device’s overall performance. A healthy battery should provide sufficient power to ensure smooth functioning without unexpected shutdowns or rapid battery drain.
If you notice any abnormalities, such as a battery percentage that does not increase or an excessively fast battery drain, there may be an issue with the new battery. In such cases, it is advisable to double-check the battery installation and connections.
If the battery issues persist, it is recommended to consult a professional technician or contact Sony customer support for further assistance. They will be able to provide guidance and help troubleshoot any issues you may be experiencing with your new battery.
Remember, testing the battery after installation is crucial to ensure that your Sony Xperia functions optimally and that the new battery provides the power and performance you expect from your device.
Additional Tips and Considerations – Avoiding damage to other components during battery replacement – Seeking professional assistance if unsure
When replacing the battery on your Sony Xperia, it’s important to keep in mind some additional tips and considerations to avoid causing damage to other components of the device. By following these guidelines, you can ensure a smooth and successful battery replacement process.
Avoiding damage to other components during battery replacement:
1. Be gentle when handling the device: While removing the back cover and disconnecting the battery, make sure to handle the Sony Xperia with care. Apply gradual and steady force when prying off the back cover and disconnecting the battery ribbon cables to prevent any accidental damage to other internal components.
2. Avoid excessive bending or twisting of cables: The ribbon cables that connect the battery to the device are delicate. Be cautious not to excessively bend or twist them as this can cause them to break or disconnect from the circuit board. Take your time and handle the cables with care.
3. Keep screws and small components organized: During the battery replacement process, you may need to remove small screws or components from the Sony Xperia. It’s crucial to keep these pieces organized and in a safe place to ensure that they are not lost or misplaced. Consider using a magnetic mat or containers to store the screws and components securely.
Seeking professional assistance if unsure:
1. Consider consulting the manufacturer’s guide or website: If you’re unsure about any step of the battery replacement process or if your device has specific instructions, it’s recommendable to refer to the official manufacturer’s guide or website. They often provide detailed instructions specific to each model, which can help you avoid any potential mistakes or complications.
2. Reach out to a professional technician: If you lack confidence or experience in handling electronic devices, it’s best to seek the assistance of a professional technician. They have the expertise and knowledge to replace the battery without putting the device at risk. Additionally, professionals have access to specialized tools and equipment that may be required for a successful battery replacement.
3. Consider warranty implications: If your Sony Xperia is still under warranty, attempting a battery replacement yourself may void the warranty. It’s advisable to check the terms and conditions of your warranty or contact the manufacturer before proceeding with the replacement. They may recommend authorized service centers or provide guidance on the best course of action.
By following these additional tips and considering seeking professional assistance if unsure or inexperienced, you can minimize the risk of damage to your Sony Xperia during the battery replacement process. Remember, the goal is to safely and successfully replace the battery while preserving the overall functionality of your device.
Troubleshooting – Addressing common issues that may arise
While changing the battery on your Sony Xperia, you may encounter some common issues that could hinder the process. Fortunately, most of these can be easily addressed with a few troubleshooting steps. Let’s take a look at some of the potential problems you may encounter and the solutions:
1. Battery not fitting properly: If you find that the new battery is not fitting snugly into the Sony Xperia, double-check that you have purchased the correct battery model. Sometimes, a slight discrepancy in size or shape can cause a poor fit. If you have the correct battery, ensure that it is oriented correctly and try inserting it again. If the problem persists, consider contacting the manufacturer or a professional technician for further assistance.
2. Phone not powering on: After replacing the battery, if your Sony Xperia does not turn on, there may be a simple solution. First, verify that the battery is properly connected to the device. If the connections are secure, try performing a soft reset by holding down the power button for 10-15 seconds. If the phone still doesn’t power on, it could indicate a larger issue, and you may want to consult a professional technician.
3. Rapid battery drain: If you notice that your Sony Xperia’s battery life significantly decreases after replacing the battery, it could be due to certain settings or apps. Check for any power-hungry apps running in the background and close them. You can also adjust the device’s display settings, such as brightness or timeout duration, to optimize battery usage. Additionally, consider performing a factory reset to eliminate any software glitches that may be contributing to the issue.
4. Overheating: Overheating can occur after a battery replacement if the battery is not inserted correctly or if there are software-related issues. Ensure that the battery is securely connected, and check for any software updates that may address heating problems. If the issue persists, it may be best to seek professional assistance, as it could indicate a more serious underlying problem.
5. Loss of data: While changing the battery, there is a remote possibility of data loss. To avoid this, it is always recommended to back up your important data before proceeding with any hardware changes. However, if you do happen to lose data, there are data recovery services available that may help retrieve the lost information. Contact a professional technician for further guidance in data recovery.
By being aware of these common issues and their troubleshooting solutions, you can navigate the battery replacement process with confidence. However, if you encounter any other problems or have concerns during the process, it is advisable to seek professional assistance from authorized service centers or experienced technicians.
Conclusion
Changing the battery on your Sony Xperia device is a relatively simple process that can extend the lifespan of your phone and improve its performance. By following the step-by-step guide provided, you can replace the battery and enjoy a longer-lasting and more reliable mobile experience.
Remember to always use high-quality replacement batteries and the proper tools for the job. Take your time and follow the instructions carefully to avoid any damage to your device. If you’re unsure or uncomfortable with the process, it’s always best to seek professional assistance.
With a new battery in place, you can enjoy longer battery life, improved performance, and the peace of mind knowing that you have the power to stay connected throughout the day. So don’t hesitate, grab your tools and get ready to give your Sony Xperia a new lease on life!
FAQs
Q: How do I change the battery on my Sony Xperia?
To change the battery on your Sony Xperia, follow these steps:
- Turn off your phone and remove the SIM card tray.
- Locate the small notch or opening on the back cover of your phone.
- Insert a pry tool or your fingernail into the notch and gently lift the back cover off.
- Once the back cover is removed, you will see the battery. Use a Phillips screwdriver to remove any screws securing the battery.
- Disconnect the battery connector from the motherboard using a plastic spudger or a pair of tweezers.
- Remove the old battery and replace it with the new one.
- Reconnect the battery connector and secure any screws if necessary.
- Place the back cover back onto the phone and press down until it clicks into place.
- Insert the SIM card tray back into the phone and turn it on.
Q: Can I change the battery on my Sony Xperia myself?
Yes, you can change the battery on your Sony Xperia yourself by following the steps mentioned above. However, please note that opening your phone and replacing the battery may void the warranty. If your phone is still under warranty, it’s recommended to contact Sony or an authorized service center for battery replacement.
Q: How do I know if my Sony Xperia battery needs to be replaced?
There are a few signs that indicate your Sony Xperia battery may need to be replaced. These include:
- Decreased battery life: If your phone is not holding a charge for as long as it used to, it could be a sign that the battery is deteriorating.
- Sudden shutdowns: If your phone shuts down abruptly even when the battery percentage is not low, it may be a sign of a failing battery.
- Swelling or bulging battery: If you notice that your battery is swollen or bulging, it’s a clear indication that it needs to be replaced immediately.
Q: Where can I buy a new battery for my Sony Xperia?
You can buy a new battery for your Sony Xperia from various sources, including online retailers such as Amazon, eBay, or the official Sony website. Additionally, you can also check with local electronics stores or mobile phone repair shops for battery replacements.
Q: How long does it take to change the battery on a Sony Xperia?
The time it takes to change the battery on a Sony Xperia can vary depending on your experience level and the model of your phone. On average, it can take around 15-30 minutes to complete the battery replacement process. However, it’s always recommended to take your time and follow the instructions carefully to avoid any damage.