
Are you eager to learn how to open your Sony Xperia Tablet Z? Look no further! This comprehensive guide will walk you through the steps to effortlessly open your device and explore its inner workings. The Sony Xperia Tablet Z is a popular and sleek device, known for its impressive features and powerful performance. Whether you need to replace a component, perform troubleshooting, or simply satisfy your curiosity, understanding how to open your Sony Xperia Tablet Z is a valuable skill. In this article, we will provide you with step-by-step instructions, along with some useful tips and tricks, to ensure a successful and hassle-free process. So without further ado, let’s dive right in and uncover the secrets of opening your Sony Xperia Tablet Z!
Inside This Article
- Hardware Requirements
- Preparation Steps
- Opening the Back Cover
- Detaching the Battery
- Conclusion
- FAQs
Hardware Requirements
In order to successfully open your Sony Xperia Tablet Z, you will need a few tools and components. Here are the hardware requirements necessary for this process:
1. Phillips screwdriver: This tool will be used to remove the screws on the back cover of the tablet.
2. Spudger or plastic opening tool: This tool will help you pry open the back cover without causing any damage to the tablet.
3. Tweezers: These are useful for handling small components and fragments during the opening process.
4. Replacement adhesive strips: It is essential to have new adhesive strips on hand to ensure a secure reattachment of the back cover once the tablet is opened.
Keep in mind that using the correct tools will help prevent any accidental damage to the tablet. It is important to handle the components with care and follow the steps precisely to avoid any complications.
Preparation Steps
Before attempting to open your Sony Xperia Tablet Z, it’s crucial to follow a few preparation steps. This will ensure that you have the necessary tools and knowledge to safely disassemble the device without causing any damage. Here are the steps to get you started:
Gather the Required Tools
The first step is to gather all the necessary tools. You will need a small Phillips screwdriver, a plastic pry tool, a suction cup, and a guitar pick or thin plastic opening tool. These tools will help you remove the back cover and access the internal components of the tablet.
Work in a Clean and Well-Lit Area
Find a clean and well-lit area where you can work comfortably. Make sure to clear the surface of any clutter or potential hazards that could interfere with your work. Having good lighting will help you see the small components and connectors inside the tablet more clearly.
Power Off the Tablet
Before proceeding, it is essential to power off your Sony Xperia Tablet Z completely. This will prevent any accidental damage to the device and ensure your safety during the disassembly process. Press and hold the power button until the power menu appears, and then select the “Power off” option.
Remove the SIM Card and Memory Card
If your tablet has a SIM card slot or a memory card slot, you should remove the cards before opening the device. Locate the SIM card tray or memory card slot on the sides or top of the tablet and use a SIM card ejector tool or a small paperclip to gently push the tray out or eject the card.
Back Up Your Data
Before proceeding with any hardware modification, it’s always a good idea to back up your important data. This will ensure that you don’t lose any files or personal information during the disassembly or repair process. You can use the tablet’s built-in backup features or connect it to a computer to create a backup.
Read the Repair Guide
It’s highly recommended to read through a detailed repair guide or tutorial for your specific tablet model before attempting to open it. The repair guide will provide you with step-by-step instructions and visuals to help you navigate through the disassembly process safely. It will also highlight any potential issues or precautions to note during the repair.
By following these preparation steps, you will be well-equipped and ready to proceed with opening your Sony Xperia Tablet Z. Taking the time to prepare and gather the necessary tools will ensure a smooth disassembly process and help prevent any accidental damage to your device.
Opening the Back Cover
Opening the back cover of your Sony Xperia Tablet Z is a relatively simple process. Just follow these steps to access the internal components:
1. Ensure that the tablet is powered off to avoid any potential damage during the disassembly process.
2. Look for the small notch located on one edge of the tablet. This is where you will insert a thin, flat object to pry open the back cover.
3. Carefully insert a plastic opening tool or a flathead screwdriver into the notch. Gently apply pressure to lift one side of the back cover.
4. Slowly work your way around the edges of the tablet, applying gentle pressure with the opening tool to release the clips securing the back cover. Take your time and make sure not to force anything, as excessive force could cause damage.
5. Once all the clips are released, carefully lift the back cover to separate it from the tablet. Be cautious as there may be a ribbon cable connecting the back cover to the motherboard. If this is the case, gently disconnect the cable before fully removing the cover.
6. With the back cover removed, you will have access to the internal components of your Sony Xperia Tablet Z. This includes the battery, SIM card slot, and other key hardware components.
Remember to handle the internal components with care and avoid placing any unnecessary pressure on them. When you are ready to reassemble the tablet, simply align the back cover with the edges of the device and press firmly until all the clips snap into place.
Opening the back cover of your Sony Xperia Tablet Z is a necessary step for various hardware-related tasks, such as replacing the battery or accessing the SIM card slot. By following these steps and being mindful of the delicate internal components, you can safely open the back cover and perform the necessary maintenance or upgrades on your device.
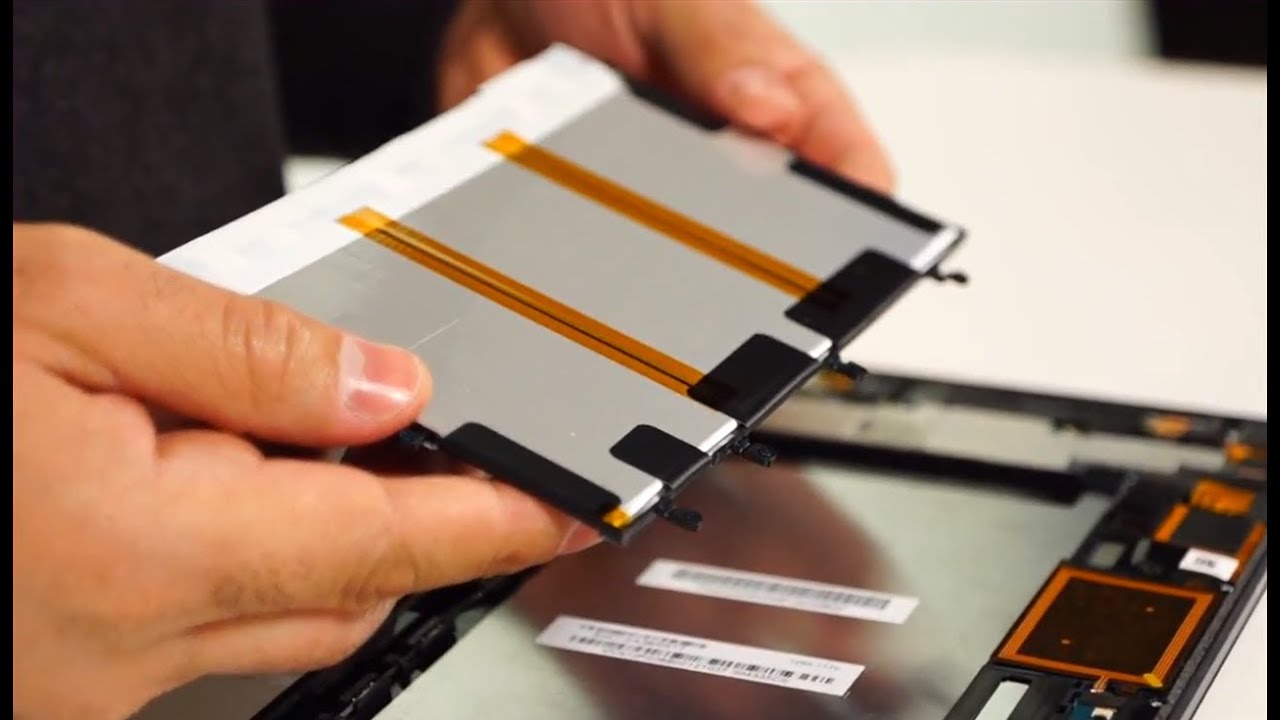
Detaching the Battery
Detaching the battery of your Sony Xperia Tablet Z is a straightforward process that requires a few simple steps. Follow the steps below to safely remove the battery:
Step 1: Begin by turning off your Sony Xperia Tablet Z completely.
Step 2: Locate the small slot on the top-left corner of the tablet. This slot is used to access the battery compartment.
Step 3: Insert a small, pointed object, such as a SIM card removal tool or a paperclip, into the slot. Gently push into the slot until you feel a slight resistance.
Step 4: Apply gentle pressure to slide the battery cover off. Be careful not to apply excessive force or you might damage the cover.
Step 5: Once the battery cover is removed, you will see the battery. It is connected to the device by a small connector.
Step 6: Carefully detach the connector by gently pulling it straight out from the device. Take your time and ensure that you do not damage the connector.
Step 7: After disconnecting the battery connector, you can safely lift the battery out of the device.
And there you have it! You have successfully detached the battery of your Sony Xperia Tablet Z. If you need to replace the battery, make sure to follow the instructions provided with the new battery to install it correctly.
Conclusion
Opening a Sony Xperia Tablet Z can seem like a daunting task, but with the right tools and instructions, it can be done successfully. By following the steps outlined in this guide, you will be able to safely remove the back cover of your tablet and access its internal components.
Remember to take your time, be patient, and exercise caution when performing any DIY repairs on your device. If you are unsure about any step or if you encounter any difficulties during the process, it is always recommended to seek professional assistance to avoid causing further damage.
By being proactive and learning how to open your Sony Xperia Tablet Z, you can save yourself time and money on future repairs or upgrades. Whether you need to replace a faulty component or simply want to explore the internals of your device out of curiosity, this guide has provided you with the necessary knowledge to get started. Happy exploring!
FAQs
1. How do I open Sony Xperia Tablet Z?
To open Sony Xperia Tablet Z, locate the small indentation on the bottom of the device. Insert a SIM eject tool or a small paperclip into the indentation and apply slight pressure. This will release the tray and allow you to remove it. Once the tray is removed, you can insert or remove the SIM card as needed.
2. Can I open Sony Xperia Tablet Z without a tool?
Yes, if you don’t have a SIM eject tool or a paperclip, you can use the end of an earring or a straightened paperclip to open the Sony Xperia Tablet Z. Gently insert the tip into the indentation and apply slight pressure to release the tray.
3. Is it easy to open Sony Xperia Tablet Z?
Yes, opening Sony Xperia Tablet Z is a relatively easy process. The device is designed to make it convenient for users to insert or remove the SIM card when needed. However, it’s always important to exercise caution and be gentle while handling the device to avoid any damage.
4. Do I need to power off Sony Xperia Tablet Z before opening it?
It is not necessary to power off your Sony Xperia Tablet Z before opening it to access the SIM card tray. However, it is always a good practice to turn off the device before making any changes to minimize the risk of damage.
5. Can I open Sony Xperia Tablet Z while it is charging?
It is recommended to disconnect and power off your Sony Xperia Tablet Z before opening it, even if it is being charged. This ensures that you avoid any potential damage to the device or risk of electric shock while handling it.