
In this digital era, smartphones have become an indispensable part of our lives. Among these innovative devices, the iPhone stands out as a true symbol of cutting-edge technology. One essential feature that every iPhone user needs to know is how to change the time on their device.
Whether you’re traveling to a different time zone, adjusting the clock for daylight saving time, or simply need to correct the time on your iPhone, it’s crucial to have this knowledge at your fingertips. In this article, we will guide you through the steps to easily change the time on your iPhone, ensuring that your device is always synced with the correct time.
With detailed instructions and helpful tips, you’ll be able to make the necessary adjustments and have complete control over the time displayed on your iPhone. So let’s dive in and discover how you can change the time on your iPhone hassle-free!
Inside This Article
- How to Change Time on iPhone
- Set the Time Manually
- # Enable Automatic Time Zone Update
- # Adjust Time Using 24-Hour Clock Format
- Change Date and Time Display Format
- Conclusion
- FAQs
How to Change Time on iPhone
Changing the time on your iPhone is a simple process that can be done in just a few steps. Whether you want to set the time manually, enable automatic time zone updates, adjust the time format, or change the date and time display format, you’ll find all the information you need in this guide. So let’s dive in and learn how to change the time on your iPhone.
Set the Time Manually
If you prefer to set the time on your iPhone manually, follow these steps:
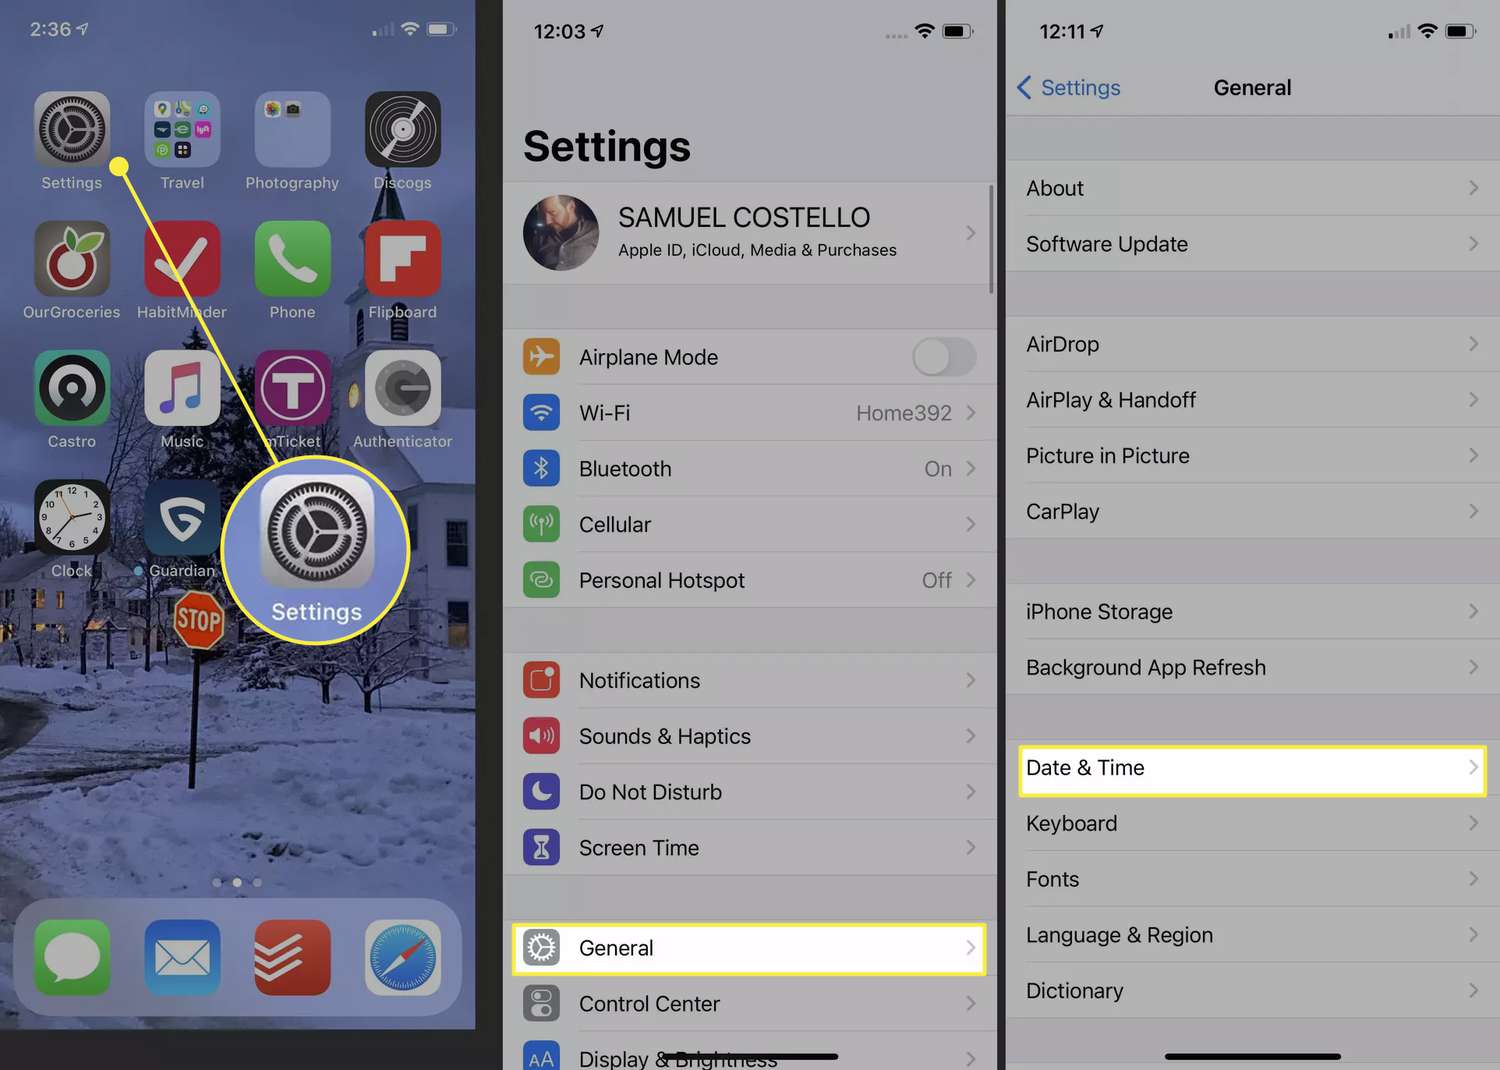
- Open the Settings app on your iPhone.
- Scroll down and tap on “General”.
- Tap on “Date & Time”.
- Toggle off the “Set Automatically” option.
- Tap on “Time Zone” and select your desired time zone.
- Scroll down and tap on “Date & Time” again.
- Tap on “Set Date & Time”.
- Adjust the hour, minute, and second using the wheels or by tapping the up and down arrows.
- Tap “Save” to set the new time.
By following these steps, you can manually set the time on your iPhone and have full control over the displayed time.
Enable Automatic Time Zone Update
If you want your iPhone to automatically update the time based on your current location, here’s what you need to do:
- Open the Settings app on your iPhone.
- Scroll down and tap on “General”.
- Tap on “Date & Time”.
- Toggle on the “Set Automatically” option.
With this option enabled, your iPhone will use your current location to update the time whenever you change time zones.
Adjust Time Using 24-Hour Clock Format
If you prefer to use the 24-hour clock format instead of AM and PM, follow these steps:
- Open the Settings app on your iPhone.
- Scroll down and tap on “General”.
- Tap on “Date & Time”.
- Toggle on the “24-Hour Time” option.
By enabling this feature, your iPhone will display the time in the 24-hour format.
Change Date and Time Display Format
If you want to customize the way your iPhone displays the date and time, here’s what you can do:
- Open the Settings app on your iPhone.
- Scroll down and tap on “General”.
- Tap on “Date & Time”.
- Tap on “Customize Format”.
- Select your desired format for the date and time.
- Tap “Done” to save your changes.
With this option, you can personalize how the date and time are displayed on your iPhone to suit your preferences.
Now you know how to change the time on your iPhone. Whether you want to set it manually, enable automatic time zone updates, adjust the time format, or change the date and time display format, you have the necessary tools to do it. Enjoy having the accurate and personalized time on your iPhone!
Set the Time Manually
If you find that the time on your iPhone is incorrect or if you are traveling to a different time zone, you can easily set the time manually. Here’s how:
- Open the Settings app on your iPhone.
- Scroll down and tap on “General”.
- Next, tap on “Date & Time”.
- Toggle off the “Set Automatically” switch.
- You will now be able to set the time and date manually by scrolling the appropriate wheels.
- Once you have set the desired time, tap on “Done” to save the changes.
Setting the time manually is useful, especially when you want to make sure that your iPhone is synced with a specific time or if you want to enter a different time zone manually.
# Enable Automatic Time Zone Update
If you want your iPhone to automatically update the time based on your current location, you can enable the automatic time zone update feature. This convenient feature ensures that your device’s time is always accurate, no matter where you are.
To enable automatic time zone update on your iPhone, follow these simple steps:
- Open the “Settings” app on your iPhone’s home screen.
- Scroll down and tap on “General”.
- Next, tap on “Date & Time”.
- Toggle on the switch next to “Set Automatically”.
Once you have enabled automatic time zone update, your iPhone will regularly connect to the cellular network or Wi-Fi to retrieve the current time zone information. This ensures that your device’s time is synchronized with the local time, making it incredibly convenient when traveling or changing time zones.
Remember that enabling automatic time zone update may consume some data as your iPhone connects to the network to retrieve the latest time zone information. However, the amount of data used is minimal and should not significantly affect your data usage.
If you wish to disable the automatic time zone update feature, simply follow the same steps and toggle off the “Set Automatically” switch in the “Date & Time” settings menu.
With automatic time zone update enabled on your iPhone, you can rest assured that your device will always display the accurate local time, whether you’re at home or exploring new destinations.
# Adjust Time Using 24-Hour Clock Format
If you prefer to display the time on your iPhone in the 24-hour clock format, also known as military time, you can easily make this adjustment. The 24-hour clock format is commonly used in many countries around the world and provides a more precise way to indicate time.
To adjust the time format on your iPhone to the 24-hour clock, follow these simple steps:
- Open the Settings app on your iPhone.
- Scroll down and tap on “General”.
- Next, tap on “Date & Time”.
- Under the Time Format section, you will see two options: 12-Hour and 24-Hour. Tap on “24-Hour”.
Once you have selected the 24-Hour option, your iPhone will immediately switch to displaying the time in the 24-hour clock format. The change will be reflected on your lock screen, home screen, and in any apps that display the time.
Switching to the 24-hour clock format can be useful for those who prefer using this format or for individuals who need to quickly and accurately read time, especially in a professional or military setting.
Remember that this change will not affect the way time is displayed when communicating with others through messaging apps or when scheduling events in your calendar. It only affects the way time is displayed on your iPhone.
So go ahead and adjust the time format on your iPhone to the 24-hour clock if it suits your needs and preferences. Enjoy the convenience and precision of the military time format!
Change Date and Time Display Format
If you want to customize the way date and time are displayed on your iPhone, you can easily change the date and time format preferences. Follow the steps below to change the date and time display format:
- Open the Settings app on your iPhone.
- Scroll down and tap on “General”.
- Next, tap on “Date & Time”.
- Under the “Date & Time” settings, you will find the option to change the date and time format. Tap on “Set Automatically” to toggle it off.
- Once you have turned off the “Set Automatically” feature, you can now manually choose the format for the date and time.
- To change the date format, tap on “Date” and select your preferred format from the available options.
- To change the time format, tap on “Time” and choose the format you prefer.
- After selecting your desired date and time formats, exit the settings app. The changes will now take effect on your iPhone’s display.
By customizing the date and time display format, you can personalize your iPhone to suit your preferences. Whether you prefer a specific date format such as “Month/Day/Year” or “Day/Month/Year”, or a time format like the 12-hour clock or 24-hour clock, you have the flexibility to adjust it to your liking.
Keep in mind that the changes you make to the date and time display format will only affect how it is displayed on your iPhone. It does not affect the actual date and time settings, which can still be set automatically or adjusted manually.
So go ahead and change the date and time display format on your iPhone to match your preferred style and make your device feel more personalized and tailored to your needs.
Conclusion
Changing the time on your iPhone is a simple task that can be done in just a few steps. Whether you need to update the time to reflect daylight savings or adjust it after traveling to a different time zone, the process is straightforward. By accessing the Date & Time settings in your iPhone’s Settings app, you can easily change the time and ensure that it is accurate.
Remember, keeping your iPhone’s time up to date is important for various reasons, including accurate scheduling, timely notifications, and synchronization with other devices. So, the next time you find yourself needing to change the time on your iPhone, follow these steps and make the necessary adjustments with ease.
Don’t let a wrong time setting on your iPhone become a hassle. Take control and keep your device’s time accurate and reliable.
FAQs
1. How do I change the time on my iPhone?
To change the time on your iPhone, follow these steps:
- Open the Settings app on your iPhone.
- Scroll down and tap on “General”.
- Tap on “Date & Time”.
- Toggle on the “Set Automatically” option if you want your iPhone to set the time automatically based on your location.
- If you prefer to set the time manually, toggle off the “Set Automatically” option and tap on “Set Date & Time”.
- Adjust the date and time using the provided options.
- Once you have set the desired time, exit the settings.
2. Why is it important to keep the time accurate on my iPhone?
Accurate time on your iPhone is crucial for various reasons. It ensures that your alarms, reminders, and calendar events are properly synchronized, helping you manage your time effectively. It also ensures that time-sensitive applications, such as banking apps or travel apps, function correctly and provide real-time information. Furthermore, having accurate time settings is important for accurate location tracking and seamless communication with other devices or networks.
3. Can I change the time zone on my iPhone?
Yes, you can easily change the time zone on your iPhone. Follow these steps:
- Open the Settings app on your iPhone.
- Scroll down and tap on “General”.
- Tap on “Date & Time”.
- Toggle off the “Set Automatically” option.
- Select your desired time zone from the provided options.
- Exit the settings, and your iPhone will adjust to the new time zone.
4. Is it possible to change the time display format on my iPhone?
Unfortunately, the time display format on an iPhone cannot be changed system-wide. However, some apps and widgets may have the option to customize the time display format according to your preference. Additionally, you can enable the 24-hour clock format in the Date & Time settings if you prefer that style.
5. Why is my iPhone showing the wrong time even after setting it correctly?
If your iPhone is still showing the wrong time even after setting it correctly, there are a few potential causes and solutions:
- Check if the “Set Automatically” option is enabled in the Date & Time settings. If it is, make sure your device has a strong internet connection to receive the correct time.
- Restart your iPhone to refresh the system settings and re-establish the connection to the time server.
- If the issue persists, check for any available software updates and install them. Software updates can often address bugs and system errors that may affect the time settings.
- If none of the above solutions work, contact Apple support or visit an Apple Store for further assistance.