
Changing the date on your iPhone may seem like a simple task, but it can become a bit tricky if you’ve never done it before. Whether you need to adjust the date due to a time zone change or set it correctly for scheduling appointments, having the knowledge to change the date is essential. In this article, we will guide you through the step-by-step process of changing the date on an iPhone, ensuring that you can effortlessly keep your device up to date with the correct day and time. Discover the easy methods to modify the date settings on your iPhone and unlock the full potential of this versatile device. Let’s dive in!
Inside This Article
- Set Date and Time Automatically
- Manually Change the Date on iPhone
- Adjust Time Zone Settings
- Enable or Disable 24-Hour Time Format
- Conclusion
- FAQs
Set Date and Time Automatically
In this digital age, we rely heavily on our smartphones to keep us organized and up to date. Our iPhones are not just communication devices; they also serve as personal assistants, helping us manage our schedules and appointments. One important feature that contributes to this functionality is the ability to automatically set the date and time on our iPhones.
When we first set up our iPhones, they are typically configured to automatically update the date and time based on our location. This means that when we travel across time zones or when daylight saving time begins or ends, our iPhones will adjust accordingly. The benefit of this feature is that we don’t have to worry about manually changing the date and time; our iPhones take care of it for us.
To ensure that the date and time on your iPhone are being set automatically, follow these steps:
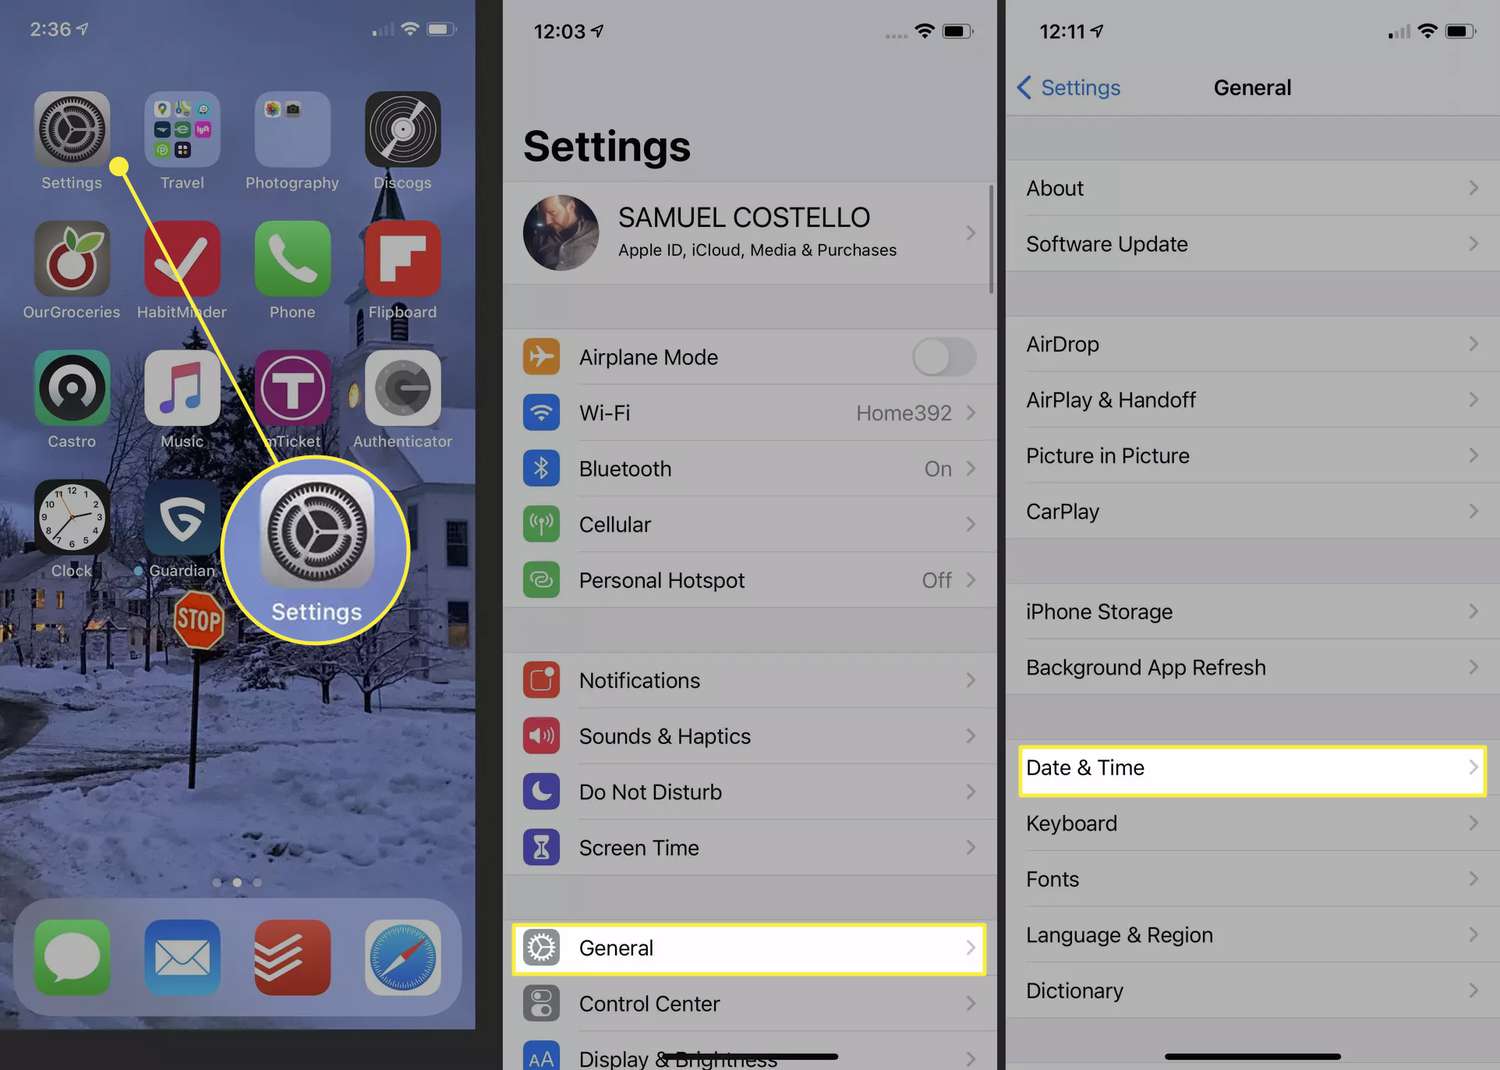
- Open the “Settings” app on your iPhone.
- Scroll down and tap on “General”.
- Tap on “Date & Time”.
- Make sure the “Set Automatically” switch is toggled on. If it is already on, your iPhone is set to update the date and time automatically.
It’s important to note that for the “Set Automatically” feature to work properly, your iPhone needs to have a reliable internet connection. Additionally, you may need to disable any VPN or location spoofing services that could interfere with the accurate determination of your location.
By setting the date and time automatically on your iPhone, you can rest assured that your device is always in sync with the rest of the world. This eliminates the hassle of manually adjusting the date and time when you travel or when there are changes in time zones or daylight saving time. With this feature enabled, your iPhone becomes an even more efficient personal assistant, helping you stay punctual and organized.
Manually Change the Date on iPhone
Changing the date on an iPhone can be done manually through the device’s settings. Whether you want to correct an incorrect date or simply set a specific date, the process is quick and straightforward. Here’s how you can manually change the date on your iPhone:
1. Open the “Settings” app on your iPhone. It’s the gray icon with gears typically found on the home screen.
2. Scroll down and tap on “General.”
3. In the “General” menu, tap on “Date & Time.” It’s located below “Airplane Mode” and “VPN.”
4. Tap on the toggle switch next to “Set Automatically” to turn it off. This will enable manual date and time adjustments.
5. You will now see options to change the date and time. Tap on “Date & Time” to open the date selection menu.
6. Use the scrolling wheels or the “+” and “-” buttons to set the desired date. You can navigate through months, days, hours, and minutes.
7. Once you’ve set the desired date, tap the “Done” button in the upper-right corner of the screen.
8. Your iPhone will now display the newly set date. The changed date will appear in various apps, including the calendar, messages, and other applications that utilize the date and time feature on your device.
Remember that manually changing the date on your iPhone can be useful in certain situations, such as when you need to reference a specific date or troubleshoot time-sensitive issues. However, it’s important to note that changing the date too frequently or to incorrect dates can potentially affect the functionality of certain apps and services.
Adjust Time Zone Settings
Adjusting the time zone settings on your iPhone is essential for ensuring that your device displays the correct time and keeps you synced with the local time when you travel. Here’s how you can easily adjust the time zone settings:
Step 1: Open the Settings app
To access the time zone settings on your iPhone, start by opening the Settings app. Look for the gear icon on your home screen, tap on it, and the Settings app will open.
Step 2: Tap on “General”
Once you’re in the Settings app, scroll down and find the “General” option. Tap on it to proceed to the next step.
Step 3: Select “Date & Time”
In the General settings menu, you’ll find several options. Look for “Date & Time” and tap on it to access the date and time settings.
Step 4: Enable “Set Automatically”
In the Date & Time settings, you’ll see the option to enable or disable “Set Automatically.” By enabling this option, your iPhone will automatically adjust the time and time zone based on your current location. Toggle the switch to the right to enable it.
Step 5: Verify the time zone
Once you have enabled “Set Automatically,” your iPhone will display the current time zone based on your location. You can verify the time zone by checking the displayed information on the screen.
Step 6: Manually select a time zone (optional)
If you prefer to manually select a specific time zone, you can disable “Set Automatically” by toggling the switch to the left. Once disabled, you can manually scroll through the available time zone options and select the one that corresponds to your desired location.
Step 7: Adjust for daylight saving time (if applicable)
If your region observes daylight saving time, make sure the option to automatically adjust for it is enabled. This way, your iPhone will automatically switch between standard and daylight saving time based on the specified rules for your location.
Step 8: Save the changes
Once you’ve made the necessary adjustments to the time zone settings, tap on the “Save” or “Done” button at the top right corner of the screen. Your changes will be saved, and your iPhone will display the correct time based on the selected time zone.
By following these simple steps, you can easily adjust the time zone settings on your iPhone and ensure that your device reflects the correct local time wherever you are.
Enable or Disable 24-Hour Time Format
Changing the time format on your iPhone to either 12-hour or 24-hour format is a personal preference. Some find it more convenient to use the 24-hour format, also known as military time, while others prefer the traditional 12-hour format. Whichever format you prefer, the iPhone offers the flexibility to switch between the two.
To enable or disable the 24-hour time format on your iPhone, follow these simple steps:
- Open the Settings app on your iPhone.
- Scroll down and tap on “General.”
- Tap on “Date & Time.”
- Under the “Time” section, you will see the “24-Hour Time” toggle. If it is green and switched to the right, the 24-hour format is enabled. If it is white and switched to the left, the 12-hour format is enabled.
- To switch to the 24-hour format, tap the toggle to the right. The toggle will turn green, indicating that the 24-hour format is now enabled. To switch back to the 12-hour format, tap the toggle to the left, and it will turn white.
- Exit the Settings app, and your chosen time format will be applied.
It’s worth noting that changing the time format on your iPhone does not affect the time displayed in your notifications or on your lock screen. The format change only applies to the time displayed in the status bar and in the Clock app.
By enabling the 24-hour time format, you can easily distinguish between morning and afternoon hours without the need for AM or PM indicators. This can be particularly useful for those who work in environments that use military time or prefer the simplicity of a 24-hour format.
We hope this guide has helped you understand how to enable or disable the 24-hour time format on your iPhone. Whether you opt for the 12-hour or 24-hour format, the choice is yours, and you can easily switch between the two to suit your preference.
Conclusion
In conclusion, changing the date on your iPhone is a simple process that can be done in a few steps. Whether you need to adjust the date due to travel, daylight saving time, or other reasons, the iPhone offers a user-friendly interface for making this change. By accessing the “Settings” menu and selecting the “Date & Time” option, you can easily modify the date and time settings on your device. Remember to ensure that your iPhone is set to the correct time zone to avoid any discrepancies in time-sensitive applications and services. With just a few taps, you can keep your iPhone up to date and synchronized with the current date and time.
FAQs
1. How do I change the date on my iPhone?
To change the date on your iPhone, follow these steps:
- Go to the “Settings” app on your iPhone’s home screen.
- Scroll down and tap on “General”.
- Select “Date & Time”.
- Toggle the switch next to “Set Automatically” to turn it off.
- Tap on the “Date & Time” option and manually adjust the date and time settings by scrolling through the numbers or using the “+” and “-” buttons.
- Once you’ve set the desired date, tap “Done” to save the changes.
2. Why would I need to change the date on my iPhone?
There are several reasons why you might need to change the date on your iPhone. Some common scenarios include:
- Correcting the date if it was set incorrectly.
- Changing the date to reflect a different time zone.
- Setting the date to a future or past date for testing or specific purposes.
- Synchronizing the date with other devices or systems.
3. Can I set my iPhone to automatically update the date and time?
Yes, you can set your iPhone to automatically update the date and time. By enabling the “Set Automatically” option in the Date & Time settings, your iPhone will use the network time to automatically update the date and time based on your current location.
4. Will changing the date on my iPhone affect any of my apps or data?
In most cases, changing the date on your iPhone will not have any significant impact on your apps or data. However, there may be some apps or services that rely on accurate date and time information for functionality or synchronization purposes. Before changing the date, it’s a good idea to check with any critical apps or services to ensure there won’t be any adverse effects.
5. How often should I update the date on my iPhone?
Under normal circumstances, there is no need to update the date on your iPhone frequently. Once you have set the correct date and enabled the “Set Automatically” option, your iPhone will automatically update the date and time based on your time zone and network information. However, if you are traveling to a different time zone or if there are any issues with the automatic date and time settings, you may need to update the date manually.