
Are you tired of your iPhone automatically filling in the wrong address every time you type in a form? Don’t worry, we’ve got you covered! In this article, we will show you how to change your autofill address on your iPhone. Whether you have moved to a new location or simply want to update your contact information, changing your autofill address is a simple process that can make your life easier. By following the steps outlined below, you’ll be able to ensure that your iPhone accurately inputs the correct address every time you fill out a form online. So let’s dive in and learn how to update your autofill address on your iPhone!
Inside This Article
- How to Change Your Autofill Address on iPhone
- Steps to Change Your Autofill Address on iPhone
- Additional Tips and Considerations
- Conclusion
- FAQs
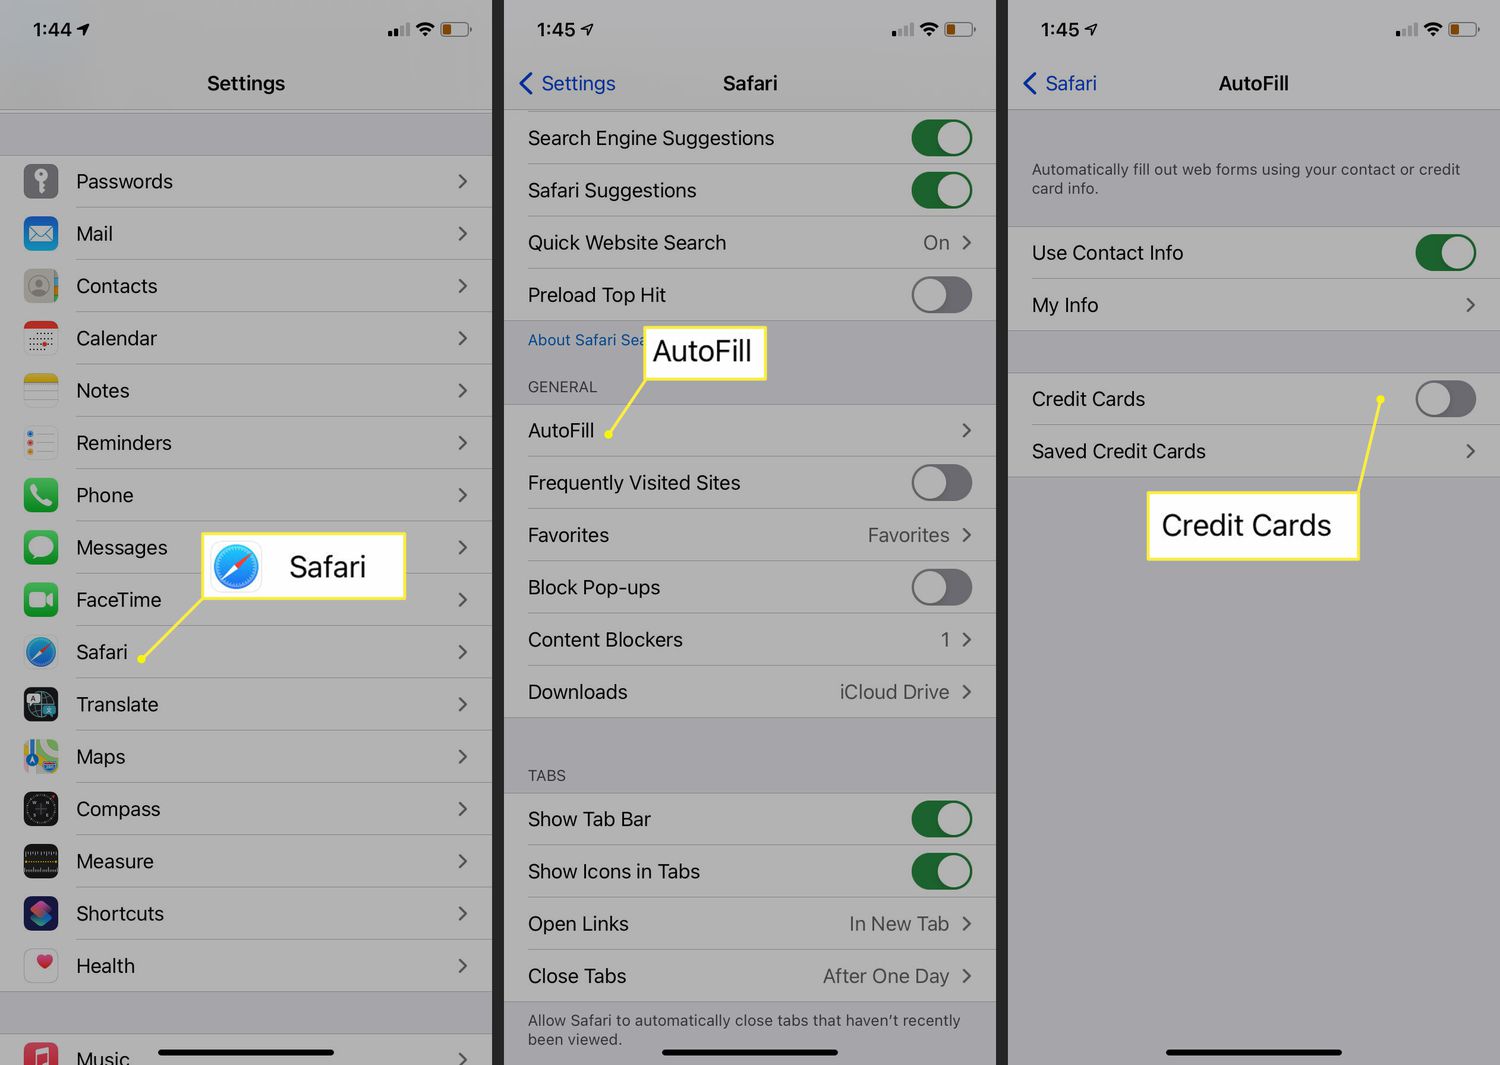
How to Change Your Autofill Address on iPhone
Autofill is a convenient feature on iPhone that automatically fills in your information, such as addresses, when you are filling out forms or making online purchases. However, if your address has changed or if you need to update the information, you might be wondering how to change your autofill address on your iPhone. In this guide, we will walk you through the steps to check and update your saved autofill addresses, add a new address, edit and delete existing addresses, and even change the default autofill address on your iPhone.
Checking and Updating Saved Autofill Addresses
The first step is to check the saved autofill addresses on your iPhone. Here’s how you can do it:
- Open the settings app on your iPhone.
- Scroll down and tap on “Safari” or “Settings & Privacy” followed by “Autofill.
- Tap on “Saved Addresses” or “AutoFill Addresses” option.
On this screen, you will see a list of all the saved autofill addresses on your iPhone. If you need to update any of the addresses, tap on the address and make the necessary changes. Once you are done, tap on “Save” to update the address.
Adding a New Autofill Address
If you have recently moved or want to add a new address to your autofill, here’s how you can do it:
- Open the settings app on your iPhone.
- Scroll down and tap on “Safari” or “Settings & Privacy” followed by “Autofill”.
- Tap on “Saved Addresses” or “AutoFill Addresses” option.
- Tap on the “+” button to add a new address.
- Enter the details of the new address, such as name, street, city, state, and ZIP code.
- Tap on “Save” to add the new address to your autofill.
Your new address will now be available for autofill when you are filling out forms or making online purchases.
Editing and Deleting Existing Autofill Addresses
If you need to make changes to an existing autofill address or delete it, follow these steps:
- Open the settings app on your iPhone.
- Scroll down and tap on “Safari” or “Settings & Privacy” followed by “Autofill”.
- Tap on “Saved Addresses” or “AutoFill Addresses” option.
- To edit an address, tap on the address and make the necessary changes. Tap on “Save” to update the address.
- To delete an address, swipe left on the address and tap on “Delete”.
By following these steps, you can easily edit or delete the existing autofill addresses on your iPhone.
Changing the Default Autofill Address
If you have multiple addresses saved in your autofill, you can choose a default address. Here’s how:
- Open the settings app on your iPhone.
- Scroll down and tap on “Safari” or “Settings & Privacy” followed by “Autofill”.
- Tap on “Default Address” or “Use Contact Info” option.
- Select the address you want to set as the default.
Now, whenever the autofill feature is activated, your default address will be automatically filled in for you.
With these simple steps, you can change your autofill address on your iPhone, ensuring that your information is up to date and easily accessible when you need it. Take advantage of this convenient feature and streamline your form filling and online shopping experiences on your iPhone.
Steps to Change Your Autofill Address on iPhone
Changing your autofill address on your iPhone is a simple process that can help streamline your online form filling experience. By keeping your address information up to date, you can easily and conveniently fill out forms with just a few taps. Follow these steps to change your autofill address on your iPhone:
Step 1: Open the Settings app on your iPhone.
Step 2: Tap on “Safari” from the list of options.
Step 3: Scroll down and tap on “Autofill”.
Step 4: You will see two options: “Saved Credit Cards” and “Saved Addresses”. Tap on the one that contains the address you want to change.
Step 5: Select the address you want to change from the list of saved addresses.
Step 6: Edit the address details as needed. You can modify fields such as street name, city, state, zip code, and more.
Step 7: Once you have made the necessary changes, tap on “Done” to save the updated autofill address.
By following these simple steps, you can easily update your autofill address on your iPhone. This will ensure that your forms are filled accurately and efficiently, saving you time and effort in the long run.
Additional Tips and Considerations
When it comes to managing your autofill address on your iPhone, there are a few additional tips and considerations to keep in mind. These tips will help you make the most of the autofill feature and ensure that your address information is accurate and up to date.
Selecting a trusted address source: It’s important to choose a trusted source for your address information. This could be your home address, work address, or any other address that you frequently use. By selecting a reliable address source, you can ensure that the autofill feature fills in the correct address each time.
Ensuring accurate and up-to-date information: It’s essential to keep your address information accurate and up to date in your autofill settings. If you have recently moved or changed your address, make sure to update it in the autofill settings on your iPhone. This will prevent any confusion or incorrect address entries when using autofill.
Managing multiple addresses in Autofill: If you have more than one address that you frequently use, you can easily manage multiple addresses in the autofill settings on your iPhone. By adding multiple addresses, you can choose the most appropriate one depending on your location or the type of form you are filling out. This flexibility ensures that your autofill feature adapts to your needs.
By considering these additional tips and managing your autofill address settings effectively, you can maximize the convenience and efficiency of the autofill feature on your iPhone. Remember to select a trusted address source, keep your information accurate and up to date, and utilize the ability to manage multiple addresses in Autofill.
Conclusion
Changing your autofill address on your iPhone is a simple process that can save you time and frustration when filling out forms online. By following the steps outlined in this article, you can easily update or delete your existing autofill address, and add a new address if needed. Keep in mind that having accurate autofill information can help streamline your browsing experience and make online transactions more convenient.
Remember, regularly reviewing and updating your autofill address ensures that your information remains current and accurate. Additionally, taking the time to confirm and modify your autofill settings helps protect your privacy and security when entering personal data online. So don’t hesitate to take control of your autofill address on your iPhone and enjoy a smoother and more efficient browsing experience!
FAQs
1. How do I change my autofill address on iPhone?
To change your autofill address on iPhone, follow these steps:
– Open the Settings app on your iPhone.
– Scroll down and tap on “Safari”.
– In the Safari settings, tap on “Autofill”.
– Tap on “Saved Credit Cards” or “Saved Addresses”, depending on which information you want to edit.
– Select the address you want to change.
– Make the necessary edits to the address fields.
– Tap “Save” to update the autofill address.
2. Can I have multiple autofill addresses on my iPhone?
Yes, you can have multiple autofill addresses on your iPhone. In the Safari settings, under “Autofill”, you can add and manage multiple saved addresses. This is useful if you frequently use different addresses, such as your home address, work address, or multiple addresses for shipping purposes.
3. Why is my autofill address not updating on my iPhone?
If your autofill address is not updating on your iPhone, try the following troubleshooting steps:
– Make sure you have an active internet connection.
– Close the Safari app and reopen it.
– Restart your iPhone.
– Make sure you are using the latest version of iOS.
– Disable and re-enable the autofill feature in the Safari settings.
– If the issue persists, you may need to reset your iPhone settings or contact Apple Support for further assistance.
4. Can I use third-party autofill apps on iPhone?
Yes, you can use third-party autofill apps on iPhone. In addition to the built-in autofill feature, there are several third-party apps available on the App Store that offer advanced autofill capabilities. These apps can securely store and fill in your personal information, including addresses, credit card details, and more. Some popular autofill apps for iPhone include LastPass, 1Password, and Dashlane.
5. Is the autofill feature secure on iPhone?
Yes, the autofill feature on iPhone is designed with security in mind. The information you save in the autofill settings is securely stored on your device and encrypted. However, it’s important to exercise caution and ensure that you have a passcode or biometric authentication (such as Touch ID or Face ID) enabled on your device to prevent unauthorized access. It’s also recommended to regularly update your iOS software to ensure you have the latest security patches.