
Have you ever found yourself frustrated with your iPhone’s autofill feature when it comes to addresses? Perhaps you recently moved, or you have multiple addresses that you frequently use. Whatever the case may be, knowing how to change the autofill address on your iPhone can save you time and effort when filling out forms or sending packages.
In this article, we will guide you through the steps to change the autofill address on your iPhone. Whether you’re using the latest iPhone model or an older version, our instructions will help you update this information swiftly and easily.
So, let’s dive in and discover how you can customize your autofill address on your iPhone, ensuring that it accurately reflects your current location and saves you valuable time in the future.
Inside This Article
- Introduction
- Method 1: Changing Autofill Address through Settings
- Method 2: Editing Existing Address in Safari Autofill
- Method 3: Adding a New Address to Autofill
- Method 4: Managing Autofill Addresses with iCloud Keychain
- Introduction
- Method 1: Changing Autofill Address through Settings
- Method 2: Editing Existing Address in Safari Autofill
- Method 3: Adding a New Address to Autofill
- Method 4: Managing Autofill Addresses with iCloud Keychain
- Conclusion
- Conclusion
- FAQs
Introduction
Autofill is a convenient feature on the iPhone that automatically fills in your address information when you are filling out forms or making purchases online. However, your address may change over time, necessitating the need to update your autofill address. In this article, we will guide you through the process of changing your autofill address on your iPhone. Whether you need to update your address in Safari or in the settings of your device, we’ve got you covered.
Updating your autofill address is essential to ensure that your information remains accurate and up to date, saving you time and effort when making online transactions or filling out forms. It’s important to note that the exact steps and options may vary slightly depending on the version of iOS you are using, but the overall process remains relatively consistent. Now, let’s dive into the steps for changing your autofill address on your iPhone.
Before we proceed with updating your autofill address, it’s a good idea to clear any existing autofill addresses that may be stored on your device. This will ensure that you start with a clean slate and avoid any confusion caused by outdated information. Let’s jump into the first step: clearing existing autofill addresses.
Method 1: Changing Autofill Address through Settings
If you want to update your autofill address on your iPhone, one of the most convenient ways to do it is through the device’s settings. By following these steps, you’ll be able to modify your autofill address and ensure that it’s always up to date:
- Start by unlocking your iPhone and opening the Settings app. The Settings app has a gear icon and can usually be found on your home screen.
- Scroll down until you find the section labeled “Password & Accounts.” Tap on it to proceed.
- In the Password & Accounts settings, you’ll see a list of accounts that are linked to your device. Look for the section titled “Autofill Passwords” and tap on it.
- Within the Autofill Passwords settings, you’ll find the option to modify your autofill address. Tap on “My Info.” If you have already set your address, it should display your contact card with your current address. If you haven’t set it yet, you’ll need to set up your contact card first by tapping on “Contacts” and selecting your own contact card from the list.
- After tapping on “My Info,” you’ll be taken to your Contacts app, where you can select your contact card. Make sure your details are up to date, including your address. If your address has changed, simply edit it and save the changes.
- Exit the Contacts app and return to the Autofill Passwords settings. You should now see your updated address reflected in the “My Info” section.
- That’s it! Your autofill address has been successfully updated through the Settings app. Now, whenever you use autofill on your iPhone, it will populate with your new address.
Changing your autofill address through the iPhone settings is a quick and straightforward process. By keeping your address up to date, you can ensure that your autofill information is accurate and saves you time when filling out forms and entering addresses on your device.
Method 2: Editing Existing Address in Safari Autofill
If you frequently use Safari as your web browser on your iPhone, you may have noticed that it automatically saves and suggests address information when filling out forms online. This autofill feature can be incredibly convenient, but what happens if you need to make changes to an existing address? Fortunately, Safari makes it easy to edit or delete autofill addresses directly within the browser settings. Follow the steps below to edit an existing address in Safari autofill:
- Open the Safari app on your iPhone and tap on the address bar at the top of the screen.
- In the autofill suggestions that appear, locate the address that you want to edit or delete. You can identify it by the blue address label.
- Tap on the blue address label to open the autofill entry.
- Within the address panel, you will see the individual fields such as name, street address, city, state, and zip code.
- To edit any of the fields, simply tap on the field and make the necessary changes.
- If you wish to delete the entire address, scroll to the bottom of the panel and tap on the “Remove” button.
- Once you have finished making your edits, tap the “Save” button to save the changes to the autofill address.
Your edited address will now replace the previous information in the Safari autofill suggestions. This means that the next time you encounter a form that requires an address, Safari will suggest the updated information for autofill.
It’s important to note that editing an address within Safari autofill only affects the autofill suggestions in the Safari browser. Other apps and services may have their own independent autofill settings and databases. If you want to change your autofill address globally across your iPhone, you will need to utilize the method outlined in the previous section.
By knowing how to edit existing addresses in Safari autofill, you can ensure that your address information is up to date and accurate, making it more convenient to fill out online forms and navigate websites on your iPhone.
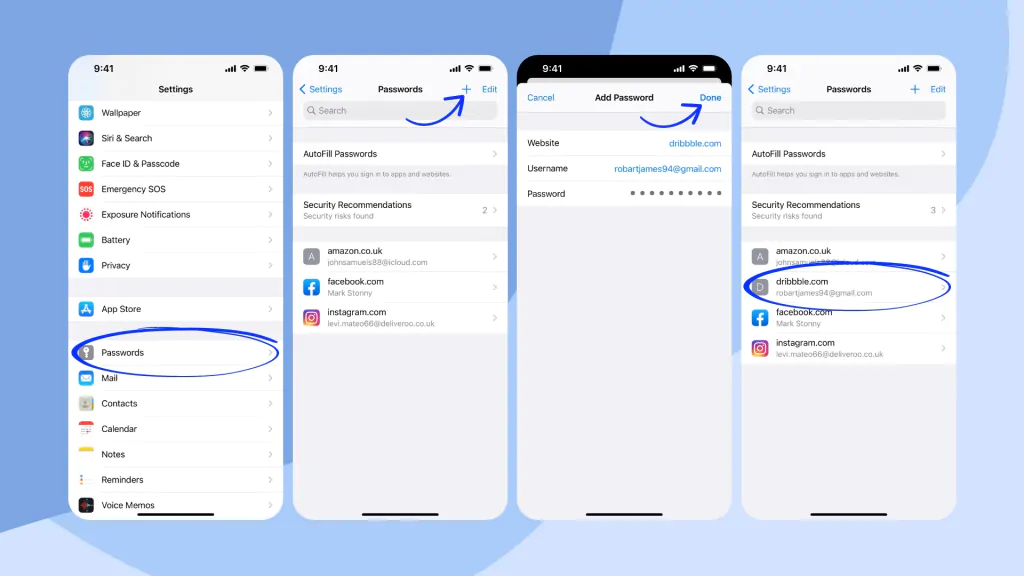
Method 3: Adding a New Address to Autofill
If you frequently enter a new address into forms on your iPhone, it can be convenient to add that address to your Autofill settings. This way, you won’t have to manually type it every time.
To add a new address to your Autofill settings, follow these steps:
- Open the “Settings” app on your iPhone.
- Scroll down and tap on “Safari”.
- Under the “General” section, tap on “Autofill”.
- Tap on “Saved Addresses”.
- Tap on the “+” button in the top-right corner.
- Enter the new address details, including the recipient name, address line 1 and line 2, city, state, ZIP code, and any other necessary information.
- Tap on “Done” to save the new address.
Once you’ve added the new address to your Autofill settings, you can use it when filling out forms in Safari or other apps that support Autofill.
Keep in mind that the new address will now appear in the list of saved addresses in the Autofill settings. If you need to edit or delete the address in the future, simply follow the steps outlined in the earlier methods.
Adding a new address to Autofill can save you time and effort when filling out online forms on your iPhone. It ensures accuracy and allows for quick autofill options, making the process more convenient and efficient.
Method 4: Managing Autofill Addresses with iCloud Keychain
One convenient feature of the iPhone is iCloud Keychain, which allows you to securely store and sync your autofill information across all your Apple devices. By using iCloud Keychain, you can easily manage your autofill addresses and ensure they are up to date.
Here’s how to manage your autofill addresses using iCloud Keychain:
- Go to the Settings app on your iPhone.
- Scroll down and tap on your Apple ID at the top of the screen.
- Select “iCloud” from the list of options.
- Scroll down and find “Keychain” in the list.
- Toggle the switch next to “Keychain” to enable it if it’s not already enabled.
- Tap on the “Advanced” option under Keychain.
- Select “Autofill” from the list of options.
- You will see a list of autofill information, including addresses.
- To edit an existing address, tap on it and make the necessary changes.
- If you want to add a new address, tap on the “+” button at the top right corner of the screen.
- Enter the new address details in the respective fields.
- Tap “Done” to save the changes.
By utilizing iCloud Keychain, you have the flexibility to manage your autofill addresses seamlessly. Any changes you make will be synchronized across your Apple devices, ensuring that your information is always up to date and easily accessible whenever you need it.
With these four methods at your disposal, you have the necessary tools to change, edit, add, and manage autofill addresses on your iPhone. Whether you prefer using Settings, Safari, or iCloud Keychain, you can customize your autofill information to suit your needs.
Introduction
Autofill is a handy feature on iPhones that automatically fills in your personal information, such as name, address, and contact details, when prompted on websites and apps. This feature saves you time and effort, eliminating the need for manual data entry. However, there may come a time when you need to change your autofill address on your iPhone. Whether you have moved to a new location or simply want to update your information, it’s essential to know how to modify your autofill address to ensure accuracy. In this article, we will explore different methods to change your autofill address on your iPhone.
Method 1: Changing Autofill Address through Settings
If you want to modify your autofill address for all apps and websites on your iPhone, you can do so through the Settings. Follow these steps:
- Open the Settings app on your iPhone.
- Scroll down and tap on “Safari” or “Passwords & Accounts,” depending on your iOS version.
- Tap on “AutoFill” or “Autofill Passwords.”
- Select “Saved Credit Cards” or “Saved Autofill Information.”
- Tap on your existing autofill address.
- Edit the address fields as needed.
- Tap “Save” to save the updated address.
By following these steps, you can easily change your autofill address for all websites and apps that rely on autofill data through the Settings on your iPhone.
Method 2: Editing Existing Address in Safari Autofill
If you primarily use Safari as your web browser, you can modify your autofill address directly within the Safari settings. Here’s how:
- Open the Settings app on your iPhone.
- Scroll down and tap on “Safari”.
- Tap on “Autofill” under the “General” section.
- Select “Saved Credit Cards” or “Saved Addresses”.
- Tap on your existing autofill address.
- Edit the address fields as needed.
- Tap “Done” to save the changes.
By following these steps, you can easily update your autofill address specifically for Safari and its autofill feature.
Method 3: Adding a New Address to Autofill
If you have recently moved or want to add an additional address to your autofill options, you can do so by adding a new address to the autofill settings. Follow these steps:
- Open the Settings app on your iPhone.
- Scroll down and tap on “Safari” or “Passwords & Accounts,” depending on your iOS version.
- Tap on “AutoFill” or “Autofill Passwords”.
- Select “Saved Credit Cards” or “Saved Autofill Information”.
- Tap on “Add Credit Card” or “Add Address” to enter the new address details.
- Fill in the required information for the new address.
- Tap “Save” to add the new address to your autofill options.
With these steps, you can easily supplement your existing autofill addresses with new ones, providing you with more options when using autofill on your iPhone.
Method 4: Managing Autofill Addresses with iCloud Keychain
If you use iCloud Keychain to manage your passwords and autofill information across multiple devices, you can utilize it to manage your autofill addresses as well. Here’s how:
- Open the Settings app on your iPhone.
- Tap on your name at the top of the Settings menu.
- Select “iCloud” or “Passwords & Accounts.”
- Tap on “Keychain.”
- Toggle on the “AutoFill Passwords” option.
- Tap on “Saved Passwords” or “Saved Credit Cards”.
- Find the autofill address you want to edit or delete.
- Edit or delete the address as needed.
- Tap “Done” to save the changes.
By using iCloud Keychain, you can manage and sync your autofill addresses across all your devices seamlessly.
Conclusion
Changing your autofill address on your iPhone is a straightforward process. Whether you want to modify the address through settings, edit it within Safari, add a new address, or manage it with iCloud Keychain, you have various options to ensure your autofill information remains up-to-date and accurate. By taking advantage of these methods, you can easily update your autofill address and enjoy the convenience of autofill on your iPhone.
Conclusion
In conclusion, changing the autofill address on your iPhone is a simple process that can greatly enhance your user experience. By following the steps outlined in this article, you can easily update your address information and ensure that accurate information is automatically filled in whenever you need it.
Quick and convenient, the autofill feature on the iPhone saves you time and effort, especially when it comes to filling out forms or making online purchases. Whether you need to change your default address or add a new one, the Settings menu on your iPhone provides you with the necessary options to customize your autofill preferences.
Remember to regularly review and update your autofill address information to ensure its accuracy, especially if you frequently change your location or move to a new residence. Taking the time to keep your autofill address up to date will ensure seamless browsing, shopping, and other online activities on your iPhone.
So, don’t let outdated address information slow you down. Take control of your autofill settings and enjoy a more streamlined and efficient mobile experience on your iPhone.
FAQs
1. How do I change the autofill address on my iPhone?
To change the autofill address on your iPhone, follow these steps:
1. Go to the “Settings” app on your iPhone.
2. Scroll down and tap on “Safari”.
3. Tap on “Autofill”.
4. Tap on “Saved Credit Cards”.
5. If prompted, enter your passcode or use Touch ID/Face ID to authenticate.
6. Under “My Card”, tap on “Edit” to change your address.
7. Make the necessary changes to your address.
8. Tap on “Done” to save the changes.
2. Can I have multiple autofill addresses on my iPhone?
Yes, you can have multiple autofill addresses on your iPhone. Follow the steps mentioned above to change your autofill address, and you can add multiple addresses by tapping on “Add Credit Card” under the “Saved Credit Cards” section in the Autofill settings.
3. How do I delete an autofill address on my iPhone?
To delete an autofill address on your iPhone, follow these steps:
1. Go to the “Settings” app on your iPhone.
2. Scroll down and tap on “Safari”.
3. Tap on “Autofill”.
4. Tap on “Saved Credit Cards”.
5. If prompted, enter your passcode or use Touch ID/Face ID to authenticate.
6. Swipe left on the address you want to delete.
7. Tap on “Delete” to confirm the deletion.
4. Can I change the default autofill address on my iPhone?
Yes, you can change the default autofill address on your iPhone. Follow the steps mentioned in the first FAQ to go to the Autofill settings. Under “My Card”, you can tap on “Edit” to change the default address. Make the necessary changes and tap on “Done” to save the changes. The newly selected address will become the default autofill address.
5. Will changing the autofill address on my iPhone affect other devices?
No, changing the autofill address on your iPhone will not affect other devices. The autofill address is specific to each device, so any changes made on your iPhone will not impact the autofill settings on other devices like iPad, MacBook, or iMac.