
Are you tired of your iPhone or iPad eating up all your storage space with photos? Well, don’t fret because there’s a simple solution – compressing photos! By reducing the size of your photos, you can free up storage on your mobile device without compromising on image quality.
Compressing photos not only helps you save valuable storage space but also makes it easier and quicker to share your photos with friends and family. Whether you want to send multiple photos via email or upload them to social media platforms, compressed images can significantly reduce the file size, making the process faster and more efficient.
In this article, we’ll guide you through the steps on how to compress photos on your iPhone and iPad. We’ll explore both built-in and third-party methods, giving you options that fit your preferences and requirements. Let’s dive in and reclaim that valuable storage space!
Inside This Article
- Use the built-in iOS Photo Compression Tool
- Utilize Third-Party Photo Compression Apps
- Adjust Photo Compression Settings in Camera App
- Reduce Photo File Size through Cloud Storage Services
- Conclusion
- FAQs
Use the built-in iOS Photo Compression Tool
When it comes to compressing photos on your iPhone or iPad, you’ll be pleased to know that iOS offers a built-in photo compression tool. This tool allows you to reduce the file size of your photos without compromising the quality.
To access the built-in photo compression tool, follow these steps:
- Open the Photos app on your device.
- Select the photo you want to compress.
- Tap on the share icon located at the bottom left corner of the screen.
- Scroll down and select “Reduce File Size.”
- Wait for the compression process to complete, and your compressed photo will be saved as a separate image.
Using the built-in iOS photo compression tool is a quick and convenient way to reduce the file size of your photos. It’s particularly useful when you need to free up storage space on your device or when you want to send photos via email or messaging apps with smaller file sizes.
However, it’s essential to note that the level of compression applied by the tool is not customizable. The process aims to strike a balance between reducing the file size and maintaining a reasonable image quality. If you require more control over the compression settings, you may want to explore alternative methods.
Utilize Third-Party Photo Compression Apps
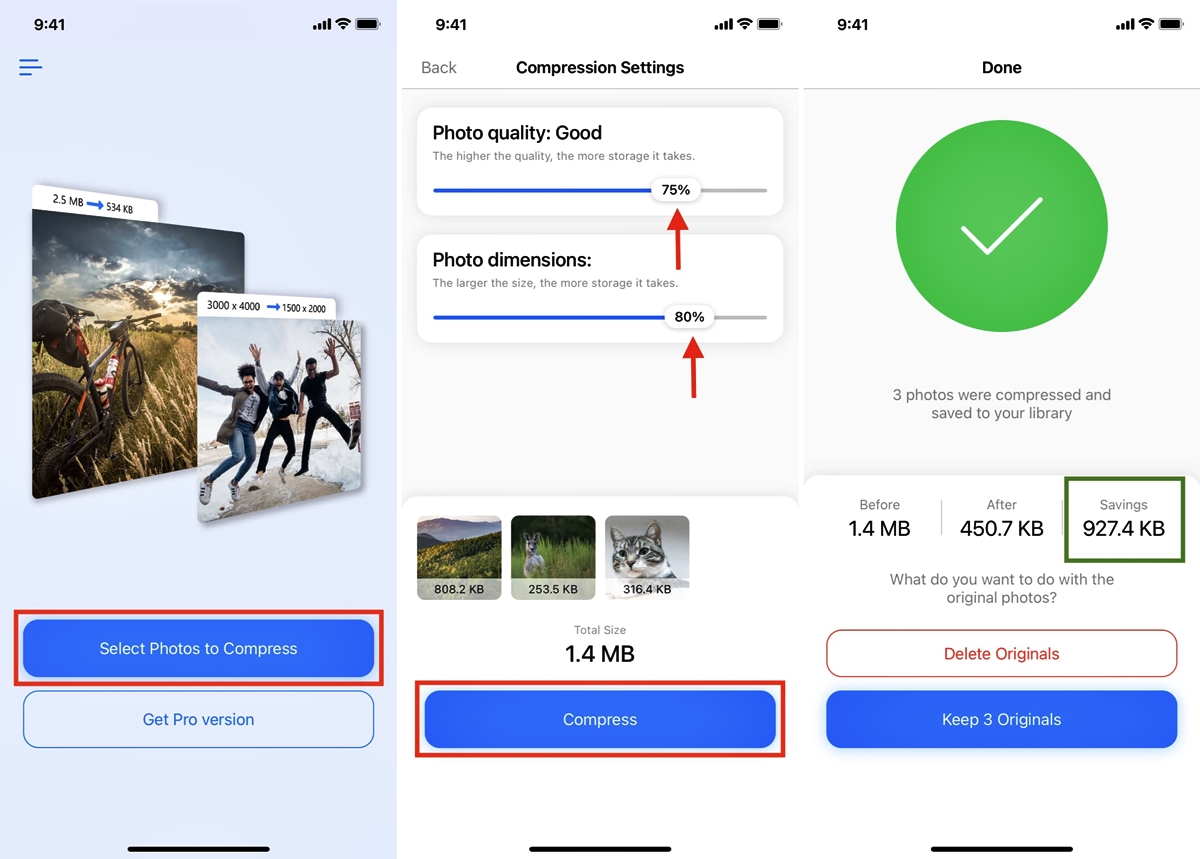
If you’re looking for more control and advanced options for compressing your photos on iPhone and iPad, you can turn to third-party photo compression apps. These apps offer additional features and settings to help you optimize your images without sacrificing quality.
One popular third-party photo compression app is “JPEGmini.” This app uses advanced algorithms to reduce the file size of JPEG images without compromising their visual quality. It analyzes the image and determines the optimal compression level, resulting in smaller file sizes while maintaining high-resolution images.
Another notable app is “Photo Compress & Resize.” This app not only allows you to compress your photos but also provides the option to resize them. You can select the desired compression level and resolution, ensuring the perfect balance between file size and image quality.
“Image Size” is another trusted app that offers a simple and straightforward approach to photo compression. With this app, you can easily select multiple photos and compress them with minimal effort. It provides a preview of the compressed image size, allowing you to compare the before and after file sizes.
When choosing a third-party photo compression app, make sure to read reviews and ratings from other users to ensure its reliability and performance. It’s always beneficial to opt for apps with regular updates and good customer support to address any issues or concerns.
Using third-party photo compression apps can be a convenient way to efficiently manage the file sizes of your photos on iPhone and iPad. These apps offer additional features and customizable settings, giving you more control over the compression process.
Remember, regardless of the app you choose, it’s essential to strike a balance between file size reduction and image quality preservation. Experiment with different compression levels to find the perfect sweet spot that meets your needs.
Now that we’ve explored how to utilize third-party photo compression apps let’s move on to the next method of compressing photos on iPhone and iPad.
Adjust Photo Compression Settings in Camera App
The camera app on your iPhone or iPad offers a convenient way to adjust photo compression settings. By making a few simple adjustments, you can reduce the file size of your photos without compromising on quality. Here’s how:
- Open your camera app and go to the settings menu.
- Look for the “Photo Capture” or “Image Quality” option.
- Select the option that allows you to adjust the compression level. It may be displayed as “High Efficiency” or “Most Compatible”.
- If you want to prioritize smaller file sizes, choose the “High Efficiency” option. This format uses the HEIF (High Efficiency Image Format) algorithm, which compresses images more effectively while maintaining visual quality.
- On the other hand, if compatibility with other devices is a priority for you, select the “Most Compatible” option. This format saves your photos in the traditional JPEG format, which can be easily shared with other devices.
- Keep in mind that choosing the “High Efficiency” option may result in slightly longer processing times when capturing photos, as the images need to be converted from HEIF to JPEG for compatibility purposes.
- Experiment with different compression settings and capture a few sample photos to see the difference in file sizes. Find the right balance that suits your needs.
By adjusting the photo compression settings in your camera app, you can control the file size of your photos without sacrificing too much on quality. This offers a handy solution for managing storage space on your device and optimizing photo sharing and uploading experiences.
Reduce Photo File Size through Cloud Storage Services
Cloud storage services have become incredibly popular for not only storing files but also for their ability to optimize and compress photos. These services offer convenience and flexibility, allowing you to access your photos from any device while also reducing their file size. Here are a few ways you can use cloud storage services to reduce photo file size on your iPhone and iPad.
Firstly, many cloud storage services, such as Google Drive and Dropbox, automatically compress photos when you upload them. This compression helps to reduce the file size without significantly affecting the quality of the image. By simply uploading your photos to these services, you can instantly save valuable storage space on your device.
In addition, some cloud storage platforms offer optional settings that allow you to control the level of compression applied to your photos. For example, Google Photos includes a “High Quality” setting which offers unlimited photo storage while compressing images to a smaller file size. This can be a great option if you don’t require absolute image fidelity and prioritize saving storage space.
Furthermore, another strategy for reducing photo file size through cloud storage services is to manually optimize and compress your photos before uploading them. There are various third-party apps available that specialize in photo compression, allowing you to customize the level of compression according to your specific needs. By compressing the photos first, you can ensure that they take up less space in your cloud storage while still maintaining acceptable image quality.
It’s important to note that while cloud storage services can help reduce photo file size, there may be limitations on the amount of storage space available. Some services offer a certain amount of free storage, while others require a subscription for larger storage capacities. Make sure to choose a cloud storage service that aligns with your photo storage needs.
In conclusion, compressing photos on your iPhone and iPad is an essential skill to have, especially in today’s digital age where multimedia sharing is prevalent. By following the steps outlined above, you can significantly reduce the file size of your photos without compromising their quality.
By compressing your photos, you’ll be able to save valuable storage space on your device, making room for more memories and apps. Additionally, compressed photos are easier and quicker to share, whether it’s through email, messaging apps, or social media platforms.
With a variety of photo compression apps and built-in features available, you have multiple options to choose from. Experiment with different compression methods and find the one that works best for your needs.
Remember, compressing photos may involve a trade-off between file size and image quality. So, make sure to strike the right balance and find the optimal compression level that suits your preferences.
So, why wait? Start compressing your photos today and enjoy the benefits of a more streamlined and efficient mobile experience!
FAQs
Q: Can I compress photos on my iPhone or iPad?
A: Yes, you can easily compress photos on your iPhone or iPad using built-in features or third-party apps. Compressing photos can help reduce their file size, freeing up storage space and making them easier to share or upload.
Q: How do I compress photos on my iPhone or iPad using built-in features?
A: To compress photos using built-in features on your iPhone or iPad, follow these steps:
- Open the Photos app and select the photo you want to compress.
- Tap the Share button, typically represented by a square with an upward arrow.
- Scroll down and select “Compress” from the options available.
- A compressed version of the photo will be created, which you can save or share as desired.
Q: Are there any third-party apps that can help me compress photos on my iPhone or iPad?
A: Yes, there are several third-party apps available on the App Store that specialize in compressing photos. Some popular options include “Image Size”, “Photo Compress & Resize”, and “TinyPNG – Shrink Images”. These apps provide additional features and customization options for compressing photos.
Q: Will compressing a photo affect its quality?
A: Compressing a photo can potentially reduce its quality to some extent, depending on the compression algorithm used and the degree of compression applied. However, with modern compression techniques, the loss of quality is often minimal and may not be noticeable to the naked eye. It’s always recommended to keep a backup of the original photo in case you need it in the future.
Q: Can I compress multiple photos at once on my iPhone or iPad?
A: Yes, you can compress multiple photos at once on your iPhone or iPad. If you’re using the built-in Photos app, you can select multiple photos and follow the same steps mentioned earlier to compress them. Some third-party apps also offer batch compression, allowing you to compress multiple photos simultaneously, saving you time and effort.