
Are you looking to relive your favorite memories on your iPhone or iPad? Don’t worry, we’ve got you covered! In this article, we will guide you on how to view your photo memory mixes on your iOS device. With the latest update in 2023, Apple has introduced a new feature that allows users to create stunning photo memory mixes from their cherished moments, giving you a fresh and engaging way to revisit your photos and videos. Whether it’s a birthday celebration, a vacation, or a special event, these memory mixes add an extra element of excitement and nostalgia to your browsing experience. So, let’s jump right in and discover how you can access and enjoy these beautiful photo memory mixes on your iPhone or iPad.
Inside This Article
- How to View Photo Memory Mixes on iPhone & iPad (2023 Update)
- Enabling the Memories Feature
- # 3. Accessing Memories on Photos App
- Customizing Memories Settings
- Sharing Memories with Others
- # 6. Troubleshooting Issues with Memories
- Conclusion
- FAQs
How to View Photo Memory Mixes on iPhone & iPad (2023 Update)
Welcome to the world of iPhone and iPad photography, where capturing memories has never been easier. With the abundance of high-quality cameras on these devices, you can effortlessly document precious moments and create lasting memories. One of the features that enhances this experience is the ability to view Photo Memory Mixes. In this article, we will guide you step-by-step on how to view these captivating mixes on your iPhone and iPad. Let’s dive in!
Before you can start enjoying Photo Memory Mixes, you need to ensure that the Memories feature is enabled on your device. To do this, follow these simple steps:
1. Open the “Settings” app on your iPhone or iPad.
2. Scroll down and tap on “Photos & Camera”.
3. Under the “Memories” section, toggle the switch to turn on “Show Memories”.
4. You can also adjust other settings, such as choosing the duration of the Memory Mixes and whether to include related memories.
Once you have enabled the Memories feature, you can easily access the Photo Memory Mixes on the Photos app. Follow these steps:
1. Open the “Photos” app on your device.
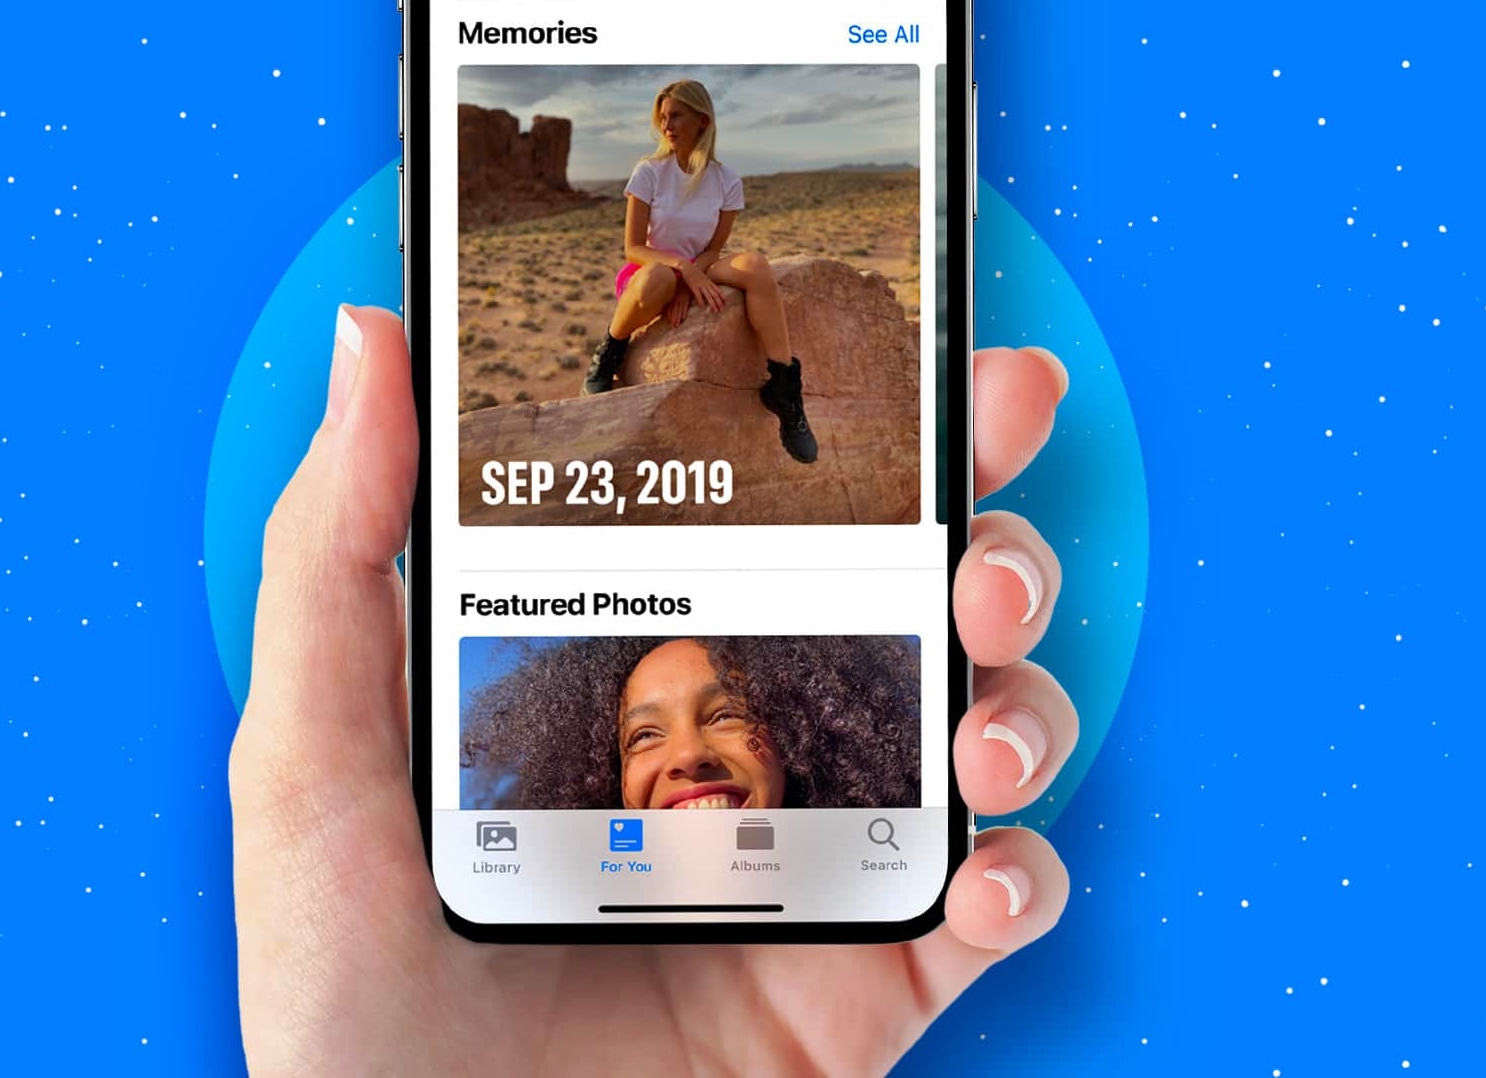
2. Tap on the “For You” tab at the bottom of the screen.
3. Scroll down until you see the “Memories” section.
4. Tap on any Memory Mix to start viewing it. You can swipe left or right to navigate through the different photos and videos in the mix.
5. To play the Memory Mix as a slideshow, tap on the “Play” button at the bottom of the screen.
Customizing the Memories settings allows you to have more control over the content and style of the Photo Memory Mixes. Here’s how you can do it:
1. Open the “Photos” app and go to the “For You” tab.
2. Scroll down to the “Memories” section and tap on “See All” to view all your Memory Mixes.
3. Select a Memory Mix that you want to customize.
4. Tap on the “Edit” button to access the customization options.
5. You can choose different music, change the title, and even add or remove specific photos or videos from the mix.
6. Once you’re satisfied with the changes, tap on “Done” to save your customized Memory Mix.
No memory is complete without sharing it with loved ones. Fortunately, sharing Photo Memory Mixes with others is a breeze. Here’s how:
1. Open the “Photos” app and go to the “For You” tab.
2. Scroll down to the “Memories” section and tap on “See All”.
3. Select the Memory Mix that you want to share.
4. Tap on the “Share” button, which is represented by a square with an arrow pointing upwards.
5. Choose the method through which you want to share the Memory Mix, such as Messages, Mail, or social media platforms.
6. Follow the on-screen instructions to complete the sharing process.
If you encounter any issues while trying to view or customize Memory Mixes, there are a few troubleshooting steps you can try:
1. Ensure that you have the latest version of iOS installed on your iPhone or iPad.
2. Restart your device to refresh the system.
3. Go to the “Settings” app and navigate to “Photos & Camera”. Disable the “Show Memories” option, wait a few moments, and then re-enable it.
4. If the issue persists, you can contact Apple Support for further assistance.
Enabling the Memories Feature
Memories is a captivating feature on iPhone and iPad that automatically creates curated photo and video collections based on specific locations, events, or periods of time. These collections, known as Memories, bring your cherished moments to life in beautifully designed slideshows. To enjoy this feature, you need to ensure that Memories is enabled on your device. Here’s how to do it:
1. Open the Settings app on your iPhone or iPad.
2. Scroll down and tap on “Photos.”
3. In the Photos settings, you will find the “Memories” option. Tap on it to access the Memories settings.
4. Toggle the “On” switch next to “Show Memories” to enable the feature. This allows the Photos app to automatically create and display Memories based on the content in your photo library.
5. You can also enable the “Notification Center” option to receive notifications when new Memories are created.
6. Additionally, you can choose whether you want to include photos from specific time periods or events. Tap on “Show More” under “Featured Photos” and select the desired options.
7. Once you have made your desired changes, simply exit the Settings app, and the Memories feature will be enabled.
With Memories enabled, your iPhone or iPad will analyze and curate your photo library regularly, creating unique collections that capture the essence of your special moments. Now, let’s explore how to access Memories in the Photos app.
# 3. Accessing Memories on Photos App
Once you have enabled the Memories feature on your iPhone or iPad, accessing the Memories on the Photos app is a breeze. Memories are a great way to relive your favorite moments and rediscover forgotten gems from your photo library. Here’s how you can access Memories on your device:
1. Open the Photos app on your iPhone or iPad.
2. At the bottom of the screen, you will see different tabs, such as “Photos,” “For You,” “Albums,” etc. Tap on the “For You” tab, which is indicated by a heart-shaped icon.
3. On the “For You” tab, scroll down until you see the section labeled “Memories.”
4. Tap on the “See All” button to view all your Memories.
5. You will now be presented with a collection of memories created by the Photos app. Each memory is accompanied by a cover photo, title, and a date range.
6. Tap on a specific memory to view it in full-screen mode.
7. Within a memory, you can swipe through the photos and videos that are part of that particular memory.
8. You can also adjust the playback speed of a memory by tapping on the play button and selecting the desired speed.
9. To exit from the memory view, simply swipe down on the screen or tap on the “Done” button at the top-left corner of the screen.
Accessing memories on the Photos app allows you to revisit special moments and enjoy curated collections of photos and videos. It’s a convenient way to relive cherished memories in a visually captivating format.
Customizing Memories Settings
When it comes to reliving your favorite moments through Memories on your iPhone or iPad, you have the power to customize the settings to suit your preferences. Here are some key ways to personalize your Memories experience:
1. Selecting the Duration: Memories can be customized to have a specific duration, allowing you to control how long each Memory plays. You can choose from options like Short, Medium, or Long, depending on your preference. Simply go to the Settings within the Photos app, tap on Memories, and adjust the Duration setting to your liking.
2. Choosing a Mood: Memories automatically select a mood for each collection of photos and videos, but you have the option to change it. By selecting a different mood, you can set the tone for your Memory. Choose from options like Playful, Happy, or Chill. This can be done by tapping on the Memory, tapping on the play button, and then selecting the mood icon to change it.
3. Customizing the Background Music: Memories are accompanied by background music that sets the atmosphere and enhances the viewing experience. You can choose from a selection of songs provided by Apple, or even select your own music from your library. To change the background music, tap on the Memory, tap on the play button, and then select the music icon to choose a new song.
4. Rearranging Photos and Videos: If you want to change the order of the photos and videos within a Memory, you can easily rearrange them. Tap on the Memory, tap on the play button, and then tap on the album icon. From there, you can drag and drop the media files to rearrange them in the desired order.
5. Adding Favorite Memories: Some Memories are particularly dear to our hearts and we want to preserve them in a special way. With the “Add to Favorite Memories” option, you can mark certain Memories as favorites, making them easily accessible whenever you want to revisit them. Simply tap on the Memory, tap on the three dots icon, and then select “Add to Favorite Memories”.
By customizing these settings, you can truly make your Memories a personalized and delightful experience. Experiment with different durations, moods, background music, and arrangements to create Memories that perfectly reflect your unique moments.
Sharing Memories with Others
Memories are a wonderful way to relive special moments captured through photos and videos on your iPhone and iPad. But why keep those memories to yourself when you can easily share them with others? Whether it’s a vacation, a birthday party, or a fun outing, sharing memories allows you to spread joy and nostalgia with your friends and family.
So, how can you share your photo memories with others? Here are some simple steps to get you started:
Step 1: Open the Photos app
Launch the Photos app on your iPhone or iPad. This app is the central hub for all your photos and videos, including memories.
Step 2: Navigate to the Memories tab
Tap on the “Memories” tab located at the bottom of the screen. This tab organizes your memories based on different themes, dates, or locations.
Step 3: Select a memory to share
Browse through the memories displayed and select the one you want to share. Memories are automatically created by iOS, but you can also create your own custom memories.
Step 4: Tap on the Share button
Once you’ve chosen the memory you want to share, tap on the Share button, usually represented by an arrow pointing upwards. This action will open up various sharing options.
Step 5: Choose a sharing method
From the list of sharing options, select the method you prefer. You can share memories through messages, email, social media platforms, or even AirDrop.
Step 6: Customize your sharing settings
Before sending the memory, you can customize the sharing settings according to your preference. Options may include adding a caption, selecting specific recipients, adjusting privacy settings, or setting expiration dates.
Step 7: Send and spread the joy
Once you’ve personalized your sharing settings, tap on the Send button to share the memory. Your selected recipients will receive a notification or message containing the memory, allowing them to relive the moment and share their own reactions.
Step 8: Encourage others to share
Don’t forget to encourage your friends and family to share their own memories related to the shared moment. This can create a beautiful shared experience and strengthen the bond between you and your loved ones.
Sharing memories is not only a way to reminisce but also a way to connect and engage with others. Whether it’s through a heartfelt message, a shared laugh, or a flood of old memories, the act of sharing creates a lasting impact.
So, go ahead and start sharing your photo memories with others today. Spread the joy, create new memories, and cherish the moments that make life truly special. Happy sharing!
# 6. Troubleshooting Issues with Memories
While the Memories feature on your iPhone and iPad is a convenient way to relive your favorite moments, there may be times when you encounter issues or face challenges. Don’t worry – we’re here to help you troubleshoot and resolve these problems. Here are some common issues you may encounter with Memories and the steps you can take to fix them.
1. Memories are not appearing: If you’re unable to see any Memories on your device, ensure that the Memories feature is enabled. Go to the Photos app, tap on the “For You” tab, and scroll down to confirm that Memories is turned on. If it’s already enabled and you still can’t see any Memories, try restarting your device or updating your iOS to the latest version.
2. Missing or incomplete Memories: If some of your photos or videos are missing from a Memory or if the Memory seems to be incomplete, it could be due to a variety of reasons. Firstly, check if you’ve accidentally deleted any photos or videos that were part of the Memory. If so, restore them from the Recently Deleted album. Additionally, ensure that your device has sufficient storage space to generate and display Memories. If you suspect an issue with the Photos app, try force quitting it and reopening it.
3. Unwanted or irrelevant content in Memories: Memories are created based on the algorithm’s analysis of your photos and videos. However, sometimes the algorithm may include unrelated or unwanted content in Memories. To resolve this, you can customize the content included in Memories. You can go to the Memory, tap on the ellipsis (…) button, and select “Edit Memory.” From there, you can remove specific photos or videos, or even change the theme of the Memory.
4. Error messages or crashing: If you’re experiencing error messages or if the Photos app crashes when accessing or playing Memories, try closing any other apps running in the background and then reopen the Photos app. If the issue persists, consider updating your iOS to the latest version or restarting your device. If the problem continues, you may want to contact Apple Support for further assistance.
5. Slow loading or playback issues: If the Memories take a long time to load or playback is not smooth, it could be due to a slow internet connection or insufficient device resources. Ensure that you have a stable internet connection and close any unnecessary apps or processes that may be running in the background. Additionally, you can try clearing the cache of the Photos app by going to Settings > General > iPhone Storage > Photos and tapping on “Offload App.” This will free up some space and potentially improve performance.
By following these troubleshooting steps, you should be able to overcome most issues related to Memories on your iPhone or iPad. However, if you continue to experience problems, it’s recommended to reach out to Apple Support for further assistance and guidance specific to your device.
Conclusion
In conclusion, viewing photo memory mixes on your iPhone and iPad is a great way to relive and cherish your favorite moments. With the advancements in iOS and the Photos app, it has become easier than ever to create and enjoy these personalized slideshows.
From organizing your photos into meaningful collections and adding background music to customizing the transitions and duration, the options are endless. Whether you want to share your photo memory mixes with friends and family or simply enjoy them privately, the process is simple and intuitive.
By following the steps outlined in this article, you can create stunning photo memory mixes that capture the essence of your special moments. So, grab your iPhone or iPad and start creating those beautiful memory mixes today!
FAQs
Q: How can I view photo memory mixes on my iPhone or iPad?
A: To view photo memory mixes on your iPhone or iPad, simply follow these steps:
- Open the Photos app on your device.
- Tap on the “For You” tab located at the bottom of the screen.
- Scroll down until you find the “Memories” section and tap on it.
- Here, you will see a collection of memory mixes created by the Photos app.
- Select the memory mix you want to view and tap on it.
- The memory mix will instantly begin playing, showcasing a compilation of photos and videos from your library with background music and transitions.
Q: Can I customize photo memory mixes on my iPhone or iPad?
A: Yes, you can customize photo memory mixes on your iPhone or iPad. After selecting a memory mix, you can tap on the “Edit” button to make changes. You can adjust the duration, add or remove photos and videos, change the music, and even choose different visual themes and effects. Take advantage of the creative tools offered by the Photos app to make your memory mixes unique and personalized.
Q: How can I share photo memory mixes with others?
A: Sharing photo memory mixes with others is easy and can be done in various ways:
- While viewing a memory mix, tap on the share icon (usually represented by a square with an arrow pointing up).
- Choose how you want to share the memory mix, such as through Messages, Mail, social media platforms, or by saving it to your iCloud Drive.
- Follow the prompts to complete the sharing process.
You can also AirPlay the memory mix to compatible devices, such as an Apple TV, for a larger and more immersive viewing experience.
Q: Can I download photo memory mixes to my iPhone or iPad?
A: Yes, you can download photo memory mixes to your iPhone or iPad. To download a memory mix, follow these steps:
- While viewing the memory mix, tap on the share icon.
- Choose the “Save Video” or “Save Memory Movie” option from the sharing menu.
- The memory mix will be saved to your device’s Camera Roll or Photos app, depending on your settings.
Once downloaded, you can access and view the memory mix anytime, even without an internet connection.
Q: Are photo memory mixes automatically created on my iPhone or iPad?
A: Yes, photo memory mixes are automatically created on your iPhone or iPad by the Photos app. The app uses advanced algorithms to analyze your photo library and intelligently curates a collection of photos and videos into engaging memory mixes. These mixes are designed to evoke nostalgia and create a captivating visual experience by combining images, videos, music, and transitions. You can find these automatically generated memory mixes in the “For You” tab of the Photos app.