
Are you a proud owner of both an Android phone and a Mac computer? If so, you might be wondering how to connect your Android phone to your Mac. While these two devices come from different tech ecosystems, fear not – there are several ways you can establish a seamless connection between them. By connecting your Android phone to your Mac, you can easily transfer files, sync data, and even mirror your phone’s screen onto your Mac. In this article, we will explore different methods and tools you can use to connect your Android phone to your Mac, allowing you to enjoy the best of both worlds in terms of functionality and convenience.
Inside This Article
- Step 1: Install Android File Transfer
- Step 2: Enable USB Debugging on your Android phone
- Step 3: Connect your Android phone to your Mac via USB cable
- Step 4: Launch Android File Transfer on your Mac
- Step 5: Transfer files between your Android phone and Mac
- Step 6: Safely eject your Android phone from your Mac
- Troubleshooting tips for connecting Android phone to Mac
- Conclusion
- FAQs
Step 1: Install Android File Transfer
Connecting your Android phone to your Mac requires a software called Android File Transfer. This software allows you to transfer files between your Android phone and your Mac seamlessly. Here’s how you can install it:
1. First, open your preferred web browser and go to the official Android File Transfer website.
2. On the website, click on the “Download Now” button to start downloading the installation file for Android File Transfer.
3. Once the download is complete, locate the downloaded file in your Downloads folder or the location you have chosen for downloaded files.
4. Double-click on the downloaded file to initiate the installation process. Follow the on-screen instructions to install Android File Transfer on your Mac.
5. After the installation is complete, you can find the Android File Transfer application in your Applications folder.
With Android File Transfer installed on your Mac, you are now ready to connect your Android phone and start transferring files effortlessly.
Step 2: Enable USB Debugging on your Android phone
USB debugging is a crucial step in connecting your Android phone to your Mac. It allows your computer to communicate with your phone by granting it permission to access developer-level functions. Enabling USB debugging is a simple process, and here’s how you can do it:
1. Open the Settings app on your Android phone.
First, locate the Settings app icon on your home screen or in the app drawer and tap on it to open the Settings menu.
2. Scroll down and select “Developer Options”.
In the Settings menu, scroll down until you find the “Developer Options” or “Developer settings” option. It may be located under the “System” or “About phone” section.
3. Enable Developer Options (if not already enabled).
If Developer Options is already visible in the Settings menu, skip to the next step. However, if you don’t see Developer Options, you’ll need to enable it first. To do this, go to the “About phone” or “About device” section, scroll down to find “Build number”, and tap on it repeatedly (usually around 7 times) until you see a pop-up message indicating that you are now a developer.
4. Tap on “Developer Options”.
Once you have enabled Developer Options, go back to the main Settings menu and scroll down again. This time, you should see “Developer Options” or “Developer settings” listed. Tap on it to access the developer settings.
5. Toggle on the “USB Debugging” option.
In the Developer Options menu, scroll down until you find “USB Debugging” and toggle the switch to enable it. You may be asked to confirm your action, so make sure to proceed with the prompt.
6. Connect your Android phone to your Mac.
Now that USB debugging is enabled on your Android phone, connect it to your Mac using a USB cable. Make sure to use the original cable or a high-quality USB cable to ensure a stable connection.
Once connected, your phone will prompt you to allow USB debugging access from your Mac. Check the box that says “Always allow from this computer” to avoid being prompted every time you connect your phone.
That’s it! You have successfully enabled USB debugging on your Android phone, and now you can proceed to the next step to connect it to your Mac.
Step 3: Connect your Android phone to your Mac via USB cable
Connecting your Android phone to your Mac is a straightforward process that allows you to transfer files and access your phone’s content directly from your computer. Follow these simple steps to establish a connection:
- Start by locating the USB cable that came with your Android phone. This cable is essential for establishing a physical connection between your phone and Mac.
- Next, connect one end of the USB cable to your Android phone’s charging port. The other end of the cable should be plugged into an available USB port on your Mac.
- Once the cable is securely connected, your Android phone will prompt you to choose the appropriate USB connection option. Select “File Transfer” or “Media device (MTP)” to enable data transfer between your phone and Mac.
- Your Mac will then recognize the connected Android phone and display it as a storage device on your desktop or in the Finder sidebar. You may also receive a notification on your Mac confirming the successful connection.
- If the Android File Transfer program does not launch automatically, you can manually open it by navigating to “Applications” > “Android File Transfer” on your Mac.
That’s it! Your Android phone is now successfully connected to your Mac via USB cable. You can now start transferring files, such as photos, videos, music, and documents, easily between your Android phone and your Mac.
Step 4: Launch Android File Transfer on your Mac
After connecting your Android phone to your Mac via USB cable, the next step is to launch the Android File Transfer application on your Mac. The Android File Transfer application allows you to access and transfer files between your Android phone and your Mac.
To launch Android File Transfer, follow these steps:
- Go to your Applications folder on your Mac and locate the Android File Transfer application.
- Double-click on the Android File Transfer icon to open the application.
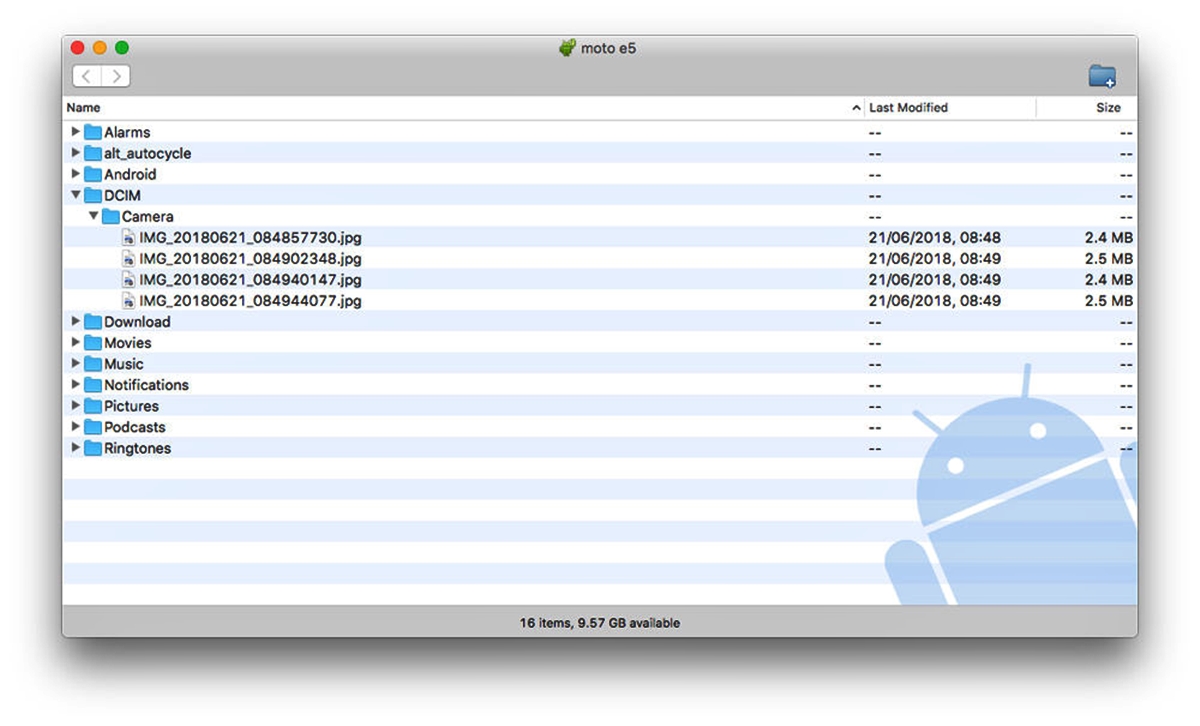
Once the Android File Transfer application is launched, you will see a window displaying the folders and files on your Android phone. From here, you can navigate through the folders, view and manage files, and transfer them to your Mac.
If you encounter any issues or errors when launching Android File Transfer, make sure that your Android phone is connected properly to your Mac via the USB cable. Also, ensure that you have enabled USB debugging on your Android phone as mentioned in the previous steps.
Please note that the Android File Transfer application is compatible with Mac OS X 10.5 or later versions. If you are using an older version of macOS, you may need to upgrade your operating system or use alternative methods to transfer files between your Android phone and Mac.
Now that you have successfully launched the Android File Transfer application on your Mac, you are ready to proceed to the next step and transfer files between your Android phone and Mac.
Step 5: Transfer files between your Android phone and Mac
Now that you have successfully connected your Android phone to your Mac, it’s time to transfer files between the two devices. Whether you need to transfer photos, videos, documents, or any other files, you can do it easily with the help of a few simple steps. Here’s how:
1. Open Android File Transfer: Launch the Android File Transfer application on your Mac. It should automatically detect your connected Android phone and display its contents.
2. Navigate through your Android phone’s files: In the Android File Transfer window on your Mac, you’ll see the folders and files stored on your Android phone. You can browse through these folders to find the files you want to transfer.
3. Select the files to transfer: Click on the files or folders you want to transfer to your Mac. To select multiple files, hold down the Command key while clicking on the desired files.
4. Drag and drop the files: Once you have selected the files, simply drag them from the Android File Transfer window to a folder on your Mac. You can choose to transfer them to your Desktop, Documents folder, or any other location of your preference.
5. Monitor the transfer progress: As the files are being transferred, you will see a progress bar indicating the status of the transfer. Larger files may take more time to transfer, so be patient while the process completes.
6. Verify the transferred files: Once the transfer is complete, navigate to the location on your Mac where you transferred the files. Open the folder and check if the files have been successfully transferred. You can now access and use these files on your Mac.
7. Safely disconnect your Android phone: After you have transferred the files, it’s important to safely disconnect your Android phone from your Mac. To do this, click on the “Eject” button next to your Android phone’s name in the Android File Transfer window.
Note: If you encounter any issues during the file transfer process, ensure that you have USB debugging enabled on your Android phone and that you’re using a compatible USB cable. You can also try restarting both your Android phone and Mac, as well as reinstalling the Android File Transfer application.
With these simple steps, you can effortlessly transfer files between your Android phone and your Mac. Whether you need to backup important photos, transfer documents for work, or simply enjoy your favorite music on your Mac, this process allows you to seamlessly share files and access them across devices. So, make the most of it and enjoy the convenience of transferring files between your Android phone and Mac.
Step 6: Safely eject your Android phone from your Mac
After transferring all the files you need from your Android phone to your Mac, it’s essential to safely eject your device before disconnecting it. This ensures that no data is lost or corrupted and that your Android phone is disconnected properly from your Mac.
To safely eject your Android phone from your Mac, follow these steps:
- Make sure all file transfers and operations are complete. Close any file transfer windows or applications that are open on your Mac.
- Locate the Eject icon for your Android phone on your Mac. This icon is typically found in the Finder sidebar, in the Devices section.
- Click on the Eject icon. This will safely disconnect your Android phone from your Mac and prevent any data loss.
- Once you have clicked the Eject icon, wait for a few moments until you see a notification on your Android phone indicating that it is safe to disconnect.
- After you see the notification on your Android phone, you can safely unplug the USB cable from your Mac and your Android phone.
It is important to follow these steps to ensure the integrity of your data and to avoid any potential damage to your Android phone or Mac. By safely ejecting your Android phone from your Mac, you minimize the risk of data corruption and ensure a smooth disconnection process.
Remember, abruptly unplugging your Android phone while it is connected to your Mac can lead to data loss or even damage to your device. So, always take the extra step to safely eject your Android phone before disconnecting it from your Mac.
Troubleshooting tips for connecting Android phone to Mac
Connecting your Android phone to your Mac should be a straightforward process, but sometimes issues can arise. If you’re experiencing difficulties when trying to connect your Android phone to your Mac, don’t worry; we’ve got you covered with some troubleshooting tips. Follow these steps to troubleshoot and overcome common connectivity issues:
1. Check your USB cable: The first thing you should do is ensure that the USB cable you are using to connect your Android phone to your Mac is in good condition. Sometimes, a faulty or damaged cable can prevent proper data transfer. Try using a different USB cable to see if the issue persists.
2. Restart your devices: Sometimes, a simple restart can solve connectivity problems. Start by disconnecting your Android phone from your Mac, then turn off both devices. Wait for a few seconds before turning them back on. Once both devices have powered on, attempt to reconnect your Android phone to your Mac.
3. Enable USB debugging: USB debugging is an important setting on your Android phone that allows it to communicate with your Mac. To enable USB debugging, navigate to the developer options in your phone’s settings. If you don’t see developer options, go to “About phone” and tap on the build number several times until the developer options are activated. In the developer options, toggle on the USB debugging feature.
4. Install Android File Transfer: Android File Transfer is a software application designed specifically for Mac users to transfer files between their Mac and Android phone. If you haven’t already, download and install Android File Transfer on your Mac. Be sure to check for any updates to the software as well.
5. Check for compatibility issues: Ensure that your Android phone and Mac are compatible with each other. Older Android devices may not be fully compatible with the latest version of macOS. Additionally, make sure that your Mac’s operating system is up to date to maximize compatibility.
6. Try a different USB port: Sometimes, certain USB ports on your Mac may encounter connectivity issues. Connect your Android phone to a different USB port on your Mac to see if this resolves the problem. Additionally, avoid using USB hubs or extension cables, as they can sometimes interfere with the connection.
7. Reset network settings: If all else fails, you can try resetting the network settings on your Android phone. This will delete any saved Wi-Fi networks and Bluetooth connections, but it may help resolve any underlying connectivity issues. To reset network settings, go to your phone’s settings, select “System” or “General management,” and look for the “Reset” option.
If you’ve tried all of the above troubleshooting tips and are still unable to connect your Android phone to your Mac, it may be prudent to seek additional technical assistance. Contact your Android phone manufacturer or Apple support for further guidance.
Remember, every Android phone and Mac setup can have unique quirks and issues, so it’s important to be patient and try different solutions until you find what works for you. Don’t be discouraged; once you establish a stable connection between your Android phone and Mac, you’ll be able to transfer files and enjoy the benefits of seamless device integration.
Connecting your Android phone to your Mac opens up a world of possibilities. Whether you need to transfer files, sync data, or simply enjoy the convenience of managing your phone from your Mac, there are several methods available. From using Android File Transfer to third-party apps like AirDroid or SyncMate, you can find the solution that best suits your needs.
Remember to make sure that both your Android phone and your Mac are compatible and meet the necessary requirements for the connection method you choose. With a reliable connection established, you can seamlessly transfer photos, videos, music, and more between your devices. Enjoy the convenience of managing your Android phone right from your Mac, and make the most out of the powerful features offered by both platforms.
So, what are you waiting for? Connect your Android phone to your Mac today and experience the benefits of a seamless integration between these two powerful devices.
FAQs
1. Can I connect my Android phone to a Mac computer?
Absolutely! Connecting your Android phone to a Mac computer is possible and relatively simple. Mac computers are equipped with built-in software that allows seamless communication with Android devices.
2. What is the purpose of connecting my Android phone to a Mac?
Connecting your Android phone to a Mac has several advantages. You can transfer files between the two devices, sync your contacts and calendars, and even mirror your phone’s screen on your Mac for easier multitasking.
3. How can I connect my Android phone to a Mac?
To connect your Android phone to a Mac, follow these steps:
1. Connect your Android phone to your Mac using a USB cable.
2. On your Android phone, swipe down from the top of the screen to access the notification panel.
3. In the notification panel, tap on the “USB charging this device” notification.
4. Choose the option that says “File Transfer” or “Transfer files” to enable file transfer between devices.
5. Your Mac should recognize your Android phone as an external device, and you can access its contents through the Finder or Android File Transfer application.
4. Can I transfer files between my Android phone and Mac?
Yes, you can transfer files between your Android phone and Mac. Once your Android phone is connected to your Mac, you can simply drag and drop files between the two devices using the Finder or Android File Transfer application.
5. Is there any software I need to install on my Mac to connect my Android phone?
Most Mac computers come with the Android File Transfer application pre-installed. This application allows you to transfer files between your Android phone and Mac seamlessly. If you don’t have the Android File Transfer application, you can download it for free from the official Android website.