
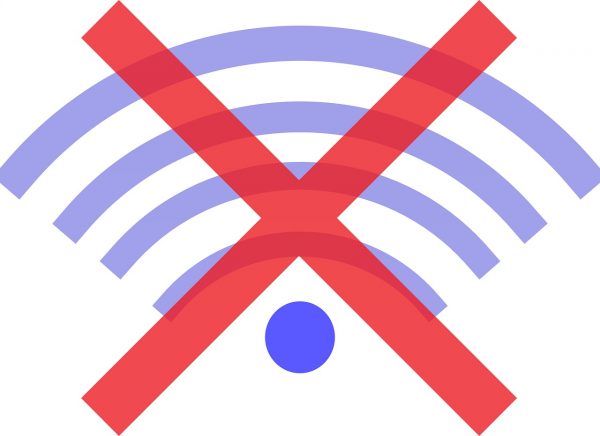
Nowadays, there is a need to stay connected online even when we’re on the go. This is why Wi-Fi network access is essential and a must-fix feature when it encounters problems on a mobile phone. On Android phones, you’ll know if there’s a Wi-Fi connectivity issue when the “Failed to Obtain IP Address” notification appears. On the brighter side, this error should not be something to stress you out because there are a handful of easy hacks and fixes you can try out.
What Failed to Obtain IP Address Error Means
Basically, the router assigns your device with an IP address whenever you connect to a Wi-Fi network. This comes in a chain of numbers, for example, 192.168.1.1, 172.18.256.1, or any numerical combination in similar formats. However, your phone might not always be able to get this address. Failing to obtain it will result in your phone not connecting to Wi-Fi.
You might experience the Failed to Obtain IP Address Error even with a Wi-Fi network your device has already connected previously. Moreover, it can happen to any Android phone user. There are different reasons for this; failing to obtain an IP address might be due to wrongly configured Wi-Fi settings, router bugs, or a software problem. In any case, the solutions are pretty straight forward as we already mentioned.
Best Solutions When Obtaining IP Address Fails
While there are several possible reasons why an Android phone is unable to connect to a Wi-Fi network, there are also plenty of ways to fix it. Below are the 10 best solutions for an Android phone showing a Failed to Obtain IP Address error depending on the probable cause. With multiple methods to try, you can still fix the problem if you fail on the first attempt.
Also Read: 10 Easy Fixes for Mobile Data Not Working on Android
1. Move Near Router

Sometimes, it is not because your Android phone lost its capability of getting an IP address. It may just be too slow in accessing a network. When it seems that the task is taking forever, your connection might also be unstable.
You may want to rethink your router placement or simply move near it. Try to use your Android phone while sitting next to the router so you can experience faster connectivity. It’s basically logic — distance equals speed. That is also why gadgets connected directly to a router can surf the web faster than devices far away from the unit.
2. Reboot Android Phone or Router
If it is unknown whether the phone or router is causing the Failed to Obtain IP Address problem, try restarting both first. A reboot reverts devices to a state free of minor issues and running data, so it is always part of troubleshooting tips you can find online. It may also help an Android phone or a router that is slowing down to function back to normal.
Rebooting an Android phone is a hassle-free task for anyone. Restarting can be done in three to five steps for most of the latest models. Moreover, there is no need to browse through menus. All that is required are a few button clicks.
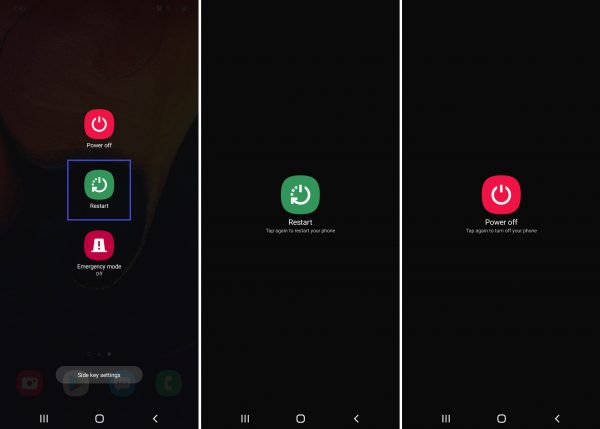
Here’s a quick run-down:
1. Hold the power button of the phone.
2. Wait for the power options to show up.
3. Tap either the Restart/ Reboot or Power Off button.
4. If you selected Power Off, switch on your phone after a few seconds via the power rocker.
Regarding routers, the steps may vary slightly depending on how the provider designed the controls. There is a common way to do it for most models, though.
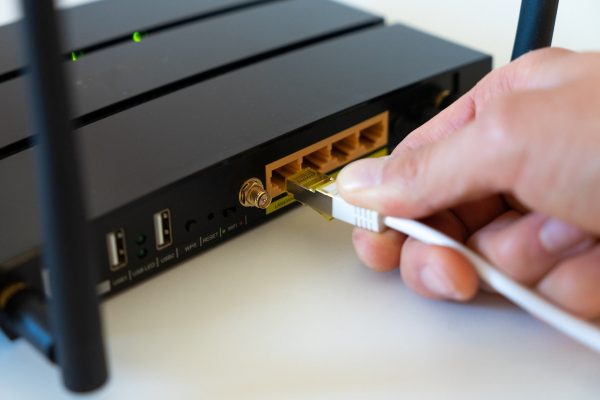
You can reboot a router properly by following these steps:
1. Turn off the router via its power switch.
2. Unplug it carefully from the power outlet.
3. Wait for a few seconds.
4. Plug the router again.
5. Wait for the router to restart.
3. Rename Phone That Failed to Obtain IP Address
Changing the device name is just customization. Despite this, technology experts still recognize renaming as one of the working solutions to the Failed to Obtain IP Address error caused by unknown factors. Furthermore, it is easy to do, so it will not give you too much trouble and is definitely worth the try.
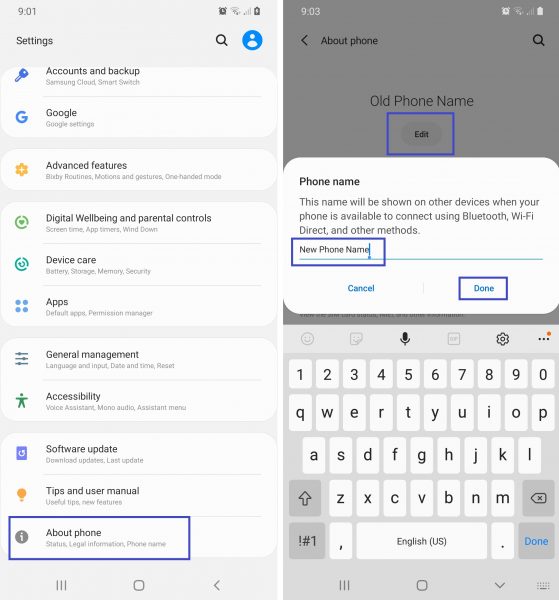
To edit your Android phone’s name that is seen by the router and other connected devices, follow these instructions:
1. From the home menu, head towards your phone Settings.
2. Scroll down and tap About Phone from the menu.
3. Click on the Edit button below the device name.
4. Input the replacement device name you came up with.
5. Hit OK or Done to finalize the name.
6. Start reconnecting to a Wi-Fi network.
4. Forget Network
The failure to obtain an IP address often happens for a short while so making the Android phone forget and reconnect to a network should work most of the time. Forgetting, in this context, means that the device will detect the network as if it was a first-time connection. As a result, you will have the phone rescan the network, and you will be asked for the password to connect to it.
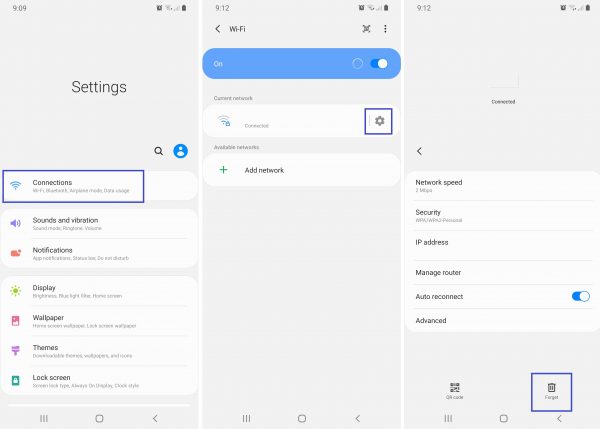
Here’s how you can make your Android phone forget a Wi-Fi network:
1. Locate and tap the Settings icon on the home interface.
2. Click Connections from the menu.
3. Select Wi-Fi on the next page or swipe its slider button to the right.
4. From the existing scanned list, tap the network name or its cog icon.
5. Click on Forget Network from the pop-up options or the next page.
6. Switch off and on the Wi-Fi via the slider button to rescan.
7. Select the forgotten network.
8. Login using the credentials.
Also Read: How to Find WiFi Password on Android and iOS
5. Set Static IP Address
The IP address that the router provides your Android phone is dynamic so it may change and have problems. Fortunately, you can set the IP address on your own if you encounter the Failed to Obtain IP Address or other Wi-Fi connection errors.
The address you will be assigning to your device is called Static IP. That is fixed, unlike the one from your router. To proceed, you must make your Android phone forget the network beforehand, which you already know how to do.
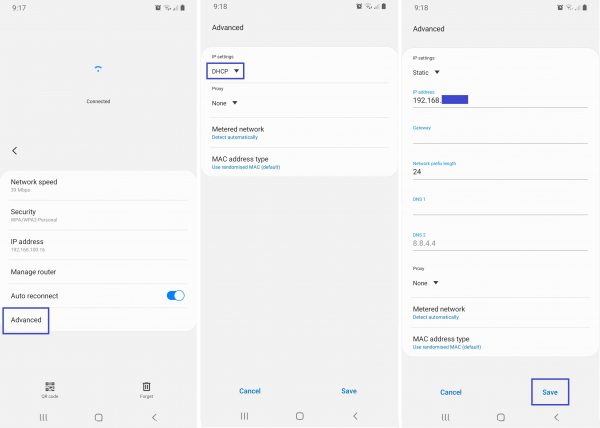
Here are the steps to follow to obtain a Static IP after forgetting the Wi-Fi network:
1. Click on Advanced below the network information fields.
2. Select IP Settings.
3. Replace DHCP with Static by clicking the drop-down menu arrow.
4. Use a new number between 1 and 225 as the last digits of your current IP address, then tap Save.
5. Use a different number between 1 and 225 if what you used is already taken by a device or not working.
6. Swap AES and TKIP Modes
A router can have minor issues with the network encryption mode that lead to the Failed to Obtain IP Address error on an Android phone. When this is likely the cause, you have to try an alternate mode as a solution.
Choose the right encryption type to switch to. Routers often have AES and TKIP encryption modes. AES is an acronym for Advanced Encryption Standard, while TKIP means Temporal Key Integrity Protocol. Although AES is more popular globally and considered stronger and faster than TKIP, both can still effectively protect a Wi-Fi network from breaches or hacking. Given that, choosing any of the two will work for your router.
To swap modes and fix the IP address issue, find the encryption settings of your router. Security settings and configurations are typically available on the router’s webpage. The procedure to change those will vary depending on your router provider.
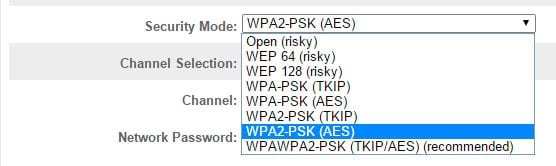
Here are general instructions that will help you replace the encryption mode in use:
1. Visit your router’s webpage.
2. Login using your default or customized credentials.
3. Look for the Wireless Settings menu.
4. Click on the Security tab if available.
5. Select the encryption mode you prefer between AES and TKIP.
7. Deactivate MAC Address Filtering
The MAC address is as important as an IP address when it comes to Internet access. When relevant settings are toggled, Wi-Fi connectivity might also be affected.
MAC or Media Access Control is a physical or local device identifier, which is different from an IP address that is a global one. An example of a MAC address is 00:0a:97:9c:68:17 or any combination of letters and numbers in the same format. Part of the series is the device manufacturer ID.
When MAC Address Filtering is activated on your router, it will prevent a specific device from accessing certain networks. This is why checking the MAC Address Filtering feature is one of the best solutions when your device fails to obtain an IP address.
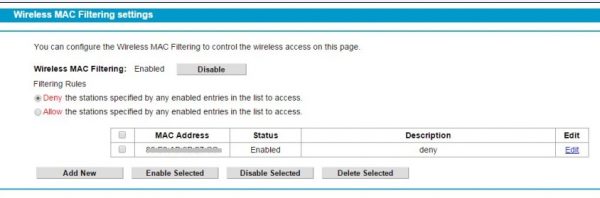
You can deactivate MAC Address Filtering on your router in a few steps:
1. Access your router’s homepage via the web.
2. Sign in using your default or customized login name and password.
3. Look for the WLAN, Access Control, or Advanced option.
4. Click on the WLAN MAC Filter or a similar tab.
5. Select the Disable option for the listed addresses if any.
6. Click Save or Apply for the router to implement the changes.
Note that the procedure may also vary slightly depending on your router brand’s webpage. Also, not all routers have the MAC Filtering capability. You must check the official support page of your router provider besides the guide above so you can navigate the interface easier.
8. Toggle Airplane Mode
Airplane Mode is a mobile device feature that is useful even if you are not on a flight or trip. It prevents the gadget from interfering with aircraft signal transmission and wasting battery power.
Airplane Mode disables your Android phone’s mobile data, Bluetooth, and Wi-Fi functions. Once switched off, it will result in the router and mobile device rescanning and reestablishing a connection. Airplane Mode works like a reboot but is specifically for Wi-Fi; therefore, this may solve the Failed to Obtain IP Address error even if the cause is unknown.
There are two ways to toggle an Android phone’s built-in Airplane Mode: via the Settings menu or an icon shortcut. Both methods will take you just a few seconds to finish.
Method 1: Through the Menu
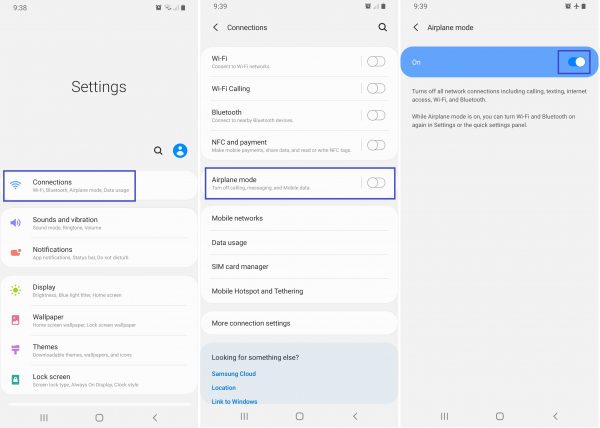
1. Launch your Settings menu or tap its icon.
2. Go to the Connections option.
3. Click on Airplane Mode to activate it.
4. Wait shortly before the next step.
5. Click on Airplane Mode again to deactivate it.
Method 2: Through the Shortcut Icon
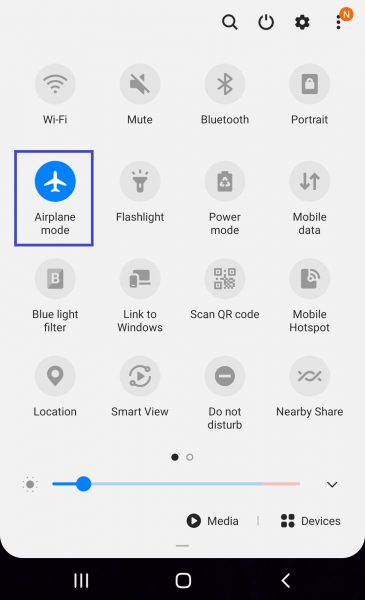
1. Open the Quick Settings menu by swiping your fingers up or down from the home screen.
2. Click on the Airplane Mode icon.
4. Wait for a few seconds after it turns blue.
5. Tap on it again to disable Airplane Mode.
9. Clear Google Play Services Cache
Google Play Services is an umbrella of various essential functions, including those relevant to connectivity. Clearing its cache can fix Wi-Fi issues, including the Failed to Obtain IP Address error on Android phones regardless of the cause.
A cache is temporary storage for the app, browser, or device data. This allows the device to make quick data retrieval for a program to work smoothly. When the cache is cleared, Google Play Services for wireless connectivity can operate in a fresh state.
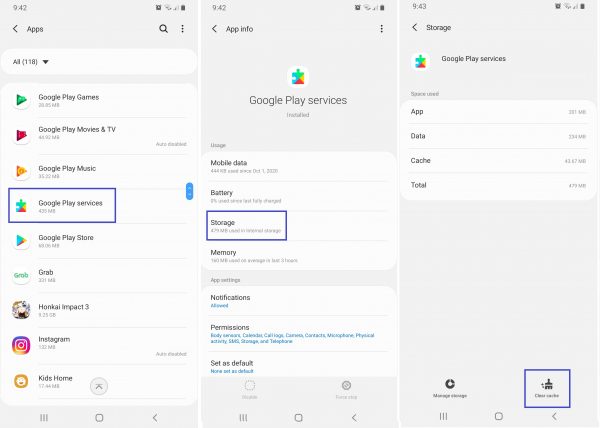
To clear the Google Play Services cache on your Android phone:
1. Go to the Settings from your home interface.
2. Choose the Apps option from the menu.
3. Click on Google Play Services.
4. Tap Storage.
5. Choose Clear Cache.
10. Factory Reset
A factory reset fixes a problematic Android phone because it restores software and memory to the same condition when the gadget was purchased. Even so, make a factory reset your last resort to solving most device problems because it clears data, files, and settings. Moreover, do not forget to back-up your files beforehand and the credentials you will be needing afterward. Only try the method if you are 100 percent sure you are prepared so you would not miss anything important.
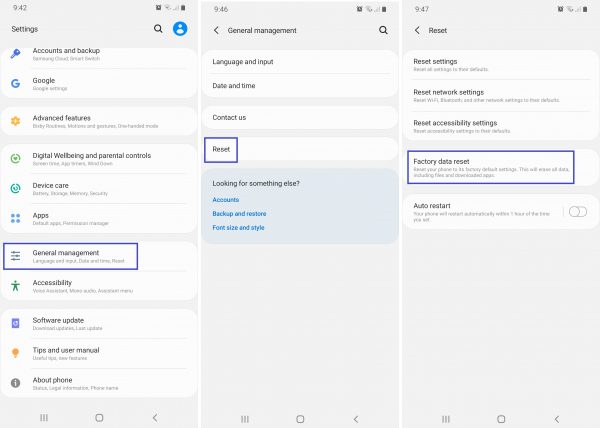
You can do a factory reset on your Android phone through these steps:
1. Tap the Settings icon or launch its menu on your device.
2. Choose System or General Management from the options.
3. Go to Advanced Options if available.
4. Click Reset Options or just Reset.
5. Tap Erase All Data or Factory Data Reset.
6. Make sure you have read and understood the reset coverage details shown.
7. Hit the Reset button.
Also Read: How to Back Up and Restore Android Phone Data Quickly
If Failed to Obtain IP Address Error Persists
When you tried everything but you cannot determine the cause, and no solution works on your Android phone’s Failed to Obtain IP Address issue, consider asking the experts for advice. It is easy to contact your mobile phone maker via the Android Help website and customer support hotlines. Alternatively, you can reach out to third-party Android support providers or via help forums because there are many on the web.
Takeaways on Failed to Obtain IP Address Solutions
The Failed to Obtain IP Address and other Wi-Fi connection errors can happen to anyone, be it an Android phone user or not. It will be best for you to learn about all the possible solutions to the problem even before it happens. Being prepared and knowledgeable already gives you an overview of the scenarios. Also, it helps you pick good back-up plans to solve the problem fast.