
Sure, here's the introduction in HTML format:
html
Are you a proud owner of a Moto G smartphone and wondering how to transfer photos to your Mac? Look no further! In this comprehensive guide, we’ll walk you through the simple and efficient methods to seamlessly transfer your cherished photos from your Moto G to your Mac. Whether you’re a photography enthusiast, a social media aficionado, or simply looking to free up space on your device, mastering the art of transferring photos is essential. With our expert tips and step-by-step instructions, you’ll be able to effortlessly manage your photo collection and unleash the full potential of your Moto G and Mac synergy.
Inside This Article
- Connecting Moto G to Mac
- Using Android File Transfer
- Transferring Photos via Google Photos
- Using Bluetooth to Transfer Photos
- Conclusion
- FAQs
**
Connecting Moto G to Mac
**
Transferring photos from your Moto G to a Mac is a simple process that can be accomplished using various methods. Whether you prefer a direct USB connection or a wireless transfer, there are several options to choose from based on your convenience and preference.
When connecting your Moto G to a Mac, the first step is to ensure that your device is unlocked and the screen is active. This allows the Mac to recognize the phone and establish a connection for data transfer. It’s essential to use a high-quality USB cable to ensure a stable connection between the Moto G and the Mac.
Once your Moto G is connected to the Mac via USB, you can choose the appropriate transfer method based on your preference and the available tools on your Mac. Whether you opt for Android File Transfer, Google Photos, or Bluetooth, the process of transferring photos from your Moto G to your Mac can be seamless and efficient.
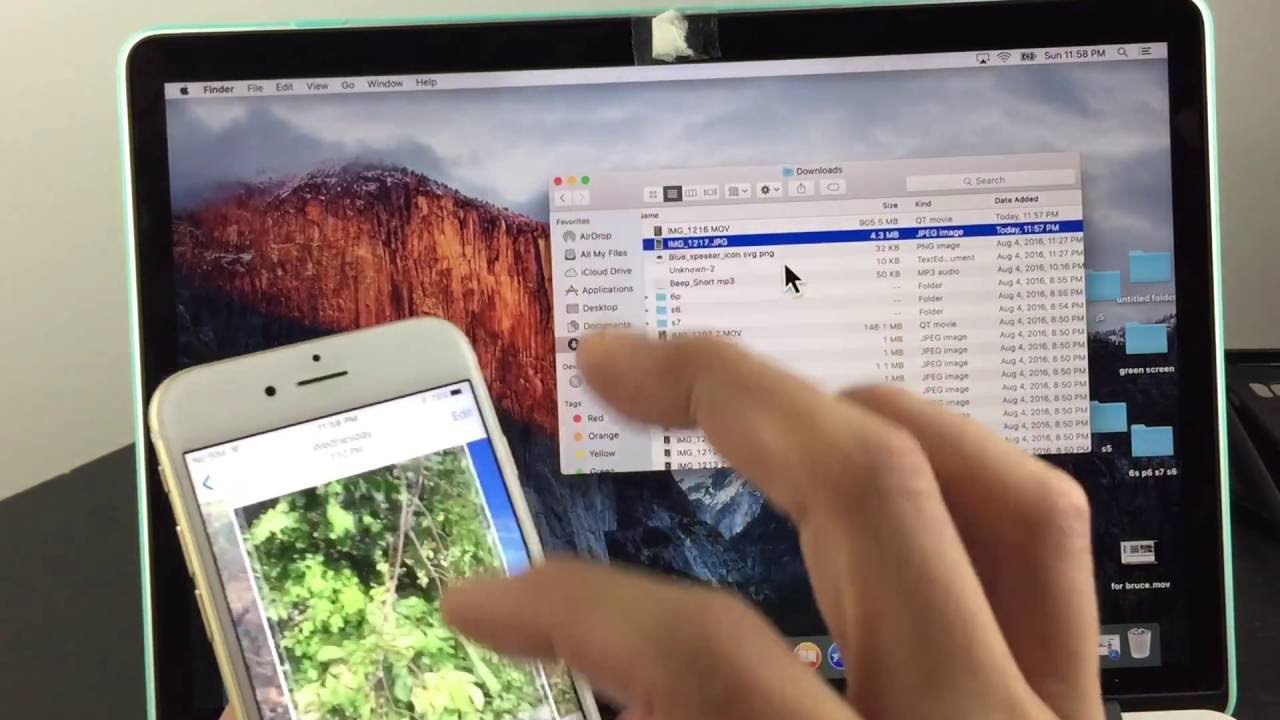
Using Android File Transfer
Android File Transfer is a handy tool that allows you to connect your Moto G to your Mac and transfer photos with ease. To get started, download and install the Android File Transfer application on your Mac. Once installed, connect your Moto G to your Mac using a USB cable.
After connecting your Moto G to your Mac, unlock your phone and swipe down from the top of the screen to view your notifications. Tap on the “USB for file transfer” notification and select “File transfer” or “Transfer files” from the options provided. This will enable your Mac to access your Moto G’s storage.
Next, open the Android File Transfer application on your Mac. You should now be able to browse the files and folders on your Moto G directly from your Mac. Navigate to the folder containing your photos, select the photos you want to transfer, and drag them to a location on your Mac, such as the desktop or a specific folder.
Once the transfer is complete, safely disconnect your Moto G from your Mac by ejecting it from the Finder or by clicking the eject button next to your device in the Android File Transfer application. You can now access your Moto G photos on your Mac and easily manage them as needed.
Transferring Photos via Google Photos
Another convenient method to transfer photos from your Moto G to your Mac is by using Google Photos. This cloud-based service allows you to store, organize, and share your photos across devices seamlessly.
To get started, ensure that Google Photos is installed on your Moto G and that you’re logged in with your Google account. Once your photos are backed up to Google Photos, you can access them from any device with internet access, including your Mac.
On your Mac, open a web browser and navigate to the Google Photos website. Sign in with the same Google account used on your Moto G, and you’ll be able to view and download the photos from your Moto G directly to your Mac.
Google Photos also offers the option to download the photos in bulk, making it efficient for transferring a large number of photos at once. Additionally, you can organize your photos into albums within Google Photos, making it easier to manage and access specific sets of photos on your Mac.
Using Google Photos for transferring photos from your Moto G to your Mac provides a seamless and convenient way to access and download your photos across different platforms, ensuring that your precious memories are always within reach.
Using Bluetooth to Transfer Photos
If you prefer a wireless method for transferring photos from your Moto G to your Mac, Bluetooth can be a convenient option. Both your Moto G and Mac have Bluetooth capabilities, allowing you to establish a direct connection for file sharing.
First, ensure that Bluetooth is enabled on both devices. On your Moto G, navigate to Settings, then Bluetooth, and toggle the switch to enable it. Similarly, on your Mac, access System Preferences, then Bluetooth, and activate it if it’s not already on.
Once Bluetooth is enabled on both devices, pair your Moto G with your Mac. On your Moto G, go to Settings, then Bluetooth, and select “Pair new device.” Your Mac should appear in the list of available devices. Select it to initiate the pairing process.
After the devices are paired, you can proceed to transfer photos. Navigate to the specific photo or photos you want to transfer on your Moto G, then select the option to share via Bluetooth. Choose your Mac as the recipient device, and the transfer process will begin.
On your Mac, you may receive a prompt to accept the incoming Bluetooth transfer. Once accepted, the photos will be transferred from your Moto G to your Mac. Keep in mind that Bluetooth transfer speeds may be slower compared to using a cable or other methods, especially when transferring large files or multiple photos.
Using Bluetooth to transfer photos from your Moto G to your Mac provides a wireless and convenient way to share your memories without the need for cables or additional software. However, it’s important to be mindful of the potential limitations of Bluetooth transfer speeds, especially when dealing with larger files.
Conclusion
Transferring photos from your Moto G to your Mac can greatly enhance the accessibility and organization of your precious memories. By leveraging the methods outlined in this guide, you can seamlessly transfer your photos and enjoy them on a larger screen, share them with friends and family, or back them up for safekeeping. Whether you opt for the convenience of using a USB cable, the efficiency of Google Photos, or the versatility of third-party apps, the process can be straightforward and rewarding. With these options at your disposal, you can effortlessly manage your photo collection and make the most of your Moto G and Mac devices.
FAQs
1. How do I transfer photos from my Moto G to my Mac?
To transfer photos from your Moto G to your Mac, you can use the Android File Transfer application. Connect your Moto G to your Mac using a USB cable, then open the Android File Transfer app on your Mac. You can then drag and drop the photos from your Moto G to your Mac.
2. Can I transfer photos wirelessly from my Moto G to my Mac?
Yes, you can transfer photos wirelessly from your Moto G to your Mac using cloud storage services like Google Drive or Dropbox. Simply upload the photos from your Moto G to the cloud storage service, and then access them on your Mac by logging into the same account.
3. What if my Moto G is not recognized by my Mac when connected via USB?
If your Moto G is not recognized by your Mac when connected via USB, try using a different USB cable or USB port on your Mac. You can also check if the USB connection mode on your Moto G is set to "File Transfer" or "MTP" mode.
4. Are there any third-party apps that can help with transferring photos from Moto G to Mac?
Yes, there are third-party apps available on the Google Play Store that can assist with transferring photos from your Moto G to your Mac. Some popular options include AirDroid and SyncMate.
5. Can I use Bluetooth to transfer photos from my Moto G to my Mac?
While Bluetooth can be used for transferring files between Android devices, it is not the most efficient method for transferring a large number of photos from your Moto G to your Mac. It's recommended to use a USB connection or cloud storage for faster and more reliable photo transfers.