
In this digital age, smartphones have become an integral part of our lives, providing us with various functions and features to enhance our daily activities. Among these, listening to music or taking calls with headphones is a common practice for many. If you are an iPhone user, you may not be aware that you can customize your headphone accessibility settings to suit your preferences and needs. Whether it’s adjusting the audio balance, enabling the mono audio mode, or fine-tuning the volume levels, these settings can be easily accessed on your iPhone. In this article, we will guide you on how to customize your headphone accessibility settings on an iPhone, ensuring a personalized and optimized audio experience like never before.
Inside This Article
- Customizing Headphone Accessibility Settings on an iPhone
- # 2. Accessing the Headphone Accessibility Settings- Step-by-step guide on how to locate and access the headphone accessibility settings on an iPhone.
- # 3. Adjusting Volume Balance for Headphones- Instructions on how to customize the volume balance between the left and right earphones to compensate for hearing imbalances or personal preferences.
- # 4. Applying Audio Mono for Headphones
- # 5. Setting Custom Audio Levels for Headphones
- # 6. Enhancing Headphone Audio Quality- Tips and tricks on utilizing additional settings such as EQ and Sound Check to improve the audio quality and tailor it to personal preferences.
- # 7. Using Sound Recognition with Headphones- Instructions for enabling and configuring the Sound Recognition feature to receive notifications of specific sounds through headphones.
- # 8. Troubleshooting Headphone Accessibility Issues- Common problems and potential solutions related to headphone accessibility settings on an iPhone.
- Conclusion
- FAQs
Customizing Headphone Accessibility Settings on an iPhone
When it comes to using headphones with your iPhone, customizing the accessibility settings can greatly improve your listening experience. Whether you have hearing impairments or simply want to fine-tune the audio to your preference, the iPhone offers a range of options to cater to your needs. In this article, we will guide you through the process of customizing headphone accessibility settings on your iPhone.
Enabling Live Listen feature:
If you have difficulty hearing conversations or sounds, the Live Listen feature can be a game-changer. It allows your iPhone to act as a remote microphone, capturing the audio and transmitting it directly to your headphones. To enable Live Listen, follow these steps:
- Make sure your headphones are connected to your iPhone.
- Go to Settings on your iPhone and select Control Center.
- Tap Customize Controls, then find Hearing and tap the green plus icon next to Live Listen to add it to your Control Center.
- Exit the Settings and open Control Center by swiping down from the upper-right corner or up from the bottom of the screen, depending on your iPhone model.
- Tap the Hearing icon, which looks like an ear, and you will be able to start using Live Listen with your headphones.
Adjusting headphone audio levels:
If you find the audio from your headphones too loud or too quiet, you can adjust the audio levels to a comfortable volume. Here’s how:
- Connect your headphones to your iPhone.
- Go to Settings and select Accessibility.
- Scroll down and tap Audio/Visual.
- Under the Hearing section, you will find the Headphone Audio Levels option. Tap on it.
- Use the slider to adjust the volume balance between the left and right channels until it suits your preference.
- Additionally, you can enable the “Phone Noise Cancellation” feature for clearer audio during phone calls.
Changing audio routing options:
Do you want the audio to automatically switch from your iPhone’s internal speaker to your headphones when you connect them? You can easily configure this by following these steps:
- Connect your headphones to your iPhone.
- Go to Settings and select Accessibility.
- Scroll down and tap Audio/Visual.
- Under the Audio Routing section, you will find the option “Automatically Switch AirPods to iPhone.” Toggle this feature on or off according to your preference.
Configuring headphone accommodations:
If you have specific hearing needs, the iPhone allows you to customize the audio output to suit your preferences. Here’s how to configure headphone accommodations:
- Connect your headphones to your iPhone.
- Go to Settings and select Accessibility.
- Tap Audio/Visual and scroll down to find the Headphone Accommodations option.
- Inside the Headphone Accommodations, you can adjust various settings such as Audio Volume Balance, Background Noise Reduction, and Custom Audio EQ.
- Experiment with the settings until you find the perfect configuration for your headphone audio.
With these customization options, you can tailor your headphone experience on your iPhone to match your specific needs and preferences. Whether it’s enhancing the audio levels, enabling Live Listen, or configuring headphone accommodations, take advantage of these settings to enjoy a more personalized and immersive listening experience.
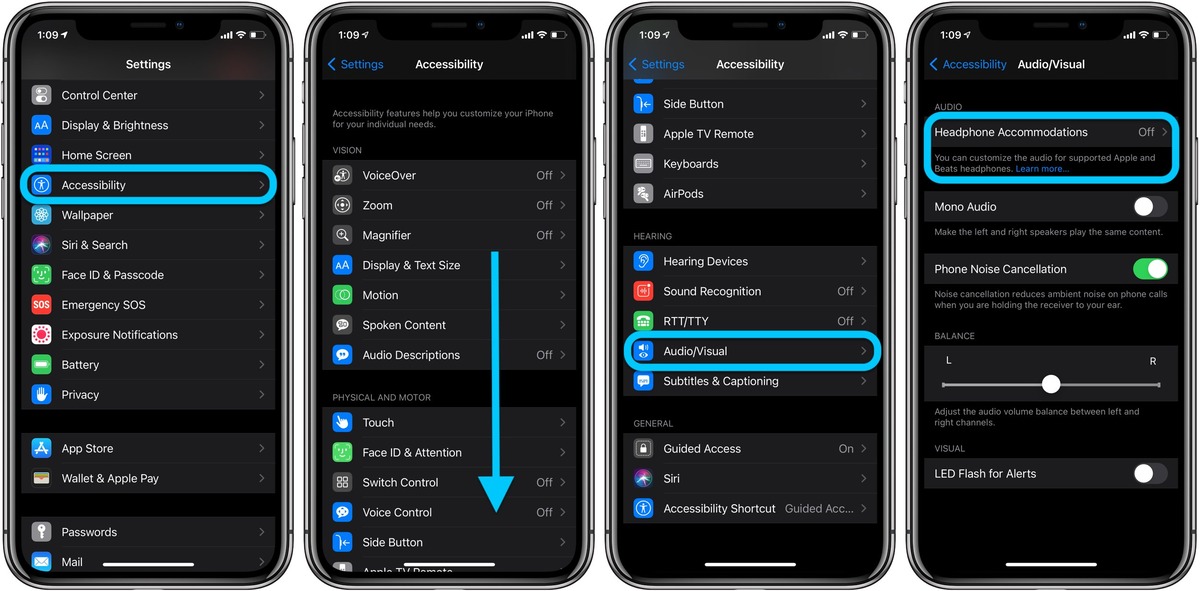
# 2. Accessing the Headphone Accessibility Settings- Step-by-step guide on how to locate and access the headphone accessibility settings on an iPhone.
If you want to customize the headphone accessibility settings on your iPhone, you’ll need to know how to access them. While the settings may vary slightly depending on the version of iOS you are running, the general steps remain the same. Follow this step-by-step guide to locate and access the headphone accessibility settings on your iPhone:
- Unlock your iPhone and go to the home screen.
- Tap on the “Settings” app to open it.
- Scroll down and tap on “Accessibility”.
- In the Accessibility menu, you will find multiple options. Scroll down again and tap on “Audio/Visual”.
- Within the Audio/Visual menu, you will see the “Headphone Accommodations” option. Tap on it.
By following these steps, you will be able to access the headphone accessibility settings on your iPhone. Once you have accessed these settings, you can proceed to customize the various options to suit your preferences and needs.
# 3. Adjusting Volume Balance for Headphones- Instructions on how to customize the volume balance between the left and right earphones to compensate for hearing imbalances or personal preferences.
Having an accurate volume balance between your headphones is crucial for an optimal audio experience. Whether you have a hearing imbalance or simply prefer the sound to be adjusted in a certain way, customizing the volume balance on your iPhone can greatly enhance your listening pleasure. Follow the steps below to adjust the volume balance for your headphones:
1. Start by accessing the “Settings” app on your iPhone and tap on “Accessibility.”
2. In the Accessibility menu, scroll down and select “Audio/Visual.”
3. Under the Audio section, you will find the option to adjust the “Balance” for your headphones. Tap on it.
4. A slider will appear, allowing you to adjust the volume balance between the left and right earphones. Slide it to the left or right to increase or decrease the volume for each ear.
5. As you move the slider, the audio balance will be adjusted in real-time, allowing you to find the perfect balance that suits your needs.
6. Keep in mind that the center position on the slider represents an equal volume balance between both ears.
7. Once you have customized the volume balance to your liking, exit the settings menu.
Now, when you listen to audio on your iPhone with headphones, you will experience a more balanced sound, ensuring that you don’t miss out on any details due to hearing imbalances or personal preferences.
Remember, adjusting the volume balance is not only helpful for individuals with hearing imbalances, but it can also provide a more immersive listening experience for everyone. Experiment with different balance settings to find what works best for you and enjoy your favorite music, podcasts, or videos with enhanced audio clarity.
# 4. Applying Audio Mono for Headphones
For individuals with hearing impairments in one ear, listening to stereo audio can be challenging. Fortunately, iPhones offer a feature called Audio Mono that allows you to combine stereo sound into a mono signal, making it easier for those with hearing limitations to enjoy audio content.
To enable Audio Mono for headphones on your iPhone, follow these simple steps:
- Open the “Settings” app on your iPhone.
- Scroll down and tap on “Accessibility”.
- In the “Accessibility” menu, select “Audio/Visual”.
- Under the “Hearing” section, tap on “Audio Mono”.
- Toggle the switch to enable Audio Mono.
Once you have enabled Audio Mono, your iPhone will combine the stereo sound into a mono signal, effectively mixing the audio channels and playing the sound through both left and right earbuds simultaneously.
This feature ensures that individuals with hearing impairments in one ear do not miss out on any audio content. Whether it’s listening to music, watching videos, or participating in phone calls, enabling Audio Mono provides a more inclusive listening experience.
It is worth noting that Audio Mono is customizable to suit individual preferences. You can adjust the volume balance for the left and right earbuds to ensure a comfortable listening experience.
To customize the volume balance while using the Audio Mono feature:
- Access the “Accessibility” menu by following the steps mentioned earlier.
- Under the “Hearing” section, tap on “Balance”.
- Drag the slider to adjust the volume balance between the left and right earbuds. Moving the slider to the left will increase the volume in the left earbud, and moving it to the right will increase the volume in the right earbud.
Adjusting the volume balance ensures that individuals can fine-tune the audio output to their specific hearing needs.
By enabling Audio Mono and customizing the volume balance, users with hearing impairments in one ear can fully enjoy their audio experience on an iPhone. This feature promotes inclusivity and accessibility, making it easier for everyone to engage with their favorite content.
# 5. Setting Custom Audio Levels for Headphones
One of the key features of modern smartphones, such as the iPhone, is the ability to customize various settings to enhance the user experience. When it comes to headphones, the iPhone offers a range of options to ensure optimal audio quality and sound clarity. One such option is the ability to set custom audio levels for headphones.
Adjusting the audio levels for different frequencies can greatly enhance the listening experience. Whether you are a music enthusiast, podcast lover, or simply enjoy watching videos on your iPhone, customizing the audio levels can make a significant difference in sound quality.
To access the custom audio levels for headphones on your iPhone, follow these steps:
- Open the Settings app on your iPhone.
- Scroll down and tap on “Accessibility.”
- Under the “Hearing” section, tap on “Audio/Visual.”
- Next, tap on “Headphone Accommodations.”
- Toggle the switch next to “Custom Audio Levels” to enable it.
Once you have enabled the custom audio levels, you can adjust the audio frequencies to your preference. The iPhone provides a visual equalizer that allows you to fine-tune the audio levels for low, mid, and high frequencies.
To set custom audio levels for headphones, follow these steps:
- Tap on the “Custom Audio Levels” option.
- You will see a frequency level bar with sliders for low, mid, and high frequencies.
- To adjust a specific frequency, drag the corresponding slider left or right.
- As you make adjustments, you will notice the visual equalizer reflecting the changes in real-time.
- Continue adjusting the audio levels until you achieve the desired sound clarity and balance.
Setting custom audio levels for headphones allows you to personalize your listening experience and optimize it according to your preferences. Whether you want to boost the bass, enhance the vocals, or fine-tune the overall sound, the iPhone’s custom audio levels feature gives you the flexibility to do so.
It is worth mentioning that the custom audio levels feature is not limited to just headphones. You can also apply these settings to other audio accessories connected to your iPhone, such as earbuds, Bluetooth speakers, or even car audio systems.
By taking advantage of the custom audio levels for headphones on your iPhone, you can truly immerse yourself in the music, podcasts, or videos you love, transforming your listening experience into something extraordinary.
# 6. Enhancing Headphone Audio Quality- Tips and tricks on utilizing additional settings such as EQ and Sound Check to improve the audio quality and tailor it to personal preferences.
When it comes to enjoying music or other audio on your iPhone, a major factor in the overall experience is the audio quality. Fortunately, the iPhone provides additional settings that allow you to enhance and customize the audio to your personal preferences. In this section, we will explore tips and tricks on utilizing these settings to improve the headphone audio quality.
One of the useful features for enhancing audio quality is the built-in equalizer or EQ. The EQ allows you to adjust the frequencies of the audio output, providing a more balanced sound or emphasizing certain elements such as bass or treble. To access the EQ settings, go to Settings, then Music, and tap on EQ. Experiment with different EQ presets and discover the one that suits your audio preferences the best.
Another setting that can greatly enhance the audio quality is Sound Check. This feature automatically adjusts the volume level of different songs, ensuring a consistent listening experience. Sound Check analyzes the audio files and applies appropriate adjustments to prevent sudden volume changes between tracks. To enable Sound Check, go to Settings, then Music, and toggle the Sound Check switch.
Additionally, make sure to check the audio output levels when using headphones. iPhone offers a Headphone Safety feature that monitors the volume levels and notifies you if the sound exceeds a recommended limit to prevent potential hearing damage. You can enable this feature by going to Settings, then Sounds & Haptics, and selecting Headphone Safety.
Furthermore, consider using high-quality headphones that are specifically designed to deliver excellent audio performance. High-resolution audio files often provide superior sound quality, so if you have access to lossless audio formats, such as FLAC or ALAC, make sure to take advantage of them.
Lastly, if you are an audiophile or have specific audio preferences, consider using third-party apps that offer advanced audio customization. These apps often provide a wide range of features, such as extensive EQ settings, sound effects, and even audio enhancement algorithms. Some popular options include Equalizer+, Boom, and Neutron Music Player.
# 7. Using Sound Recognition with Headphones- Instructions for enabling and configuring the Sound Recognition feature to receive notifications of specific sounds through headphones.
One of the many accessibility features available on iPhones is Sound Recognition. This feature allows users to receive notifications when specific sounds are detected by their device. With iOS 14 and later, users can now use Sound Recognition with headphones. This means that you can get notified of important sounds, even while wearing your headphones.
Enabling the Sound Recognition feature for headphones is quite straightforward. Simply follow these steps:
- Open the “Settings” app on your iPhone.
- Scroll down and tap on “Accessibility”.
- Tap on “Sound Recognition” under the “Hearing” section.
- Toggle the switch next to “Sound Recognition” to enable it.
- Tap on “Sounds” and choose the specific sounds you want to be notified of.
- Now, to ensure you receive these notifications through your headphones, go back to the “Accessibility” menu.
- Tap on “Audio/Visual” and then on “Headphone Accommodations”.
- Toggle the switch next to “Headphone Accommodations” to enable it.
- Adjust the “Audio Balance” and “Custom Audio Setup” sliders as per your preference.
Once you have followed these steps, you will start receiving notifications through your headphones whenever the chosen sounds are detected by your iPhone. This can be particularly useful for situations where you need to be aware of specific sounds, like a doorbell ringing, a baby crying, or a fire alarm going off.
It’s worth noting that the Sound Recognition feature uses on-device processing and does not send any audio recordings to Apple or third-party servers. This ensures your privacy and security while using the feature.
By enabling and configuring Sound Recognition with headphones on your iPhone, you can enhance your accessibility and stay informed about important sounds in your surroundings, even when wearing your headphones.
# 8. Troubleshooting Headphone Accessibility Issues- Common problems and potential solutions related to headphone accessibility settings on an iPhone.
Using headphones with your iPhone can greatly enhance your audio experience, but sometimes you may encounter accessibility issues that hinder your ability to fully enjoy your device. In this section, we will address some common headphone accessibility problems and provide potential solutions for resolving them.
1. No sound or low volume: If you are experiencing no sound or low volume when using headphones with your iPhone, try the following troubleshooting steps:
- Check the volume level on your iPhone and make sure it is not set too low.
- Ensure that the headphones are properly connected to your iPhone’s headphone jack or lightning port.
- Try using a different pair of headphones to see if the issue is with the headphones themselves.
- Restart your iPhone to see if that resolves the issue.
2. Poor audio quality: If you are experiencing poor audio quality, such as distorted sound or static, try the following troubleshooting steps:
- Make sure that the headphones are inserted correctly into your iPhone’s audio port.
- Check if the headphone cable is damaged or frayed. If so, consider replacing the headphones.
- Try cleaning the headphone jack or lightning port on your iPhone to remove any dirt or debris that may be affecting the audio quality.
- Update your iPhone’s software to the latest version, as software updates often include bug fixes that can improve audio performance.
3. Headphone controls not working: If the controls on your headphones, such as volume buttons or play/pause buttons, are not working, try the following troubleshooting steps:
- Check if the controls are compatible with your iPhone model. Some headphones may be designed specifically for certain iPhone models and may not work with others.
- Make sure that the headphone cable is securely plugged into your iPhone’s audio port. Loose connections can cause the controls to malfunction.
- If you are using wireless headphones, ensure that they are properly paired with your iPhone and that Bluetooth is turned on.
- Try disconnecting and reconnecting the headphones to see if that resolves the issue.
4. Audio only coming from one side: If you are experiencing audio that is only coming from one side of your headphones, try the following troubleshooting steps:
- Check if the headphones are properly inserted into your ears. Improper insertion can cause audio imbalance.
- Try using a different pair of headphones to see if the issue is with the headphones themselves.
- If you are using wireless headphones, try re-pairing them with your iPhone to see if that resolves the issue.
By following these troubleshooting steps, you should be able to resolve common headphone accessibility issues on your iPhone. If the problems persist, you may want to consider contacting Apple Support for further assistance.
Conclusion
Customizing headphone accessibility settings on an iPhone is a great way to enhance your listening experience and tailor it to your specific needs. Whether it’s adjusting the sound quality, enabling noise cancellation, or fine-tuning the audio levels, these settings put you in control of your headphone preferences.
iPhones offers a wide range of accessibility features that cater to individuals with different hearing abilities and personal preferences. By exploring the accessibility settings, you can take full advantage of these features and enjoy a more immersive and personalized audio experience.
Remember, your iPhone is not just a phone, but also an advanced audio device. Take the time to experiment with different settings, find what works best for you, and make the most out of your headphone experience.
So, go ahead and dive into your iPhone’s headphone accessibility settings. With a few simple adjustments, you can transform your listening experience and enjoy your favorite music, podcasts, and audio content like never before.
FAQs
1. Can I customize the headphone accessibility settings on my iPhone?
Yes, you can customize the headphone accessibility settings on your iPhone. Apple provides a range of options to modify and optimize your headphone experience to meet your specific needs.
2. How do I access the headphone accessibility settings on my iPhone?
To access the headphone accessibility settings on your iPhone, go to the “Settings” app, then tap on “Accessibility.” From there, scroll down and select “Audio/Visual” or “Hearing Devices,” depending on your iPhone model. You will find various options to customize your headphone settings.
3. What customization options are available for headphone accessibility settings?
There are several customization options available for headphone accessibility settings on the iPhone. These include adjusting the audio balance, enabling mono audio, optimizing sound for different headphone types, and configuring audio routing options.
4. How can I adjust the audio balance on my iPhone headphones?
To adjust the audio balance on your iPhone headphones, go to the headphone accessibility settings as mentioned above. Look for the “Audio Balance” option and drag the slider to the left or right to balance the audio output between the left and right channels.
5. What is the mono audio feature, and how can I enable it?
The mono audio feature combines the audio from the left and right channels into a single channel, allowing individuals with hearing impairment in one ear to hear both sides equally. To enable mono audio on your iPhone, navigate to the headphone accessibility settings, and toggle the “Mono Audio” switch to the on position.