
In this digital age, where social media platforms are a dominant force in our lives, it’s no wonder that we’re constantly on the lookout for new and exciting ways to create captivating content. One popular trend that has taken the world by storm is the boomerang effect, a looping video clip that adds a fun and intriguing element to your photos or videos. While many may think that boomerangs are exclusive to apps like Instagram, did you know that you can create stunning boomerangs right on your iPhone? Yes, you heard that right! In this article, we will delve into the step-by-step process of how to do a boomerang on your iPhone, so you can add a touch of flair and creativity to your social media posts. So, let’s dive in and learn the art of boomeranging on your iPhone!
Inside This Article
- Section 1: Understanding Boomerangs
- Section 2: Preparing Your iPhone
- Section 3: Capturing a Boomerang
- Section 4: Editing and Sharing Your Boomerang
- Conclusion
- FAQs
Section 1: Understanding Boomerangs
Boomerangs are a popular and entertaining type of video that you can create on your iPhone. But what exactly are boomerangs? Well, think of them as short, looping videos that play forward and backward in a continuous loop. They add a fun and unique element to your social media posts, allowing you to capture attention and stand out from the crowd.
The key to creating a captivating boomerang is to capture a brief moment in time and repeat it seamlessly. Whether it’s a playful jump, a hair flip, or an object in motion, boomerangs can turn ordinary moments into mesmerizing loops. These looping videos add a touch of magic and playfulness to your content.
Boomerangs are not only popular on social media platforms like Instagram, but they’re also widely shared through messaging apps and other online platforms. People love the contagious energy and the element of surprise that boomerangs bring to their feeds.
Being able to create boomerangs on your iPhone opens up a world of creative possibilities. You can showcase your personality, capture spontaneous moments, and share them with your friends and followers. The best part? You don’t need any special equipment or extensive video editing skills to get started.
Section 2: Preparing Your iPhone
Before you can create an amazing boomerang on your iPhone, there are a few steps you need to take to ensure that your device is ready for action. Follow the instructions below to get your iPhone all set up for boomerang-making greatness.
1. Check your storage: Boomerangs, like any other video, can take up a significant amount of space on your iPhone. It’s important to make sure you have enough free storage available. Go to “Settings” on your iPhone, then tap “General” and “iPhone Storage.” Here, you’ll see how much space you have left and can offload any unnecessary files to free up some room.
2. Update your software: Keeping your iPhone’s software up to date is vital for smooth performance. Boomerang apps often require the latest version of iOS to work correctly. To check for updates, go to “Settings,” then tap “General” and “Software Update.” If an update is available, simply follow the prompts to install it.
3. Optimize your settings: Before capturing a boomerang, it’s a good idea to optimize your iPhone’s camera settings. Open the camera app and tap the arrow icon to access the options menu. Here, you can adjust settings like exposure, focus, and frame rate to ensure the best results for your boomerang.
4. Clean your lens: A clean lens is essential for capturing clear and crisp boomerangs. Wipe your iPhone’s camera lens gently with a microfiber cloth or lens cleaning wipe to remove any smudges or dirt that may interfere with the quality of your boomerang.
5. Find the right light: Lighting plays a crucial role in the overall quality of your boomerangs. Natural light tends to work best, so try to capture your boomerangs outdoors or near a well-lit window. Avoid harsh shadows or direct sunlight, as it can make your boomerang appear overexposed or washed out.
6. Disable auto-lock: Boomerangs often require multiple attempts to get the perfect shot. To avoid interruptions and keep your iPhone from automatically locking during the process, go to “Settings,” then tap “Display & Brightness” and “Auto-Lock.” Choose the option “Never” to ensure your iPhone stays awake while you’re capturing your boomerang.
7. Turn on Do Not Disturb: Boomerang-making requires focus and concentration. To minimize distractions and notifications that could disrupt your creative flow, enable “Do Not Disturb” mode. Swipe up from the bottom of your iPhone screen to access the Control Center and tap the crescent moon icon.
By following these steps, your iPhone will be fully prepared to capture stunning boomerangs. Now that your device is ready, let’s move on to the exciting part – capturing your first boomerang!
Section 3: Capturing a Boomerang
Now that you understand what a Boomerang is and have prepared your iPhone, it’s time to capture your very own Boomerang! Follow these simple steps:
1. Open the Instagram app on your iPhone and tap on the camera icon at the top left corner of the screen. This will open the camera interface.
2. By default, the camera mode is set to “Normal”. Swipe right on the screen until you reach the “Boomerang” mode. It is represented by a looped arrow icon.
3. Position your subject or yourself in the frame. Remember, Boomerangs work best with moving subjects or actions, so you’ll want to capture something that has an interesting and repetitive motion.
4. Hold down the capture button. Unlike regular photos or videos, Boomerangs are short looping videos that capture a few seconds of motion. Make sure you hold down the button for the duration of the action you want to capture.
5. Once you are satisfied with the captured Boomerang, release the capture button. The app will automatically process the video and play it back to you.
6. If you’re happy with the result, tap the arrow icon at the bottom right corner of the screen to proceed to the next step. This will take you to the editing screen where you can make additional adjustments to your Boomerang, such as trimming the length or adding filters.
7. After making any desired edits, tap “Next” at the top right corner of the screen. This will bring you to the sharing screen where you can add a caption, location, and tags to your Boomerang.
8. Finally, tap “Share” to publish your Boomerang on your Instagram feed or story. You can also choose to share it on other social media platforms or directly with specific individuals.
And there you have it – you have successfully captured a Boomerang on your iPhone! Experiment with different subjects, actions, and settings to create captivating and engaging Boomerangs that will leave your audience amazed.
Section 4: Editing and Sharing Your Boomerang
After capturing a perfect boomerang on your iPhone, it’s time to unleash your creativity through editing and share it with your friends and followers. Luckily, there are several simple and user-friendly options available to edit and share your boomerangs. Let’s dive into the exciting world of boomerang editing and sharing:
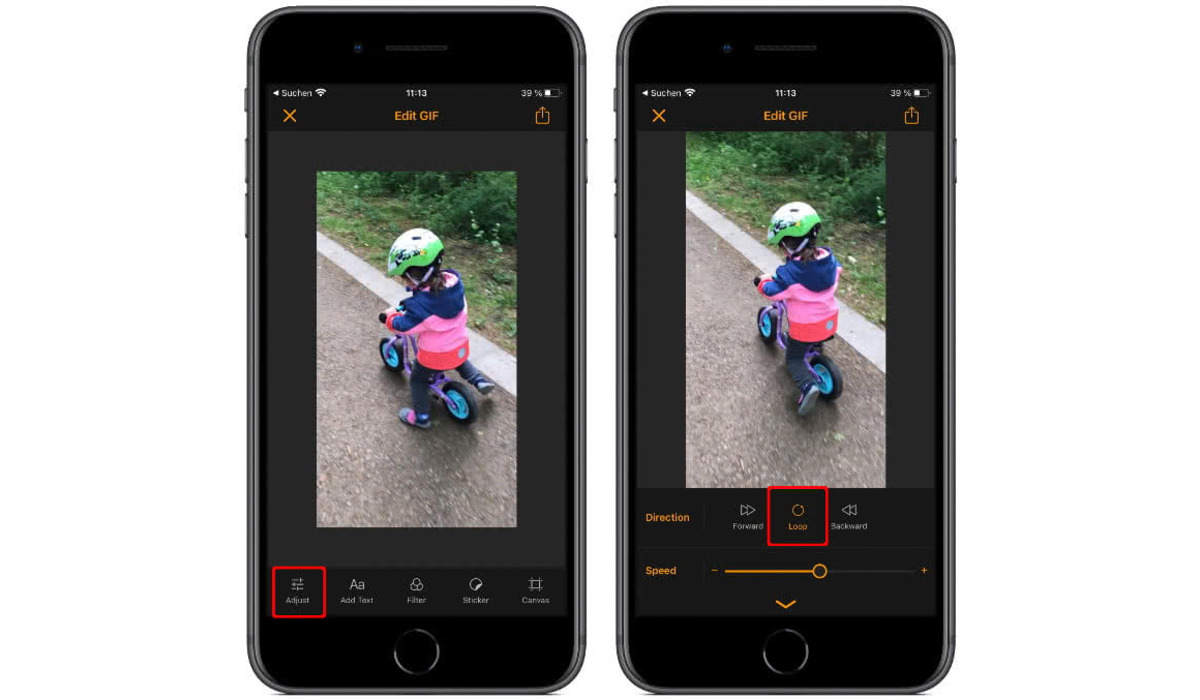
1. Using the Boomerang App: The Boomerang app itself offers a range of editing features to enhance your boomerangs. Once you’ve captured a boomerang, simply open the Boomerang app and click on the boomerang you want to edit. From there, you can trim the length, adjust the playback speed, add filters, and even include text or stickers to make it more fun and personalized.
2. Third-Party Video Editing Apps: If you’re looking for more advanced editing options, you can explore third-party video editing apps available on the App Store. Apps like iMovie or Adobe Premiere Rush allow you to add transitions, text overlays, sound effects, and even music to your boomerangs. With these apps, you can take your boomerangs to the next level and create truly captivating content.
3. Sharing on Social Media: Once you’ve edited your boomerang to perfection, it’s time to share it with the world. Most social media platforms, such as Instagram, Facebook, and TikTok, allow you to directly upload and share boomerangs. Simply open the respective app, select the boomerang from your camera roll, add any necessary captions or hashtags, and click on the share button. Your boomerang will be live for your friends and followers to enjoy!
4. Sending via Messaging Apps: If you prefer to share your boomerang with a smaller audience or specific individuals, you can send it directly through messaging apps like WhatsApp or iMessage. Once you’ve edited your boomerang, click on the share button and select the messaging app of your choice. From there, you can select the recipient(s) and send your boomerang as a message.
5. Saving to Camera Roll: Lastly, don’t forget to save a copy of your edited boomerang to your iPhone’s camera roll. This way, you’ll always have easy access to it, and you can use it for future sharing or editing purposes.
With these simple steps, you can effortlessly edit your boomerangs and share them with the world. Get creative, have fun, and let your boomerangs dazzle everyone who sees them!
Conclusion
In conclusion, learning how to do a Boomerang on an iPhone is a fun way to add a creative touch to your videos. By following the steps outlined in this article, you can easily capture captivating moments in a looped format. Whether you want to showcase your dance moves, showcase a stunning landscape, or simply add an interesting effect to your social media posts, the Boomerang feature on iPhone allows you to do so with ease.
Remember to experiment with different angles, lighting, and subjects to create unique and eye-catching Boomerang videos. With practice, you’ll be able to master the art of capturing the perfect looped moment and impressing your friends and followers.
So, grab your iPhone, follow the steps, and let your creativity soar with Boomerang!
FAQs
FAQ 1: What is a boomerang effect on the iPhone?
Answer: The boomerang effect on the iPhone refers to the ability to create a looping video where the action plays forward and then backward. It gives the illusion of a boomerang constantly returning to its starting point. This popular feature allows users to add a fun and unique touch to their videos on social media platforms.
FAQ 2: How can I create a boomerang on my iPhone?
Answer: To create a boomerang on your iPhone, you can use third-party applications like Instagram, Facebook, or TikTok. These apps usually have built-in boomerang features that allow you to record your videos and produce the looping effect instantly. Simply open the app, access the camera function, select the boomerang mode, and start recording.
FAQ 3: Can I create a boomerang using the iPhone’s native camera app?
Answer: Currently, the native camera app on the iPhone does not have a dedicated boomerang feature. However, you can still create a similar effect by recording a short video and using third-party editing apps like Boomerang by Instagram. These apps enable you to convert your video into a boomerang format and share it effortlessly.
FAQ 4: Are there any other alternatives to create boomerang-like effects on the iPhone?
Answer: Yes, if you’re looking for alternatives to the boomerang effect, you can explore the “Live Photos” feature on the iPhone. Live Photos captures a few seconds of movement before and after the photo is taken, creating a dynamic image that can be shared like a boomerang. You can enable this feature through the camera settings on your iPhone.
FAQ 5: Can I customize the boomerang effect on my iPhone?
Answer: While the boomerang effect is generally fixed in terms of its looping motion, you can still personalize your boomerang videos by adding filters, overlays, or text using various editing apps available on the App Store. These editing tools allow you to enhance your boomerang videos and make them more engaging and appealing to your audience.