
Are you tired of sending emails at inconvenient times or worried about forgetting to send important messages? Thankfully, with the advancements in technology, you can now schedule emails right from your iPhone. Imagine being able to compose an email in the evening and schedule it to be sent out the next morning without any effort on your part.
In this article, we will guide you through the steps on how to schedule an email on iPhone. Whether you want to send a birthday greeting, a work-related update, or simply streamline your communication, scheduling emails can be a game-changer in managing your digital correspondence efficiently.
So, if you’re ready to take control of your email scheduling and automate your communication, let’s dive into the simple and effective process of scheduling emails on your iPhone!
Inside This Article
- Overview
- Method 1: Using the “Delay Delivery” Feature
- Method 2: Using Third-Party Email Apps
- Method 3: Using Email Scheduling Services
- Conclusion
- FAQs
Overview
The ability to schedule emails on your iPhone provides convenience and flexibility in managing your communication. Whether you want to draft an email during non-business hours and delay its delivery until the next morning or ensure timely responses while you’re away, scheduling emails can be a game-changer. In this article, we will guide you through the process of scheduling an email on your iPhone using the built-in Mail app.
The Mail app on iPhone is a powerful tool for managing your email accounts. With its intuitive interface and seamless integration with your device, it allows you to send, receive, and organize emails effortlessly. By leveraging the scheduling feature, you can optimize your email productivity and effectively manage your communication.
Before you can schedule an email, you need to set up your email accounts on your iPhone. Whether you use a popular email service like Gmail, Yahoo, or Outlook, or have a custom domain email, the Mail app supports a wide range of email providers. Simply navigate to the Settings app, locate the “Mail” section, and add your email accounts by inputting the necessary information. Once your email accounts are set up, you’re ready to start scheduling emails.
To compose an email with the intention of scheduling it, open the Mail app and tap on the “Compose” button, usually located at the bottom right corner of the screen. This will open a new email draft. Fill in the recipient’s email address, subject, and compose the content of your email as you normally would.
Once you have written your email and are ready to schedule it, instead of tapping the send button right away, tap and hold the send button. This will bring up the scheduling options. The Mail app offers several predefined time slots, such as “Later Today,” “This Evening,” and “Tomorrow Morning,” to make it easy for you to choose the desired delivery time. If none of the predefined options suit your needs, you can tap on “Customize” to set a specific date and time for the email to be sent.
After selecting the desired delivery time, simply release your finger from the screen. The Mail app will schedule the email to be sent at the specified time. You can find the scheduled email in the “Outbox” folder within the Mail app, where you can view, edit, or delete it if needed. It’s important to note that the Mail app needs to be running in the background for the scheduled emails to be sent at the designated time.
Scheduling emails on your iPhone is a convenient feature that allows you to stay organized and efficient in your communication. Whether you want to plan ahead, ensure timely responses, or simply optimize your workflow, the Mail app’s scheduling feature can be a valuable tool. By following the steps outlined in this article, you’ll be able to schedule emails on your iPhone with ease and take control of your email management.
Method 1: Using the “Delay Delivery” Feature
The Mail app on your iPhone has a handy feature called “Delay Delivery” that allows you to schedule the sending of an email at a later time or date. This feature comes in handy when you want to compose an email but want to send it at a more appropriate or convenient time.
Here’s how you can use the “Delay Delivery” feature to schedule an email on your iPhone:
- Open the Mail app on your iPhone.
- Compose a new email by tapping on the “Compose” button typically located at the bottom right corner of the screen.
- Write your email with the recipient, subject, and body of the message.
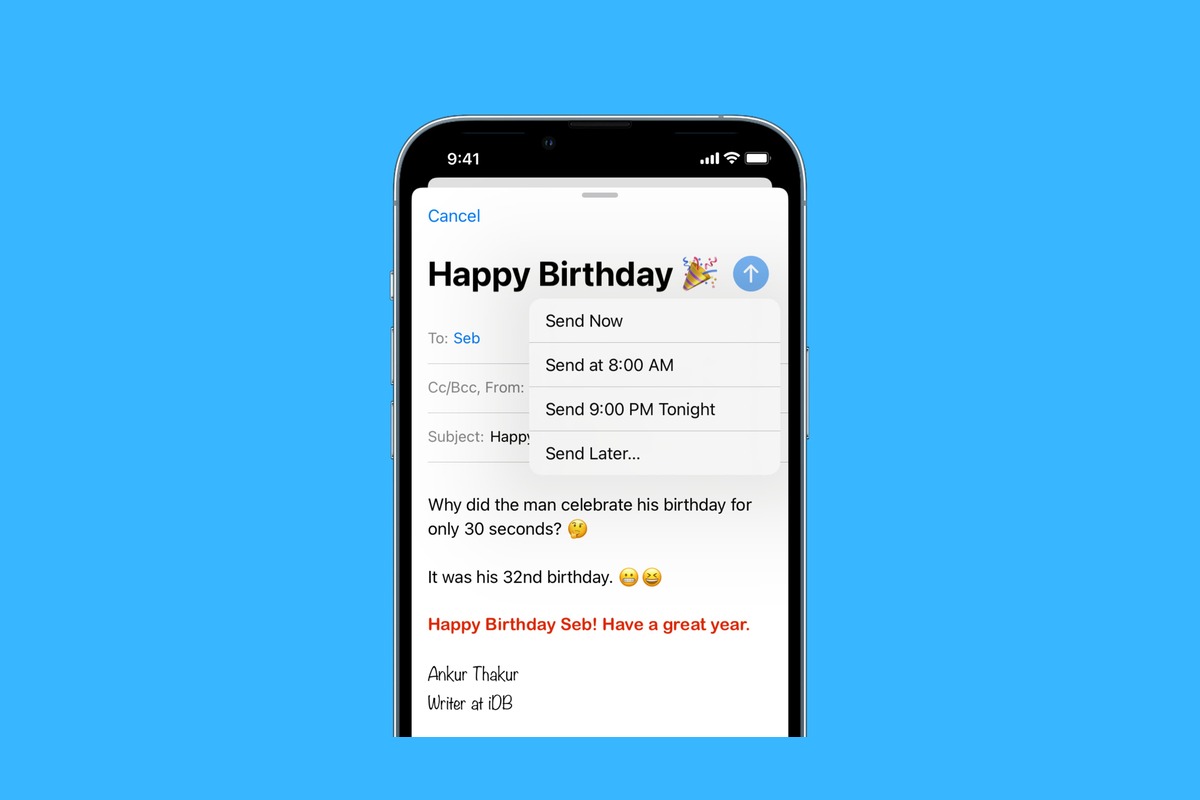
- Once you are ready to schedule the email, tap on the arrow icon located in the top right corner of the screen to reveal the additional options.
- In the toolbar that appears, tap on the “Scheduled” option.
- Next, tap on the “Send Later” option.
- Choose the date and time when you want the email to be sent.
- Tap on the “Schedule” button to confirm the scheduled delivery of the email.
That’s it! Your email will be sent automatically at the specified date and time you have chosen. Please note that your iPhone needs to be connected to the internet for the email to be sent at the scheduled time.
The “Delay Delivery” feature is a great tool for managing your emails, especially when you want to maintain a professional or organized email communication. By using this feature, you can compose emails at your convenience and have them sent at the most appropriate time, even if you are busy or away from your phone.
Now that you know how to schedule an email using the “Delay Delivery” feature on your iPhone, you can take advantage of this functionality to streamline your email management and improve your productivity.
Method 2: Using Third-Party Email Apps
If you prefer to use a third-party email app on your iPhone, there are several options available that allow you to easily schedule emails. These apps often offer additional features and customization options beyond what the default Mail app provides. Here are a few popular third-party email apps that support email scheduling:
- Microsoft Outlook: Outlook is one of the most widely used email apps, known for its advanced features and excellent integration with Microsoft services. To schedule an email in Outlook, simply compose a new message, tap on the three-dot menu, and select “Schedule Send.” From there, you can choose the date and time you want the email to be sent.
- Spark: Spark is a user-friendly email app that offers smart features and efficient inbox management. To schedule an email in Spark, open the compose screen, tap on the three-dot menu, and select “Schedule.” You can then pick the desired date and time for sending the email.
- Gmail: If you use Gmail for your email, you can schedule emails using the Gmail app as well. Simply compose a new message, tap on the three-dot menu, and select “Schedule Send.” You can choose from the suggested time options or set a custom date and time.
These are just a few examples of the many third-party email apps available for iPhone that support email scheduling. Each app may have slightly different steps for scheduling emails, so it’s important to explore the specific features and settings of the app you choose.
By using these third-party email apps, you can have greater control over when your emails are sent, ensuring that they are received at the most appropriate times and maximizing their impact.
Method 3: Using Email Scheduling Services
If you’re looking for a more robust and feature-rich solution to schedule emails on your iPhone, you can turn to email scheduling services. These services offer advanced scheduling features, allowing you to schedule emails at a specific date and time with ease.
One popular email scheduling service is Boomerang. Boomerang is a third-party app that integrates seamlessly with your iPhone’s Mail app. With Boomerang, you can schedule emails to be sent later, set reminders to follow up on emails, and even track if your emails have been read.
To get started with Boomerang, you’ll need to download and install the app from the App Store. Once installed, open the Mail app on your iPhone and compose a new email as you normally would. Instead of tapping the Send button, you’ll now see a Boomerang button near the top of the screen.
Tap on the Boomerang button, and a scheduling menu will appear. Here, you can choose the date and time when you want the email to be sent. You can also schedule reminders to follow up if you haven’t received a reply. Once you’ve set the desired schedule, tap the Send Later button to schedule the email.
Another popular email scheduling service is Mailbutler. Mailbutler offers similar scheduling features as Boomerang, with the added benefit of providing email tracking and snooze options. With Mailbutler, you can track if your emails have been opened, clicked, or shared, ensuring that you stay informed about your email interactions.
To start using Mailbutler, you’ll need to download the app from the App Store and integrate it with your iPhone’s Mail app. Once installed, compose a new email in the Mail app, and you’ll notice a new Mailbutler icon at the bottom of the screen. Tap on the icon to open the Mailbutler menu.
In the Mailbutler menu, you’ll find various options, including scheduling the email, snoozing it for later, and enabling email tracking. Choose the scheduling option and set the desired date and time for the email to be sent. After setting the schedule, tap Send Later to schedule the email.
Both Boomerang and Mailbutler are excellent options for scheduling emails on your iPhone. They provide additional features beyond just scheduling, such as email tracking and snooze options, giving you more control over your email communications. Try them out and find the one that best suits your needs!
Conclusion
In conclusion, scheduling an email on your iPhone can be a useful and time-saving feature. Whether you want to ensure timely delivery of important messages or want to prepare emails in advance, the ability to schedule emails offers convenience and flexibility. By following the step-by-step guide provided in this article, you can easily schedule emails on your iPhone without any hassle.
With just a few taps, you can set the date and time for your email to be sent automatically. This feature is particularly beneficial for individuals who work across different time zones, have a busy schedule, or want to maintain effective communication without being tied to their device constantly.
Take advantage of this feature and streamline your email management on your iPhone today. Enjoy the freedom to compose and send emails at your convenience, while ensuring they are delivered at the most appropriate time.
FAQs
1. Can I schedule emails on my iPhone?
Yes, you can schedule emails on your iPhone using certain email apps or services. By utilizing these apps, you can compose an email and choose the date and time you want it to be sent. The email will then be automatically sent at the scheduled time, even if your iPhone is turned off or you’re not connected to the internet.
2. Which email apps or services can I use to schedule emails on my iPhone?
There are various email apps and services available for iPhone that allow you to schedule emails. Some popular options include Spark, Gmail, Outlook, and Boomerang. These apps provide scheduling features that help you manage your communication effectively.
3. How do I schedule an email using Spark on iPhone?
To schedule an email using Spark on your iPhone, follow these steps:
- Open the Spark app on your iPhone.
- Compose a new email.
- In the email composition screen, tap on the three-dot menu icon.
- From the menu, select “Schedule Send”.
- Choose the desired date and time for sending the email.
- Tap “Schedule” to confirm.
4. Can I edit or cancel a scheduled email on my iPhone?
Yes, you can edit or cancel a scheduled email on your iPhone, depending on the email app or service you are using. In most cases, you can access your scheduled emails through a specific section or menu within the app, where you can make changes or delete them altogether.
5. Are there any limitations to scheduling emails on an iPhone?
While scheduling emails on an iPhone is a convenient feature, there may be some limitations depending on the email app or service you are using. For example, some apps may have a maximum limit on the number of scheduled emails or restrict the scheduling feature to certain email providers. Additionally, the availability of scheduling options may vary based on your iPhone’s operating system version.