
Are you a proud owner of the Redmi 2 smartphone and looking to explore some advanced features? One such feature is fastboot mode, which is a powerful tool that allows you to perform various functions on your device. Whether you need to flash a custom ROM, unlock the bootloader, or install system updates, knowing how to access the fastboot mode is essential.
In this article, we will guide you through the steps to enter fastboot mode on your Redmi 2. We will explain what fastboot mode is, why you might need to use it, and provide a step-by-step guide on how to access it. So, if you’re ready to delve into the world of fastboot mode, grab your Redmi 2 and let’s get started!
Inside This Article
Preparing for Fastboot
Before you can jump into the exciting world of fastboot mode on your Redmi 2, there are a few essential things you need to do to prepare.
Firstly, make sure you have the necessary USB drivers installed on your computer. The USB drivers enable your computer to recognize and communicate with your Redmi 2 when connected via USB cable. You can typically find the USB drivers on the official website of your device’s manufacturer. Download and install the drivers specific to the Redmi 2 model.
Next, enable USB debugging on your Redmi 2. This allows your device to communicate with your computer when connected in fastboot mode. To enable USB debugging, go to “Settings” on your device, scroll down to “About Phone,” and tap on “MIUI version” seven times to enable developer options. Once developer options are unlocked, go back to the main settings page, tap on “Additional settings,” choose “Developer options,” and enable “USB debugging.”
It is also essential to ensure that your Redmi 2 has sufficient battery charge. Fastboot operations can drain your battery quickly, so it is recommended to have at least 50% battery level before entering fastboot mode. If your battery is low, charge your device for a while before proceeding.
Lastly, gather the necessary tools for the fastboot process. You will need a compatible USB cable to connect your Redmi 2 to your computer. Make sure the cable is in good condition and capable of data transfer. Additionally, have a computer or laptop with a USB port ready to establish the connection.
By following these preparatory steps, you will be well-equipped to dive into the world of fastboot mode on your Redmi 2. Once you have everything in place, you can move on to the next step of booting into fastboot mode.
Booting into Fastboot Mode
Fastboot mode is a powerful feature found in many Android devices, including the popular Redmi 2. It allows you to flash custom firmware, unlock the bootloader, and perform various system operations that require a low-level access to the device. To enter Fastboot mode on your Redmi 2, follow the steps below:
Step 1: Make sure your Redmi 2 is turned off.
Step 2: Press and hold the Volume Down button and the Power button simultaneously until you see the MI logo appear on your device’s screen.
Step 3: Once the MI logo appears, release both buttons.
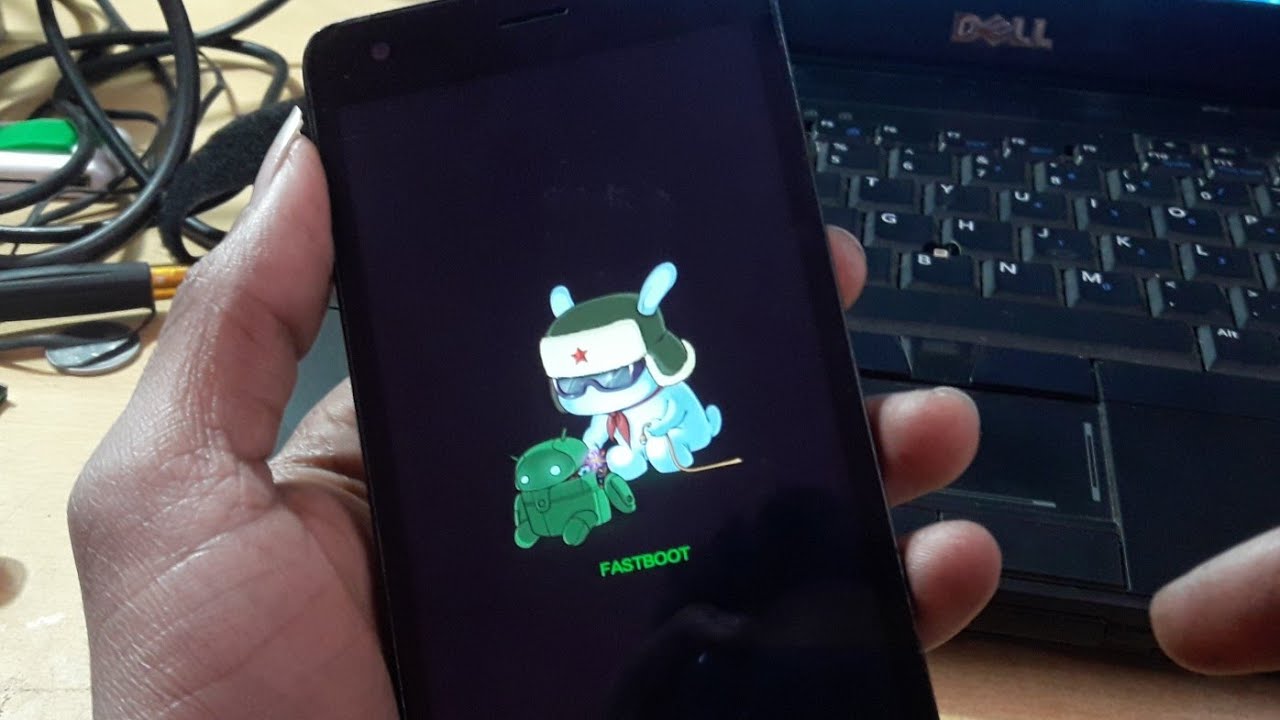
Step 4: Your Redmi 2 will now boot into Fastboot mode, displaying a Fastboot logo on the screen.
It’s important to note that entering Fastboot mode may vary slightly depending on the device model and manufacturer. However, the steps mentioned above should work for most Redmi 2 devices. If you’re having trouble entering Fastboot mode, consult your device’s user manual or search for specific instructions for your device model.
Using Fastboot Commands
Once you have successfully booted into Fastboot mode on your Redmi 2, you can start using various Fastboot commands to perform advanced operations on your device. These commands allow you to flash custom recoveries, unlock the bootloader, install custom ROMs, and more. Here are some commonly used Fastboot commands and how to use them:
1. Fastboot devices: This command is used to check if your device is being recognized by Fastboot. Simply open the command prompt or terminal, navigate to the directory where Fastboot is installed, and type “fastboot devices. If your device is listed, it means it is successfully connected in Fastboot mode.
2. Fastboot flash recovery: If you want to install a custom recovery like TWRP or CWM, you can use this command. Make sure you have the recovery.img file in the same directory as Fastboot, then open the command prompt or terminal, navigate to that directory, and type “fastboot flash recovery recovery.img” to flash the recovery.
3. Fastboot oem unlock: This command allows you to unlock the bootloader of your Redmi 2. Unlocking the bootloader is necessary if you want to install a custom ROM or root your device. Simply open the command prompt or terminal, navigate to the Fastboot directory, and type “fastboot oem unlock”. Follow the on-screen instructions to unlock the bootloader.
4. Fastboot reboot: This command is used to reboot your device. After flashing a custom recovery or performing other operations, you can use “fastboot reboot” to restart your Redmi 2 and apply the changes. Make sure your device is still connected in Fastboot mode when using this command.
5. Fastboot erase: If you want to erase specific partitions on your device, you can use the “fastboot erase” command. For example, “fastboot erase userdata” will erase the user data partition, while “fastboot erase cache” will erase the cache partition. Be cautious when using this command, as it will delete all the data in the specified partition.
6. Fastboot getvar: If you want to check various information about your device, such as the bootloader status or the device model, you can use the “fastboot getvar” command. For example, “fastboot getvar unlocked” will display whether the bootloader is unlocked, while “fastboot getvar product” will show the device model.
These are just a few examples of the commands you can use in Fastboot mode on your Redmi 2. It’s important to note that incorrect usage of Fastboot commands can potentially brick your device, so make sure to double-check the commands and follow the instructions carefully. It’s also recommended to do thorough research and backup your device before attempting any advanced operations.
Conclusion
In conclusion, learning how to fastboot in Redmi 2 is a valuable skill for any smartphone enthusiast or user. Fastboot mode allows you to troubleshoot and make changes to your device that may be otherwise inaccessible. Understanding the steps involved in booting your Redmi 2 into fastboot mode is essential for tasks such as flashing custom ROMs, unlocking the bootloader, or resolving software issues.
By following the instructions provided in this article, you can confidently enter fastboot mode on your Redmi 2 and take advantage of the powerful functionalities it offers. Remember to exercise caution when making any changes to your device and ensure that you have a backup of your data before proceeding. With this knowledge, you can fully explore and customize your Redmi 2, unlocking its full potential.
FAQs
Q: What is Fastboot in Redmi 2?
Fastboot is a special mode available in Redmi 2 devices that allows users to perform various operations on their smartphones, such as flashing custom ROMs, installing custom recoveries, and unlocking the bootloader. It provides a direct interface between the smartphone and the computer, enabling advanced troubleshooting and modification.
Q: How do I enter Fastboot mode in Redmi 2?
To enter Fastboot mode in Redmi 2, follow these steps:
1. Power off your Redmi 2 device.
2. Press and hold the Volume Down button and the Power button simultaneously.
3. Release the buttons when the Fastboot logo appears on the screen.
4. Your Redmi 2 device is now in Fastboot mode.
Q: What can I do in Fastboot mode?
In Fastboot mode, you can perform various operations, including:
1. Flashing custom ROMs: Install custom firmware to enhance your device’s performance and unlock additional features.
2. Installing custom recoveries: Use custom recoveries like TWRP or CWM to perform advanced backups, restores, and system modifications.
3. Unlocking the bootloader: Unlocking the bootloader allows you to customize your device’s software and install unofficial software.
4. Flashing system updates: Install official software updates provided by the device manufacturer.
Please note that performing these operations incorrectly can lead to device damage or loss of data. Ensure that you have proper knowledge and backup your data before proceeding.
Q: How can I flash a custom ROM in Fastboot mode?
To flash a custom ROM in Fastboot mode, follow these steps:
1. Ensure that you have a compatible custom ROM for your Redmi 2 device.
2. Connect your Redmi 2 to your computer using a USB cable.
3. Open the command prompt or terminal on your computer and navigate to the directory where the custom ROM files are located.
4. Enter the Fastboot mode by following the steps mentioned earlier.
5. In the command prompt or terminal, enter the fastboot flash command followed by the name of the custom ROM file.
6. Wait for the flashing process to complete and then reboot your device.
Note: Flashing a custom ROM can void your device’s warranty, so proceed with caution and ensure you have a backup of your data.
Q: Can I revert back to the original software after flashing a custom ROM in Fastboot mode?
Yes, you can revert back to the original software after flashing a custom ROM in Fastboot mode. To do so, you need to find the stock firmware for your specific Redmi 2 model and follow the steps provided by the device manufacturer to flash the stock ROM. It is crucial to carefully follow the instructions and ensure that you have the correct stock firmware to avoid any issues during the flashing process.