
Do you often find yourself overwhelmed by the amount of text you need to read on your iPhone? Whether it’s long articles, important emails, or even your favorite book, sometimes it can be challenging to give your full attention to every word. But what if there was a way to have your iPhone read the text aloud to you, giving your eyes a break and allowing you to multitask or simply enjoy a more immersive experience?
In this article, we will explore the various methods and tools available to have your iPhone read text for you. From built-in accessibility features to third-party apps, we’ll guide you step-by-step through the process of enabling and customizing text-to-speech on your iPhone. Say goodbye to eye strain and let your iPhone lend you its voice, making your reading experience more accessible and convenient than ever before.
Inside This Article
- Method 1: Using the Accessibility Feature
- Method 2: Using the Voice Control Feature
- Method 3: Using Third-Party Apps
- Method 4: Using the Siri Shortcut Feature
- Tips for a Better Text-to-Speech Experience
- Conclusion
- FAQs
Method 1: Using the Accessibility Feature
If you own an iPhone and want to have it read text for you, you’re in luck! Apple provides a built-in accessibility feature that allows you to enable text-to-speech functionality easily. This incredibly useful feature can be a game-changer for those with visual impairments or anyone looking for a convenient way to have text read out loud.
To access the accessibility feature, follow these simple steps:
- Open the “Settings” app on your iPhone.
- Scroll down and tap on “Accessibility.”
- Tap on “Spoken Content.”
- Next, tap on “Voices” to choose the preferred voice for text-to-speech.
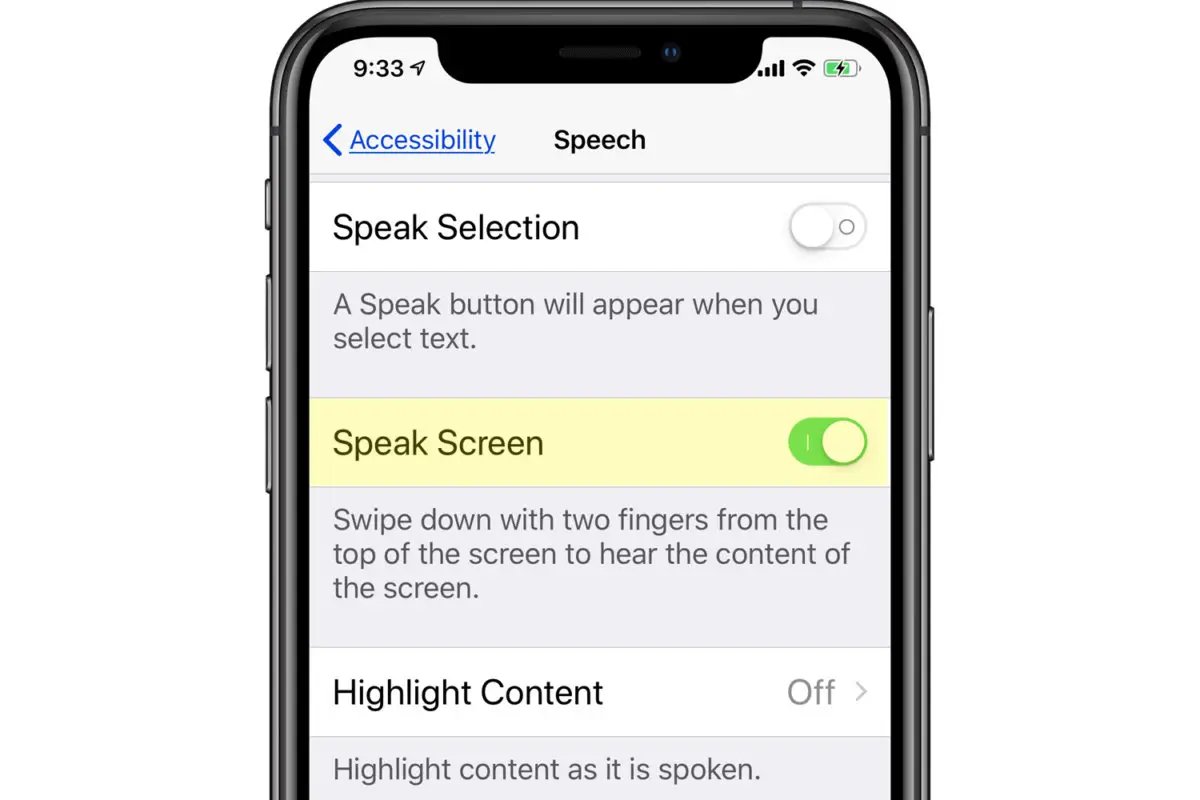
- Toggle the switch next to “Speak Selection” or “Speak Screen” to enable the feature.
Once you have enabled the text-to-speech feature, you can use it in different ways:
- Speak Selection: When enabled, you can select any text on your iPhone and tap on the “Speak” option in the context menu that appears.
- Speak Screen: With this feature enabled, you can have your entire screen read to you by swiping down with two fingers from the top of the screen.
With the accessibility feature, your iPhone can read articles, emails, books, and more, allowing you to absorb information hands-free. Whether you want to catch up on your favorite blog post while doing household chores or have important documents read to you while on the go, this feature can be a lifesaver.
Remember to adjust the speaking rate and language as per your preference by going back to the “Spoken Content” settings. You can also customize other settings, such as highlighting words as they are spoken, for a more tailored experience.
Using the accessibility feature on your iPhone opens up a world of possibilities, making technology even more accessible and user-friendly. Take advantage of this incredible feature and let your iPhone do the reading for you!
Method 2: Using the Voice Control Feature
If you’re an iPhone user, you’re in luck! One of the fantastic features available to you is the Voice Control feature, which can be incredibly useful when you want your iPhone to read text to you. Whether you want to listen to an article, a long email, or even a book, the Voice Control feature has got you covered.
With the Voice Control feature, you can control your iPhone using just your voice. It allows you to navigate through apps, compose text messages, and even have your iPhone read out loud any text displayed on the screen. It provides an intuitive and hands-free way to access and interact with your device.
To activate the Voice Control feature, go to your iPhone’s Settings and tap on “Accessibility.” From there, select “Voice Control” and toggle the switch to enable it. You can also assign a custom phrase to activate the Voice Control feature by selecting “Customize Commands.”
Once Voice Control is enabled, you can simply say “Read Text” to have your iPhone read the text on the screen aloud. This feature is compatible with various apps, including Safari, Messages, Mail, and more. Just open the desired app and navigate to the text you want to be read, then activate Voice Control and say the command.
Aside from reading text, the Voice Control feature also supports various commands that allow you to interact with your iPhone using your voice. You can ask it to open apps, make calls, play music, and even control settings. With Voice Control, your iPhone becomes a true personal assistant that follows your voice commands.
To enhance your experience with the Voice Control feature, it’s important to speak clearly and distinctly. Make sure to enunciate your words properly to ensure accurate recognition and interpretation by your device. Also, be aware that background noise or accents may affect the performance of Voice Control, so using it in a quiet environment is recommended.
The Voice Control feature on your iPhone gives you the flexibility to listen to text whenever you need without straining your eyes or requiring you to read it yourself. Whether you’re driving, exercising, or simply multitasking, this feature makes it convenient to access information using only your voice.
So, the next time you want to have your iPhone read text to you, remember to take advantage of the Voice Control feature. It’s a powerful tool that brings accessibility and convenience to your iPhone experience.
Method 3: Using Third-Party Apps
If you’re looking for alternative options to have your iPhone read text, you can consider using third-party apps. These apps are designed to provide enhanced features and functionality for text-to-speech conversion. Here are a few popular third-party apps that you can explore:
- Voice Dream Reader: Voice Dream Reader is a versatile app that supports multiple file formats, including PDF, DOC, and eBooks. It offers a wide range of customization options for voice, reading speed, and highlighting. You can also sync the app with cloud storage services like Dropbox or Google Drive.
- NaturalReader: NaturalReader is another popular app that allows you to convert text into spoken words. It supports various document types, including PDF, TXT, and Word documents. The app offers a pleasant reading experience with its natural-sounding voices and adjustable reading speed.
- Read4Me: Read4Me is a user-friendly app that enables you to have your iPhone read text aloud. It supports different formats like TXT, PDF, and HTML. You can easily import files from your device or through cloud storage services. The app also includes useful features such as bookmarking and text highlighting.
Before using any third-party app, make sure to read reviews, check the compatibility with your iPhone model, and consider any additional costs or in-app purchases that may be required. It’s also a good idea to try out the app’s free version or trial period, if available, before committing to a paid subscription.
These third-party apps can be a great way to enhance your text-to-speech experience on your iPhone. Whether you’re a student, visually impaired individual, or simply looking for a convenient way to have your text read aloud, these apps offer versatility and customization options to suit your needs.
Method 4: Using the Siri Shortcut Feature
If you’re an iPhone user, you’re probably familiar with Siri, your virtual assistant. Siri is not only capable of answering questions and performing tasks but can also be used to read text out loud. With the Siri Shortcut feature, you can create custom voice commands to trigger the text-to-speech function. This method allows you to have your iPhone read text effortlessly.
Setting up Siri Shortcuts to read text is easy. Here’s how you can do it:
- Open the Shortcuts app on your iPhone. If you don’t have it installed, you can download it from the App Store.
- Tap on the “+” button to create a new shortcut.
- Select “Add Action” to choose the actions you want your shortcut to perform.
- Search for “Speak Text” and select it. This action will enable Siri to read the text.
- Customize the shortcut by entering the text you want Siri to read.
- Tap on the play button to test the shortcut and ensure it’s working correctly.
- Once you’re satisfied, tap on “Done” to save the shortcut.
With the Siri Shortcut feature in place, you can assign a specific phrase or command to activate the text-to-speech function. For example, you can configure Siri to read incoming messages by saying, “Read my messages,” or have it read an article by saying, “Read this article.”
By using Siri Shortcut, you can conveniently have your iPhone read important emails, documents, articles, eBooks, and more. This feature not only saves you time but also allows you to multitask while listening to the content you need.
Remember that to use the Siri Shortcut feature effectively, you need to ensure your iPhone is running on iOS 12 or later. Additionally, make sure you grant the necessary permissions to the Shortcuts app so it can access and read text from different applications.
Now that you know how to use the Siri Shortcut feature to have your iPhone read text, you can make the most out of this valuable tool. Whether you’re looking to catch up on your favorite articles, review important documents, or simply enjoy a hands-free reading experience, Siri Shortcut has you covered.
Tips for a Better Text-to-Speech Experience
Text-to-speech technology has revolutionized the way we consume content on our devices. It allows our phones to read out text, making it accessible to those with visual impairments or those who prefer to listen rather than read. If you want to enhance your text-to-speech experience, here are some tips to keep in mind:
1. Choose a High-Quality TTS Voice: The voice that reads the text can greatly impact your listening experience. Most devices offer a variety of voices to choose from, including different accents and languages. Experiment with different options until you find the voice that is most comfortable and easy to understand for you.
2. Adjust the Reading Speed: TTS technology allows you to control the speed at which the text is read. Some people prefer a faster pace, while others prefer a slower one. Find the reading speed that suits your preference and allows you to follow along without feeling rushed or bored.
3. Pay Attention to Pronunciation: TTS engines may not always pronounce words correctly, especially for uncommon or technical terms. If you frequently come across mispronunciations, consider using phonetic spellings or learning the pronunciation of specific words to ensure a more accurate reading.
4. Break Up Text into Smaller Parts: Listening to a large block of text can be overwhelming. If possible, break up long paragraphs into smaller chunks or use bullet points and subheadings to help the TTS engine pause and divide the content more naturally. This will make it easier for you to follow along and remember key points.
5. Use Text Formatting to Enhance Clarity: The formatting of the text can significantly impact how it is read by TTS technology. Use proper punctuation, capitalization, and formatting such as bold or italic to help the TTS engine understand the intended emphasis and convey the meaning more accurately.
6. Minimize Background Noise: Listening to text being read out can be challenging if there is a lot of background noise. Find a quiet environment or use headphones to minimize distractions and enhance your listening experience. This will allow you to focus more on the content being read.
7. Customize the TTS Settings: Most devices and apps offer settings that allow you to customize various aspects of the TTS experience. Take some time to explore these settings and adjust them according to your preferences. You may be able to change the pitch, volume, or even the intonation of the TTS voice to make it sound more natural to you.
8. Take Breaks and Rest Your Ears: Extended periods of listening to TTS can strain your ears. Remember to take frequent breaks and rest your ears to prevent fatigue. Take advantage of the pause or stop button to give yourself short intervals of silence and allow your ears to recover.
By following these tips, you can enhance your text-to-speech experience and make it more enjoyable and personalized. Whether you’re using it for accessibility purposes or simply prefer to listen rather than read, a better text-to-speech experience awaits!
Conclusion
In conclusion, having the ability to make your iPhone read text aloud can greatly enhance its functionality and convenience. Whether you have visual impairments, prefer a hands-free approach, or simply want to listen to your articles, messages, or documents while on the go, the iPhone’s text-to-speech feature is a valuable tool. By following the steps outlined in this article, you can quickly and easily enable this feature and start enjoying the benefits it provides.
Never again will you have to strain your eyes to read small text or interrupt your activities to read incoming messages. With your iPhone reading text aloud, you can multitask, stay informed, and make the most of your device. So, go ahead and give it a try – you may find that it becomes an indispensable part of your iPhone experience.
FAQs
1. Can I have my iPhone read text to me?
Yes, you can! The iPhone has a feature called “Speak Screen” that allows it to read the text on your screen out loud. This can be incredibly helpful for those who have difficulty reading or prefer to have content read aloud to them. To activate this feature, go to Settings, select Accessibility, tap on Spoken Content, and enable the Speak Screen option. Then, swipe down with two fingers from the top of the screen to have your iPhone read the text to you.
2. Can I choose the speed and voice of the text-to-speech feature on my iPhone?
Absolutely! The text-to-speech feature on the iPhone allows you to customize the speed and voice to your preference. To adjust the speed, go to Settings, select Accessibility, tap on Spoken Content, and adjust the Speaking Rate slider. As for the voice, you can choose from a variety of options, including different accents and languages, by selecting Voices in the Spoken Content menu.
3. Can I use the text-to-speech feature for any app or webpage on my iPhone?
The text-to-speech feature can be used in most apps and webpages on your iPhone. However, it may depend on the app or website’s compatibility with the iOS accessibility settings. Generally, if an app or webpage supports Apple’s built-in accessibility features, the text-to-speech feature should work seamlessly.
4. How can I make my iPhone read specific text on a webpage or document?
To make your iPhone read specific text on a webpage or document, you can use the “Speak Selection” feature. First, select the text you want to be read by tapping and holding on it until the selection handles appear. Then, tap on the “Speak” option in the context menu. Your iPhone will start reading the selected text out loud.
5. Is there a way to have my iPhone read text in a different language?
Yes, you can have your iPhone read text in a language other than the default language. To do this, go to Settings, select Accessibility, tap on Spoken Content, and choose Voices. From there, select the desired language and voice. Your iPhone will then be able to read text in that specific language.