
Do you often find yourself struggling to read small text on your iPhone or iPad? Well, worry no more! The magnifier feature on your iPhone and iPad can help you zoom in on text, making it easier for you to read, especially if you have visual impairment or difficulty seeing smaller fonts.
In this article, we will guide you on how to use the magnifier feature on your iPhone and iPad, step-by-step. Whether you need to enlarge text in a book, menu, or any other document, the magnifier feature can come to your rescue. So, let’s dive in and explore how to make the most of this handy tool.
Inside This Article
- Understanding the Magnifier Tool
- How to Enable the Magnifier Tool
- Using the Magnifier Tool on your iPhone
- Using the Magnifier Tool on your iPad
- Adjusting Magnifier Settings
- Helpful Tips for Using the Magnifier Tool
- Troubleshooting the Magnifier Tool
- Conclusion
- FAQs
Understanding the Magnifier Tool
The magnifier tool is a useful feature available on both iPhones and iPads that can assist in various tasks such as reading small text, examining objects closely, or even capturing clear images of documents. This tool essentially turns your device into a portable magnifying glass, making it easier to see details that may otherwise be difficult to discern.
With the magnifier tool, you can zoom in on objects or text, adjust the brightness and contrast to enhance visibility, and even capture images for further reference. Whether you have trouble with small print, need to examine fine details, or just want to take a closer look at something, the magnifier tool can be a valuable companion.
One of the great advantages of the magnifier tool is its accessibility. It can be easily accessed from the home screen or the control center, making it readily available whenever you need it. Additionally, the tool offers various customization options, allowing you to tailor the settings to your specific needs and preferences.
The magnifier tool utilizes the device’s camera to provide a real-time view of any object or text you wish to magnify. By simply pointing your iPhone or iPad camera at the subject, you can instantly zoom in and explore the details in a clear and magnified view.
This tool can come in handy in a variety of situations. For example, if you are struggling to read a restaurant menu or decipher small text on product labels, you can easily activate the magnifier tool to enlarge the text and make it more legible. Furthermore, if you are inspecting intricate details on a piece of artwork or jewelry, the magnifier tool can provide a close-up view, helping you appreciate the craftsmanship.
Understanding how to use the magnifier tool is the first step in taking advantage of its capabilities. In the following sections, we will walk you through enablement, functionality, helpful tips, and troubleshooting steps to ensure a seamless experience with this valuable tool.
How to Enable the Magnifier Tool
If you have an iPhone or iPad and want to take advantage of the magnifier tool, you’ll be pleased to know it’s a simple process to enable it. The magnifier tool allows you to zoom in and get a closer look at things such as text, small objects, or even a QR code. To enable the magnifier tool, follow the steps below.
1. Open the “Settings” app on your iPhone or iPad. You can find the app icon on your home screen, resembling a gear.
2. Scroll down and tap on “Accessibility”. This option is typically located in the third group of settings.
3. In the Accessibility menu, tap on “Magnifier”. You may need to scroll down to find it.
4. Toggle the switch next to “Magnifier” to turn it on. When the switch turns green, you’ll know it’s enabled.
5. Optional: Adjust the magnifier settings to suit your preferences. You can customize options such as auto-brightness, contrast, and the appearance of the magnifier button.
That’s it! You’ve successfully enabled the magnifier tool on your iPhone or iPad. Now you can start using it whenever you need a closer look at something. In the next sections, we’ll explore how to use the magnifier tool on both your iPhone and iPad.
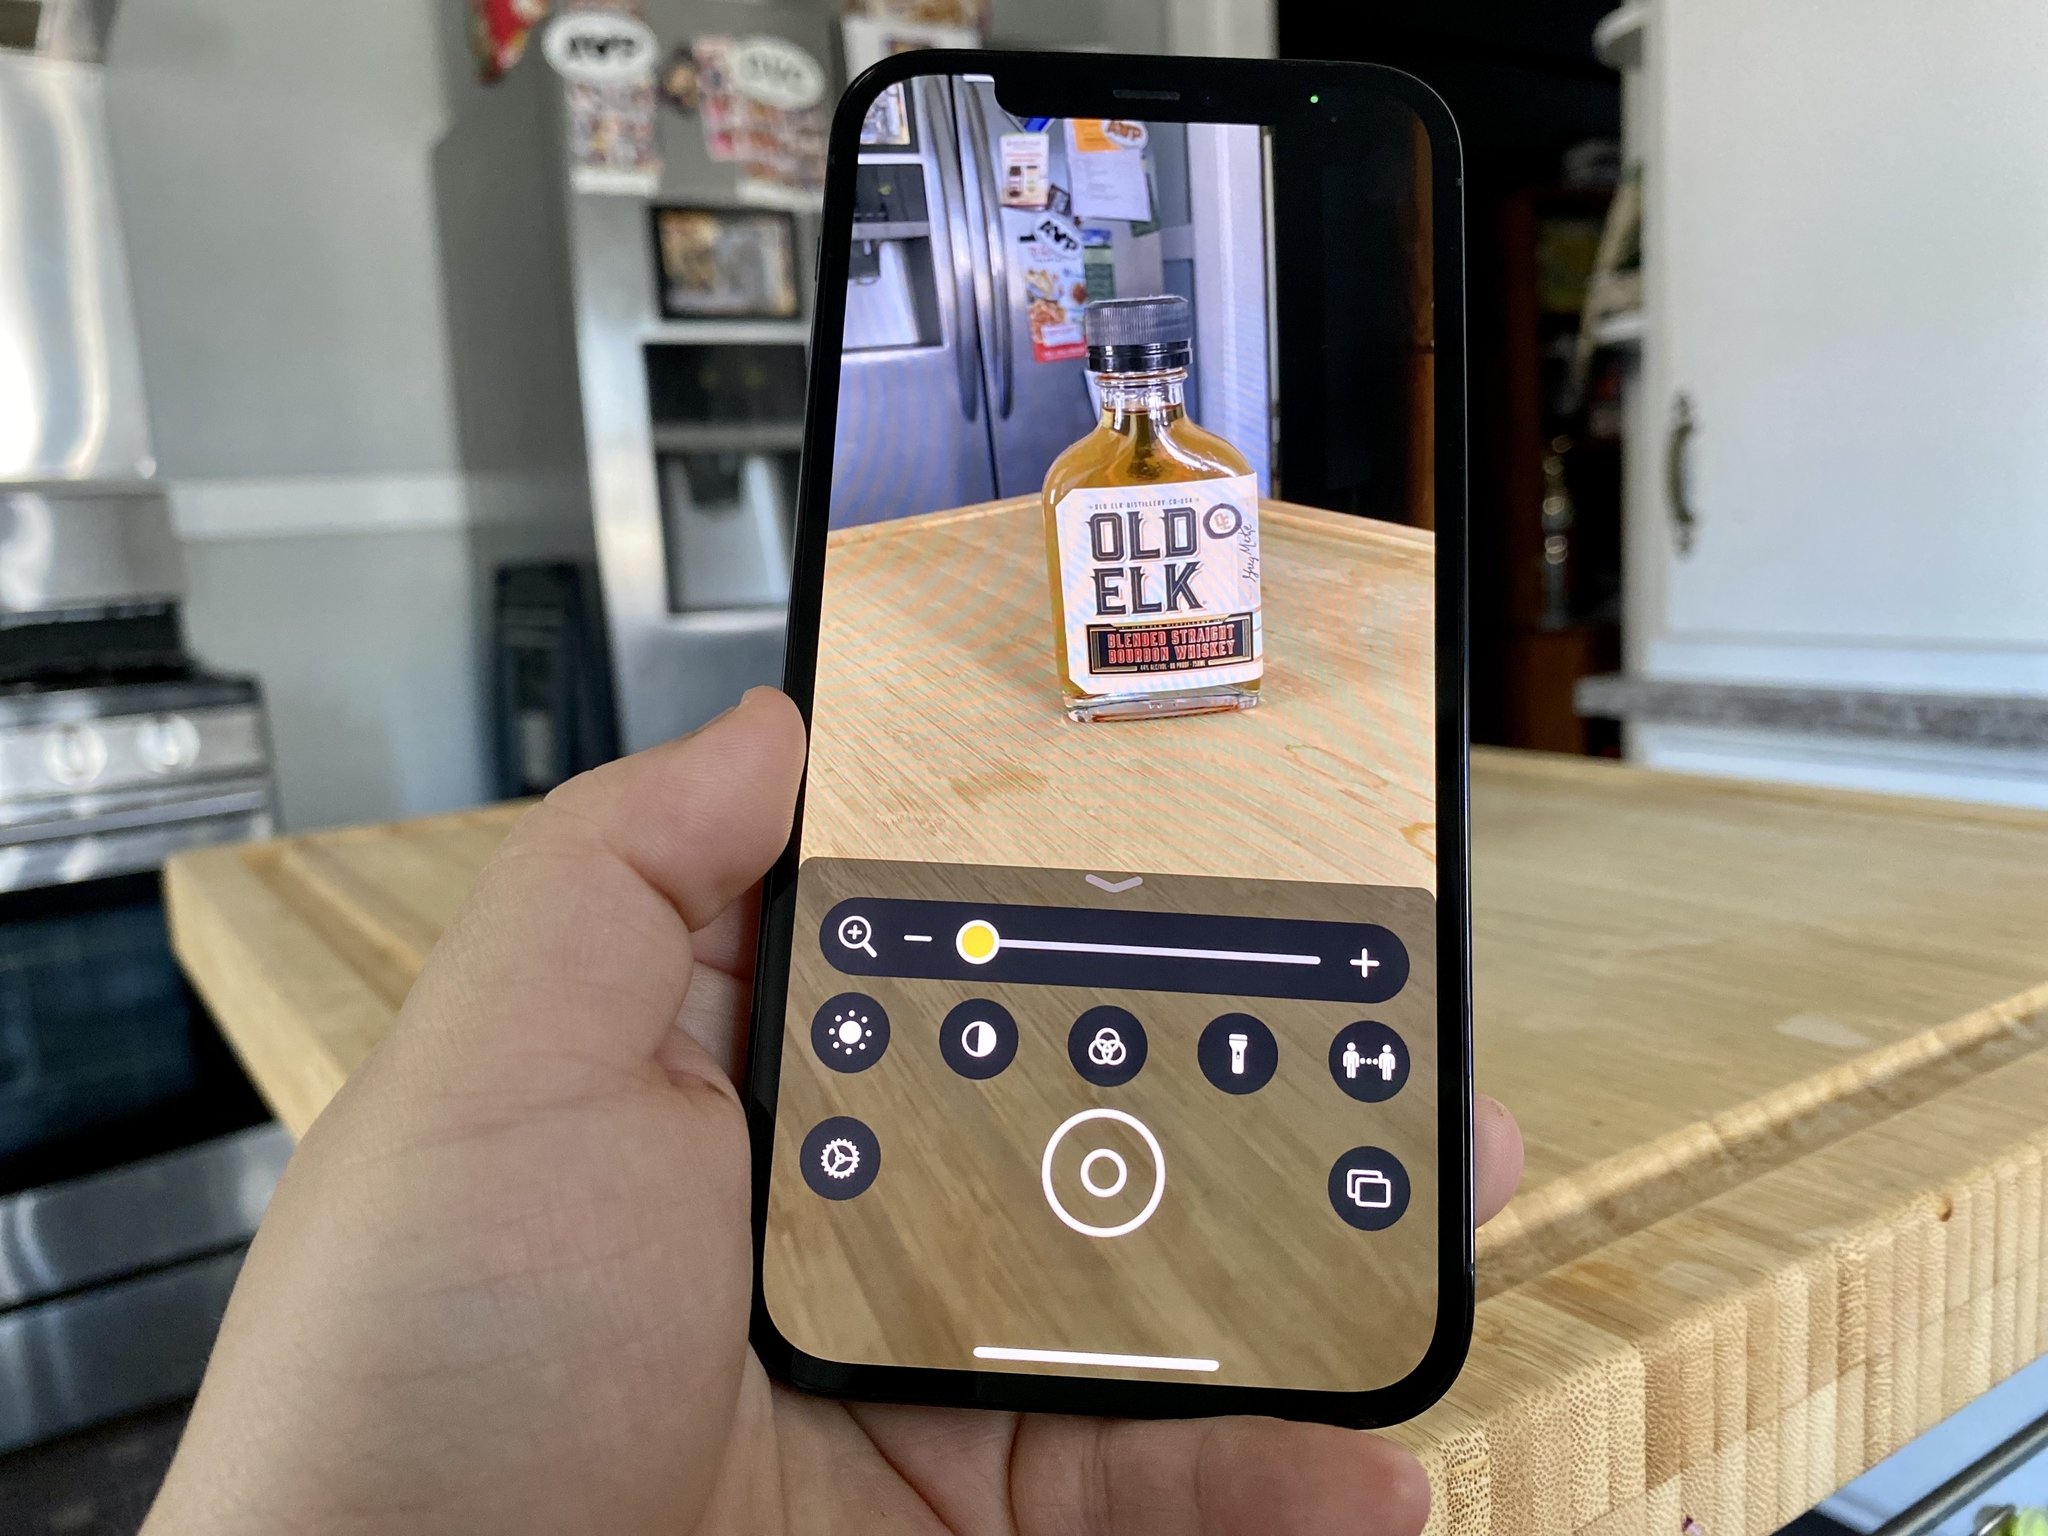
Using the Magnifier Tool on your iPhone
The Magnifier Tool on your iPhone is a handy feature that allows you to magnify objects and texts in real-time, providing enhanced visibility and clarity. Whether you have trouble reading small print, need to examine intricate details, or simply want to get a closer look at something, the Magnifier Tool is there to assist you.
To access the Magnifier Tool on your iPhone, follow these simple steps:
- Open the Settings app on your iPhone.
- Scroll down and tap on “Accessibility”.
- Tap on “Magnifier” under the Vision section.
- Toggle the switch to turn on the Magnifier feature.
Once you have enabled the Magnifier Tool, you can easily access it from the Control Center. To open the Control Center, swipe down from the top right corner of the screen on iPhone X or newer models, or swipe up from the bottom on older iPhone models.
In the Control Center, look for the Magnifier icon, which looks like a magnifying glass. Tap on the icon to open the Magnifier Tool.
When the Magnifier Tool is open, you can use your iPhone’s camera to magnify objects or texts. Simply point your iPhone’s camera at the item you want to magnify, and adjust the magnification level by using the slider at the bottom of the screen.
If you need to freeze the image to examine it more closely, tap the lock icon at the bottom of the screen. This will hold the image in place, allowing you to zoom in and explore the details.
The Magnifier Tool also offers additional features to assist you further. By tapping the flash icon, you can turn on the flash to illuminate objects in low light conditions.
Moreover, you can apply various color filters to enhance visibility for individuals with color blindness or visual impairments. To access the color filters, tap the filter icon and choose the filter that best suits your needs.
To exit the Magnifier Tool, simply press the home button or swipe up from the bottom of the screen.
Using the Magnifier Tool on your iPhone can be incredibly helpful in a variety of situations, from reading small labels and menus to examining fine print or even finding lost objects.
It’s important to note that not all iPhone models support the Magnifier Tool. To check if your iPhone is compatible, follow the above steps to access the Magnifier settings. If you don’t see the Magnifier option, it means that your device does not support this feature.
Now that you know how to use the Magnifier Tool on your iPhone, take advantage of this useful accessibility feature and enjoy enhanced visual capabilities.
Using the Magnifier Tool on your iPad
The magnifier tool on your iPad is a powerful feature that allows you to zoom in on objects and text, making it easier to see the details. Whether you have low vision or simply need a closer look at something, the magnifier tool can be incredibly helpful.
To access the magnifier tool on your iPad, follow these steps:
- Open the Settings app on your iPad.
- Tap on “Accessibility” in the left-hand menu.
- Scroll down and select “Magnifier” from the list of options.
- Toggle the switch to enable the magnifier tool.
Once you have enabled the magnifier tool, you can easily access it by triple-clicking the home button or sidebar button (depending on your iPad model).
When the magnifier tool is activated, your iPad’s camera will launch, and you will see a magnified viewfinder on the screen. You can now use your iPad’s camera to zoom in on objects and text.
Here are a few tips for using the magnifier tool effectively on your iPad:
- Adjust Magnification: By using the slider at the bottom of the screen, you can adjust the level of magnification. Move the slider to the right to zoom in and to the left to zoom out.
- AutoFocus and Lock Focus: If you’re having trouble getting a clear image, tap on the screen to autofocus. Once you have the desired focus, tap and hold on the screen to lock the focus so that it doesn’t change when you move the iPad.
- Turn on the Flash: In low-light situations, you can turn on the flash by tapping on the lightning bolt icon. This will provide better lighting to enhance visibility.
- Freeze Frame: If you need to examine something more closely or capture a picture, tap on the freeze frame button (camera icon). This will capture a still image that you can manipulate and zoom in on.
- Color Filters: If you have specific visual needs, you can apply color filters to the magnified image. Tap on the filter button (three overlapping circles) to select from a range of options.
Using the magnifier tool on your iPad can greatly improve your ability to see and interact with the world around you. Whether you’re reading small text, examining fine details, or getting a closer view of an object, the magnifier tool is a valuable feature that can assist you in many situations.
Remember to disable the magnifier tool when you’re done using it to conserve your battery life. Simply triple-click the home button or sidebar button and toggle off the magnifier option.
Now that you know how to use the magnifier tool on your iPad, you can take advantage of this powerful feature and make your iPad even more versatile and convenient to use.
Adjusting Magnifier Settings
The Magnifier tool on your iPhone and iPad comes with a variety of settings that allow you to customize your magnification experience. Here are some tips on how to adjust the magnifier settings to suit your needs:
1. Zoom Level: You can adjust the zoom level to control the level of magnification. To do this, open the Magnifier tool, and then use the slider at the bottom of the screen to increase or decrease the zoom level. Experiment with different zoom levels to find the one that works best for you.
2. Toggle Flashlight: If you’re using the Magnifier tool in a low-light environment, you can turn on the flashlight to improve visibility. To do this, simply tap the flashlight icon at the bottom left corner of the Magnifier screen. This will illuminate the area you’re magnifying, making it easier to see.
3. Lock Focus: By default, the Magnifier tool continuously autofocuses on the subject you’re magnifying. However, if you want to lock the focus on a specific object, you can do so by tapping and holding on the screen. This can be useful when you need to examine a particular item in detail without the focus shifting.
4. Change Filters: The Magnifier tool offers different filters that can enhance the visibility of text and objects. To switch between filters, tap on the filter icon at the bottom right corner of the Magnifier screen. You can choose from options like “Inverted Colors,” “Grayscale,” and “Yellow/Blue Filter.” Find the filter that works best for your visual needs.
5. Adjust Contrast: If you find it difficult to read text due to low contrast, you can adjust the contrast settings in the Magnifier tool. Tap on the “Settings” icon at the bottom right corner of the Magnifier screen, then select “Contrast” from the menu. Increase or decrease the contrast level until the text becomes more readable for you.
6. Enable Auto-Brightness: To ensure optimal visibility, you can enable the auto-brightness feature in the Magnifier tool. This allows the screen brightness to automatically adjust based on the lighting conditions around you. To enable auto-brightness, go to Settings > Accessibility > Magnifier, and toggle on the “Auto-Brightness” option.
7. Customize Shortcut: If you frequently use the Magnifier tool, you can customize a shortcut to quickly access it. Go to Settings > Accessibility > Accessibility Shortcut, and select “Magnifier” from the list of options. Now, when you triple-click the home button or the side button (iPhone X or newer), the Magnifier tool will open up instantly.
By adjusting the magnifier settings on your iPhone or iPad, you can optimize the functionality of the Magnifier tool and make it more personalized to your visual needs. Experiment with the settings and find the configuration that works best for you.
Helpful Tips for Using the Magnifier Tool
Using the magnifier tool on your iPhone or iPad can greatly enhance your visibility and make it easier to read small text or examine details. To ensure you make the most out of this handy feature, here are some helpful tips:
- Adjust the brightness: To get a clear and sharp magnified image, make sure to adjust the brightness of your device. You can do this by going to “Settings” > “Display & Brightness” and sliding the brightness bar to the desired level. A brighter screen will provide better visibility.
- Use the flashlight: In dimly lit environments, you can use the flashlight along with the magnifier tool to illuminate the object or text you want to magnify. Simply swipe up from the bottom of your device’s screen to access the Control Center, then tap the flashlight icon to turn it on.
- Lock the focus: If you need to maintain focus on a specific object or text, you can lock the focus in the magnifier tool. Just tap and hold on the screen until the yellow focus lock box appears. This way, you can move your device around without losing focus on the desired area.
- Adjust the magnification level: The magnifier tool allows you to adjust the level of magnification to suit your needs. You can do this by using the slider at the bottom of the magnifier screen. Slide it to the right to zoom in and to the left to zoom out. Experiment with different magnification levels to find what works best for you.
- Freeze the image: If you need to examine a specific part of the magnified image, you can freeze the screen to keep the image in place. Simply tap the freeze frame button located at the bottom left corner of the magnifier screen. This allows you to study the details without worrying about your hand movement.
- Adjust the contrast: In some cases, adjusting the contrast can make the magnified text or object easier to distinguish. You can change the contrast level by going to “Settings” > “Accessibility” > “Display & Text Size”. From there, you can experiment with different options and select the one that provides the best visibility for you.
- Enable color filters: For individuals with visual impairments or color blindness, enabling color filters can enhance the visibility and make the magnified image easier to perceive. You can enable color filters by going to “Settings” > “Accessibility” > “Display & Text Size” > “Color Filters”. From there, you can choose the filter that best suits your needs.
By following these helpful tips, you can make the most out of the magnifier tool on your iPhone or iPad. Whether you need to read small text, examine intricate details, or simply enhance your vision, the magnifier tool can be a valuable feature to have at your disposal.
Troubleshooting the Magnifier Tool
If you’re encountering any issues with the Magnifier tool on your iPhone or iPad, don’t worry! Here are some troubleshooting tips to help you resolve common problems:
1. Make sure Magnifier is enabled: Double-check that you have actually enabled the Magnifier tool on your device. Go to “Settings” on your iPhone or iPad, then tap on “Accessibility” and “Magnifier” to ensure it’s turned on.
2. Restart your device: Sometimes, a simple restart can fix minor glitches. Try turning off your device and then turning it back on to refresh the system.
3. Update your iOS: Keeping your device’s operating system up to date is important for optimal performance. Check if there are any available updates for your iOS and install them if needed.
4. Check for app updates: If you’re using a third-party magnifier app, ensure that you have the latest version installed. Developers frequently release updates to address bugs and improve compatibility.
5. Reset the Magnifier settings: If the Magnifier tool is not functioning as expected, you can try resetting its settings. Go to “Settings,” then navigate to “Accessibility,” “Magnifier,” and tap on “Reset Magnifier Settings.”
6. Clear storage space: If your device’s storage is nearing full capacity, it may cause performance issues with various apps, including the Magnifier tool. Delete any unnecessary files, apps, or photos to free up storage space.
7. Contact Apple Support: If none of the above steps helped resolve the issue, it’s advisable to reach out to Apple Support for further assistance. They have dedicated professionals who can provide personalized guidance and solutions to address your specific problem.
Remember, the troubleshooting steps may vary slightly depending on the model and iOS version you are using. If you continue to experience difficulties with the Magnifier tool, don’t hesitate to seek professional help to ensure a smooth user experience.
Conclusion:
In conclusion, the magnifier feature on your iPhone and iPad is a powerful tool that can greatly enhance your day-to-day activities. Whether you need to zoom in on small text, examine fine details, or even identify objects from a distance, the magnifier can provide the functionality you need.
By following the simple steps outlined in this article, you can easily activate and customize the magnifier to suit your specific needs. From adjusting the zoom level to enabling the flashlight, you have full control over how the magnifier operates.
So next time you find yourself struggling to read small print or needing a closer look at something, remember to utilize the magnifier on your iPhone or iPad. It’s a convenient and handy feature that can transform your device into a powerful visual aid.
FAQs
1. How do I access the magnifier on my iPhone?
To access the magnifier on your iPhone, simply go to the Settings app and tap on “Accessibility.” From there, select “Magnifier” and toggle it on. You can then access the magnifier by triple-clicking the home button or side button, depending on your iPhone model.
2. Can I adjust the zoom level in the magnifier?
Yes, you can adjust the zoom level in the magnifier. Once the magnifier is activated, you can use the slider at the bottom of the screen to zoom in or out to your desired level. This allows you to magnify text, images, or any other objects you need to see more clearly.
3. Can I change the visibility options in the magnifier?
Yes, you can change the visibility options in the magnifier. By tapping the “Settings” icon in the magnifier interface, you can adjust settings such as brightness and contrast to optimize the visibility of what you are magnifying. This customization enables you to make the magnified content easier to view in different lighting conditions.
4. Is there an option to freeze the magnified image?
Yes, there is an option to freeze the magnified image. To do this, simply tap the “Freeze” button at the bottom right corner of the magnifier interface. This allows you to capture and examine a magnified image without needing to hold your device steady. You can scroll or navigate within the frozen image to explore details conveniently.
5. Can I take a photo using the magnifier?
No, the magnifier does not have a built-in option to capture photos. However, you can use the freeze feature to capture a still image and then take a screenshot by pressing the home button and power button simultaneously. This will save the magnified image as a photo in your device’s Camera Roll, allowing you to refer to it later.