
Are you struggling to move music from your files to the Music app on your iPhone? If so, you’ve come to the right place. In today’s digital age, having music readily accessible on our mobile devices is essential. Whether you have a collection of downloaded songs or want to transfer music from your computer to your iPhone, this article will guide you through the process step-by-step. With our comprehensive instructions and tips, you’ll be able to seamlessly move your music files to the Music app on your iPhone and enjoy your favorite tunes on the go. So let’s dive in and discover how to make the most of your iPhone’s music capabilities!
Inside This Article
- How To Move Music From Files To Music On iPhone
- Using iTunes
- Using iCloud Drive
- Using third-party file transfer apps
- Using AirDrop
- Conclusion
- FAQs
How To Move Music From Files To Music On iPhone
Listening to music on your iPhone is an enjoyable experience, but sometimes finding the right app or file can be a bit confusing. If you have music files stored in your Files app and want to move them to the Music app on your iPhone, there are a few methods you can use to accomplish this. In this article, we will explore four different ways to move music from Files to Music on your iPhone. Whether you prefer using iTunes, iCloud Drive, third-party file transfer apps, or AirDrop, we’ve got you covered.
1. Using iTunes
If you have your music files saved on your computer, you can transfer them to your iPhone using iTunes. Connect your iPhone to your computer and open iTunes. Select your device and navigate to the “Music” tab. Check the box next to “Sync Music” and choose the files or playlists you want to transfer. Click on “Apply” to start the sync process. Once completed, you can open the Music app on your iPhone and all the transferred music will be available for you to enjoy.
2. Using iCloud Drive
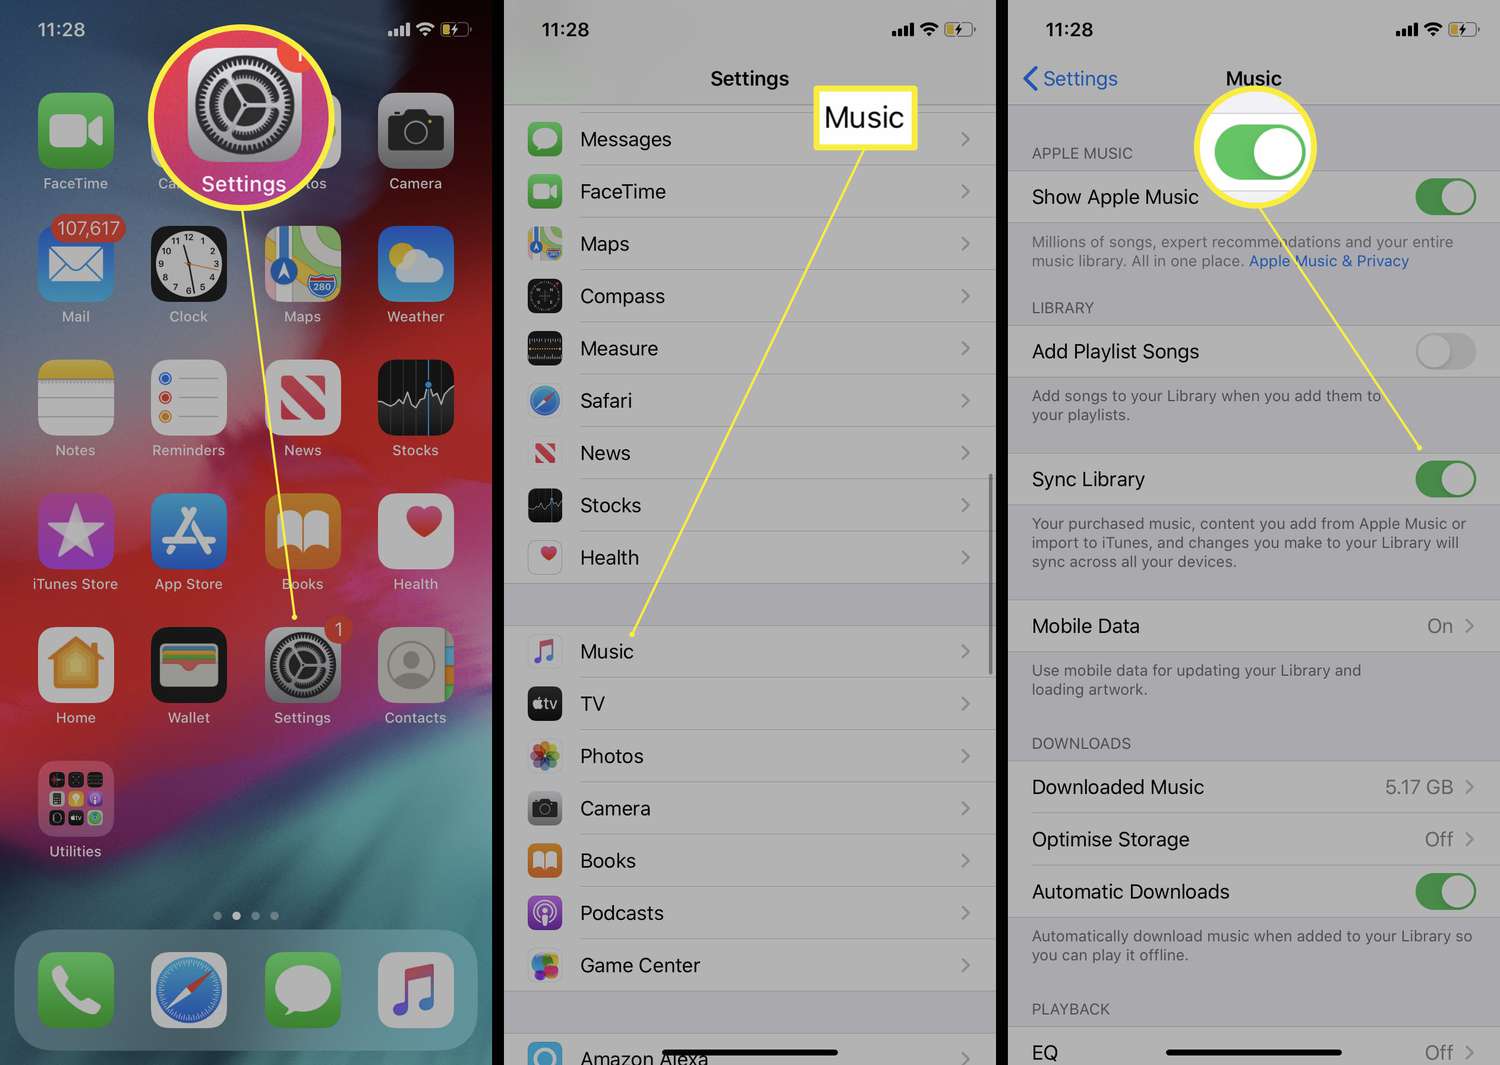
If your music files are stored in iCloud Drive, you can easily access them on your iPhone and move them to the Music app. Open the Files app on your iPhone and navigate to the folder where your music files are located. Tap and hold on the file you want to move, and select “Share” from the menu. Choose “Save to Files” and select the Music folder. The file will be saved to the Music app on your iPhone, and you can listen to it anytime without the need for an internet connection.
3. Using third-party file transfer apps
There are various third-party file transfer apps available on the App Store that allow you to transfer music files from Files to Music on your iPhone. One popular app is Documents by Readdle. Install the app on your iPhone and open the Files tab. Locate your music files and select the ones you want to transfer. Tap on the Share button and choose “Copy to Music”. The selected files will be moved to the Music app on your iPhone and you can enjoy them hassle-free.
4. Using AirDrop
If you have music files saved on another Apple device, you can use AirDrop to transfer them to your iPhone. Make sure both devices have AirDrop enabled and are in close proximity. Open the Files app on the sending device, navigate to the music files, and tap on the Share button. Choose your iPhone from the list of available devices. On your iPhone, accept the incoming AirDrop request. The music files will be transferred to the Music app on your iPhone, ready for you to listen to at your convenience.
With these four methods, you now have various options to move music from Files to Music on your iPhone. Choose the method that suits you best and enjoy your favorite tunes without any hassle. Get ready to immerse yourself in the world of music!
Using iTunes
If you want to move music from your files to the Music app on your iPhone, one of the most common and convenient methods is by using iTunes. iTunes is a multimedia software developed by Apple that allows you to manage and transfer files, including music, between your computer and iOS devices.
Here’s a step-by-step guide on how to use iTunes to move music from your files to the Music app on your iPhone:
-
Connect your iPhone to your computer
Using a USB cable, connect your iPhone to your computer and launch iTunes. Make sure you have the latest version of iTunes installed on your computer to ensure compatibility.
-
Select your iPhone
In the iTunes interface, click on the device icon located near the top-left corner of the window to select your iPhone. This will open the summary page for your iPhone.
-
Navigate to the Music tab
On the left-hand sidebar, click on “Music” under the “Settings” section. This will display the music syncing options for your iPhone.
-
Choose the music files to transfer
Next, choose the music files from your computer that you want to transfer to your iPhone. You can either select individual songs or entire playlists.
-
Initiate the transfer
Once you have selected the music files, click on the “Apply” or “Sync” button in the bottom-right corner of the iTunes window to initiate the transfer process. iTunes will start copying the selected music files to the Music app on your iPhone.
-
Wait for the transfer to complete
Depending on the size of the music files and the speed of your computer, the transfer process may take a few minutes. Ensure that your iPhone remains connected to your computer until the transfer is complete.
-
Synchronize your iPhone
After the transfer is complete, you can safely disconnect your iPhone from your computer. Open the Music app on your iPhone and you should see the transferred music files available for playback.
Using iTunes is a reliable and straightforward method to move music from your files to the Music app on your iPhone. It provides a seamless integration between your computer and iOS device, allowing you to enjoy your favorite songs wherever you go.
Using iCloud Drive
Another convenient way to move music from Files to the Music app on your iPhone is by utilizing iCloud Drive. iCloud Drive is a cloud storage service provided by Apple that allows you to access and organize your files across multiple devices.
Here’s how you can use iCloud Drive to transfer music:
- Ensure that you have iCloud Drive set up and enabled on both your iPhone and your computer.
- On your computer, open iCloud Drive and locate the music files you want to transfer. Make sure they are stored in a compatible audio format (e.g., MP3, AAC).
- Select the music files you want to move and drag them into the iCloud Drive folder.
- Wait for the files to upload to iCloud. This may take some time, depending on the size of the files and your internet connection speed.
- On your iPhone, open the Music app and go to the Library tab.
- Tap on the “Songs” or “Albums” option at the bottom of the screen, depending on how you prefer to organize your music.
- Scroll through your music library until you find the “Recently Added” section.
- Your transferred music files should appear in this section. Tap on a song or album to start playing.
With iCloud Drive, you can access your transferred music files from any Apple device signed in with the same iCloud account. This makes it easy to enjoy your favorite tunes wherever you go.
Note: Remember that using iCloud Drive requires an active internet connection, so make sure you have a stable Wi-Fi or cellular data connection to complete the transfer smoothly.
Using third-party file transfer apps
If you’re looking for a more convenient and flexible way to transfer music files from your computer to your iPhone, using third-party file transfer apps is an excellent option. These apps are specifically designed to make file transfer quick and hassle-free.
There are several popular third-party file transfer apps available for both iOS and Android devices. Some of the most commonly used apps include:
- iMazing: iMazing is a powerful file management tool that allows you to transfer music files, along with other types of media, between your computer and iPhone. It provides a user-friendly interface and offers advanced features like backup, restore, and file organization. With iMazing, you can easily transfer your music files from your computer to your iPhone with just a few clicks.
- Documents by Readdle: Documents by Readdle is another popular file transfer app that allows you to transfer music files to your iPhone. It also offers a built-in music player, which makes it convenient to organize and play your music directly from the app.
- File Transfer by Infinit: Infinit is a fast and secure file transfer app that supports transferring various types of files, including music. It uses a peer-to-peer technology to transfer files directly between devices, without the need for cloud storage or internet connection.
When using third-party file transfer apps, you’ll need to install the app on both your computer and iPhone. Once installed, follow the app’s instructions to establish a connection between the devices. Then, simply select the music files you want to transfer from your computer and initiate the transfer process within the app. The app will handle the rest, ensuring that your music files are safely and efficiently transferred to your iPhone.
Using third-party file transfer apps provides you with more flexibility and control over your music files. Whether you want to transfer individual songs or entire playlists, these apps offer a straightforward and efficient solution.
Using AirDrop
If you’re looking for a quick and seamless way to transfer music files from your computer to your iPhone, AirDrop is an excellent option. This native feature allows you to wirelessly share files between Apple devices effortlessly.
To use AirDrop to move music files from your computer to your iPhone, follow these steps:
- Make sure AirDrop is enabled on both your computer and iPhone. On your iPhone, swipe up from the bottom of the screen to open the Control Center and tap on the AirDrop icon. Set it to “Everyone” to ensure your devices can discover each other.
- On your computer, open the Finder or the file management application you use, and locate the music files you want to transfer.
- Select the music files you wish to send, right-click, and choose the “Share” option.
- In the Share menu, select your iPhone from the AirDrop section. If your iPhone isn’t appearing, make sure both devices are connected to the same Wi-Fi network and that Bluetooth is enabled.
- On your iPhone, you’ll receive a prompt to accept the incoming music files. Tap “Accept” to begin the transfer.
- Wait for the transfer to complete. The duration will depend on the size of the music files and the speed of your Wi-Fi connection.
- Once the transfer is finished, you can find the music files in the Music app on your iPhone.
AirDrop offers a convenient and hassle-free way to transfer music files from your computer to your iPhone, eliminating the need for cables or additional software. It is worth noting that AirDrop is only available on Apple devices running iOS 7 or later, and MacOS X Yosemite or later.
Keep in mind that AirDrop has a limited range, so ensure that your computer and iPhone are within close proximity for a successful transfer. Additionally, both devices need to have AirDrop functionality and be connected to the same Wi-Fi network for the feature to work.
So, if you’re tired of dealing with cables or complicated file transfer methods, give AirDrop a try. It’s a convenient and efficient way to move your music files from your computer to your iPhone with just a few taps.
Conclusion
Transferring music from files to the Music app on your iPhone is a simple and convenient process that allows you to carry your favorite tunes with you wherever you go. By using either iTunes or a third-party app like iMazing, you can easily manage and sync your music library, ensuring that you have access to your desired songs at all times.
Remember to organize your music files properly to avoid any confusion during the transfer process. You can use folders or playlists to group similar songs together and make navigation easier. Additionally, always keep your iPhone and computer up to date to ensure compatibility and enhance the overall user experience.
With just a few simple steps, you can enjoy your favorite music right on your iPhone, allowing you to create the perfect soundtrack for your daily activities. So go ahead, transfer those music files, and enjoy a seamless and immersive musical experience on your iPhone.
FAQs
1. Can I transfer music files to the Music app on my iPhone?
Yes, you can transfer music files to the Music app on your iPhone. There are several methods you can use, such as using iTunes, using cloud storage services, or transferring directly from your computer to your iPhone.
2. How do I transfer music files using iTunes?
To transfer music files using iTunes, you will need to connect your iPhone to your computer and open iTunes. Then, select your iPhone in iTunes and go to the “Music” tab. From there, you can choose to sync your entire music library or select specific songs, albums, or playlists to transfer to your iPhone.
3. Can I use cloud storage services to transfer music files to my iPhone?
Yes, you can use cloud storage services like iCloud, Google Drive, or Dropbox to transfer music files to your iPhone. Simply upload your music files to the cloud service from your computer and then download the files on your iPhone using the respective app. Make sure you have the appropriate app installed on your iPhone to access the files.
4. Is it possible to transfer music files wirelessly to my iPhone?
Yes, you can transfer music files wirelessly to your iPhone. There are various wireless transfer apps available that allow you to transfer music files from your computer to your iPhone without the need for a physical connection. These apps typically work through a shared Wi-Fi network or Bluetooth connection.
5. Are there any third-party apps that can help me transfer music files to my iPhone?
Yes, there are several third-party apps available that can assist you in transferring music files to your iPhone. Some popular options include Documents by Readdle, iMazing, and AnyTrans. These apps offer additional features and flexibility compared to the standard iTunes method, making it easier to manage and transfer your music files.