
Are you tired of listening to the same old music on your iPhone or iPad? Do you want to free up some space by deleting unwanted songs? Well, you’ve come to the right place! In this step-by-step guide, we will walk you through the process of deleting music from your iPhone or iPad. Whether you no longer enjoy a particular song or simply want to make room for new tracks, we’ve got you covered. With just a few taps, you’ll be able to remove unwanted music from your device and create a more personalized music collection. So, let’s dive right in and discover how to delete music from your iPhone or iPad!
Inside This Article
- Benefits of Deleting Music from Your iPhone or iPad
- Step 1: Open the Music App
- Step 2: Select the Music to Delete
- Step 3: Swipe Left to Delete
- Step 4: Confirm Deletion
- Step 5: Empty Recently Deleted Album
- Conclusion
- FAQs
Benefits of Deleting Music from Your iPhone or iPad
Deleting music from your iPhone or iPad can bring several benefits and improve your overall device performance and storage capacity. Here are some key advantages of deleting music from your device:
1. Free up storage space: Music files can take up a significant amount of space on your device, especially if you have a large music library. By deleting unnecessary or less frequently listened to songs, you can create more room for other apps, photos, videos, and files.
2. Improve device performance: Having a cluttered music library with a large number of songs can sometimes slow down your device’s performance. By removing excess music files, you can help optimize your device’s speed and responsiveness.
3. Organize your music library: Over time, your music library can become filled with songs that you no longer listen to or need. Deleting these songs allows you to keep your library more organized and makes it easier to navigate and find the music you truly enjoy.
4. Reduce data consumption: If you frequently stream music on your device, having a large music library can result in higher data consumption, especially if you’re streaming over cellular networks. By deleting songs you no longer listen to, you can reduce data usage and potentially save on your mobile data plan.
5. Syncing and backup benefits: When syncing your device with iTunes or backing up your device to iCloud, having a smaller music library can significantly reduce the time it takes for these processes to complete. This can be particularly helpful if you have a large music collection and frequently sync or backup your iPhone or iPad.
6. Focus on favorite songs: Deleting less favorite or rarely played songs allows you to focus on the music you truly enjoy. It can provide a more personalized and curated listening experience, making it easier to find and play your favorite tracks.
7. Improve battery life: Playing music consumes battery life. By reducing the number of songs on your device, you can extend your battery life, as the device won’t need to constantly scan and access a large music library.
By considering these benefits, you can make an informed decision about deleting music from your iPhone or iPad and optimize your device’s performance and storage capacity.
Step 1: Open the Music App
Deleting music from your iPhone or iPad is a straightforward process that begins with opening the Music app. This app comes pre-installed on all iOS devices and is represented by a classic “musical note” icon. Here’s how you can easily access it:
- Locate and tap on the Music app icon on your home screen. It’s typically found on the first page or in the “Utilities” folder.
- Once you tap on the Music app, it will open to the main screen, displaying various tabs such as “Library,” “Recently Added,” and “Playlists.”
- Now, you’re ready to proceed to the next step and select the music you want to delete.
By opening the Music app, you gain access to your entire music library, giving you the freedom to manage your collection and remove any unwanted songs or albums. Let’s move on to step 2 and learn how to select the music you wish to delete.
Step 2: Select the Music to Delete
Now that you have opened the Music app on your iPhone or iPad, it’s time to select the music you want to delete. Whether you want to remove individual songs, entire albums, or specific playlists, the process is straightforward.
To select multiple songs at once, you can use the “Edit” feature. Simply navigate to the songs list or the playlist containing the music you want to delete. Look for the “Edit” button, usually indicated by three dots or a pencil icon, and tap on it.
Once you enter the “Edit” mode, you’ll notice that checkboxes or circles appear next to each song, album, or playlist. You can now start selecting the music you want to delete by tapping on these checkboxes or circles. You can select as many items as you want.
If you prefer to delete all the music on your device, you can simply select the “All Songs” option, which will be available in the songs list or playlist selection screen. This will mark all the songs for deletion, saving you the time and effort of selecting each individual item.
After you have selected the music you want to delete, move on to the next step to learn how to delete them from your iPhone or iPad.
Step 3: Swipe Left to Delete
Once you have selected the music you want to delete in the Music app, it’s time to take the next step – swiping left to delete. This is a simple and effective way to remove unwanted songs from your iPhone or iPad. Follow these instructions:
1. On your iPhone or iPad, launch the Music app.
2. Navigate to the playlist or album where the song you wish to delete is located.
3. Find the song that you want to remove from your device, and gently swipe from right to left across the song title.
4. As you swipe, you will reveal a red “Delete” button on the right-hand side of the song.
5. Once you see the “Delete” button, release your finger from the screen. A confirmation prompt will appear.
6. At this point, you can choose to either cancel the deletion by tapping “Cancel” or proceed with the deletion by tapping “Delete from Library.”
7. If you tap “Delete from Library,” the song will be permanently removed from your device.
It’s important to note that when you swipe left to delete a song, it will not only be removed from your iPhone or iPad, but also from any other device connected to your Apple Music account. This ensures that the song is deleted across all your devices, giving you a seamless and synced experience.
By following these simple steps, you can easily remove unwanted music from your iPhone or iPad. Swiping left to delete is a quick and efficient method that helps you keep your music library organized and clutter-free.
Step 4: Confirm Deletion
Once you have selected the music files you want to delete by swiping left on them, you need to confirm the deletion. This step helps prevent accidental deletion of important music files. So, before you proceed, take a moment to review the selected files.
When you swipe left on a music file, a red “Delete” button will appear. Tap on the “Delete” button to prompt a confirmation box. This box will provide you with additional information about the deletion process and ask if you are sure you want to delete the selected files.
Take a moment to read the confirmation message as it will inform you of the consequences of deleting the music files. It may mention that the files will be permanently removed and cannot be recovered later. If you are certain about deleting the files, tap on the “Delete” option to proceed.
After confirming the deletion, the music files will be removed from your iPhone or iPad. Depending on the number of files selected, the process may take a few seconds or longer. Once the deletion is complete, you will be redirected back to your Music app’s library.
Remember, if you are unsure about deleting a particular music file, it is always a good idea to back up your device before proceeding. This way, you can safeguard your music collection and easily restore any deleted files.
Step 5: Empty Recently Deleted Album
After following the previous steps to delete music from your iPhone or iPad, you might wonder if the deleted songs are still taking up space on your device. The answer is no. When you delete music, it doesn’t immediately disappear completely. Instead, it goes to the “Recently Deleted” album, where it stays for a certain period of time.
To free up even more space on your device, you need to take an extra step and empty the “Recently Deleted” album as well. Here’s how:
1. Open the “Music” app on your iPhone or iPad and tap on the “Library” tab at the bottom of the screen.
2. Scroll down until you find the “Recently Deleted” album and tap on it.
3. Once you’re in the “Recently Deleted” album, tap on the “Select” button in the top right corner of the screen.
4. You can now choose the songs or albums you want to permanently delete. Tap on the items you want to remove and a check mark will appear next to them.
5. After selecting the music you want to delete, tap on the “Delete” button at the bottom right corner of the screen.
6. A confirmation pop-up will appear asking if you want to permanently delete the selected items. Tap on the “Delete from Library” option to proceed.
Once you’ve completed these steps, the selected music will be permanently erased from your device, and you will have successfully emptied the “Recently Deleted” album.
It’s important to note that once you delete music from the “Recently Deleted” album, there is no way to recover it. So make sure you have a backup of any important songs before emptying the album.
By regularly emptying the “Recently Deleted” album, you can ensure that your iPhone or iPad is always optimized for storage and running smoothly.
Conclusion
Deleting unwanted music from your iPhone or iPad is a simple and straightforward process. By following the step-by-step guide outlined above, you can free up valuable storage space and ensure that your device is filled with only the music you love.
Remember, it’s essential to regularly review and manage your music library to keep it organized and optimized. Whether you want to remove individual songs, albums, or entire playlists, the options are easily accessible through the Music app or settings on your iOS device.
By taking the time to clean up your music collection, you’ll not only declutter your device but also improve its performance. So, go ahead and start deleting those unwanted tracks and enjoy a streamlined and personalized music experience on your iPhone or iPad.
FAQs
-
Can I delete music from my iPhone/iPad without using iTunes?
Yes, you can delete music from your iPhone or iPad without using iTunes. One way to do this is by using the built-in Music app on your device. Simply swipe left on a song in your music library and tap on the “Delete” button that appears. You can also use third-party apps that specialize in managing and deleting music files on iOS devices.
-
Will deleting music from my iPhone/iPad delete it from my iTunes library?
No, deleting music from your iPhone or iPad will not delete it from your iTunes library. Your iTunes library is a separate entity and deleting music from your iOS device will only remove it from the device itself. The music will still be available in your iTunes library and you can sync it back to your device if needed.
-
How can I delete an entire album from my iPhone/iPad?
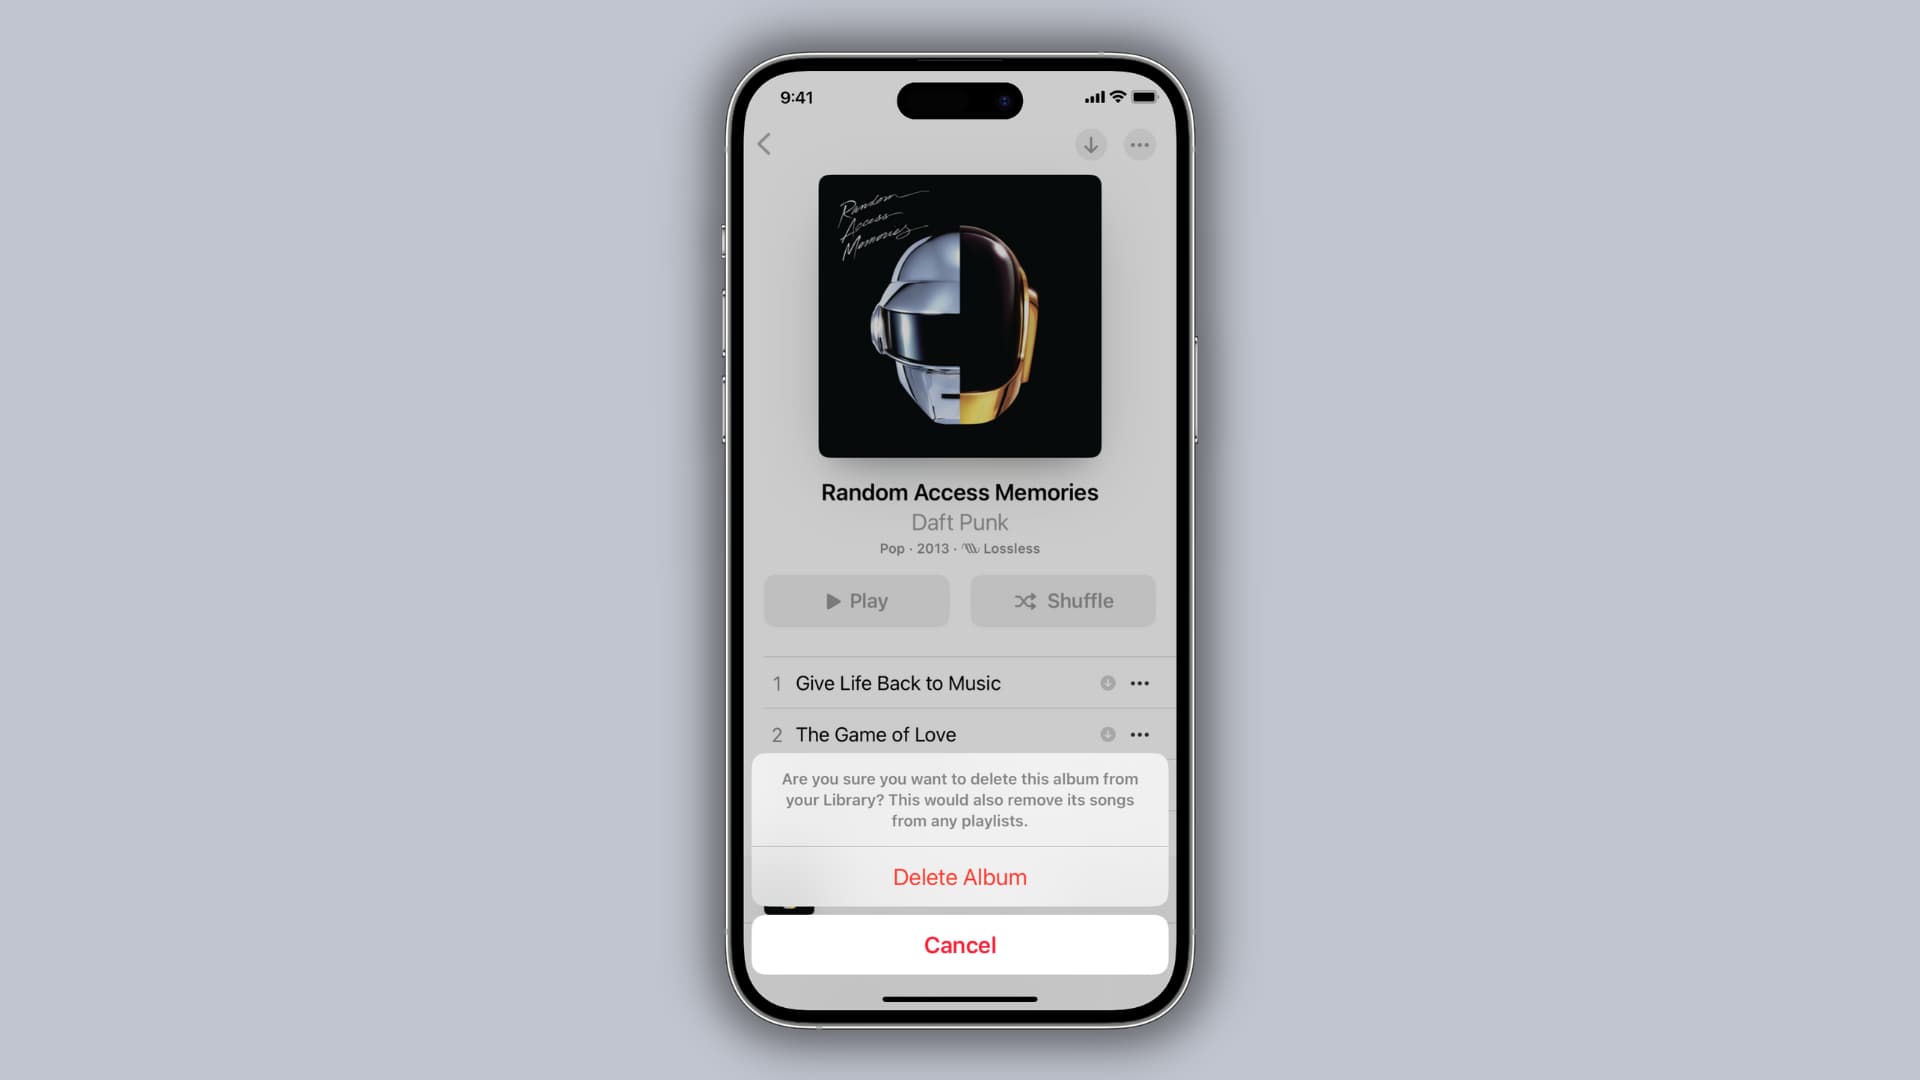
To delete an entire album from your iPhone or iPad, go to the Music app and navigate to the “Albums” section. Find the album you want to delete and swipe left on it. Then, tap on the “Delete” button that appears. This will remove the entire album from your device.
-
Can I delete music from my iPhone/iPad using my computer?
Yes, you can delete music from your iPhone or iPad using your computer. Connect your device to your computer and open iTunes. Select your device in iTunes and go to the “Music” tab. From there, you can choose to manually manage music and delete individual songs, albums, or playlists from your device.
-
Is there a way to recover deleted music from my iPhone/iPad?
If you have accidentally deleted music from your iPhone or iPad, there are a few methods you can try to recover it. One option is to check if the deleted music is still available in your iTunes library and sync it back to your device. Additionally, if you have a recent backup of your device, you can restore your device from that backup to recover the deleted music. Alternatively, there are also third-party data recovery tools available that can help you recover deleted music files from your iOS device.