
Are you struggling to remove your Levolor Cellular Shade from its bracket? You’ve come to the right place! Levolor Cellular Shades are known for their stylish design and energy efficiency, making them a popular choice for homeowners. However, when it comes time to remove the shades for cleaning, maintenance, or replacement, it can be a bit tricky if you don’t know the proper technique. In this article, we will provide you with a step-by-step guide on how to remove your Levolor Cellular Shade from its bracket. Whether you’re a DIY enthusiast or just looking to make a quick change, we will walk you through the process to ensure a hassle-free experience. So, let’s get started and make removing your Levolor Cellular Shade a breeze!
Inside This Article
- Tools and materials needed
- Steps to Remove Levolor Cellular Shade from Bracket:
- Tips and Precautions to Consider
- Conclusion
- FAQs
Tools and materials needed
Before you begin removing your Levolor cellular shade from the bracket, it is important to gather the necessary tools and materials. Here is a list of what you will need:
- Phillips head screwdriver
- Flathead screwdriver
- Pliers
- Step ladder or a sturdy chair
The Phillips head screwdriver will be used to remove any screws that may be holding the brackets in place. The flathead screwdriver can be useful for prying open the brackets or releasing any clips. Pliers may be required to help loosen any stubborn parts that are difficult to remove. Lastly, a step ladder or a sturdy chair will provide the necessary height to safely reach and access the shade and brackets.
Ensure that you have these tools and materials ready before you begin the removal process. Having them on hand will make the task easier and more efficient.
Steps to Remove Levolor Cellular Shade from Bracket:
Removing Levolor cellular shades from their brackets can be done easily with a few simple steps. Whether you are replacing the shade or need to clean it, follow these instructions to remove it from the bracket.
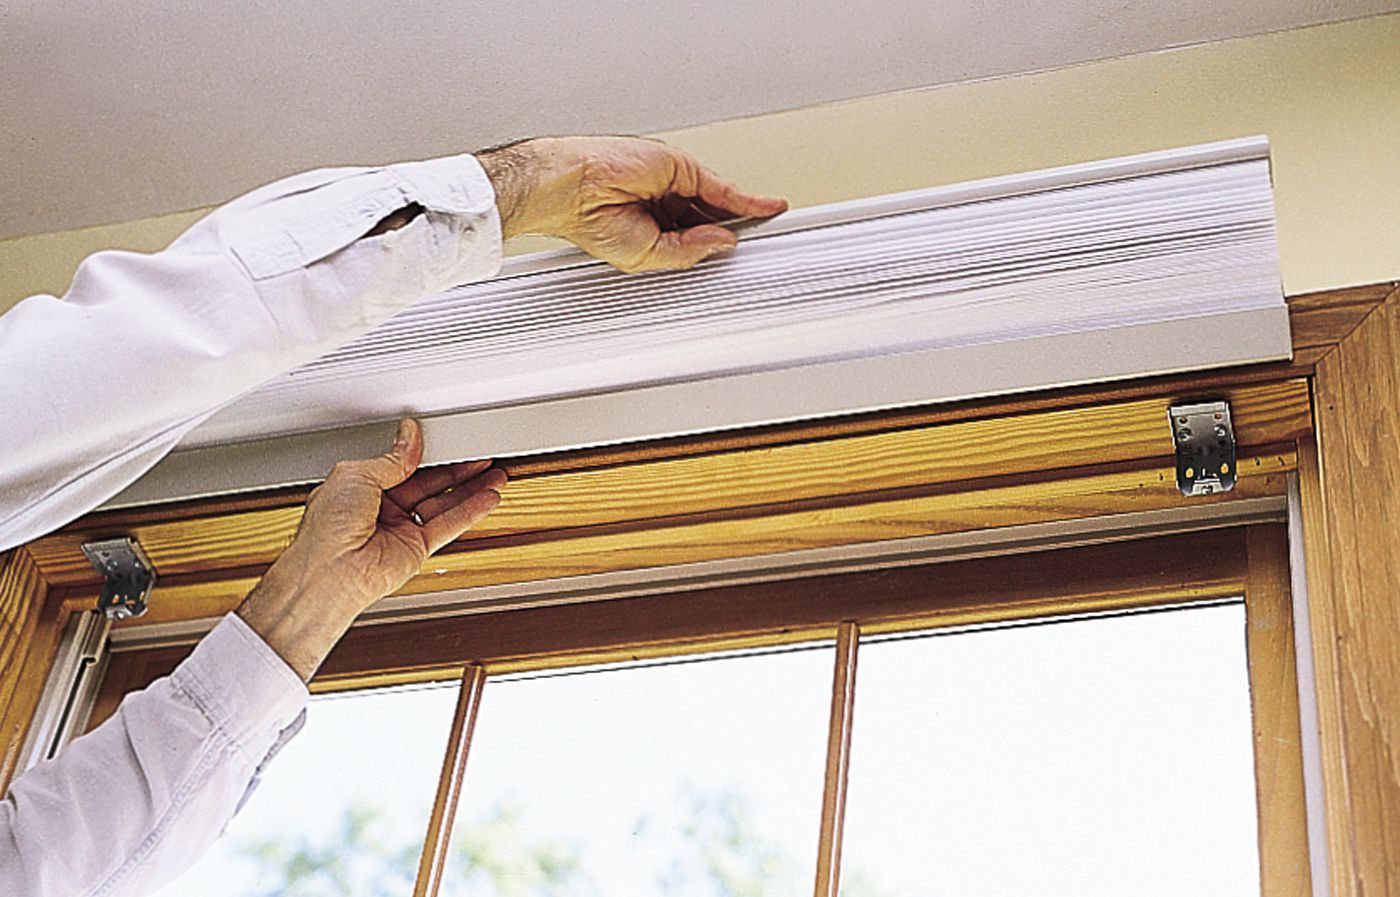
Step 1: Removing the Shade from the Bracket
Start by locating the bracket that holds the shade in place. It is usually mounted on the top of the window frame or inside the window casing. Use a stepladder if necessary to reach the bracket.
Next, look for the retaining clips or tabs on the bracket. These are small plastic or metal mechanisms that secure the shade to the bracket. Gently press the clips or tabs inward to release the shade from the bracket. You may need to use a flat-head screwdriver or a small pair of pliers for this step.
Once the clips or tabs are released, carefully lower the shade from the bracket, making sure to support it with your other hand to avoid dropping or damaging it.
Step 2: Detaching the Headrail from the Brackets
The headrail is the top part of the cellular shade that houses the mechanisms for raising and lowering the shade. To detach the headrail from the brackets, locate the small release lever or button on each bracket.
Press the release lever or button and tilt the headrail forward slightly to disengage it from the brackets. Continue to hold the headrail in this position while removing it from the brackets.
Step 3: Releasing the Bottom Rail from the Brackets
After removing the headrail, take a closer look at the bottom rail of the cellular shade. You should see small inserts or brackets that fit into the brackets on the window frame.
Press the bottom rail upward gently to disengage it from the brackets on the window frame. Once the bottom rail is free from the brackets, you can pull the shade away from the window completely.
Step 4: Removing the Brackets from the Wall
If you plan to reinstall the cellular shade or need to remove the brackets for any reason, now is the time to do it.
Using a screwdriver, loosen the screws or fasteners that secure the brackets to the wall or window frame. Once all the screws are loose, gently pull the brackets away from the wall or window frame.
Remember to keep all the screws and brackets in a safe place in case you need them for reinstallation or future use.
Tip: It may be helpful to have someone assist you when removing Levolor cellular shades, especially if they are large or installed on high windows.
Precaution: Exercise caution when working with tools and using ladders. Ensure your safety by following proper procedures and wearing appropriate protective gear.
By following these simple steps, you can easily remove your Levolor cellular shade from the bracket for replacement, cleaning, or other purposes. Remember to handle the shade with care to avoid any damage during the removal process.
Tips and Precautions to Consider
When removing Levolor cellular shades from their brackets, it’s important to follow a few tips and precautions to ensure a smooth and safe process. Here are some things to keep in mind:
1. Handle with Care: Cellular shades are made of delicate materials, so it’s essential to handle them with care during the removal process. Avoid pulling or tugging forcefully to prevent any damage.
2. Work Slowly and Methodically: Take your time when removing the shade from the brackets. Rushing the process may lead to mistakes and potential damage. Follow the steps outlined in the previous section and proceed step by step.
3. Use the Right Tools: Make sure you have the necessary tools for the job, such as a screwdriver or pliers, as mentioned in the previous section. Using the correct tools will make the removal process easier and more efficient.
4. Protect the Surrounding Area: Before starting the removal, ensure that the area surrounding the shades is protected. Cover nearby furniture or flooring with a drop cloth or plastic sheet to prevent any accidental damage or debris from falling on them.
5. Check for Interference: Before removing the shade, check if there are any obstructions or objects in the way that could interfere with the process. Move any furniture or decor items that may hinder your access to the brackets or the shade itself.
6. Don’t Force Anything: If you encounter resistance while removing the shade or any other part, do not force it. Trying to yank or pull forcefully may cause damage to the shade, brackets, or the surrounding area. Instead, double-check the instructions or seek assistance if needed.
7. Seek Professional Help if Unsure: If you’re unsure about the removal process or face any difficulties, it’s always better to seek professional help. Contact Levolor customer support or consult a window treatment specialist for guidance and assistance.
8. Properly store the shade and brackets: After successfully removing the cellular shade from the brackets, store them in a safe place to avoid any damage or misplacement. Keep the shades rolled up neatly and store the brackets and any associated hardware in a labeled container for easy reinstallation in the future.
9. Be Mindful of Electrical Wires and Cords: When removing the brackets from the wall, be cautious of any nearby electrical wires or cords. Avoid accidentally damaging or disrupting them while taking down the brackets. If needed, switch off the power in the area or seek professional assistance to handle any electrical components.
10. Proceed with Caution for Levolor Smart Shades: If you are removing Levolor smart shades that are connected to a smart home system, be extra cautious. Follow the manufacturer’s instructions for properly disconnecting and removing the shades to avoid any damage to the smart home components.
By following these tips and precautions, you can ensure a successful and hassle-free experience when removing Levolor cellular shades from their brackets. Remember, taking the time to handle the shades carefully and following proper removal techniques will help preserve their condition and allow for easy reinstallation or storage if needed.
Conclusion
In conclusion, removing a Levolor cellular shade from its bracket is a straightforward process that can be done with just a few simple steps. By understanding the mechanism of the shade and following the instructions provided, you can ensure a smooth and hassle-free removal process.
Remember to gather the necessary tools, such as a screwdriver or a tension rod, before starting the removal process. Take your time and be gentle to avoid damaging the shade or the bracket. If you encounter any difficulties, refer to the manufacturer’s instructions or seek assistance from a professional.
Whether you need to remove the shade for cleaning, repairs, or replacement, following the correct procedure will save you time and effort. With a little patience and care, you’ll be able to remove your Levolor cellular shade and have it ready for whatever comes next. Happy shade removal!
FAQs
Q: How do I remove a Levolor Cellular Shade from its bracket?
A: To remove a Levolor Cellular Shade from its bracket, start by raising the shade to its fully extended position. Next, locate the spring-loaded pin on one end of the shade. Hold the pin in place and gently pull the shade away from the bracket. Repeat the same process for the other end of the shade, and it should come off the bracket easily.
Q: Can I clean a Levolor Cellular Shade while it’s still installed on the bracket?
A: Yes, you can clean a Levolor Cellular Shade while it’s still installed on the bracket. Start by vacuuming both sides of the shade using a brush attachment or a handheld vacuum cleaner. For heavier stains or dirt, you can spot clean the shade using a mild detergent mixed with warm water. However, if the shade is heavily soiled, it is recommended to remove it from the bracket and clean it more thoroughly.
Q: How do I reinstall a Levolor Cellular Shade after cleaning or removing it from the bracket?
A: To reinstall a Levolor Cellular Shade, first, ensure that the brackets are securely mounted in the desired location. Then, align the shade with the brackets and make sure the tension rod at the top is inserted into the brackets. Gently push the shade against the brackets until you hear it click into place. Finally, test the shade by pulling it down and letting it retract to ensure smooth operation.
Q: Can I shorten the length of a Levolor Cellular Shade?
A: Yes, it is possible to shorten the length of a Levolor Cellular Shade. However, it is recommended to consult the manufacturer’s instructions or contact a professional to ensure proper and safe alteration of the shade. This is especially important as improper modifications can affect the functionality and appearance of the shade.
Q: Is it possible to replace a damaged Levolor Cellular Shade cord?
A: Yes, in most cases, it is possible to replace a damaged Levolor Cellular Shade cord. Levolor provides replacement cord kits that include detailed instructions on how to properly replace the cord. It is important to follow the instructions carefully and take necessary safety precautions when handling and replacing the cord.