
How To Change iPhone 11 Battery
Are you experiencing a dwindling battery life on your iPhone 11? While it’s frustrating to deal with, the good news is that you can replace the battery to restore your phone’s longevity. In this comprehensive guide, we’ll walk you through the process of changing the battery in your iPhone 11. Whether you’re a tech-savvy individual or a novice in the world of phone repairs, you’ll find valuable insights and step-by-step instructions to help you seamlessly swap out the old battery for a new one. Let’s delve into the details of how you can rejuvenate your iPhone 11 and bid farewell to battery woes.
Inside This Article
- Step 1: Gather Necessary Tools
- Step 2: Power Off Your iPhone 11
- Step 3: Remove the Screws
- Step 4: Open the iPhone
- Step 5: Remove the Old Battery
- Step 6: Install the New Battery
- Step 7: Reassemble Your iPhone 11
- Step 8: Power On and Test the New Battery
- Conclusion
- FAQs
Step 1: Gather Necessary Tools
Before you embark on the journey of replacing your iPhone 11 battery, it’s crucial to gather the essential tools needed for a successful battery replacement. Here are the tools you’ll need:
1. Replacement Battery: Ensure you have a high-quality replacement battery compatible with the iPhone 11. It’s advisable to purchase a battery from a reputable supplier to guarantee its authenticity and performance.
2. Pentalobe Screwdriver: The iPhone 11 is secured with pentalobe screws, so you’ll need a pentalobe screwdriver to remove these screws and access the internal components of the device.
3. Phillips Screwdriver: In addition to the pentalobe screwdriver, you’ll also require a Phillips screwdriver to carefully handle the internal screws during the battery replacement process.
4. Plastic Spudger or Opening Tool: A plastic spudger or opening tool is essential for prying open the iPhone 11 without causing damage to the delicate components or the external casing.
5. Tweezers: Tweezers will aid in handling small components and cables within the device, ensuring precision and minimizing the risk of accidental damage.
6. Adhesive Strips: To secure the new battery in place, adhesive strips are necessary. These strips facilitate a secure and stable attachment of the battery within the iPhone 11.
By ensuring you have these tools at your disposal, you’ll be well-prepared to proceed with the battery replacement process smoothly and effectively.
**
Step 2: Power Off Your iPhone 11
**
To begin the battery replacement process, it’s crucial to power off your iPhone 11. This ensures that you can safely work on the device without the risk of causing any damage. Turning off your iPhone 11 is a simple process that can be completed in a few easy steps.
First, locate the side button on your iPhone 11. This button is used to power off the device and initiate various other functions. Once you’ve located the side button, press and hold it along with either the volume up or down button simultaneously. Doing so will prompt the “slide to power off” option to appear on the screen.
Next, use your finger to swipe the power off slider from left to right. This action will power down your iPhone 11, preparing it for the battery replacement procedure. Once the device is completely powered off, you can proceed to the next step with the assurance that you can work on it safely and effectively.
**
Step 3: Remove the Screws
**
Once you have carefully detached the display assembly, you will need to remove the screws securing the battery connector bracket. These screws are small and easy to misplace, so it’s essential to keep them organized and in a safe place. Using a Phillips #000 screwdriver, carefully unscrew and set aside the three screws that secure the battery connector bracket to the logic board.
It’s important to note that these screws are different sizes, so be sure to keep track of which screw goes where. A helpful tip is to lay the screws out on a flat surface in the same pattern as they appear on the logic board. This will make it easier to remember their placement during reassembly.
Once the screws are removed, gently lift the battery connector bracket and set it aside. This will reveal the battery connector underneath. Take care not to damage the delicate connectors or the surrounding components while performing this step.
**
Step 4: Open the iPhone
**
Once you’ve removed the screws, it’s time to carefully open your iPhone 11. This step requires precision and patience, so take your time and ensure you have a clean, well-lit workspace. Begin by using a suction cup to lift the front panel slightly. Then, slide a spudger or a thin, plastic card into the gap between the front panel and the rest of the device. Gently work your way around the edges, separating the adhesive and releasing the clips that hold the front panel to the rest of the iPhone.
As you navigate around the edges, be mindful of the delicate ribbon cables that connect the front panel to the iPhone’s logic board. Avoid putting too much tension on these cables, as they are crucial for the display and touch functionality. Once the front panel is loosened, carefully swing it open like a book, pivoting along the top edge where the display cables are located. Take care not to damage or strain these cables during this process.
Opening the iPhone 11 can be a delicate procedure, so it’s essential to proceed with caution and attentiveness. By following these steps meticulously, you can successfully access the internal components of your device and proceed with the battery replacement process.
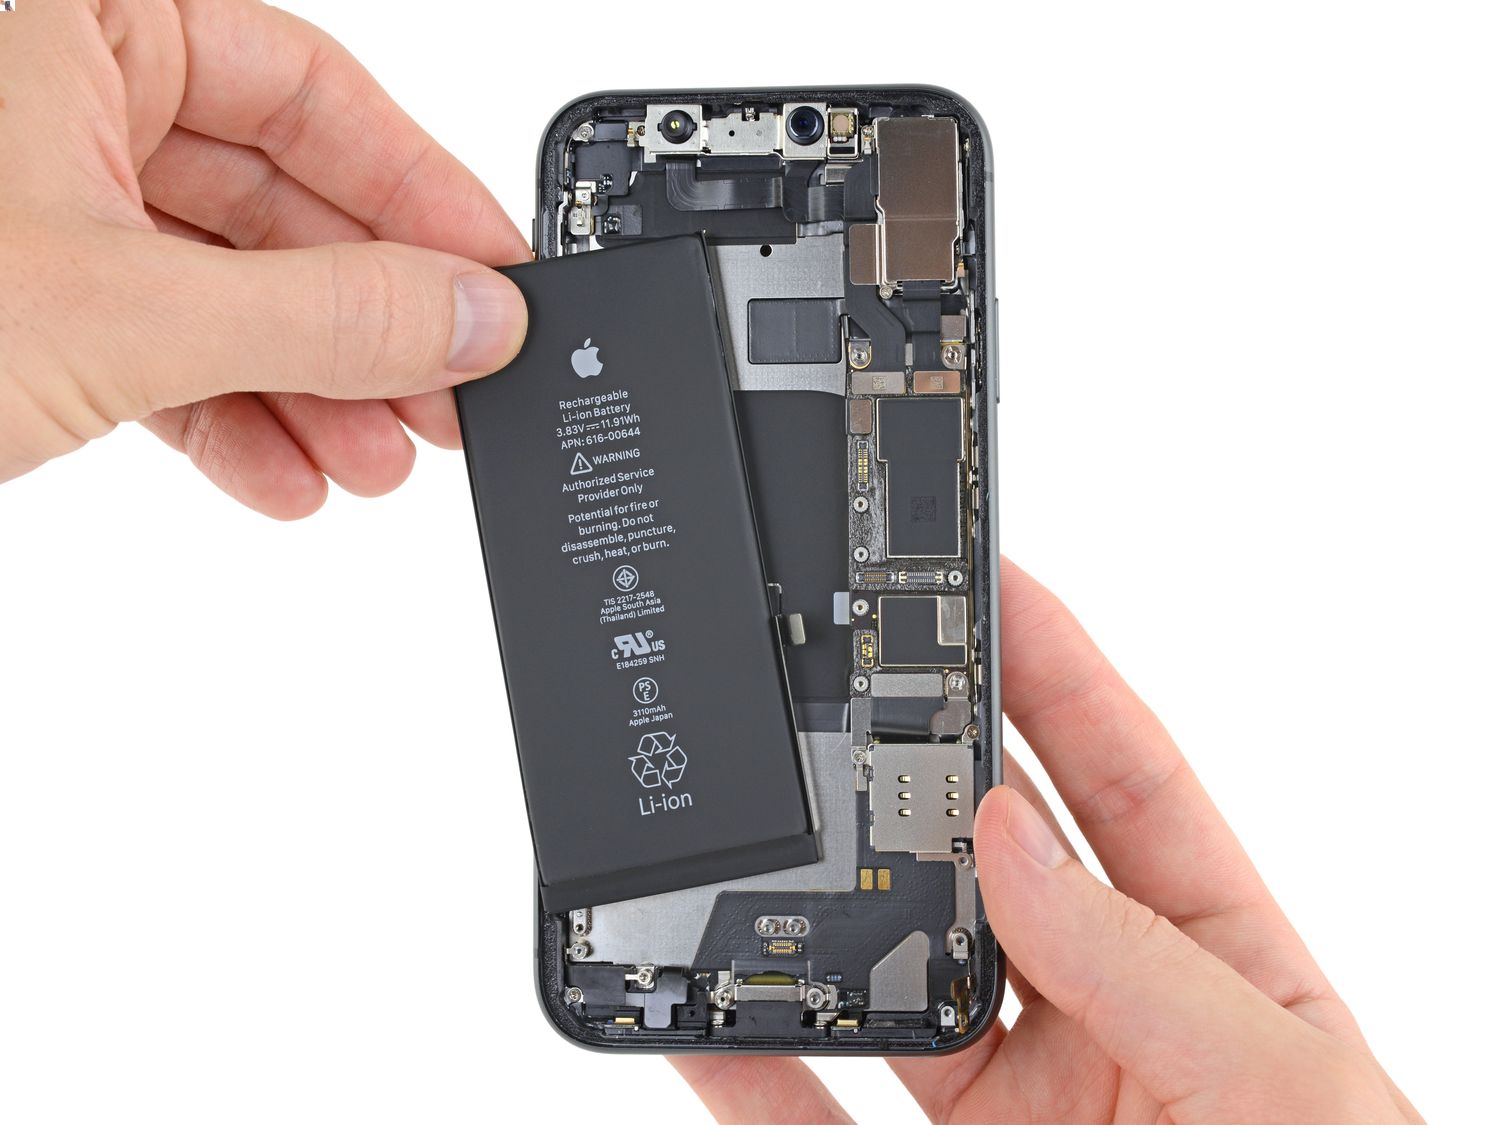
Step 5: Remove the Old Battery
Once the screws are removed, carefully lift the display assembly from the iPhone. Take note of the small components attached to the display assembly, such as the display cables and bracket. Ensure that you do not damage these components during the removal process.
Next, locate the battery connector and carefully disconnect it from the logic board. Use a plastic spudger or a similar tool to gently pry the connector from its socket. Be cautious to avoid damaging the connector or the logic board during this step.
After disconnecting the battery, you can proceed to remove the adhesive strips securing the battery in place. Gently pull each strip away from the battery, ensuring a smooth and even motion to prevent tearing. Take care not to puncture or bend the battery during this process.
Once the adhesive strips are removed, carefully lift the battery from the iPhone, ensuring that it is detached from the device without applying excessive force. Be mindful of the battery’s delicate components and handle it with care to prevent any damage.
Step 6: Install the New Battery
Once you have removed the old battery, it’s time to install the new one. Carefully take the new battery and position it in the same location where the old one was. Be sure to align the connector with the socket on the iPhone’s logic board. Gently press the battery into place to ensure a secure fit. Take your time and be mindful of the delicate components as you handle the new battery.
Next, you’ll need to reattach the connector that you previously disconnected. Carefully align the connector with the socket on the logic board and gently press it into place. Be cautious and ensure that the connector is properly seated. Once the connector is secure, you can carefully lay the adhesive strips back into place, if your replacement battery came with them. If not, ensure that the battery is snug in its housing.
After the battery and connector are in place, it’s time to reattach the screws and any other components that were removed during the battery replacement process. Take your time to ensure that everything is securely fastened and in its proper place. Once all components are reattached, you can proceed to the next step in reassembling your iPhone 11.
Step 7: Reassemble Your iPhone 11
Once you’ve successfully installed the new battery, it’s time to reassemble your iPhone 11. Begin by carefully placing the display back onto the device. Make sure the display connectors are properly aligned before you press the display back into place.
Next, reinsert the screws that secure the display connector bracket, ensuring they are snug but not overly tightened. Take your time and be gentle during this process to avoid damaging any components.
After securing the display, reattach the bracket that covers the battery connector. Double-check that all connectors are properly seated before reattaching the bracket. Once the bracket is in place, carefully tighten the screws to secure it.
Finally, align the top of the display with the frame and carefully press it into place. Work your way around the edges, ensuring that the display is seated correctly. Once the display is securely in place, power on your iPhone 11 and test the new battery to ensure everything is functioning as expected.
Sure, here's the content for "Step 8: Power On and Test the New Battery" section:
Step 8: Power On and Test the New Battery
Once the new battery is securely in place and the iPhone 11 is reassembled, it’s time to power it on and test the new battery. Press and hold the power button until the Apple logo appears on the screen. This indicates that the device is booting up.
After the iPhone 11 has powered on, use it as you normally would to ensure that the new battery is functioning correctly. Check the battery percentage to verify that it’s charging and discharging as expected. Additionally, monitor the device for any unusual behavior or rapid battery drain, which could indicate a faulty installation.
If everything appears to be in order and the new battery is performing as it should, congratulations – you’ve successfully replaced the battery in your iPhone 11! Enjoy your extended battery life and the seamless performance of your device.
Conclusion
Changing the battery of your iPhone 11 can breathe new life into your device, ensuring it continues to serve you well for years to come. By following the step-by-step guide provided and considering the FAQs, you can confidently undertake this task. Remember to prioritize safety and take your time during the process. If you encounter any challenges, do not hesitate to seek professional assistance. With a fresh battery, your iPhone 11 will be ready to keep up with your daily demands, allowing you to stay connected, capture memories, and enjoy all the features it has to offer without worrying about battery life.
FAQs
Q: Can I change the battery of my iPhone 11 on my own?
A: Yes, you can change the battery of your iPhone 11 on your own. However, it’s recommended to seek professional assistance if you’re not familiar with the process.
Q: What tools do I need to change the iPhone 11 battery?
A: To change the iPhone 11 battery, you will need a Pentalobe screwdriver, a suction handle or suction cup, a spudger, and a new battery compatible with the iPhone 11.
Q: How long does it take to change the iPhone 11 battery?
A: The process of changing the iPhone 11 battery typically takes around 30 to 45 minutes, depending on your familiarity with the process and the tools at your disposal.
Q: Is it necessary to calibrate the new battery after replacing it in an iPhone 11?
A: Yes, it’s advisable to calibrate the new battery after replacing it in an iPhone 11. This helps the device accurately gauge the battery’s performance and maximize its lifespan.
Q: Can I use any third-party battery to replace the original one in my iPhone 11?
A: It’s recommended to use a high-quality, compatible third-party battery or an original Apple battery to replace the original one in your iPhone 11 to ensure optimal performance and safety.