
Cellular shades are a popular window covering option known for their functionality and aesthetic appeal. However, over time, the cords of a cellular shade may become frayed or tangled, requiring them to be restrung. Restringing a cellular shade may seem like a daunting task, but with the right guidance and a little patience, it can be easily accomplished. In this article, we will walk you through the step-by-step process of restringing a cellular shade, ensuring that your window treatment is in perfect working condition once again. From removing the shade from the window to rethreading the cords and reattaching the shade, we will provide all the information and tips you need to successfully restring your cellular shade. With our comprehensive guide, you’ll be able to enjoy the benefits of a fully functional cellular shade in no time!
Inside This Article
- Preparing the Shade
- Removing the Old Cord
- Measuring and Cutting the New Cord
- Stringing the Shade
- Conclusion
- FAQs
Preparing the Shade
Before you begin restringing a cellular shade, it is important to properly prepare the shade to ensure a smooth and successful process. Taking the time to prepare the shade will help prevent any hiccups along the way and ensure that the new cords are installed correctly.
Here are the steps to follow when preparing the shade:
- Inspect the shade: Start by carefully examining the cellular shade for any damage or wear and tear. Look for any broken or frayed cords, damaged fabric, or bent rails. If you notice any issues, make the necessary repairs or consider replacing the shade entirely.
- Measure the cords: Take precise measurements of the length and diameter of the existing cords. This information will help you determine the appropriate replacement cords to use. Be sure to measure each cord individually, as they may vary in length.
- Acquire the necessary materials: Once you have the measurements, visit a home improvement store or order replacement cords online. Ensure that the cords you purchase are of the correct length and thickness to fit your specific shade.
- Clear the working area: Create a clean and clutter-free space to work on the shade. Remove any objects or obstacles that could hinder your movement or potentially damage the shade during the restringing process.
- Gather the tools: Along with the replacement cords, gather the tools needed for the job. This may include scissors, a screwdriver, pliers, and a cord threading tool. Having these tools readily available will make the process more efficient.
By properly preparing the shade before restringing, you set yourself up for success. Take the time to inspect, measure, acquire materials, clear the workspace, and gather the necessary tools. This will help ensure a smooth and hassle-free restringing process for your cellular shade.
Removing the Old Cord
When it comes to restringing a cellular shade, the first step is to remove the old cord. This process requires some careful maneuvering, but with the right tools and technique, it can be a relatively straightforward task. Here’s how you can remove the old cord:
1. Begin by fully extending the cellular shade and securing it in place. This will make it easier to access the cord and work on restringing it.
2. Locate the cord lock mechanism, which is usually located at the bottom of the shade. You may need to tilt the shade or remove the bottom rail to gain access to the cord lock.
3. Once you have access to the cord lock, carefully release the tension on the cord. This can usually be done by pressing a small lever or button on the cord lock mechanism.
4. With the tension released, start pulling the old cord out from the cord lock and through the cord guides along the sides of the shade. Take your time to ensure that the cord is fully removed without any tangles or snags.
5. After removing the old cord, inspect it for any signs of damage or wear. If the cord is frayed or broken, it’s best to replace it with a new one to ensure smooth operation of the cellular shade.
6. Once the old cord is removed, you can proceed to prepare the new cords for the restringing process. This involves measuring and cutting the cords to the appropriate length, which will be covered in the next section.
By carefully following these steps, you can successfully remove the old cord from your cellular shade. Remember to exercise caution and take your time to avoid any accidental damage to the shade or the cord lock mechanism.
Measuring and Cutting the New Cord
Once you have removed the old cords from your cellular shade, it’s time to measure and cut the new cord. Before you begin, ensure you have all the necessary tools and materials ready, including a measuring tape and a sharp pair of scissors.
Start by measuring the length of the old cord that you removed from the shade. Be sure to add a few extra inches to account for any extra length you may need. This will ensure that the new cord is long enough to properly restring your shade.
Next, take your new cord and cut it to the measured length. It’s essential to use a sharp pair of scissors to ensure clean and precise cuts. Avoid using dull or blunt scissors, as they can fray the ends of the cord and make it more difficult to thread through the shade.
When cutting the new cord, it’s best to work on a flat surface to ensure accuracy. Measure the desired length and make a clean, straight cut. Remember to double-check your measurements before cutting to avoid any mistakes.
Once you have cut the new cord, take a moment to examine the ends. If you notice any fraying or unevenness, you can use a lighter to carefully melt the ends, creating a neat and sealed finish. Be cautious when using a lighter and make sure to do this in a well-ventilated area.
Trim off any excess melted thread and allow the ends to cool down before handling them. This step will help prevent the cord from fraying over time and ensure a secure and durable restringing of your cellular shade.
With the new cord cut to the appropriate length and the ends neatly finished, you are now ready to move on to the next step of restringing your cellular shade.
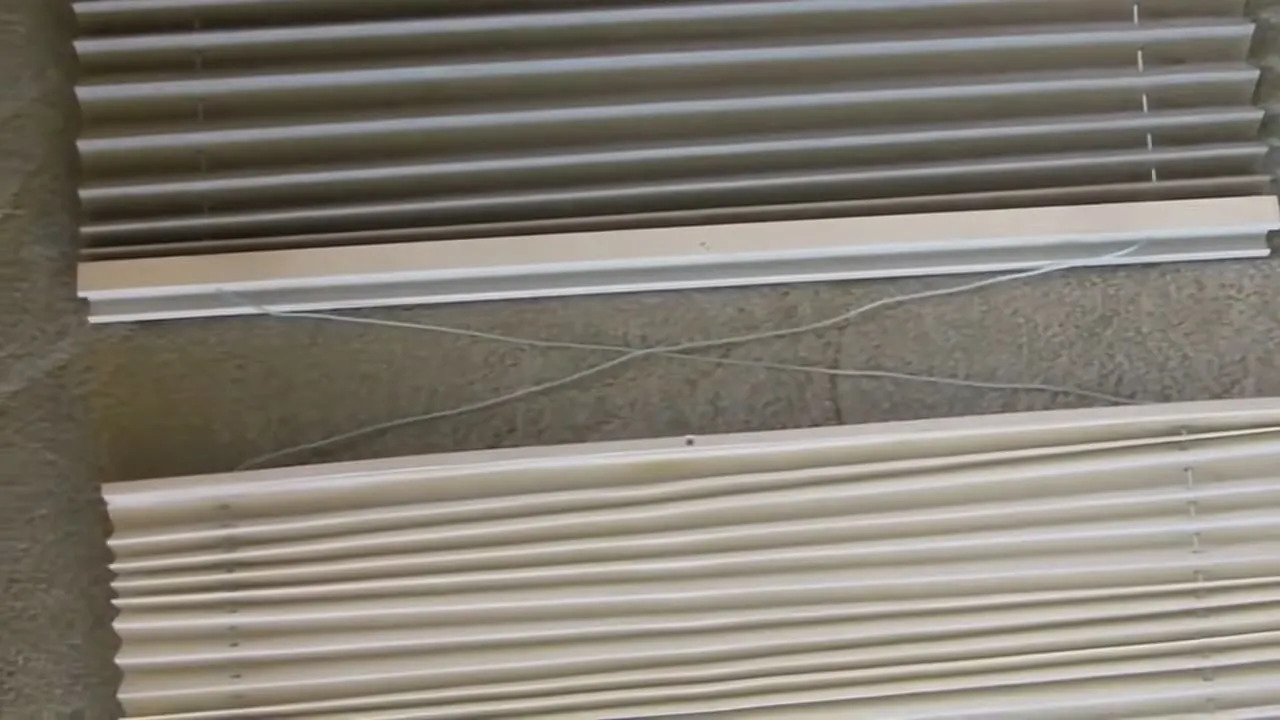
Stringing the Shade
Now that you have removed the old cords and prepared the new ones, it’s time to restring your cellular shade. Follow these step-by-step instructions to ensure a smooth process:
Step 1: Start by threading one end of the new cord through the first hole in the bottom rail of the cellular shade. Make sure it is secured tightly to prevent it from slipping out.
Step 2: Continue threading the cord through each hole in the bottom rail, making sure it follows the same path as the old cord. Use a gentle pulling motion to guide the cord through the holes.
Step 3: Once the new cord reaches the top rail, secure it in place with a knot or a cord connector. This will prevent it from unraveling and keep the shade properly aligned.
Step 4: Repeat the previous steps for each cord on both sides of the cellular shade. Ensure that all cords are threaded correctly and securely attached to their respective rails.
Step 5: After all the cords have been restrung, carefully slide the cellular shade up and down to test its functionality. Make any necessary adjustments to ensure the shade operates smoothly.
Step 6: Once you are satisfied with the restringing, trim any excess cord length from the bottom of the shade, leaving enough for future adjustments if needed.
Congratulations! You have successfully restrung your cellular shade and restored its functionality. Enjoy the benefits of a properly functioning shade and the renewed ambiance it brings to your space.
Conclusion
Restringing a cellular shade is a simple and cost-effective way to revive and prolong the lifespan of this popular window treatment. By following the steps outlined in this guide, you can easily replace the broken or worn-out cords and restore the functionality and beauty of your cellular shade.
Remember to gather all the necessary tools and materials before you begin, and take your time while restringing to ensure a secure and even restring. With a little patience and attention to detail, you can successfully complete this DIY project and enjoy the benefits of a fully functional cellular shade.
Whether you are dealing with a tangled cord, frayed strings, or a completely broken cord, restringing your cellular shade is a DIY task that can be accomplished with minimal effort. Don’t let a few damaged or worn-out cords render your cellular shade ineffective. Take matters into your own hands and follow these instructions to bring new life to your window treatment.
So, roll up your sleeves and get ready to restring your cellular shade. With a little bit of time and effort, you can restore its operation and have it looking as good as new!
FAQs
Q: What is a cellular shade?
A: A cellular shade, also known as a honeycomb shade, is a type of window covering made up of cells that trap air and provide insulation.
Q: Why would I need to restring a cellular shade?
A: Over time, the cords or strings that operate a cellular shade may become frayed, tangled, or broken. Restringing a cellular shade is necessary to restore proper functionality and ensure smooth operation.
Q: Can I restring a cellular shade myself?
A: Yes, restringing a cellular shade can be done as a DIY project. However, it requires patience, attention to detail, and some basic tools. If you are not comfortable with DIY projects or have a complex shade, it’s recommended to seek professional help.
Q: What tools do I need to restring a cellular shade?
A: To restring a cellular shade, you will need a replacement cord or string, a screwdriver or Allen wrench to remove any brackets, scissors or a utility knife to cut the new cord to size, and pliers or needle-nose pliers to manipulate and secure the cord.
Q: Are there any tips for restringing a cellular shade?
A: Yes, here are some tips for restringing a cellular shade:
– Take clear photos or videos of the shade before disassembling it to help with reassembly later.
– Measure and cut the replacement cord or string, leaving a bit of extra length for easier installation.
– Use a needle or tweezers to guide the cord through the shade’s cells.
– Secure the ends of the cord with knots or clamps to prevent it from slipping out.
– Test the shade’s operation before reinstalling it to ensure it moves smoothly.
Remember to consult the specific instructions for your cellular shade as different models may have slight variations in the restringing process.