
The Xperia Play is a unique and beloved device among mobile phone enthusiasts. Its innovative design combines the features of a traditional smartphone with the gaming capabilities of a portable console. However, some users may feel restricted by the pre-installed software and seek to unlock the full potential of their Xperia Play. This is where root access comes into play. Rooting an Xperia Play allows users to gain complete control over their device, enabling them to customize the operating system, remove pre-installed bloatware, access advanced settings, and even install custom ROMs. In this article, we will guide you through the process of rooting an Xperia Play, breaking it down into easy-to-follow steps. So, if you are ready to take your Xperia Play to the next level, let’s dive in and learn how to root this incredible device.
Inside This Article
- Step 1: Prepare your Xperia Play
- Step 2: Unlock the bootloader
- Step 3: Install a custom recovery
- Step 4: Root your Xperia Play
- Step 5: Verify root access
- Step 6: Install a custom ROM (optional)
- Step 7: Enjoy your rooted Xperia Play
- Conclusion
- FAQs
Step 1: Prepare your Xperia Play
Before you start the process of rooting your Xperia Play, it’s important to prepare your device to ensure a smooth and successful rooting process. Here are some essential steps to follow:
1. Backup your data: Rooting your device involves making changes to the system, which could potentially lead to data loss. It’s crucial to backup all your important files, contacts, messages, and any other data that you don’t want to lose. You can use various backup apps available on the Google Play Store or manually transfer your files to a computer.
2. Charge your battery: Rooting your Xperia Play can take some time, and it’s essential to have a sufficient battery charge to avoid any interruptions during the process. Make sure your device is adequately charged, preferably at least 50% or more, before you proceed with the rooting steps.
3. Enable USB debugging: To perform the rooting process, you’ll need to enable USB debugging on your Xperia Play. Go to the “Settings” menu, scroll down to “Developer options,” and enable USB debugging. If you can’t see the “Developer options” menu, go to “About phone” and tap on the “Build number” repeatedly until you see a message saying, “You are now a developer.
4. Unlock the bootloader: Unlocking the bootloader is an essential step in the rooting process as it allows you to install custom recovery and gain root access. Each Xperia Play model might have a different method to unlock the bootloader, so it’s crucial to search for the specific instructions for your device model.
5. Download necessary files: Before proceeding with rooting, you’ll need to download the necessary files such as the custom recovery, rooting tool, and any other specific files required for your Xperia Play model. Make sure to download these files from trusted sources and keep them accessible for the next steps.
By following these preparatory steps, you’ll set your Xperia Play up for a successful root. Once you’ve completed these preparations, you can move on to the next step, which is unlocking the bootloader.
Step 2: Unlock the bootloader
Unlocking the bootloader of your Xperia Play is a crucial step in the rooting process. The bootloader is a piece of software that ensures only approved operating systems and firmware can be installed on your device. By unlocking it, you gain the ability to install custom software and modify your device’s system files.
Before proceeding, it’s important to note that unlocking the bootloader will void your warranty. Additionally, it can potentially brick your device if not done correctly. Therefore, it is essential to follow the instructions carefully and proceed at your own risk.
To unlock the bootloader of your Xperia Play, you’ll need to use the official Sony Mobile website, which provides a step-by-step guide. Here are the general steps involved:
- Visit the Sony Mobile website and navigate to the unlocking bootloader page.
- Read and accept the terms and conditions to proceed.
- Download and install the Sony Xperia Flashtool on your computer.
- Connect your Xperia Play to your computer using a USB cable.
- Put your Xperia Play into Fastboot mode by turning it off and then holding the Volume Up button while connecting it to the computer.
- Open the Sony Xperia Flashtool and click on the “BLU” button to unlock the bootloader.
- Follow the on-screen instructions provided by the Flashtool.
- Once the process is complete, your Xperia Play’s bootloader will be unlocked.
It’s important to note that unlocking the bootloader will also wipe all data on your Xperia Play, so make sure to back up any important files before proceeding. Additionally, keep in mind that unlocking the bootloader may not be reversible, and it may affect your ability to receive official software updates from Sony.
After successfully unlocking the bootloader, you are one step closer to rooting your Xperia Play and gaining access to a world of customization options. Proceed to the next step to install a custom recovery and continue with the rooting process.
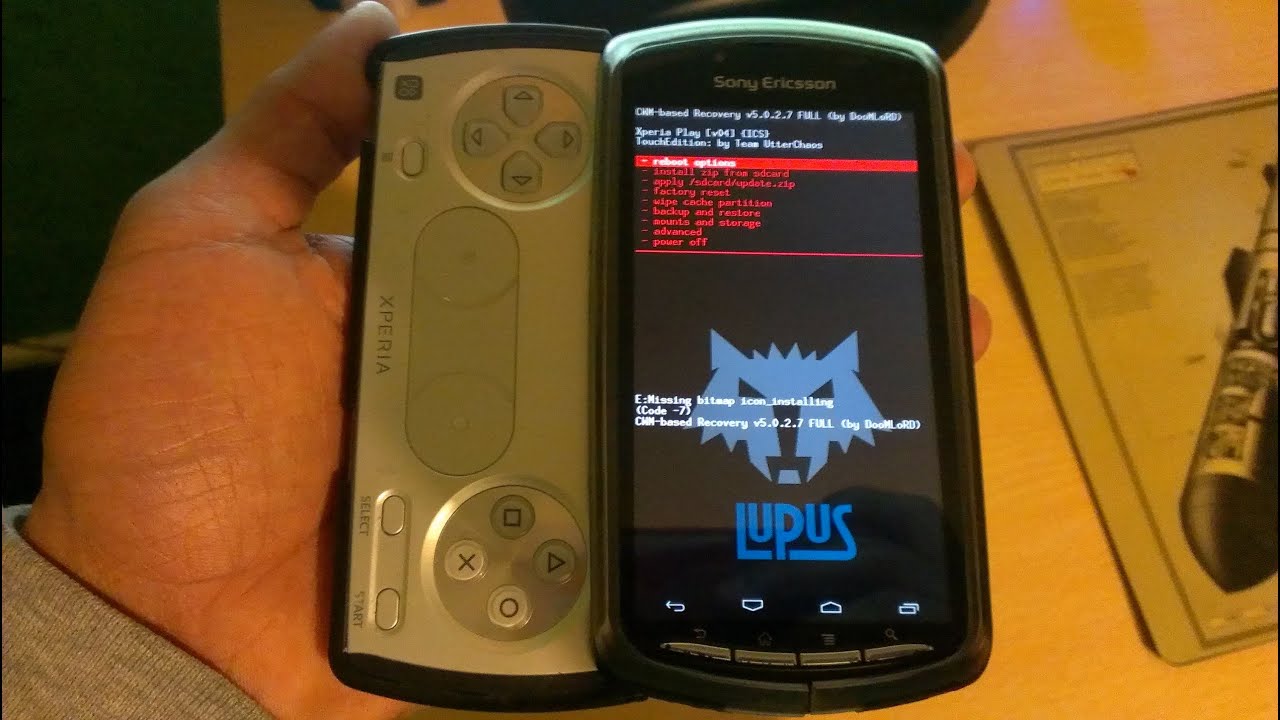
Step 3: Install a custom recovery
Installing a custom recovery on your Xperia Play is an essential step in the rooting process. This allows you to create a complete backup of your device, install custom ROMs, and perform other advanced modifications. Here’s how you can install a custom recovery on your Xperia Play:
1. Download the custom recovery: Start by downloading a compatible custom recovery for your Xperia Play. One of the most popular custom recoveries for Android devices is TWRP (TeamWin Recovery Project). Make sure to download the specific TWRP version designed for your Xperia Play model.
2. Enable USB debugging: To communicate with your Xperia Play from your computer, you need to enable USB debugging. Go to Settings > Developer Options and toggle on the USB debugging option. If Developer Options is not visible in your settings, go to Settings > About Phone and tap on the “Build Number” 7 times to enable Developer Options.
3. Connect your Xperia Play to the computer: Use a USB cable to connect your Xperia Play to your computer. Make sure you have the necessary USB drivers installed on your computer.
4. Boot your Xperia Play into Fastboot mode: Turn off your Xperia Play and then press and hold the Volume Up button while connecting it to the computer. This will boot your device into Fastboot mode, allowing you to flash the custom recovery.
5. Open a command prompt or terminal: On your computer, open a command prompt (Windows) or terminal (Mac or Linux) and navigate to the folder where you have placed the custom recovery image.
6. Flash the custom recovery: In the command prompt or terminal, enter the following command to flash the custom recovery: fastboot flash recovery recovery.img (replace “recovery.img” with the actual custom recovery file name).
7. Reboot your Xperia Play: After the custom recovery has been successfully flashed, you can reboot your Xperia Play by entering the following command: fastboot reboot
8. Boot into custom recovery: To access the custom recovery, turn off your Xperia Play and then press and hold the Volume Down button while turning it on. This will boot your device into the custom recovery mode.
Congratulations! You have successfully installed a custom recovery on your Xperia Play. Now you can proceed to the next step of rooting your device.
Step 4: Root your Xperia Play
Now that you have unlocked the bootloader and installed a custom recovery on your Xperia Play, it is time to proceed with the root process. Rooting your Xperia Play will give you administrative privileges, allowing you to access and modify system files and settings that are normally restricted.
Before we begin, it is crucial to note that rooting your device will void the manufacturer’s warranty. However, the benefits of rooting often outweigh this drawback, as it opens up a world of possibilities for customization and optimization.
To root your Xperia Play, we will be using a popular tool called “SuperSU”. Follow the steps below:
- Download the latest version of SuperSU from the official website (https://www.supersu.com).
- Connect your Xperia Play to your computer using a USB cable.
- Transfer the SuperSU file to the root folder of your device’s internal storage.
- Disconnect your Xperia Play from the computer and turn it off.
- Enter the custom recovery mode by pressing and holding the Volume Up and Power buttons simultaneously.
- In the custom recovery mode, use the Volume buttons to navigate and the Power button to select options.
- Locate and select the option to install the zip file.
- Navigate to the SuperSU file that you transferred earlier, and select it to begin the installation.
- Wait for the installation process to complete.
- Once the installation is finished, reboot your Xperia Play.
After your device has rebooted, it should now be rooted. To confirm the success of the root process, you can download and install applications that require root access, such as Titanium Backup or Root Checker, from the Google Play Store. If these applications run without any issues or error messages, it means that your Xperia Play has been successfully rooted.
Rooting your Xperia Play opens up a whole new world of possibilities. You can now customize your device even further by installing custom ROMs, overclocking the CPU, and tweaking various system settings. However, it is important to exercise caution and only make changes that you fully understand, as improper modifications can potentially harm your device’s performance or stability.
Remember, with great power comes great responsibility. Enjoy the exciting potential of your rooted Xperia Play, and explore all the unique features and customizations that you can now enjoy!
Step 5: Verify root access
After successfully rooting your Xperia Play, it’s essential to verify if the root access has been granted. This step is crucial to ensure that your device is functioning correctly and that you have full control over its capabilities.
To verify root access, you can use various apps available on the Google Play Store specifically designed for this purpose. One popular option is the “Root Checker” app, which allows you to quickly check if your Xperia Play has been successfully rooted.
Here’s how you can use the Root Checker app to verify root access:
- Open the Google Play Store on your Xperia Play and search for “Root Checker.”
- Download and install the Root Checker app from the search results.
- Once the app is installed, open it from your app drawer.
- Tap on the “Verify Root” button within the app.
- The app will analyze your device and determine whether it has root access.
If the app confirms that your Xperia Play is rooted, congratulations! You have successfully rooted your device, and you can now enjoy the full benefits of having root access.
However, if the app states that your device does not have root access, there are a few troubleshooting steps you can try:
- Make sure that you followed the previous steps correctly and that the rooting process was successful.
- Double-check if you have installed the necessary custom recovery and the appropriate rooting files.
- If the Root Checker app still indicates that your device is not rooted, you might need to repeat the rooting process or try a different rooting method.
It’s important to note that rooting your Xperia Play can void your device’s warranty and may have some risks associated with it. Proceed with caution and make sure to educate yourself about the advantages and potential risks before attempting to root your device.
Once you have verified root access on your Xperia Play, you can move on to the optional step of installing a custom ROM. This step allows you to customize your device further and explore additional features and optimizations.
Step 6: Install a custom ROM (optional)
Once you have successfully rooted your Xperia Play, you have the option to take customization to the next level by installing a custom ROM. A custom ROM is essentially a modified version of the Android operating system that offers additional features, enhancements, and customization options.
Before proceeding with the installation of a custom ROM, it’s important to note that this step is optional and not recommended for everyone. Installing a custom ROM can void your warranty and potentially lead to issues if not done correctly. However, if you are confident in your technical skills and willing to take the risk, installing a custom ROM can breathe new life into your Xperia Play.
Here are the steps to install a custom ROM on your Xperia Play:
- Research and choose a custom ROM: There are numerous custom ROMs available for the Xperia Play, each offering a unique set of features and user experiences. Take your time to research and select a ROM that meets your requirements and has positive feedback from the community.
- Backup your data: Before proceeding with any modifications, it is recommended to backup your important data and files. This will ensure that you have a copy of your data in case anything goes wrong during the installation process.
- Download the custom ROM and necessary files: Visit the official website or XDA Developers forum of the custom ROM you have chosen and download the ROM file and any additional files or patches required for the installation.
- Transfer the files to your Xperia Play: Connect your Xperia Play to your computer using a USB cable and transfer the downloaded ROM file and other necessary files to the root directory of your device’s internal storage or SD card.
- Boot into recovery mode: Turn off your Xperia Play and then press and hold the Volume Up button while pressing the Power button at the same time. This will boot your device into recovery mode.
- Perform a Nandroid backup (recommended): In recovery mode, it is highly recommended to perform a Nandroid backup. This creates a complete backup of your current system, allowing you to restore it if anything goes wrong with the installation process.
- Wipe data and cache: In recovery mode, navigate to the “Wipe” or “Advanced” section and select options to wipe data/factory reset and wipe cache partition. This will ensure a clean installation of the custom ROM.
- Install the custom ROM: In recovery mode, navigate to the “Install” or “Flash” section, and select the option to install or flash the custom ROM file that you transferred to your Xperia Play in Step 4.
- Clear cache and reboot: After successfully installing the custom ROM, navigate back to the main menu of recovery mode and select the option to clear cache. Then, reboot your Xperia Play.
Once your Xperia Play reboots, it should start up with the newly installed custom ROM. Take your time to explore the features and customization options offered by the ROM and enjoy the improved performance and user experience on your rooted Xperia Play.
Remember, installing a custom ROM is an advanced modification that carries risks. It is crucial to research and follow the instructions provided by the ROM’s developers and the Xperia Play community. If you encounter any issues during the installation process or while using the custom ROM, consult the XDA Developers forum or other online support resources for assistance.
Step 7: Enjoy your rooted Xperia Play
Now that you have successfully rooted your Xperia Play, it’s time to explore the exciting possibilities and enjoy the benefits of having full control over your device. With root access, you can customize your Xperia Play in ways that were not possible before, unleashing its full potential.
Here are a few ways to make the most out of your rooted Xperia Play:
- Install custom ROMs: With root access, you can now install custom ROMs on your Xperia Play. These custom ROMs offer a wide range of features, performance tweaks, and a completely different user interface. You can choose from various popular custom ROMs like LineageOS, Resurrection Remix, or Paranoid Android to enhance your gaming experience or try out new features.
- Boost performance: Rooting your Xperia Play allows you to install apps and mods that can boost the device’s performance. You can overclock the CPU, adjust the GPU settings, or use performance-boosting apps to get a smoother and faster gaming experience. Just be cautious with these modifications and ensure that you have adequate knowledge to avoid any potential issues.
- Remove bloatware: Android devices often come with pre-installed apps called bloatware, which can take up valuable storage space and slow down your device. After rooting, you can easily remove these unwanted apps to free up space and improve overall performance. Make sure to research and identify which apps are safe to remove to avoid any problems.
- Backup and restore: Rooting your Xperia Play gives you the ability to perform full system backups using apps like Titanium Backup. With these backups, you can easily restore your device to a specific state or transfer your data to a new device, providing you with peace of mind knowing that your data is protected.
- Customize your device: Root access opens up a world of customization options for your Xperia Play. You can install custom themes, change system fonts, customize the navigation bar, and even tweak system animations. Adding a personal touch to your device will make it truly unique and tailored to your preferences.
It’s important to note that rooting your Xperia Play may void your warranty, so it’s crucial to weigh the pros and cons before proceeding. Additionally, always ensure that you follow the correct steps and use trusted sources when rooting and modifying your device.
Remember, with great power comes great responsibility. Enjoy exploring the possibilities with your rooted Xperia Play, but always exercise caution and stay informed about the potential risks and benefits.
Conclusion
In conclusion, rooting your Xperia Play can unlock a whole new world of possibilities and customization options. By gaining administrative access to your device, you can install custom ROMs, remove bloatware, and optimize performance to suit your needs.
However, it’s important to note that rooting your device voids the warranty and carries some risks if not done properly. It’s crucial to follow the instructions carefully and ensure that you have a clear understanding of the process. Additionally, always make sure to backup your data before attempting to root your phone.
If you’re a tech-savvy individual looking to take full control of your Xperia Play, rooting can be a rewarding experience. Enjoy the freedom to personalize your device and explore new features and functionalities that were previously inaccessible.
Remember, with great power comes great responsibility, so proceed with caution and enjoy the endless possibilities that come with rooting your Xperia Play.
FAQs
1. What does it mean to root a Xperia Play?
Rooting an Xperia Play refers to the process of gaining privileged control or access over the device’s operating system. It allows users to customize their phone, install custom ROMs, access restricted features, and optimize performance.
2. Is rooting an Xperia Play legal?
Yes, rooting an Xperia Play is legal. However, it may void your device’s warranty, so it’s essential to understand the risks involved before proceeding.
3. How can I root my Xperia Play?
To root your Xperia Play, you will need to follow a specific set of instructions tailored to your device’s model and software version. It is recommended to research and find a reliable guide or tutorial that provides step-by-step instructions to ensure a successful rooting process.
4. What are the benefits of rooting an Xperia Play?
Rooting your Xperia Play offers several benefits, including:
– Increased device customization options.
– Ability to remove pre-installed bloatware.
– Enhanced system performance and battery life.
– Access to advanced customization settings and features.
– Compatibility with custom ROMs, allowing for a unique user experience.
5. Are there any risks involved in rooting an Xperia Play?
While rooting gives you more control over your Xperia Play, it also carries some risks, including:
– Voiding the device’s warranty.
– Increased potential for software instability or compatibility issues.
– The possibility of bricking your device if the rooting process is not done correctly.
– Increased susceptibility to security threats if you install questionable apps or modifications.