
Screen recording has become an essential feature for capturing and sharing content on mobile phones. Whether you want to record gameplay, create tutorials, or save important moments, being able to screen record with sound on your iPhone is a must-have skill. In this article, we will guide you through the process of screen recording with sound on your iPhone, keeping you up to date with the latest methods and techniques in 2023. From enabling the necessary settings to selecting the perfect recording options, we’ll cover everything you need to know to effortlessly capture the audio and visuals from your iPhone screen. So, if you’re ready to level up your screen recording game, let’s dive in and explore the world of screen recording with sound on your trusty iPhone.
Inside This Article
- Overview of Screen Recording on iPhone
- Enabling Sound for Screen Recording on iPhone
- Setting the Microphone for Screen Recording on iPhone
- Conclusion
- FAQs
Overview of Screen Recording on iPhone
Screen recording is a powerful feature available on iPhones that allows you to capture everything happening on your device’s screen. Whether you want to save a video tutorial, capture gameplay moments, or demonstrate an app’s functionality, screen recording comes in handy. With just a few taps, you can start recording your screen and create professional-looking videos.
Screen recording on iPhone is an incredibly useful tool for various purposes. It allows you to create visual guides, share important information, and troubleshoot technical issues. The ability to record your screen with ease makes it a valuable feature for educators, content creators, app developers, and anyone who wants to showcase their iPhone’s capabilities.
Not only does screen recording capture the visuals on your iPhone’s screen, but it can also record audio simultaneously. This means you can include voice narration, background music, or even record conversations during the screen recording process. Having sound in your screen recordings adds an extra layer of engagement and helps convey your message more effectively.
The built-in screen recording feature on iPhone provides numerous benefits. It eliminates the need for third-party apps, ensuring a seamless and integrated experience. Additionally, screen recordings are saved directly to your device’s Photos app, making it easy to access and share your recordings with others.
Enabling Sound for Screen Recording on iPhone
If you are wondering how to record the audio along with your screen recording on your iPhone, you are in the right place! Enabling sound for screen recording allows you to capture not only the visuals but also the accompanying audio, making your recordings more immersive and engaging.
Fortunately, enabling sound for screen recording on your iPhone is a simple and straightforward process. Let’s dive into the steps below to get started:
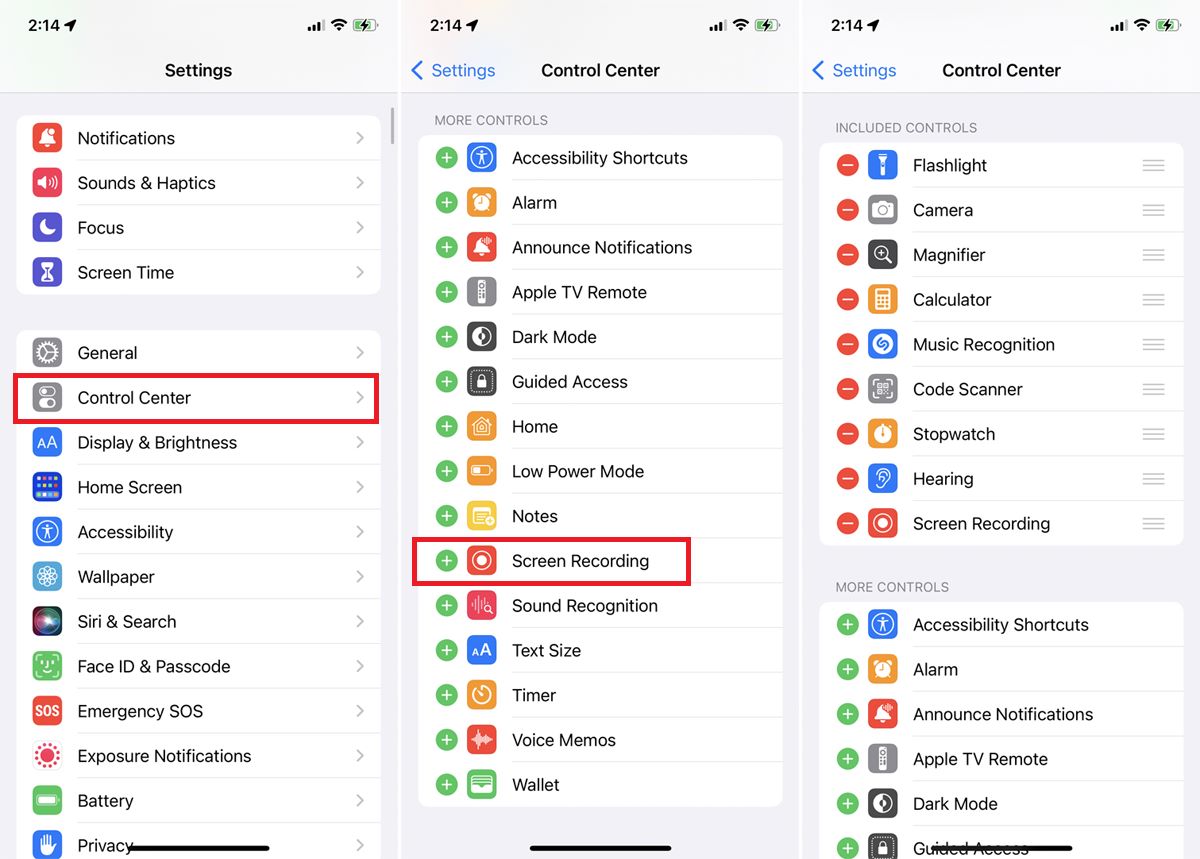
- Firstly, open the Settings app on your iPhone.
- Scroll down and tap on Control Center.
- In the Control Center settings, locate Screen Recording and tap on the green plus icon next to it. This will add the Screen Recording button to your Control Center.
- Exit the Settings app and access the Control Center by swiping down from the top-right corner of the screen (on newer iPhones running iOS 14 or later) or swiping up from the bottom of the screen (on older iPhones or iOS 13 and earlier).
- In the Control Center, you will see the Screen Recording button, which looks like a circle surrounded by a larger circle. Tap on it to start the screen recording process.
- After tapping the Screen Recording button, a countdown timer of three seconds will appear. During this time, you can navigate to the app or screen you want to record.
- To enable sound recording, long-press the Screen Recording button in the Control Center.
- A menu will appear, showing the available audio sources for the screen recording. Tap on Microphone Audio to select it and enable sound recording. If you want to record system audio, such as the sound from videos, music, or games, you can tap on Record Without Microphone.
- Once you have selected your audio source, tap on Start Recording to begin capturing your screen along with the sound.
- When you have finished recording, tap on the red status bar at the top of the screen or swipe up from the bottom and tap on the red stop button to end the recording.
- Your screen recording with sound will be automatically saved to the Photos app on your iPhone where you can view, edit, and share it as needed.
Now you know how to enable sound for screen recording on your iPhone! Whether you want to create instructional videos, capture gameplay, or save important moments on your device, adding sound to your screen recordings adds an extra layer of richness to the viewing experience. So start recording and let your creativity shine!
Setting the Microphone for Screen Recording on iPhone
If you want to include audio commentary or any sounds from your surroundings while screen recording on your iPhone, it’s important to properly set up the microphone. This ensures that the recorded audio is clear, crisp, and synchronized with the video. Here’s how you can easily configure the microphone settings for screen recording on your iPhone:
1. Launch the “Settings” app on your iPhone.
2. Scroll down and tap on “Control Center.”
3. Select “Customize Controls.”
4. Look for the “Screen Recording” option and tap on the green plus (+) icon next to it. This will add the Screen Recording control to your Control Center.
5. Now, exit the “Settings” app and swipe down from the top right corner or swipe up (depending on your iPhone model) to open the Control Center.
6. In the Control Center, locate the screen recording icon. It looks like a white circle inside a larger red circle. Press and hold the screen recording icon.
7. You will see an option for “Microphone Audio.” Tap on it to toggle the audio on or off for screen recording.
8. If you want to include audio commentary or sounds from your surroundings in the screen recording, make sure the “Microphone Audio” option is enabled. A blue microphone icon will appear on the screen recording icon to indicate that the audio is being recorded.
9. If you don’t want to include audio in the screen recording, ensure that the “Microphone Audio” option is disabled. The blue microphone icon will disappear from the screen recording icon.
10. To begin screen recording with the selected microphone settings, tap on the screen recording icon once.
11. After the screen recording starts, you can proceed with capturing the desired content from your iPhone. Remember that any audio from your surroundings or audio commentary will be recorded as long as the microphone settings are properly configured.
12. To end the screen recording, tap on the red status bar at the top of the screen and select “Stop Recording.” Alternatively, you can also open the Control Center and tap on the screen recording icon again.
By following these steps, you can easily set up the microphone for screen recording on your iPhone and capture high-quality video content along with clear audio. Whether you’re creating tutorials, sharing gameplay, or demonstrating app features, having proper audio synchronization enhances the overall viewing experience for your audience.
Conclusion
In conclusion, being able to screen record with sound on your iPhone is a valuable feature that can greatly enhance your mobile experience. Whether you want to capture a memorable moment, demonstrate a process, or share your gaming skills, screen recording offers endless possibilities.
By following the steps outlined in this guide, you can easily enable screen recording with sound on your iPhone. Remember to consider your device’s settings, choose the right microphone option, and adjust the audio levels for optimal results.
With this newfound knowledge, you can now confidently record videos with sound on your iPhone and enjoy seamless sharing and editing experiences. So go ahead, explore the countless creative prospects that screen recording has to offer and make the most out of your iPhone’s capabilities.
FAQs
1. Can I screen record with sound on my iPhone?
Absolutely! With the latest iOS update in 2023, Apple has introduced the feature that allows you to screen record with sound on your iPhone. Whether you want to capture a video clip from a game or record a tutorial, you can now capture both the visuals and the accompanying sound seamlessly.
2. How do I enable screen recording with sound on my iPhone?
Enabling screen recording with sound on your iPhone is quick and easy. Here’s how:
- Open the Control Center by swiping down from the top-right corner of your iPhone’s screen (or up from the bottom on older iPhone models).
- Look for the screen recording icon, which looks like a filled-in circle inside another circle. If you don’t see it, you may need to add it to your Control Center options in the settings.
- Press and hold the screen recording icon until a popup appears. Here you can toggle on/off options such as microphone audio, which allows you to record sound.
- Tap on the “Start Recording” button to begin your screen recording with sound.
3. Does screen recording with sound affect the performance of my iPhone?
Screen recording with sound may slightly impact the performance of your iPhone, particularly if you are recording high-resolution videos or using resource-intensive apps. However, the impact is generally minimal and should not significantly affect the overall functionality or speed of your device.
4. Can I edit the recorded screen video with sound on my iPhone?
Yes, after you have finished recording a screen video with sound on your iPhone, you can edit it using the built-in Photos app. Simply open the app, find and select the recorded video, and tap on the “Edit” button. From there, you can trim the video, add captions, apply filters, or make any other desired edits before saving or sharing the final video.
5. Are there any limitations to screen recording with sound on an iPhone?
While screen recording with sound on an iPhone offers great flexibility, there are a few limitations to keep in mind:
- You cannot record certain copyrighted content, such as streaming videos and music from apps like Netflix or Apple Music, due to DRM restrictions.
- Recording audio from phone calls or other private conversations without all parties’ consent is illegal in most jurisdictions.
- Using screen recording with sound for malicious purposes, such as capturing sensitive information without permission, is unethical and potentially illegal.