
Are you someone who often forgets to send important messages on time? Well, fret not because your iPhone has got you covered! Sending timed messages on your iPhone is a handy feature that allows you to compose messages in advance and schedule them to be sent at a specific time and date.
Whether you want to wish someone a happy birthday at midnight or send a reminder to your friend about an upcoming event, the timed messages feature ensures that your messages are delivered at the perfect moment. It’s a nifty tool that can help you stay organized and ensure that you never miss sending a message again.
In this article, we will guide you through the process of sending timed messages on your iPhone. We will explore the different methods available and provide you with step-by-step instructions to make the process as seamless as possible. So, let’s dive in and discover how you can become a pro at sending timed messages on your iPhone!
Inside This Article
- Setting up the Messages app
- Composing a timed message
- Customizing timing options
- Managing and editing timed messages
- Conclusion
- FAQs
Setting up the Messages app
Setting up the Messages app on your iPhone is a simple process that allows you to send and receive text messages, photos, videos, and more. Whether you’re new to iOS or upgrading to a new iPhone, here’s a step-by-step guide to help you get started.
1. Open the Messages app: Locate the green-colored Messages app icon on your home screen and tap on it. This will launch the app and take you to your message inbox.
2. Sign in with your Apple ID: If you’re setting up Messages for the first time, you’ll be prompted to sign in with your Apple ID. This is necessary to sync your messages across multiple devices and enable iCloud backups. Enter your Apple ID and password, or create a new Apple ID if you don’t have one.
3. Verify your phone number: After signing in, you may be prompted to verify your phone number. This step is essential for sending and receiving messages using your mobile number. Follow the on-screen instructions to complete the verification process.
4. Choose your default messaging method: In the Messages settings, you can choose your preferred method of sending and receiving messages. You can select between iMessage (for sending messages over Wi-Fi or cellular data) or SMS (for sending messages using your mobile carrier’s network). Select the option that suits your needs.
5. Set up additional features: The Messages app offers several additional features and settings to enhance your messaging experience. These include read receipts, message effects, and tapbacks. Explore the settings menu to customize these features according to your preferences.
6. Sync your messages across devices (optional): If you have multiple Apple devices, such as an iPad or Mac, you can enable message syncing to ensure that all your conversations stay up-to-date. Go to Settings > Messages > Send & Receive and check the “Use your Apple ID for iMessage” option. Then, select the email addresses and phone numbers you want to associate with your Apple ID for message syncing.
Once you’ve completed these steps, you’re all set to start using the Messages app on your iPhone. You can now send and receive messages, create group chats, attach media files, and enjoy all the features this versatile app has to offer.
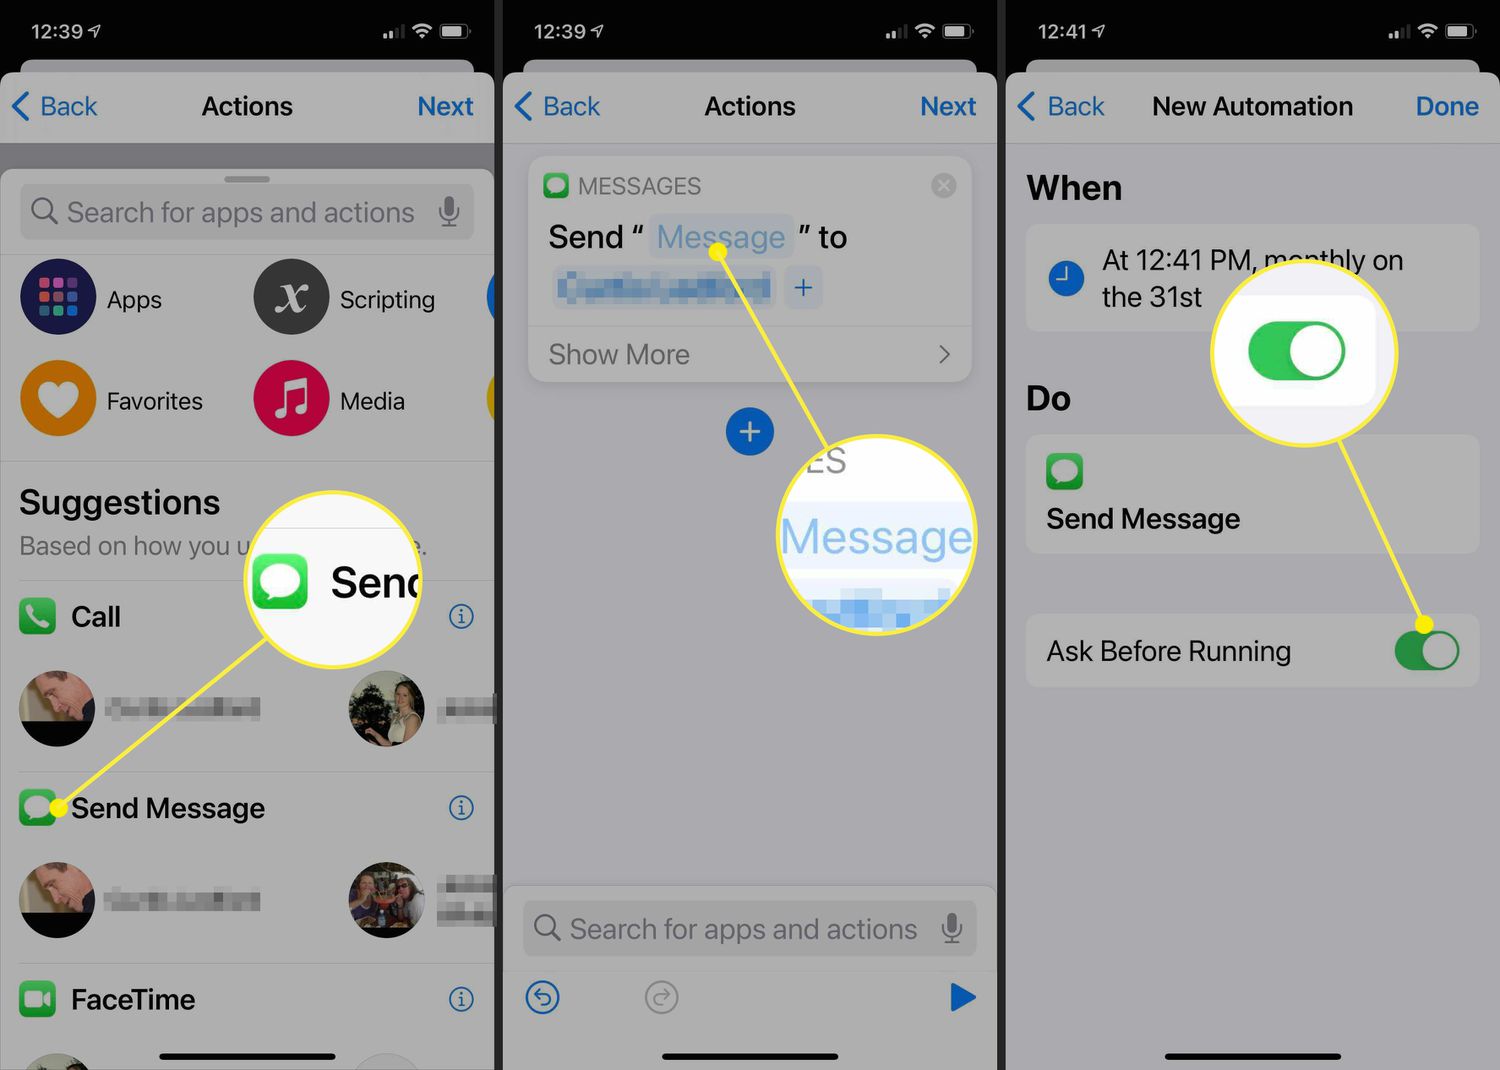
Composing a timed message
Sending a timed message on your iPhone can be a convenient way to schedule texts ahead of time, whether it’s a birthday greeting, a reminder, or a simple hello to a friend. Follow these steps to compose a timed message:
- Open the Messages app on your iPhone.
- Tap on the conversation where you want to send the timed message.
- In the text input field, type your desired message as you normally would.
- Now, instead of tapping the send button right away, long-press on the send button. This will bring up the additional sending options.
- From the menu that appears, select the “Schedule” option.
- You will be presented with various timing options to choose from. Select the one that best suits your needs.
- Once you’ve chosen the timing option, tap on the “Done” button.
- The timed message will now appear in the conversation with a clock icon next to it, indicating that it is scheduled to be sent at the designated time.
It’s important to note that the recipient must also be using an iPhone for the timed message feature to work properly. If the recipient is using a different device or platform, they may receive the message at the time it was originally sent instead.
Composing a timed message allows you to conveniently plan and schedule your texts, ensuring that they are sent at the most appropriate times. Whether you want to surprise a loved one on their special day or simply send an important reminder, this feature adds a new level of flexibility and convenience to your messaging experience.
Customizing timing options
When it comes to sending timed messages on your iPhone, customizing the timing options gives you the flexibility to choose the perfect moment for your message to be delivered. Here are some ways you can personalize the timing of your messages:
1. Delayed Delivery: The ability to delay the delivery of your message is a useful feature that ensures your message reaches its recipient at the most opportune time. Whether you want to wish someone a happy birthday right at midnight or send a reminder when they are most likely to see it, you can customize the delay by selecting the specific date and time for your message to be sent.
2. Scheduled Repeat: If you frequently send the same message to multiple recipients, the scheduled repeat option will save you time and effort. You can create a message template and set it to automatically repeat at specified intervals. This is especially handy for reminding your team members about important meetings or sending daily updates to your loved ones.
3. Do Not Disturb: This option allows you to prevent your timed messages from triggering any alerts on the recipient’s device. It’s perfect for situations when you want to send a message at a specific time, but you don’t want to disturb the recipient’s focus or sleep. This feature ensures that your message is silently delivered without causing any interruptions.
4. Group Messaging: Customizing timing options is not limited to individual contacts. With group messaging, you can schedule messages to be sent to multiple recipients simultaneously. This is great for coordinating plans, sending event reminders, or simply keeping everyone in the loop. You can choose the specific date and time for the message to be delivered to the entire group.
5. Time Zone Compatibility: If you frequently communicate with people in different time zones, it’s crucial to consider their local time when scheduling your messages. Thankfully, the timing options on your iPhone take time zone compatibility into account. Simply select the recipient’s time zone, and your message will be delivered at the designated time in their location.
With these customizable timing options, sending timed messages on your iPhone becomes a breeze. Whether you want to send a message at the stroke of midnight or coordinate plans across the globe, you have the power to choose the perfect timing for your messages.
Managing and editing timed messages
Once you have sent a timed message on your iPhone, you may find the need to manage or edit it at a later time. Fortunately, the Messages app offers convenient options to help you accomplish this.
To manage your timed messages, follow these steps:
- Launch the Messages app on your iPhone.
- Open the conversation thread containing the timed message you want to manage.
- Tap and hold the timed message bubble until a menu appears.
- From the menu options, select “Manage.” This will open the management screen for the timed message.
From the management screen, you have several options to choose from:
- Delete: If you no longer want the timed message to be sent, you can simply tap “Delete” to remove it from the message thread.
- Edit: If you need to make changes to the content of the timed message, tap “Edit” and make the necessary modifications. Once done, tap “Save” to apply the changes.
- Reschedule: If you want to change the timing of the timed message, tap “Reschedule” and select a new date and time from the available options.
- Cancel: If you decide to cancel the sending of the timed message altogether, tap “Cancel.” This will remove the timed message from the message thread and ensure it is not sent.
As you manage your timed messages, it’s important to keep in mind that any changes or deletions you make will only affect the message on your device. If the recipient has already received the message, your modifications or deletions will not have any impact on their end.
With the ability to manage and edit timed messages on your iPhone, you can ensure that your messages are delivered at the right time with the right content. Whether you need to make last-minute changes or reschedule a message, the Messages app provides the flexibility and control you need.
Conclusion
Being able to send timed messages on your iPhone can be a convenient and practical feature, allowing you to schedule important messages in advance and ensure that they are delivered at the right moment. Whether you want to send birthday wishes, reminders, or important updates, the ability to schedule messages can save you time and effort.
With the help of various methods, such as using third-party apps or taking advantage of the built-in scheduling feature in iOS, you have multiple options to send timed messages on your iPhone. Take the time to explore these methods and find the one that best suits your needs.
Remember to always double-check your scheduled messages to avoid any mishaps. Additionally, keep in mind that not all messaging apps support scheduling, so be sure to use an app that offers this functionality.
By mastering the art of sending timed messages, you can streamline your communication and never miss an important occasion again. So go ahead, give it a try, and enjoy the convenience of scheduled messaging on your iPhone.
FAQs
1. Can I send timed messages on iPhone?
Yes, you can send timed messages on iPhone using the built-in messaging app. This feature allows you to schedule messages to be sent at a specific date and time.
2. How do I send a timed message on iPhone?
To send a timed message on iPhone, follow these steps:
- Open the Messages app on your iPhone.
- Compose a new message by tapping on the “New Message” icon.
- Type in the recipient’s name or phone number.
- Write your message in the text field.
- Tap and hold the send button (the arrow icon) until the “Send with Effect” menu appears.
- From the menu options, select “Schedule Send.”
- Select the desired date and time for the message to be sent.
- Tap “Done” to schedule the message.
- Review the message details and tap “Send” to confirm the scheduled message.
3. Can I edit or cancel a scheduled message on iPhone?
Yes, you can edit or cancel a scheduled message on iPhone before it is sent. To do so, follow these steps:
- Open the Messages app on your iPhone.
- Tap and hold the message you want to edit or cancel until a menu appears.
- Select “Edit Message” or “Cancel Message” from the menu options.
- If you choose to edit the message, make the necessary changes and tap “Send.”
- If you choose to cancel the message, confirm the cancellation by tapping “Cancel Send.”
4. Are timed messages available for all messaging apps on iPhone?
No, timed messages are only available for the native Messages app on iPhone. Third-party messaging apps may have their own scheduling features, but they may vary in functionality and availability.
5. What happens if the recipient’s phone is turned off when a timed message is scheduled to be sent?
If the recipient’s phone is turned off or not connected to the internet at the scheduled send time, the message will not be delivered immediately. However, once the recipient’s phone is turned on or connected to the internet, the message will be sent automatically.