
Group texting has become a popular and convenient way to communicate with multiple people simultaneously. The iPhone, with its seamless integration of features and user-friendly interface, offers a straightforward process for creating group texts. Whether you need to coordinate with a group of friends, plan a surprise party, or collaborate with colleagues, the ability to send a single message to multiple recipients will save you time and effort.
In this article, we will guide you through the steps to create group texts on your iPhone. We will explore the various methods available and provide you with a detailed explanation of how to use each one effectively. So, whether you are a seasoned iPhone user or a newcomer to the iOS ecosystem, get ready to take your messaging game to the next level and make group texting a breeze.
Inside This Article
- How To Create Group Text On iPhone
- Adding Contacts to a Group
- Creating a Group Text Message
- How To Create Group Text On iPhone
- Adding Contacts to a Group
- Creating a Group Text Message
- Sending a Group Text Message
- Managing and Editing Group Texts
- Conclusion
- FAQs
How To Create Group Text On iPhone
Creating a group text on your iPhone allows you to easily communicate with multiple contacts at once. Whether you’re planning a surprise party, organizing a team project, or just catching up with a group of friends, group texts can help keep everyone in the loop. In this article, we’ll show you how to create a group text on your iPhone in a few simple steps.
Step 1: Start a Group Chat
The first step is to open the Messages app on your iPhone and tap on the new message icon in the top-right corner. Instead of adding one recipient, we’ll be adding multiple contacts to create a group chat. Enter the name or phone number of the first contact you want to include in the group, and their name should appear in the recipient field.
Step 2: Add Contacts to the Group
To add more contacts to the group, tap on the “Add Contact” button (often represented by a + symbol) next to the recipient field. This will open your contacts list, where you can select the additional contacts you want to include. You can select as many contacts as you’d like to create the desired group. Once you’ve added all the necessary contacts, tap on the “Done” button in the top-right corner to return to the message composition screen.
Step 3: Customize the Group Name
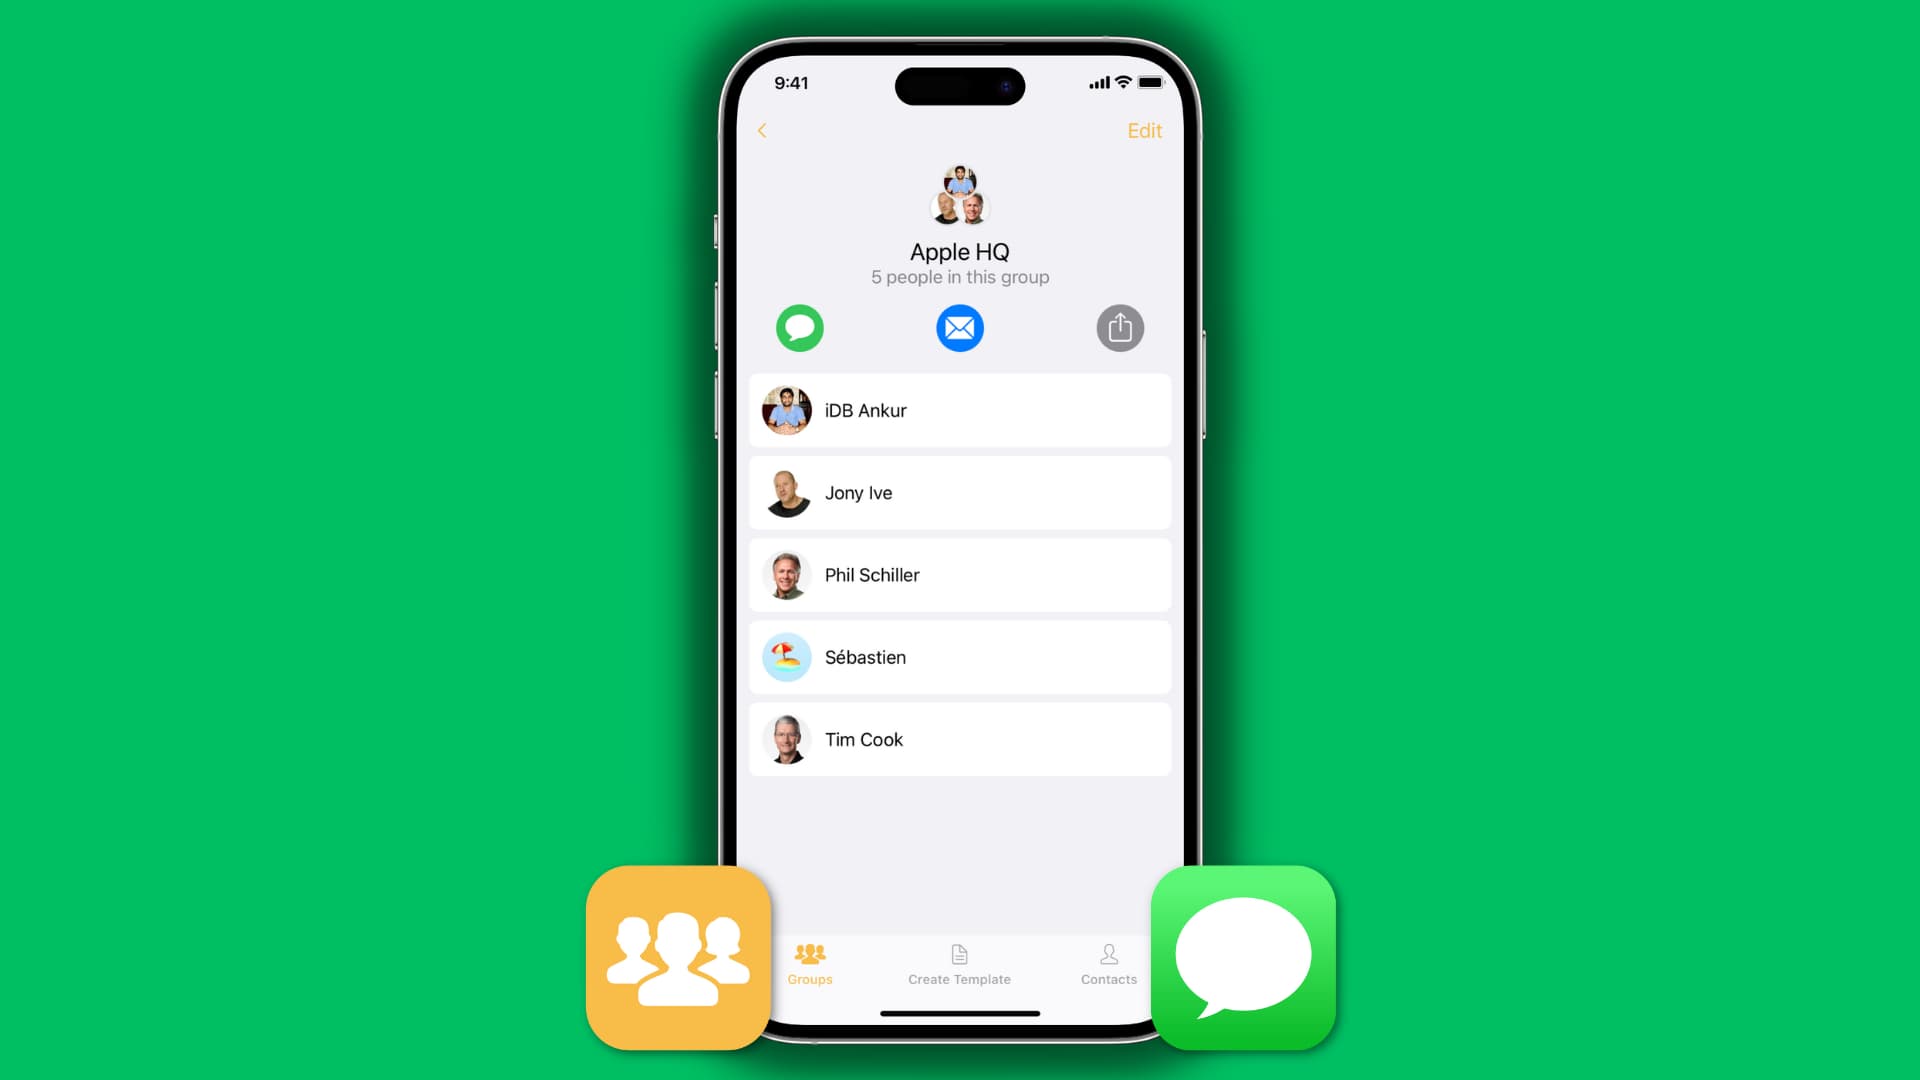
By default, the group chat will be named based on the names of the contacts included. However, you can customize the group name to something more descriptive or fun. Tap on the “i” icon in the top-right corner of the group chat, and then tap on “Enter a Group Name.” Type in the desired name for the group and tap on “Done” to save the changes.
Step 4: Send Messages to the Group
Now that you’ve created the group chat and added your contacts, you can start sending messages to the entire group. Simply type your message in the text field at the bottom of the screen and tap on the send icon (usually a paper plane) to send it. All the recipients in the group chat will receive the message, and their responses will be visible to everyone in the chat.
Group texts on iPhone make it convenient to communicate with multiple contacts simultaneously. Whether you’re planning an event, coordinating a team, or just chatting with a group of friends, creating a group chat ensures that everyone stays connected and up to date. Follow the simple steps outlined above and enjoy the benefits of hassle-free group texting on your iPhone.
Adding Contacts to a Group
Creating a group text on your iPhone allows you to easily communicate with multiple people at once. Once you have started a group chat, the next step is to add contacts to the group. Here’s how you can do it:
- Open the Messages app on your iPhone.
- Tap on the existing group chat or start a new one by tapping on the “Compose” button and selecting multiple contacts.
- Once you’re in the group chat, tap on the “i” icon at the top-right corner of the screen.
- Scroll down and tap on the “Add Contact” option. This will open your iPhone’s contacts list.
- Select the contacts you want to add to the group by tapping on their names. You can select multiple contacts by tapping on each one individually.
- After selecting the contacts, tap on the “Done” button at the top-right corner of the screen.
By following these steps, you can add as many contacts as you want to the group chat. This is especially useful when you have a large number of people you want to include in a conversation, such as planning a group outing or organizing a team event.
It’s important to note that the contacts you add to the group must have the iMessage feature enabled. Otherwise, they will be unable to receive or participate in the group chat if they are using a non-Apple device or do not have iMessage configured.
Once you have added contacts to the group chat, they will be able to see all the messages sent by other group members and participate in the conversation. This makes it easy and convenient to have group discussions and share information with multiple people simultaneously on your iPhone.
Creating a Group Text Message
Group text messaging on the iPhone allows you to conveniently send messages to multiple recipients at once, making it perfect for coordinating plans, sharing updates, or simply staying connected with a group of friends or colleagues. Here’s how you can create a group text message on your iPhone:
- Open the Messages app on your iPhone. It’s the green speech bubble icon.
- Tap on the pencil and paper icon in the top right corner of the Messages screen to start a new message.
- In the “To:” field, begin typing the name or phone number of the first contact you want to include in the group. As you type, suggestions will appear below that you can tap on to select the contact.
- Repeat step 3 to add more contacts to the group. You can also tap on the “+” button to browse your contacts and select additional recipients.
- Once you have added all the desired contacts, type your message in the text field at the bottom of the screen.
- When you’re ready to send the message, tap on the send button, which looks like a blue arrow.
And there you have it! You have successfully created a group text message on your iPhone. All the recipients in the group will receive the message and can respond to it, creating a seamless and efficient way to communicate with multiple people at once.
It’s worth noting that group text messaging uses the cellular network, so it may incur charges based on your cellular plan. If you prefer to use a messaging app or want to avoid potential costs, you can also consider creating a group in a messaging app like WhatsApp or Facebook Messenger where you can send messages using an internet connection.
Additionally, if you want to keep your group organized or easily identify it, you can customize the group name. To do this, simply tap on the “i” icon next to the group chat, then tap on “Group Name.” From there, you can enter a name for your group, such as “Family,” “Work Team,” or any other identifier that makes sense to you.
Creating a group text message on your iPhone is a great way to streamline your communication and keep everyone in the loop. Whether you’re planning a surprise party, coordinating a trip, or simply staying connected, the group text messaging feature on the iPhone offers a convenient and efficient way to send messages to multiple recipients at once.
How To Create Group Text On iPhone
Creating a group text on iPhone allows you to conveniently send messages to multiple contacts at once. Whether you want to plan an event, coordinate with a team, or simply catch up with friends, group texts are a practical and efficient way to stay connected. In this article, we will guide you through the process of creating a group text on iPhone, step by step.
Adding Contacts to a Group
The first step in creating a group text on iPhone is to add contacts to the group. Here’s how you can do it:
- Open the Messages app on your iPhone.
- Tap on the compose button to start a new message.
- In the “To” field, enter the name of the first contact you want to add to the group. You can type their name or select it from your contacts.
- Once the contact is selected, tap on the “+” button next to their name to add them to the group.
- Repeat the process for each contact you want to add to the group. You can add as many contacts as you like.
Once you have added all the contacts to the group, you are ready to move on to the next step.
Creating a Group Text Message
Now that you have added contacts to the group, it’s time to create a group text message. Follow these steps:
- In the Messages app, open the existing group conversation or create a new one by following the steps mentioned earlier.
- Type your message in the text field at the bottom of the screen.
- You can also attach photos, videos, or other media to your message by tapping on the camera icon next to the text field.
- Once you have composed your message, tap on the send button to send it to the entire group.
Congratulations! You have successfully created a group text message on your iPhone.
Sending a Group Text Message
Sending a group text message is as easy as sending a regular text message. Here are the steps:
- Open the Messages app on your iPhone.
- Tap on the existing group conversation or create a new one by following the steps mentioned earlier.
- Type your message in the text field at the bottom of the screen.
- Tap on the send button to send the message to the entire group.
Each member of the group will receive the message, and their replies will be visible to everyone in the group conversation.
Remember to respect people’s privacy and obtain their consent before adding them to a group or sharing their contact information. It’s always a good practice to communicate and collaborate with others responsibly and considerately.
Now that you know how to create and send group text messages on iPhone, you can easily stay connected with multiple contacts at once. Take advantage of this feature to streamline your communication and make group conversations more efficient.
Managing and Editing Group Texts
Once you have created a group text message on your iPhone, you may need to manage and edit it as the conversation progresses. Here are some useful tips on how to effectively manage and edit group texts:
1. Adding or Removing Members: To add or remove members from an existing group text, follow these steps:
- Open the group text conversation on your iPhone.
- Tap on the group name or icons at the top of the conversation.
- Scroll down and tap on “Add Contact” to add new members to the group.
- If you want to remove a member, swipe left on their name and tap “Remove”.
2. Leaving a Group Text: If you no longer wish to be part of a group text, you can easily leave the conversation. Here’s how:
- Open the group text conversation on your iPhone.
- Tap on the group name or icons at the top of the conversation.
- Scroll down and tap on “Leave This Conversation”.
- Confirm your decision by tapping “Leave This Conversation” again.
3. Editing the Group Name: You can customize the name of the group text to make it easier to identify. Follow these steps to edit the group name:
- Open the group text conversation on your iPhone.
- Tap on the group name or icons at the top of the conversation.
- Tap on the current group name and enter the new name using the keyboard.
- Tap “Done” to save the new group name.
4. Muting Group Notifications: If you find the constant notifications from a group text to be distracting, you can mute them temporarily. Here’s how:
- Open the group text conversation on your iPhone.
- Tap on the group name or icons at the top of the conversation.
- Toggle on the “Hide Alerts” switch.
5. Archiving or Deleting Group Texts: If you want to declutter your message inbox, you can archive or delete old group text conversations:
- To archive a group text, swipe left on the conversation in your message inbox and tap “Archive”.
- To delete a group text, swipe left on the conversation and tap “Delete”. Note that deleting a group text will remove it permanently.
By effectively managing and editing your group texts on your iPhone, you can stay organized and maintain better communication within your groups. Whether it’s adding or removing members, customizing the group name, muting notifications, or archiving/deleting conversations, these tips will help you streamline your group text experiences.
Conclusion
In conclusion, creating group texts on your iPhone is a breeze with the built-in messaging app. Whether you are planning an event, coordinating a project, or simply keeping in touch with a group of friends or family members, group texting allows you to communicate efficiently and effectively.
By following the simple steps outlined above, you can easily set up and manage group texts on your iPhone. Remember to choose the appropriate contacts, give your group a distinctive name, and take advantage of the various features available, such as muting notifications or sending multimedia files.
Group texting saves time and effort by allowing you to send a single message to multiple recipients at once. It fosters collaboration, promotes communication, and ensures that everyone is kept up-to-date in real-time.
So, the next time you need to discuss plans, share information, or have a group conversation, make use of the group texting feature on your iPhone for seamless communication and effortless coordination. Stay connected and stay in the loop with the power of group texting on your iPhone!
FAQs
1. How do I create a group text on iPhone?
To create a group text on your iPhone, follow these steps:
1. Open the Messages app on your iPhone.
2. Tap on the “compose” button to start a new message.
3. In the “To” field, enter the contact names or phone numbers of the people you want to include in the group text. You can also tap on the “+” button to select contacts from your address book.
4. Type your message in the text field.
5. Tap on the blue arrow icon to send the group text message to all the selected contacts.
2. Can I name the group text on iPhone?
Yes, you can name a group text on iPhone to make it easier to identify and differentiate from other group texts. Here’s how to do it:
1. Open the Messages app on your iPhone.
2. Tap on the existing group text conversation you want to name.
3. Tap on the “i” icon at the top right corner of the screen.
4. Scroll down and tap on “Enter a Group Name” option.
5. Type the desired name for the group text and tap on “Done” to save it.
3. Can I add or remove people from an existing group text on iPhone?
Yes, you can add or remove people from an existing group text on iPhone. Here’s how:
– To add people to a group text conversation:
1. Open the Messages app on your iPhone.
2. Tap on the existing group text conversation.
3. Tap on the “i” icon at the top right corner of the screen.
4. Tap on “Add Contact” and select the contacts you want to add.
– To remove people from a group text conversation:
1. Open the Messages app on your iPhone.
2. Tap on the existing group text conversation.
3. Tap on the “i” icon at the top right corner of the screen.
4. Swipe left on the contact you want to remove and tap on “Remove”.
4. Is there a limit to the number of people I can include in a group text on iPhone?
Yes, there is a limit to the number of people you can include in a group text on iPhone. The maximum number of participants allowed in a group text depends on your carrier and the iOS version you’re using. Generally, the limit ranges from 20 to 30 participants. If you exceed the limit, you may need to create multiple group texts or consider using a third-party messaging app.
5. Can I customize the appearance of group texts on iPhone?
Yes, you can customize the appearance of group texts on iPhone. You can choose to enable or disable group message notifications, show or hide alerts, and even set different tones for group texts. To customize these settings, go to the Settings app on your iPhone, scroll down and tap on “Messages”, and then navigate to the “Group Messaging” section.