
Are you tired of scrolling through your iPhone contacts to find the right people to send a group message or email? Well, look no further! In this article, we will show you how to create group contacts on your iPhone so that you can easily manage and communicate with multiple people at once. Whether you need to coordinate a family event, plan a work meeting, or simply send a quick update to your friends, having group contacts will save you time and effort. Say goodbye to the hassle of selecting individual contacts every time and say hello to the convenience of organizing your contacts into groups. So, let’s dive into the step-by-step process and unlock the power of group communication on your iPhone!
Inside This Article
- Setting Up Group Contacts
- Adding Contacts to a Group
- Managing Group Contacts
- Sending Messages or Emails to a Group
- Conclusion
- FAQs
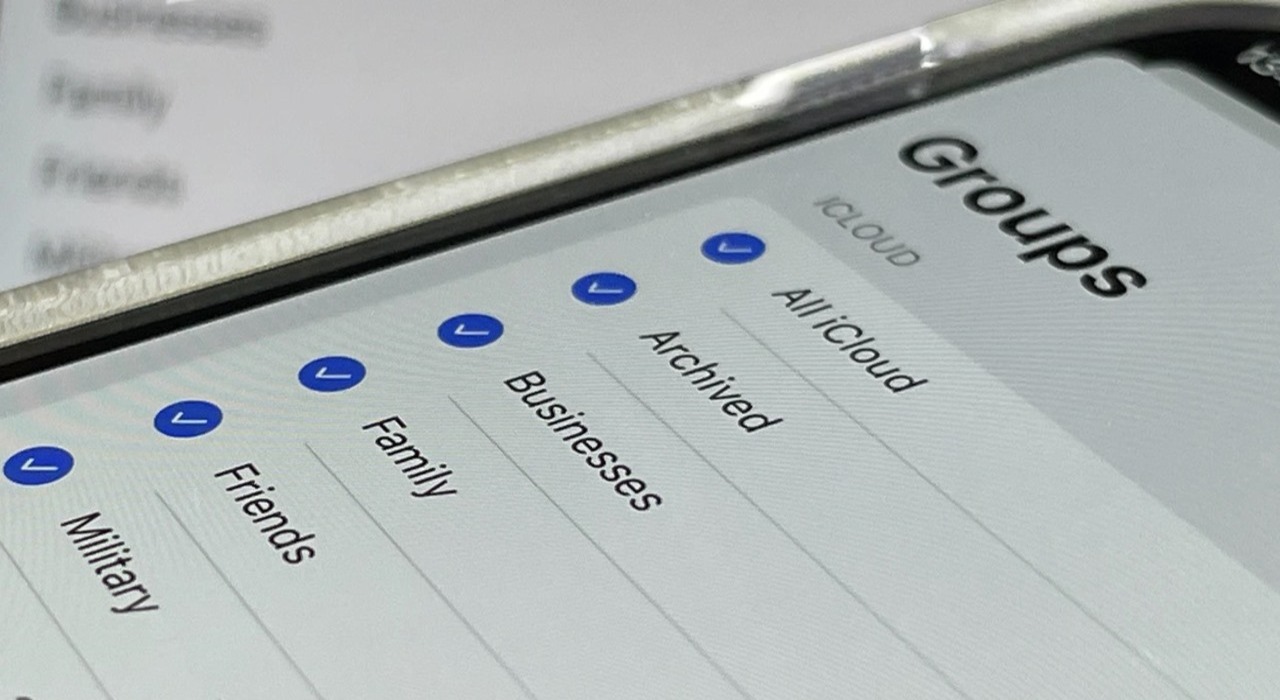
Setting Up Group Contacts
Creating group contacts on your iPhone can be incredibly useful when you want to send a message or email to multiple people at once. Instead of manually selecting each individual contact every time, you can simply create a group and add contacts to it. Here’s how to set up group contacts on your iPhone:
1. Open the Contacts app on your iPhone. It’s the icon that looks like a silhouette of a person.
2. Tap on the “Groups” option at the top-left corner of the screen. This will show you a list of available groups.
3. Scroll down and select “Add Group” to create a new group.
4. Give your new group a name. You can choose something descriptive like “Family,” “Friends,” or “Work Colleagues.”
5. Tap “Done” to save the group.
Now that you’ve created a group, you can start adding contacts to it.
Pro Tip: You can also create a group directly from a contact’s details. Simply open a contact, tap on “Edit,” scroll down to the “Add to Existing Group” option, and select or create a new group.
Adding Contacts to a Group
Creating a group of contacts on your iPhone can make it easier to communicate with multiple people at once. Whether you want to send a quick message or organize a group event, having all the contacts in one group can save you time and effort. Follow the steps below to add contacts to a group on your iPhone:
1. Open the Contacts App: Locate and open the “Contacts” app on your iPhone’s home screen.
2. Select the Contacts: From the list of contacts, select the ones you want to add to the group. You can tap on each contact’s name to select them, or tap the circle beside their names to mark them. You can add as many contacts as you want.
3. Tap on “Add to Group”: Once you have selected the contacts, tap on the “Add to Group” option located at the bottom of the screen. A menu will appear with different options.
4. Choose “New Group”: From the menu options, select “New Group” to create a new group for the selected contacts. Alternatively, if you already have existing groups, you can choose one of those options.
5. Name the Group: After selecting “New Group,” you will be prompted to name the group. Type in a name that describes the contacts in the group or the purpose of the group.
6. Save the Group: Once you have named the group, tap “Save” to create the group and add the selected contacts to it. The contacts will now be added to the newly created group.
7. Repeat the Process: To add more contacts to the group, repeat the process by selecting additional contacts and choosing the existing group or creating a new one.
By following these steps, you can easily add multiple contacts to a group on your iPhone. This feature can be particularly helpful when you need to send group messages, emails, or organize events with specific sets of people.
How To Create Group Contacts On iPhone
Managing Group Contacts
Once you have created a group of contacts on your iPhone, it’s important to know how to manage them efficiently. Here are some tips to help you effectively manage your group contacts:
Edit Group Information: If you need to change the name or add additional members to a group, you can easily do so. Simply go to the “Contacts” app, select the group you want to edit, and tap on the “Edit” button. From there, you can make any necessary changes to the group’s information.
Remove Contacts from a Group: If you need to remove a contact from a specific group, follow these steps. Open the “Contacts” app, go to the group, and tap on it to open the group’s contact list. Locate the contact you want to remove and swipe left. A red “Delete” button will appear. Tap on it to remove the contact from the group.
Add Contacts to a Group: To add contacts to an existing group, open the “Contacts” app and select the desired group. Tap on the “Edit” button and scroll down to find the “Add Contacts” option. Tap on it, and you will be able to search and add contacts to the group. You can either select multiple contacts at once or add them individually.
Sort Contacts within a Group: If you have a large number of contacts in a group, it may be helpful to sort them by name or any other desired criteria. To do this, open the “Contacts” app, select the group, and tap on the “Edit” button. From there, you will find the option to sort contacts. Choose the preferred sorting method, and your contacts will be organized accordingly.
Delete a Group: If you no longer need a particular group, you can delete it. Open the “Contacts” app and select the group you want to delete. Tap on the “Edit” button and scroll down until you find the “Delete Group” option. Confirm your choice, and the group will be removed from your iPhone.
By following these steps, you can easily manage your group contacts on your iPhone. Whether you need to add, remove, edit, or sort contacts within a group, these methods will ensure that your contact list is organized and easy to navigate.
Now that you know how to manage group contacts, let’s move on to the next section to learn how to send messages or emails to a group.
Sending Messages or Emails to a Group
Once you’ve set up your group contacts on your iPhone, it’s incredibly convenient to send messages or emails to the entire group all at once. This can save you time and effort, especially if you frequently communicate with the same set of people.
To send a message or email to a group, follow these simple steps:
- Open the Messages or Mail app on your iPhone.
- Compose a new message or email by tapping on the “New Message” or “Compose” button.
- In the recipient field, begin typing the name of the group you created. As you type, suggestions should appear below.
- Select the desired group from the suggestions. This will add all the contacts in the group as recipients.
- Write your message or email as you normally would and hit the send button.
That’s it! Your message or email will be sent to every member of the group you selected. It’s a quick and efficient way to reach out to multiple people simultaneously.
It’s important to note that when you send a message or email to a group, each recipient will receive the message or email individually. This means that they won’t see the other members of the group in the recipient list.
If you need to update the group or add/remove contacts in the future, make sure to follow the steps outlined in the previous sections to manage your group contacts.
Now that you know how to send messages or emails to a group on your iPhone, you can streamline your communication and stay in touch with your contacts more efficiently.
Conclusion
Creating group contacts on your iPhone can greatly simplify your communication and help you stay organized. By following the simple steps outlined in this article, you can effortlessly manage your contacts and streamline your messaging process. Whether you need to send a group text or make a group call, having group contacts set up is a valuable feature that saves you time and effort. With just a few taps, you can create, edit, and delete group contacts on your iPhone, customizing your communication experience to suit your needs.
So, start organizing your contacts today and enjoy the convenience of group contacts on your iPhone. Whether you’re planning an event, contacting family members, or collaborating with a team, group contacts will make your life easier and keep everyone connected. Take advantage of this powerful feature and harness the full potential of your iPhone’s communication capabilities.
FAQs
1. Can I create group contacts on my iPhone?
Yes, you can create group contacts on your iPhone. This allows you to easily send messages, emails, or make phone calls to a group of people at once.
2. How do I create a group contact on my iPhone?
To create a group contact on your iPhone, follow these steps:
- Open the Contacts app on your iPhone.
- Tap on the “Groups” tab located at the top left corner of the screen.
- Tap on the “Create New Group” option.
- Give your group a name.
- Add contacts to the group by tapping on the “Add Contact” option.
- Select the contacts you want to add to the group.
- Tap on the “Save” button to create the group contact.
3. Can I edit or delete a group contact on my iPhone?
Yes, you can edit or delete a group contact on your iPhone. To edit the group contact, go to the Contacts app, find the group contact, and tap on it. From there, you can make changes to the group name or remove contacts from the group. To delete a group contact, go to the Contacts app, find the group contact, swipe left on it, and tap on the “Delete” option.
4. How do I send a message or email to a group contact on my iPhone?
To send a message or email to a group contact on your iPhone, follow these steps:
- Open the Messages or Mail app on your iPhone.
- Create a new message or email.
- In the recipient field, type the name of the group contact.
- Your iPhone will recognize the group contact and populate the field with all the contacts in that group.
- Compose your message or email and send it as usual.
5. Can I make a phone call to a group contact on my iPhone?
No, you cannot make a phone call to a group contact directly from the Contacts app on the iPhone. However, you can initiate a group FaceTime call by following these steps:
- Open the FaceTime app on your iPhone.
- Create a new FaceTime call.
- In the “To” field, type the name of the group contact.
- Your iPhone will recognize the group contact and populate the field with all the contacts in that group.
- Tap on the video or audio call icon to start the group FaceTime call.