
Welcome to our guide on how to turn on Wi-Fi on your iPhone! The iPhone is not only a powerful communication device but also a gateway to the digital world. With Wi-Fi connectivity, you can browse the internet, stream your favorite content, and connect with friends and family seamlessly. In this article, we will walk you through the simple steps to enable Wi-Fi on your iPhone, allowing you to stay connected wherever you go. Whether you’re a new iPhone user or simply need a refresher, this guide will help you navigate through the settings and get your Wi-Fi up and running in no time. So, let’s dive in and unlock the full potential of your iPhone’s wireless capabilities!
Inside This Article
- Overview of Wi-Fi on iPhone
- Method 1: Using the Settings App
- Method 2: Using Control Center
- Method 3: Using Siri
- Method 4: Using Bluetooth & Wi-Fi in Control Center (iOS 13 and later)
- Conclusion
- FAQs
Overview of Wi-Fi on iPhone
Wi-Fi is a crucial feature on iPhones that allows users to connect to the internet without using cellular data. With Wi-Fi, you can browse the web, stream media, download apps, and perform various online activities at faster speeds and with more stability.
Your iPhone is equipped with a built-in Wi-Fi chip, which enables it to detect and connect to available Wi-Fi networks in your vicinity. This ensures that you can seamlessly transition from cellular data to Wi-Fi when a network is detected, helping you save on data usage and potentially improving your browsing experience.
Enabling Wi-Fi on your iPhone is a simple process that can be done through the device’s settings. Once turned on, your iPhone will automatically search for available networks and allow you to connect to one of your choice.
In the following sections, we will guide you through the steps to enable Wi-Fi on your iPhone and connect to a network, troubleshoot any issues that may arise, and explore additional settings to optimize your Wi-Fi experience.
Method 1: Using the Settings App
Turning on Wi-Fi on your iPhone is a breeze when you know where to find the settings. Follow these simple steps to enable Wi-Fi:
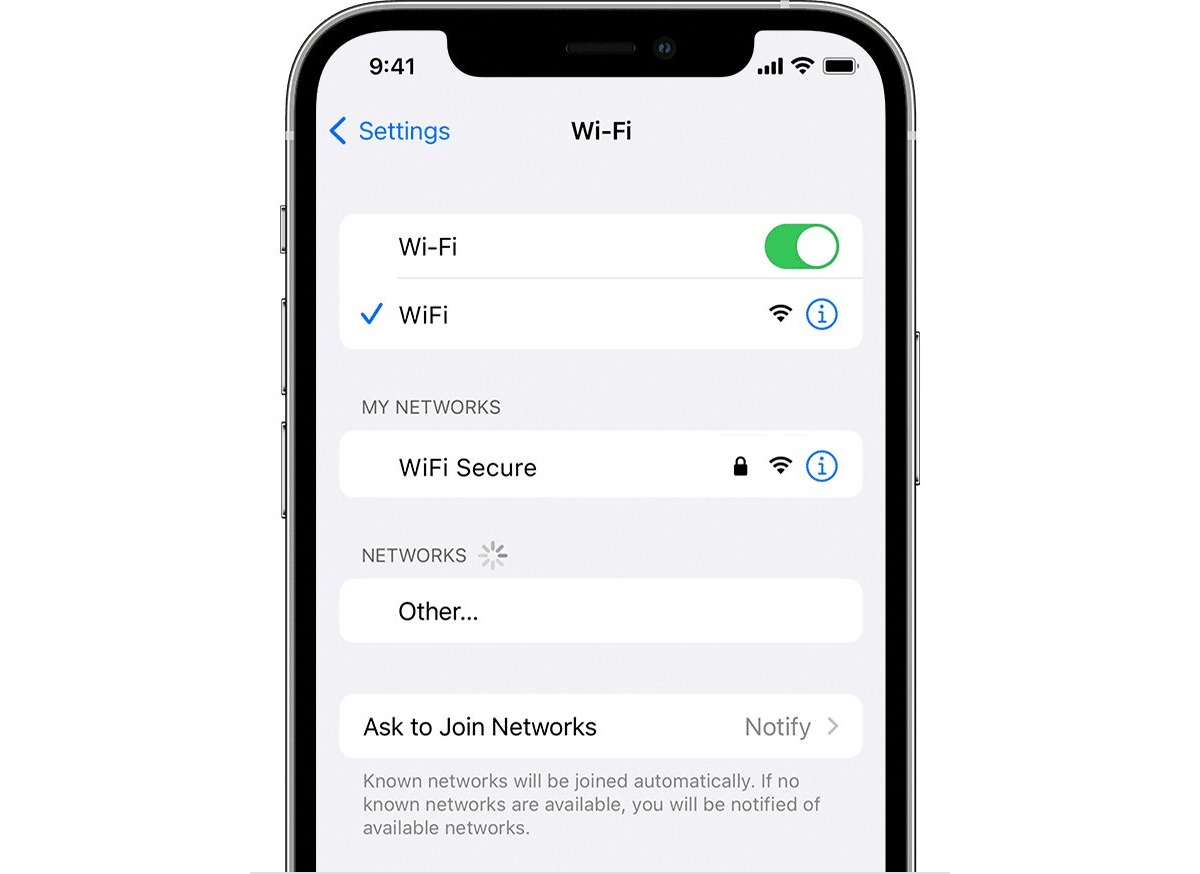
Step 1: Open the “Settings” app on your iPhone. You can find the app icon on your home screen, usually represented by a gear wheel.
Step 2: Tap on “Wi-Fi” from the list of available options. This will take you to the Wi-Fi settings page.
Step 3: On the Wi-Fi settings page, you will find a switch to toggle Wi-Fi on and off. Simply tap the switch to turn it on. The switch will turn green, indicating that Wi-Fi is now active on your iPhone.
That’s it! You have successfully turned on Wi-Fi on your iPhone using the Settings app.
Once Wi-Fi is enabled, your iPhone will start scanning for available networks. You can then connect to a Wi-Fi network of your choice by tapping on its name from the list of available networks.
Method 2: Using Control Center
Step 1: Swipe up from the bottom of the screen to access Control Center.
Step 2: Tap the Wi-Fi icon to turn it on.
If you’re looking for a quick and convenient way to enable Wi-Fi on your iPhone, using Control Center is the way to go. Control Center is a handy menu that allows you to access various settings and features of your iPhone with just a swipe and a tap. Follow these simple steps to activate Wi-Fi using Control Center:
Step 1: Start by swiping up from the bottom of your iPhone screen. This action will bring up Control Center, where you’ll find a range of options and shortcuts.
Step 2: Look for the Wi-Fi icon, which resembles a fan-shaped curve, and tap on it. By doing so, you’ll toggle the Wi-Fi feature on, enabling your iPhone to search for available networks.
Once Wi-Fi has been activated, your iPhone will start scanning for nearby Wi-Fi networks. You can then proceed to connect to a specific network by selecting it from the list of available options. It’s worth noting that the Wi-Fi icon in Control Center will remain highlighted when the feature is turned on.
Using Control Center to enable Wi-Fi offers a practical and time-saving solution for quickly accessing your device’s settings. However, keep in mind that this method only turns on Wi-Fi and does not automatically connect you to a network. To connect to a Wi-Fi network, you will still need to access your iPhone’s settings or use other methods such as the Wi-Fi menu in the Settings app.
If you encounter any issues while trying to enable Wi-Fi through Control Center, don’t panic. There are several troubleshooting steps you can take to resolve the problem and get your Wi-Fi up and running smoothly. Let’s explore some common issues and solutions:
Firstly, ensure that your Wi-Fi is enabled in your iPhone’s settings by going to the “Settings” app and navigating to the “Wi-Fi” section. If Wi-Fi is turned off, simply toggle the switch to the “on” position.
If Wi-Fi is already enabled, but you are still unable to connect to a network, try turning Wi-Fi off and on again. This can often resolve temporary connection issues and re-establish a stable Wi-Fi connection.
Another troubleshooting step is to reset your network settings. This will clear any saved Wi-Fi networks and restore your iPhone’s network settings to default. To do this, go to “Settings” > “General” > “Reset” > “Reset Network Settings”. Keep in mind that this will also remove any stored Wi-Fi passwords, so you’ll need to re-enter them when reconnecting to networks.
If none of these steps work, it’s possible that there is an issue with your Wi-Fi router or the network itself. Try resetting your router or contacting your internet service provider for further assistance.
By following these troubleshooting tips, you should be able to overcome any difficulties and successfully enable Wi-Fi on your iPhone using Control Center. Remember to keep your device updated with the latest software version to ensure optimal performance and compatibility with Wi-Fi networks.
Method 3: Using Siri
Step 1: Activate Siri by pressing and holding the home button or saying “Hey Siri”.
Step 2: Say “Turn on Wi-Fi”.
One of the easiest ways to enable Wi-Fi on your iPhone is by using Siri. Siri, Apple’s digital assistant, can perform various tasks with simple voice commands, including turning on Wi-Fi. Here’s how you can do it:
To activate Siri, press and hold the home button on your iPhone or simply say “Hey Siri” if you have enabled the feature. Siri will pop up on your screen, ready to assist you.
Once Siri is active, say the command “Turn on Wi-Fi”. Siri will then execute the command, and your iPhone’s Wi-Fi will be enabled.
The advantage of using Siri to turn on Wi-Fi is that it offers a hands-free and convenient way to manage your device. Whether you are busy cooking in the kitchen, driving, or have your hands full, you can activate Siri and enable Wi-Fi effortlessly.
Please note that Siri relies on an internet connection, so make sure you have a stable cellular or Wi-Fi connection to use this feature. Also, ensure that your iPhone is connected to a network with internet access for Siri to process your commands efficiently.
If you encounter any issues with Siri not responding or not understanding your command to turn on Wi-Fi, you can try the following troubleshooting steps:
- Ensure that Siri is enabled in your iPhone settings. Go to Settings > Siri & Search and toggle on “Listen for “Hey Siri”” and “Press Home for Siri”.
- Check your internet connection. If you have a weak cellular signal or no Wi-Fi connection, Siri may not function properly.
- Restart your iPhone. Sometimes, a simple restart can resolve any temporary glitches or issues with Siri.
- Update your iPhone’s software. Apple regularly releases updates to improve Siri’s performance, so keeping your device up to date can help resolve any compatibility issues.
Remember, Siri is there to assist you, and turning on Wi-Fi is just one of the many tasks it can help you with. Enjoy the convenience of voice commands and make the most of your iPhone’s capabilities.
Method 4: Using Bluetooth & Wi-Fi in Control Center (iOS 13 and later)
If you have an iPhone running on iOS 13 or later, you can quickly enable Wi-Fi by using the Bluetooth & Wi-Fi options in the Control Center. Here’s how you can do it:
Step 1: Swipe down from the top-right corner of your iPhone X or later models. If you have an iPhone 8 or earlier, swipe up from the bottom to access the Control Center.
Step 2: Press and hold the network settings card in the top-left corner of the Control Center. This card displays information about your connectivity options, including Wi-Fi, Bluetooth, Cellular Data, and Airplane Mode.
Step 3: Once you hold the network settings card, you will see the Wi-Fi, Bluetooth, and Cellular Data options in the expanded menu. Tap the Wi-Fi icon to enable Wi-Fi.
By following these simple steps, you can quickly turn on Wi-Fi on your iPhone using the Control Center’s Bluetooth & Wi-Fi options. This method provides a convenient way to access your Wi-Fi settings without having to navigate through multiple menus.
If you encounter any difficulties enabling Wi-Fi using this method, there are a few troubleshooting tips you can try:
- Ensure that your iPhone’s Bluetooth is enabled.
- Make sure you are not in Airplane Mode, as it disables both Wi-Fi and Bluetooth.
- Restart your iPhone and try again.
- If the issue persists, you can try forgetting the Wi-Fi network and reconnecting to it.
- If none of the above steps work, you may want to consider contacting Apple Support for further assistance.
Enhancing the Wi-Fi connectivity on your iPhone can significantly improve your browsing experience. Here are some additional settings and options you can explore:
- Under the Wi-Fi settings, you can prioritize Wi-Fi networks, enable Wi-Fi Assist, and manage known networks.
- Disable the “Ask to Join Networks” option to prevent your iPhone from constantly asking to join unfamiliar Wi-Fi networks.
- Use a Wi-Fi extender or mesh system to extend the coverage and improve the signal strength in your home or office.
- Ensure that your iPhone’s software is up to date, as Apple often releases updates to improve Wi-Fi performance and address connectivity issues.
By taking advantage of these additional settings and options, you can optimize the Wi-Fi connectivity on your iPhone and enjoy seamless browsing, streaming, and downloading experiences.
So now you know how to enable Wi-Fi on your iPhone using the Bluetooth & Wi-Fi options in the Control Center. Whether you’re connecting to a home network, a public hotspot, or your office Wi-Fi, these methods will help you stay connected and enjoy all the benefits of a reliable internet connection.
Conclusion
In conclusion, turning on Wi-Fi on your iPhone is a simple and straightforward process. By following the steps outlined in this article, you can easily connect to Wi-Fi networks and enjoy a fast and reliable internet connection on your device. Whether you want to conserve cellular data, access faster download speeds, or connect to a network with a stronger signal, Wi-Fi is a vital feature on your iPhone.
Remember to always keep your device updated, stay aware of your data usage, and ensure a secure connection when connecting to Wi-Fi networks. By prioritizing Wi-Fi usage, you can optimize your iPhone experience and make the most of the internet capabilities of your device.
So go ahead and turn on Wi-Fi on your iPhone to unlock a world of possibilities and stay connected wherever you go.
FAQs
1. How do I turn on Wi-Fi on my iPhone?
To turn on Wi-Fi on your iPhone, follow these steps:
1. Open the Settings app on your iPhone.
2. Tap on the Wi-Fi option.
3. Toggle the switch next to Wi-Fi to turn it on.
4. Your iPhone will automatically search for available Wi-Fi networks. Tap on the network you want to connect to and enter the password if required.
2. Why should I use Wi-Fi on my iPhone?
Using Wi-Fi on your iPhone has several advantages. Firstly, it allows you to connect to the internet at a faster speed compared to cellular data. This is particularly helpful when downloading large files, streaming videos, or playing online games. Additionally, using Wi-Fi helps conserve your mobile data allowance and reduces the risk of exceeding your monthly limit.
3. How can I connect to a secured Wi-Fi network on my iPhone?
To connect to a secured Wi-Fi network on your iPhone, follow these steps:
1. Open the Settings app on your iPhone.
2. Tap on the Wi-Fi option.
3. Scroll down and tap on the network you want to connect to.
4. Enter the password for the network and tap Join.
5. If the password is correct, your iPhone will connect to the Wi-Fi network.
4. Can I set my iPhone to automatically connect to known Wi-Fi networks?
Yes, you can set your iPhone to automatically connect to known Wi-Fi networks. Follow these steps to enable the feature:
1. Open the Settings app on your iPhone.
2. Tap on the Wi-Fi option.
3. Toggle the switch next to Ask to Join Networks to disable it.
4. Once this feature is disabled, your iPhone will automatically connect to known Wi-Fi networks that you have connected to in the past.
5. What should I do if my iPhone won’t connect to Wi-Fi?
If your iPhone won’t connect to Wi-Fi, here are a few troubleshooting steps you can try:
1. Make sure that Wi-Fi is turned on and that you are in range of a Wi-Fi network.
2. Restart your iPhone by holding down the power button and sliding the power off slider.
3. Reset your network settings by going to Settings > General > Reset > Reset Network Settings. Keep in mind that this will erase saved Wi-Fi passwords.
4. Check if there are any software updates available for your iPhone and install them if needed.
5. If all else fails, contact your internet service provider or visit an Apple Store for further assistance.