
In today’s digital age, mobile payment solutions have become increasingly popular and convenient. One such solution is Apple Pay, a secure and easy-to-use payment method available for iPhone, Apple Watch, and Mac users. With Apple Pay, you can make purchases both in stores and online without the need for physical cards or cash. This innovative technology utilizes near-field communication (NFC) and biometric authentication, such as Touch ID or Face ID, to ensure smooth and secure transactions. Whether you’re grabbing a coffee on the go, shopping online, or even making in-app purchases, Apple Pay offers a seamless payment experience. In this article, we will explore everything you need to know about using Apple Pay with your iPhone, Apple Watch, or Mac, and provide you with step-by-step instructions to get started. Let’s dive in and discover the convenience of Apple Pay!
Inside This Article
- Setting up Apple Pay on your iPhone
- Adding credit or debit cards to Apple Pay
- Using Apple Pay with your iPhone
- Using Apple Pay with your Apple Watch
- Using Apple Pay with your Mac
- Conclusion
- FAQs
Setting up Apple Pay on your iPhone
Apple Pay is a convenient and secure digital payment method that allows you to make purchases using your iPhone. Setting up Apple Pay on your device is a simple process that can be completed in just a few steps. Follow the guide below to get started:
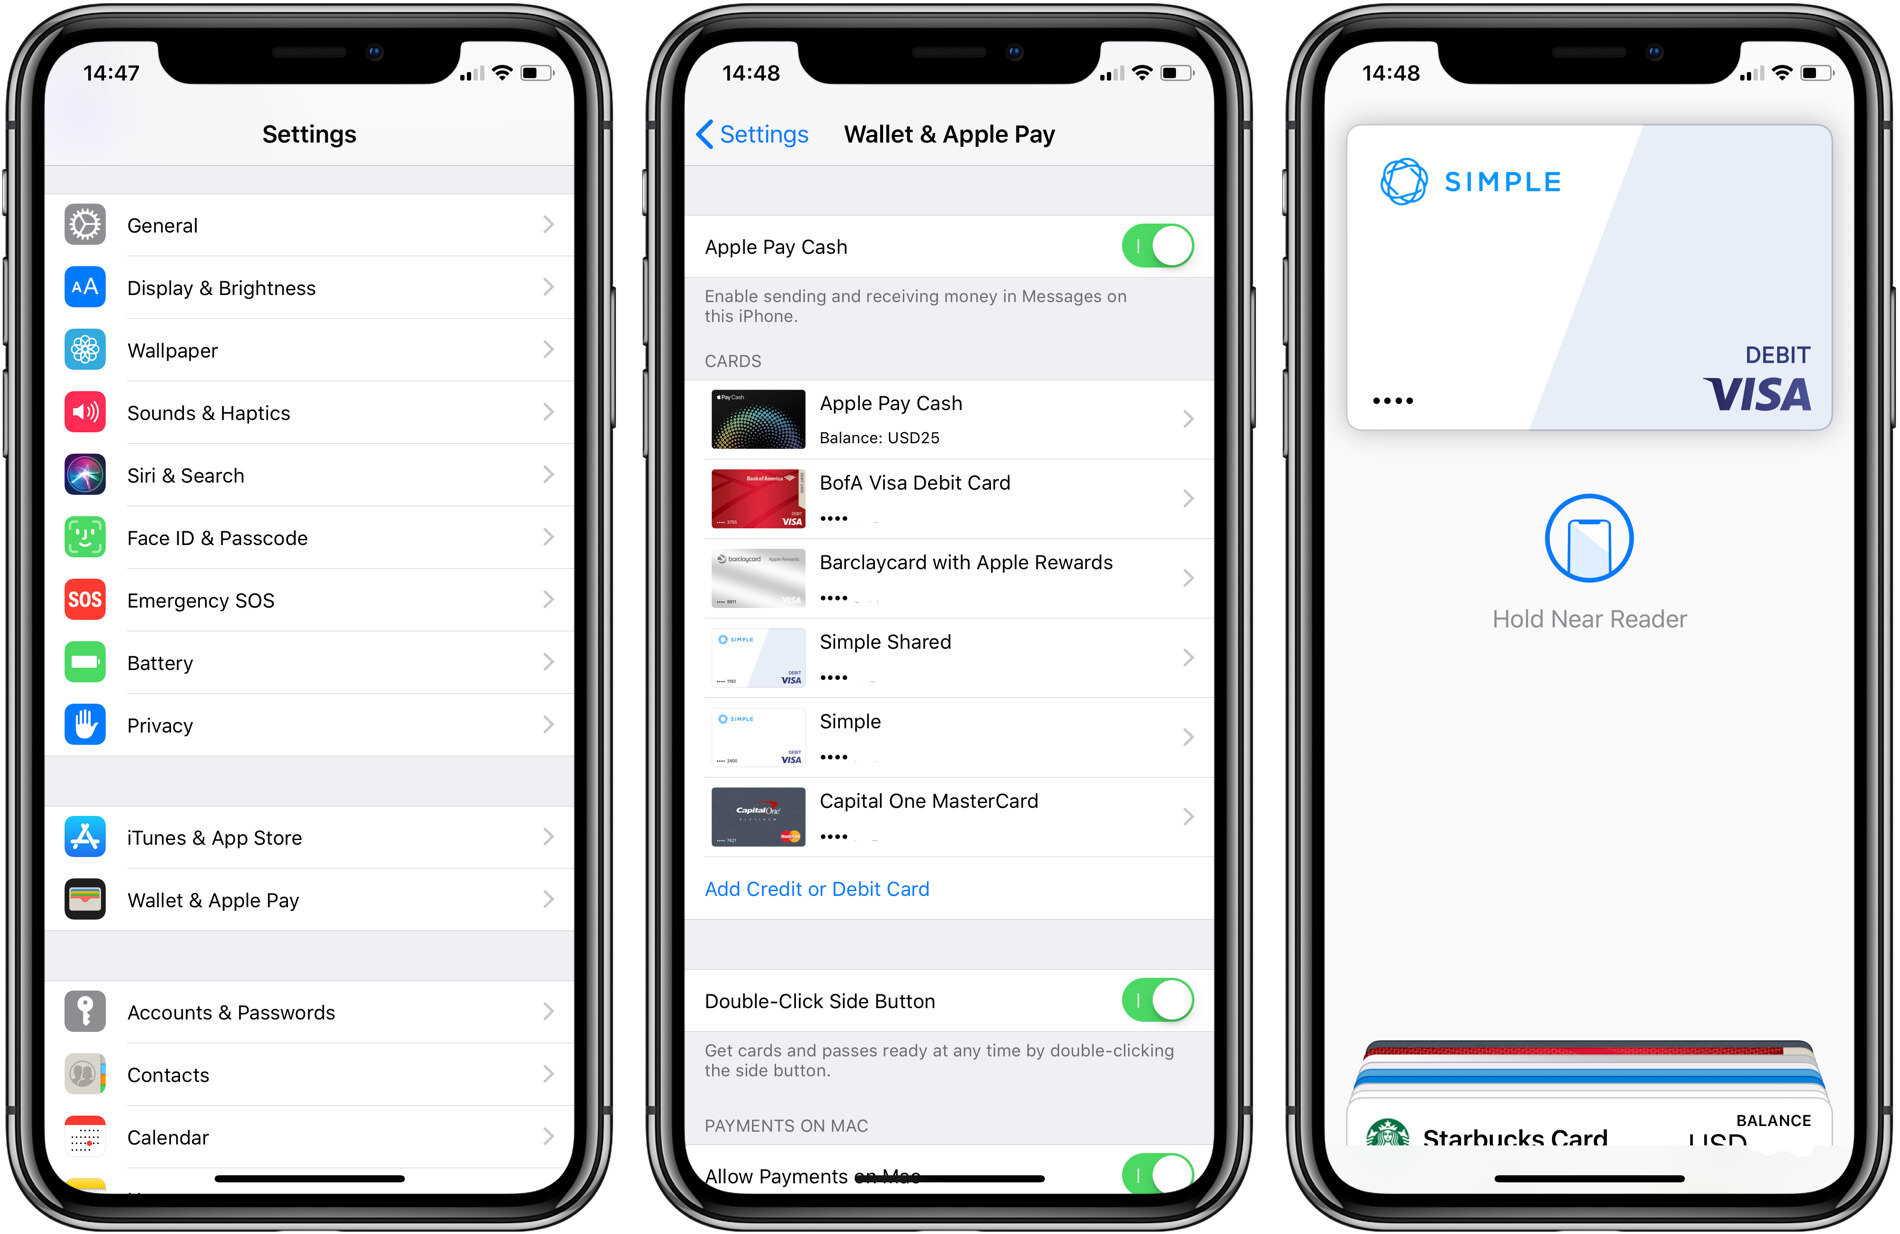
1. Open the “Settings” app on your iPhone.
2. Scroll down and tap on “Wallet & Apple Pay.
3. Tap on “Add Card”.
4. If you have a supported bank card, you can choose “Set Up Apple Pay” and follow the on-screen instructions to add your card. If your card is not supported, you can still use Apple Pay by adding it manually.
5. To add a card manually, tap on “Enter Card Details Manually” and fill in the required information, including the card number, expiration date, and security code. You can also choose to scan your card using the iPhone’s camera.
6. After entering the card details, tap on “Next” and your card will be verified. This may involve receiving a verification code by text message or a call from your bank.
7. Once your card is verified, you can set it as your default payment card or choose to use it only for specific transactions.
8. To add more cards, repeat steps 3-7.
9. You can also add cards directly from supported apps or by tapping the “+” button in the Wallet app.
That’s it! Your iPhone is now set up to use Apple Pay. You can start using Apple Pay at participating stores, online retailers, and within apps that support this payment method.
Remember, Apple Pay provides a secure way to make payments by using a unique Device Account Number and Touch ID or Face ID for authentication. Your actual card details are never shared with merchants, keeping your financial information safe.
Adding credit or debit cards to Apple Pay
Apple Pay provides a convenient and secure way to make payments using your iPhone, Apple Watch, or Mac. Before you can start using Apple Pay, you need to add your credit or debit cards to the Apple Wallet app. Here’s how you can do it:
1. Open the Wallet app on your iPhone or iPad. This app should already be installed on your device.
2. Tap on the “+” icon in the top-right corner of the screen. This will initiate the process of adding a new card to Apple Pay.
3. You have two options for adding your card: Add Card or Add Card Manually. If your financial institution supports it, you can choose the Add Card option and simply follow the prompts to authenticate and add your card. This method is quicker and more convenient.
4. If your financial institution doesn’t support the Add Card option, you can choose Add Card Manually. You will need to enter your card details, such as the card number, expiration date, and security code. You may also need to provide additional verification information as required by your bank.
5. Once you have entered the required information, tap on Next. Apple Pay will then attempt to verify your card. This may involve contacting your bank and may take a few moments.
6. After verification, you may be prompted to complete the process by following any additional steps provided by your bank, such as confirming your identity via a phone call or text message.
7. Once your card is successfully added, it will appear in the Wallet app. You can now use Apple Pay for contactless payments wherever it is accepted.
8. For added convenience, you can also add multiple cards to Apple Pay. Simply repeat the above steps for each card you want to add.
Remember, when adding credit or debit cards to Apple Pay, it’s important to ensure that you have the necessary permission and authentication from your financial institution. This will help protect your card information and ensure a secure payment experience.
By adding your cards to Apple Pay, you can enjoy the convenience of making contactless payments with just a tap of your iPhone, Apple Watch, or Mac. It’s a quick and secure way to make purchases both online and in stores.
Using Apple Pay with your iPhone
Apple Pay is a convenient and secure way to make payments using your iPhone. With just a few taps, you can easily make purchases at supported retailers, within apps, and even on websites. Here’s how to use Apple Pay with your iPhone:
1. Set up Apple Pay: Before you can use Apple Pay, you’ll need to set it up on your iPhone. Open the Wallet app, tap on the “+” sign, and follow the on-screen instructions to add your credit or debit cards to Apple Pay.
2. Access Apple Pay: To use Apple Pay in stores, simply double-click the side or home button on your iPhone, depending on the model. This will bring up your default payment card, which you can authenticate using Face ID, Touch ID, or your device passcode.
3. Make a payment: Once the Apple Pay interface is activated, hold your iPhone near the contactless payment terminal. Your iPhone will vibrate or beep when the payment is successful. Be sure to keep your device close to the terminal until the transaction is complete.
4. Use Apple Pay within apps: Many apps support Apple Pay, allowing you to make purchases without needing to enter your payment information. Simply select Apple Pay as the payment method, authenticate with Face ID, Touch ID, or your passcode, and confirm the payment.
5. Pay on websites with Apple Pay: Some websites also let you use Apple Pay for online purchases. When checking out, look for the Apple Pay button or the “Pay with Apple Pay” option. Tap it, authenticate the transaction, and confirm the payment.
6. Manage your Apple Pay cards: If you need to update or remove a card from Apple Pay, you can do so in the Wallet app. Simply tap on the card and choose the appropriate action, whether it’s editing the card details or removing it from Apple Pay.
7. Stay secure with Apple Pay: Using Apple Pay adds an extra layer of security to your transactions. When you use it, your actual card numbers are not stored on your device or shared with merchants. Instead, a unique device account number is assigned and encrypted, keeping your payment information secure.
With Apple Pay on your iPhone, you can enjoy the convenience of making quick and secure payments in various situations. Whether it’s in stores, within apps, or on websites, Apple Pay makes it easy to complete your transactions with just a tap of your finger.
Using Apple Pay with your Apple Watch
If you own an Apple Watch, you have the convenience of using Apple Pay right from your wrist. With just a few simple steps, you can make secure payments without having to reach for your iPhone. Here’s a guide on how to use Apple Pay with your Apple Watch.
1. Set up Apple Pay on your Apple Watch:
The first thing you need to do is set up Apple Pay on your Apple Watch. To do this, open the Apple Watch app on your iPhone and go to the “My Watch” tab. Scroll down and tap on “Wallet & Apple Pay.” Follow the prompts to add your credit or debit cards to the Wallet app on your Apple Watch.
2. Authenticate your cards:
After adding your cards, you will need to authenticate them for security purposes. There are two ways to authenticate your cards on Apple Watch: using your iPhone or using your Apple Watch itself. If you choose to use your iPhone, you will need to enter the security code for your cards. If you prefer to use your Apple Watch, you will be prompted to enter the security code on the device.
3. Make a payment:
To make a payment with Apple Pay on your Apple Watch, simply double-click the side button while the watch face is active. This will bring up your default card. You can swipe left or right to choose a different card if you have multiple cards added. Once you have selected the desired card, hold your Apple Watch up to the payment terminal. Wait for the checkmark and haptic feedback to confirm the payment.
4. Use Apple Pay on older terminals:
If you encounter an older payment terminal that doesn’t support contactless payments, you can still use Apple Pay on your Apple Watch. Just bring your wrist close to the card reader, and the magnetic components in your Apple Watch will mimic the magnetic stripe found on the back of a credit or debit card. This feature is called “Express Transit Mode.”
5. Managing your Apple Pay cards:
If you need to add, remove, or update your credit or debit cards associated with Apple Pay on your Apple Watch, you can do so through the Wallet app on your iPhone. Open the app, tap on the “Add” button to add a new card, or tap on an existing card to edit its details or remove it from Apple Pay.
6. Ensure your Apple Watch is secure:
It’s essential to keep your Apple Watch secure to protect your Apple Pay transactions. Make sure to set up a passcode on your Apple Watch and enable wrist detection. Additionally, consider enabling the “Unlock with Apple Watch” feature on your iPhone, so you can easily unlock it without typing in your passcode when your Apple Watch is unlocked and on your wrist.
Using Apple Pay with your Apple Watch offers a streamlined and secure way to make payments on the go. With just a tap of your wrist, you can complete transactions hassle-free. So, set up Apple Pay on your Apple Watch today and enjoy the convenience it brings!
Using Apple Pay with your Mac
Apple Pay is a convenient and secure way to make online purchases using your Mac. With just a few simple steps, you can set up Apple Pay and streamline your checkout process. Whether you’re shopping online or making in-app purchases, Apple Pay offers a seamless and hassle-free payment experience. Let’s dive into how you can use Apple Pay with your Mac.
Step 1: Set up Apple Pay on your Mac
The first thing you need to do is ensure that your Mac supports Apple Pay and that it is running the latest macOS version. To check if your device is compatible and up to date, go to the Apple menu, click on “About This Mac,” and select “Software Update.”
Once you’ve confirmed that your Mac meets the requirements, you can proceed with setting up Apple Pay. Open “System Preferences” from the Apple menu and click on “Wallet & Apple Pay.”
Step 2: Add your cards to Apple Pay
In the Wallet & Apple Pay preferences, click on the “+” button to add your credit or debit cards to Apple Pay on your Mac. You can either manually enter the card details or, if your card issuer supports it, use the camera on your iPhone to capture the card information.
Follow the on-screen instructions to verify the card details and complete the setup process. Once your cards are added, they will be available for use with Apple Pay on your Mac.
Step 3: Making a purchase with Apple Pay
When you’re ready to make a purchase online, look for the Apple Pay button at checkout. It is represented by the Apple Pay logo. Click on the button, and if your Mac has Touch ID or Face ID, you can use it to authenticate the transaction. If not, you’ll need to use your iPhone or Apple Watch to authenticate the purchase.
After confirming the payment, your Mac will send the necessary details securely to complete the transaction, and you’re done! No need to enter your card details or billing address every time you make a purchase.
Security and privacy with Apple Pay
Apple Pay offers a high level of security and protection for your payment information. When you use Apple Pay, your card details are never shared with the online merchant. Instead, a unique, encrypted transaction code is generated for each purchase, ensuring that your data is kept safe.
Furthermore, Apple Pay supports biometric authentication through Touch ID and Face ID, adding an extra layer of security to your transactions. Only you can authorize purchases using your fingerprint or facial recognition.
Using Apple Pay with your Mac not only makes the checkout process quicker and more convenient, but it also provides peace of mind knowing that your payment information is secure. So, take advantage of this feature and enjoy a seamless shopping experience on your Mac.
Conclusion
In conclusion, using Apple Pay on your iPhone, Apple Watch, or Mac is a convenient and secure way to make payments. With just a tap or a glance, you can make purchases at stores, within apps, and on websites without the need for physical cards or entering your payment information multiple times.
The seamless integration of Apple Pay with the Apple ecosystem ensures a smooth and effortless payment experience. The added layer of security provided by Touch ID, Face ID, and the Secure Element chip gives you peace of mind knowing that your financial information is protected.
Whether you’re shopping at a local store, ordering food from your favorite restaurant, or making online purchases, Apple Pay simplifies the payment process. With its widespread acceptance and continuous expansion, using Apple Pay has never been easier.
So, start enjoying the benefits of Apple Pay today and experience a whole new level of convenience and security in your digital transactions.
FAQs
Q: How do I set up Apple Pay on my iPhone?
To set up Apple Pay on your iPhone, go to the Wallet & Apple Pay settings. Tap on “Add Credit or Debit Card” and follow the on-screen instructions to add your card details. Once your card is verified, you can start using Apple Pay for contactless payments.
Q: Can I use Apple Pay with any iPhone model?
Apple Pay is available on iPhone models with NFC (Near Field Communication) capabilities. This includes iPhone models starting from the iPhone 6 and newer.
Q: Can I use Apple Pay outside of my country?
Yes, Apple Pay is supported in many countries around the world. However, availability may vary depending on the specific banks and merchants in each country.
Q: How secure is Apple Pay?
Apple Pay uses advanced security features to protect your payment information. When you make a purchase, your actual card details are not shared with the merchant. Instead, a unique Device Account Number is assigned and encrypted on your device. This adds an extra layer of security and helps prevent unauthorized transactions.
Q: Can I use Apple Pay on my Apple Watch?
Yes, you can use Apple Pay on your Apple Watch. Just double-click the side button on your watch to bring up the Wallet app. Hold your watch near the contactless payment terminal and wait for the payment to be processed.