
In today’s fast-paced digital era, our smartphones have become an indispensable part of our lives. Whether it’s communicating with loved ones, staying up to date with social media, or managing our daily tasks, our phones hold a wealth of valuable information. But what happens when you encounter issues with your iPhone and need to reset it? Thankfully, iTunes comes to the rescue! iTunes is a powerful tool provided by Apple that allows you to sync and manage your iPhone’s content. But did you know that you can also use iTunes to reset your iPhone? In this article, we will guide you through the step-by-step process of using iTunes to reset your iPhone and get it back to its factory settings. So, let’s dive in and discover how to effectively utilize iTunes to breathe new life into your iPhone!
Inside This Article
- Step 1: Connect your iPhone to your computer
- Step 2: Launch iTunes on your computer
- Step 3: Select your iPhone in iTunes
- Step 4: Access the “Summary” tab
- Step 5: Reset your iPhone to factory settings
- Step 6: Confirm the reset process
- Step 7: Wait for the reset to complete
- Step 8: Set up your iPhone as new or restore from backup
- Conclusion
- FAQs
Step 1: Connect your iPhone to your computer
Connecting your iPhone to your computer is the first step in using iTunes to reset your iPhone. This allows you to establish a physical connection between your device and your computer, enabling the transfer of data and the management of your iPhone settings.
To connect your iPhone to your computer, you will need a USB cable that is compatible with your device. Most iPhones come with a USB cable included in the box. Simply plug one end of the USB cable into the charging port on your iPhone, and the other end into an available USB port on your computer.
Once you have connected your iPhone to your computer, iTunes should launch automatically. If it doesn’t, you can open iTunes manually by searching for it in your computer’s programs or applications.
It’s important to note that your computer should have the latest version of iTunes installed for a smooth and seamless connection. If you don’t have iTunes installed or need to update it, you can download it from the official Apple website.
Once your iPhone is connected to your computer and iTunes is open, you will see your device listed in the iTunes interface. This confirms that your iPhone is successfully connected and ready to be managed using iTunes.
By connecting your iPhone to your computer, you establish a direct line of communication between the two devices. This connection enables you to back up your iPhone data, initiate a reset, and restore your device from a previous backup.
Step 2: Launch iTunes on your computer
Now that your iPhone is connected to the computer, it’s time to launch iTunes. iTunes is a software application developed by Apple that allows you to play and manage your digital media collection, as well as sync and backup your iOS devices.
To launch iTunes, simply locate the application icon on your computer’s desktop or in the applications folder. You can also use the search function to find it quickly. Once you locate the iTunes icon, double-click on it to open the application.
After launching iTunes, you will see the familiar interface that includes various tabs and menus for managing your media library and iOS devices. Make sure that you are running the latest version of iTunes to ensure compatibility with your iPhone.
If you haven’t installed iTunes on your computer yet, you can visit the official Apple website and download the latest version for free. Follow the on-screen instructions to install iTunes before proceeding with the reset process.
It’s worth noting that iTunes is available for both Windows and macOS operating systems, so you can use it regardless of the computer you’re using. Just make sure you have a stable internet connection to download and install the software.
Once iTunes is successfully launched, you’re ready to move on to the next steps of resetting your iPhone.
Step 3: Select your iPhone in iTunes
After successfully connecting your iPhone to iTunes, the next step in the process of resetting your device is to select it in the iTunes interface. This step is crucial because it ensures that the correct device is being targeted for the reset.
To select your iPhone, look for the device icon or name in the upper-left corner of the iTunes window. You may see a small iPhone icon or the name you assigned to your device. Click on it to navigate to the device summary page.
On the device summary page, you will find various tabs and options for managing your iPhone. This is where you can access important settings, such as backup and restore options. It also allows you to view essential information about your device, including the model, capacity, and serial number.
Make sure you are on the “Summary” tab, as this is where you will find the necessary options for resetting your iPhone. If you are not on this tab, simply click on it to proceed.
Once you are on the “Summary” tab, scroll down until you find the “Restore iPhone” button. This button is located in the center of the window, just below the device information section.
By clicking on the “Restore iPhone” button, you will initiate the process of resetting your device to its factory settings. It is important to note that this action will erase all data and settings on your iPhone, so it is crucial to have a backup ready if you wish to restore your data later on.
Before proceeding, double-check that you have a recent backup of your iPhone to ensure you don’t lose any valuable data. You can create a backup by selecting the “Back Up Now” button under the “Manually Back Up and Restore” section on the same page.
Once you are confident that you have a backup, proceed by clicking on the “Restore iPhone” button. A confirmation prompt will appear, asking if you are sure you want to restore your iPhone to its factory settings. Confirm your decision by clicking “Restore” and let iTunes proceed with the reset process.
Please note that the reset process may take a few minutes to complete. During this time, your iPhone will restart multiple times, and the screen may display the Apple logo and a progress bar. This is normal and indicates that the reset process is underway.
Once the reset process is complete, your iPhone will be restored to its original factory settings. You can then set it up as a new device or choose to restore it from a previous backup.
By following these steps and selecting your iPhone in iTunes, you can easily initiate the reset process and restore your device to its factory settings.
Step 4: Access the “Summary” tab
Once you have connected your iPhone to iTunes and it has been recognized, you will need to access the “Summary” tab in order to proceed with the reset process.
To access the “Summary” tab, simply click on the iPhone icon that appears in the upper-left corner of the iTunes window. This will take you to the device summary page, where you can view important information about your iPhone and manage various settings.
The “Summary” tab provides an overview of your iPhone’s storage capacity, software version, and serial number. It also displays options for updating your iPhone’s software and restoring it to factory settings.
Once you are on the “Summary” tab, you will see a section labeled “Restore iPhone.” This is where you will initiate the iPhone reset process. Click on the “Restore iPhone” button to proceed.
Before proceeding with the reset, make sure you have backed up your iPhone to avoid losing any important data. If you haven’t done so yet, refer to the previous step for instructions on how to back up your iPhone using iTunes.
Note that restoring your iPhone to factory settings will erase all data and settings on your device. This includes apps, photos, music, contacts, and any other personal information. Therefore, it is crucial to have a backup before proceeding with the reset.
Once you have accessed the “Summary” tab and made a backup of your iPhone, you are ready to initiate the reset process. But before you do, there are a few more things to consider, which we will discuss in the next step.
Step 5: Reset your iPhone to factory settings
Resetting your iPhone to factory settings is a crucial step in the process of troubleshooting any software issues or preparing to sell your device. It wipes out all your personal data, settings, and installed apps, bringing your iPhone back to its original factory state. Here’s how you can do it using iTunes:
1. Once you have backed up your iPhone, ensure that it is still connected to your computer and that iTunes is launched. If it is not already open, launch iTunes now.
2. In the iTunes interface, locate your iPhone’s icon or name in the upper left corner and click on it to access the device summary page.
3. On the device summary page, click on the “Restore iPhone” button.
4. A confirmation dialog box will appear, informing you that restoring your iPhone to factory settings will erase all data and settings. Click on “Restore” to proceed.
5. iTunes will now start the process of resetting your iPhone to factory settings. This may take a few minutes, so be patient and do not disconnect your iPhone during this time.
6. Once the reset process is complete, your iPhone will restart and display the “Hello” screen. This indicates that your device is now back to its factory settings.
7. Follow the on-screen instructions to set up your iPhone as a new device or restore it from a backup, depending on your preferences.
It is important to note that resetting your iPhone to factory settings will erase all data and settings, so make sure you have a recent backup before proceeding. This process is irreversible, so double-check to ensure you have everything you need before initiating the reset.
By following these steps, you can easily reset your iPhone to factory settings using iTunes. Remember to exercise caution and back up your data regularly to avoid any potential loss of important information.
Step 6: Confirm the reset process
Once you have selected the option to reset your iPhone in iTunes, you will be prompted with a confirmation message before proceeding with the reset. This step is crucial as it ensures that you are fully aware of the consequences of resetting your device.
When you receive the confirmation message, carefully read through the information presented. It will typically outline the data that will be erased from your iPhone, including contacts, photos, messages, and any other personal settings or preferences you have customized.
Take a moment to consider if you have backed up all your important data and files. If you have not done so, it is highly recommended to cancel the reset process and perform a backup immediately. This will prevent any permanent loss of valuable information.
If you are certain that you have performed a recent backup or that you do not have any crucial data that needs to be saved, you can proceed with confirming the reset process. Look for the “Confirm” or “Reset” button in the confirmation message and click on it.
Once you have confirmed the reset, iTunes will initiate the process. It may take a few minutes for the reset to complete, during which your iPhone will be restored to its original factory settings.
Keep in mind that performing a reset will erase all the data on your iPhone and return it to its default settings. This means that you will need to set it up as a new device or restore it from a previous backup once the reset is complete.
After the reset process is finished, your iPhone will restart and you will be greeted with the initial setup screen. Follow the on-screen prompts to configure your iPhone according to your preferences.
It is essential to note that resetting your iPhone should only be done as a last resort, when troubleshooting or resolving significant software issues. If you are uncertain about resetting your device, it is advisable to seek assistance from an Apple support professional or contact Apple customer support for guidance.
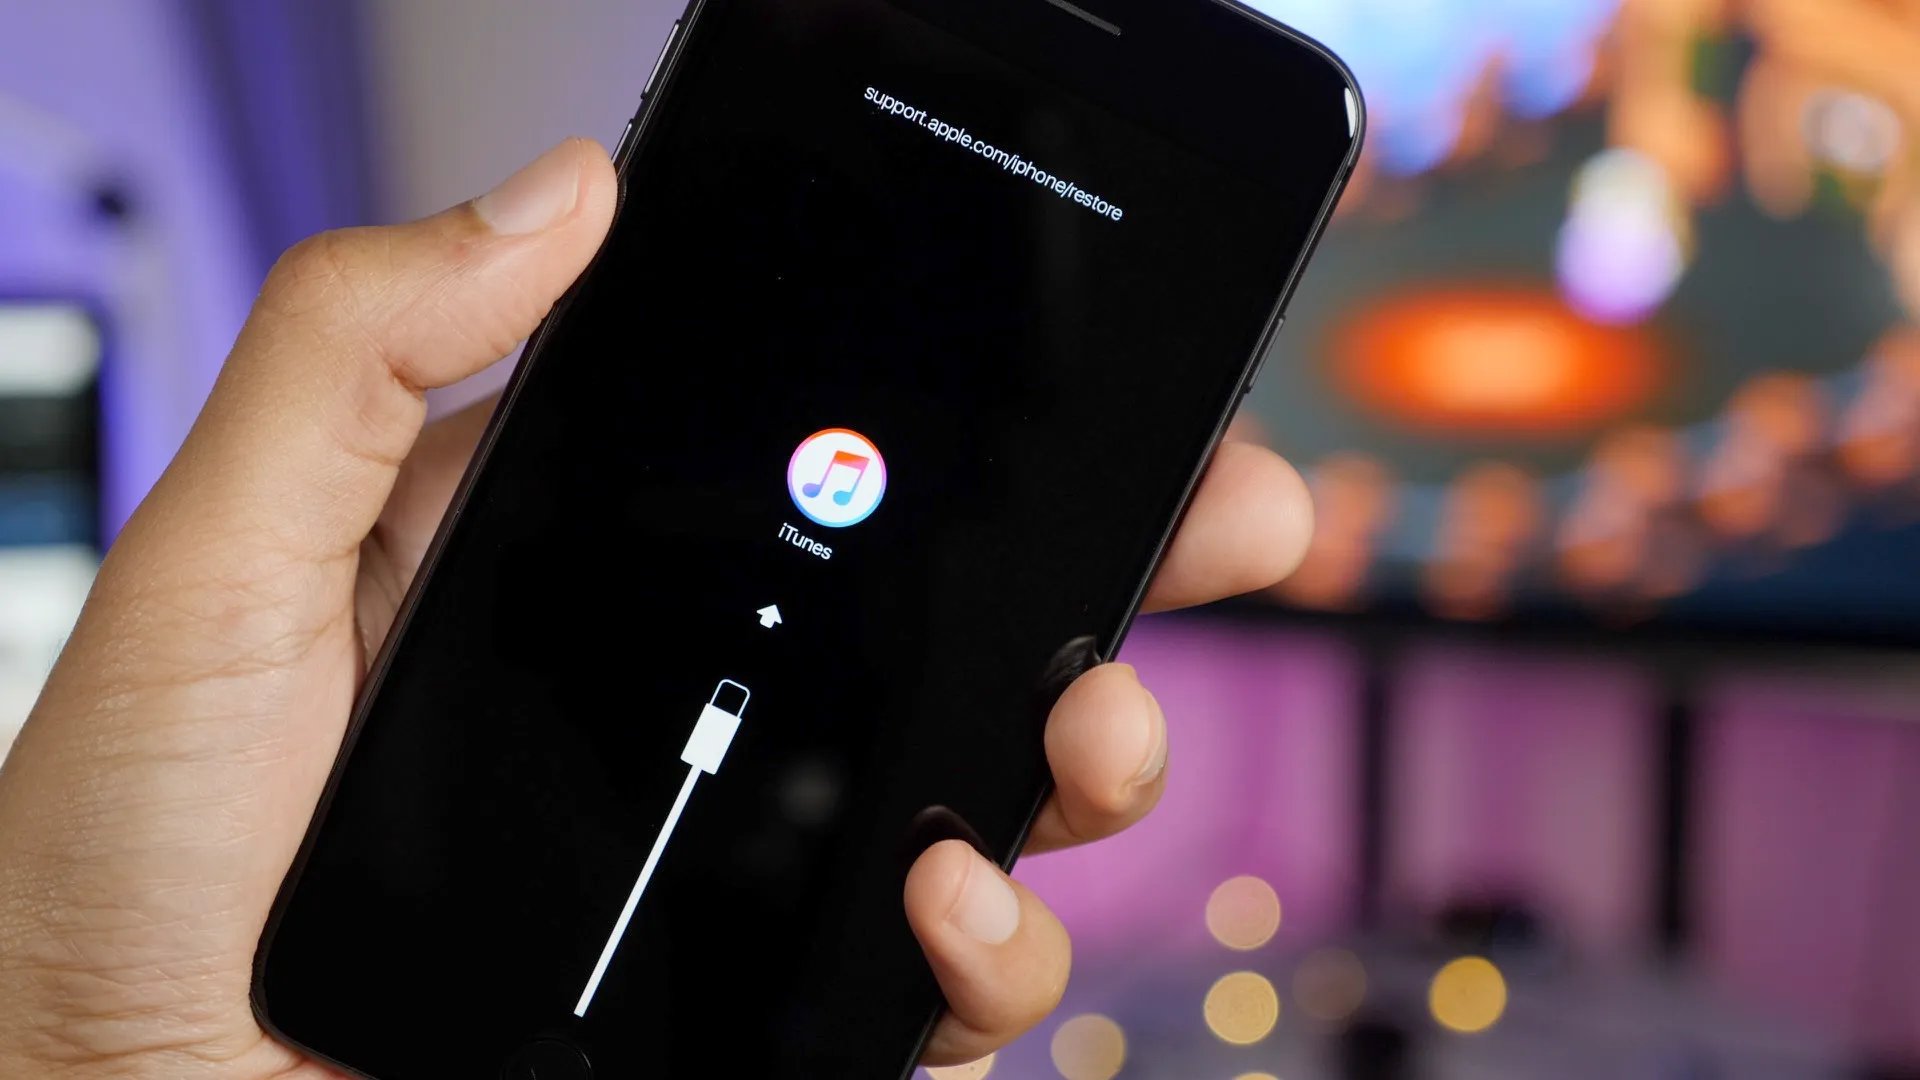
Step 7: Wait for the reset to complete
After initiating the reset process, it is important to be patient and allow the reset to complete. This may take some time depending on the size of your data and the speed of your internet connection. During this time, it’s crucial not to disconnect or interrupt the iPhone from the computer running iTunes.
While the reset is in progress, your iPhone’s screen may display the Apple logo and a progress bar. This indicates that the device is undergoing the reset procedure. The progress bar may move slowly or appear to pause at certain points, but it is essential to refrain from interfering with the process.
It is normal for the entire reset process to take anywhere from a few minutes to an hour or more, depending on the complexity of your iPhone’s settings and the amount of data being reset. It is essential to ensure a stable power source throughout the entire process to prevent any potential disruptions.
During the reset, iTunes will display a message indicating that your iPhone is being restored. You can monitor the progress of the reset by looking at the progress bar on your device’s screen as well as the progress bar displayed in iTunes.
Once the reset process is complete, your iPhone will restart, and you will be prompted to set it up as a new device or restore it from a backup. If you have followed the previous steps to back up your iPhone, you will have the option to restore all your data and settings from the backup.
It is vital to exercise caution while handling your iPhone during this step. Avoid unplugging or disconnecting the device until the reset is fully completed, as it may cause data loss or potential damage to your iPhone.
By patiently allowing the reset process to finish, you ensure the most optimal reset experience for your iPhone, and once it’s complete, you can move forward to setting up your device and getting back to using it as usual.
Step 8: Set up your iPhone as new or restore from backup
After completing the reset process on your iPhone using iTunes, you will be presented with the option to set up your device as new or restore it from a previous backup. This step is crucial in ensuring that your iPhone is configured according to your preferences and has all your data and settings intact.
If you choose to set up your iPhone as new, it means that you will start with a clean slate. This option is ideal if you want a fresh start or if you are setting up a new device for the first time. You will be prompted to enter your Apple ID and set up your device preferences, including language, region, and privacy settings.
On the other hand, if you choose to restore from a backup, you can transfer all your previous data, apps, and settings to your iPhone. This option is convenient if you have recently had your iPhone replaced, or if you want to revert to a previous state of your device. iTunes allows you to choose from the available backups you have made previously.
Regardless of your choice, it is important to carefully consider which option suits your needs. Setting up your iPhone as new gives you a fresh start, but you will need to re-download and reconfigure all your apps and settings. Restoring from a backup, however, saves you time and ensures a seamless transition to your previous device state.
Before making a decision, it is recommended to assess your current situation. If you have recently experienced issues with your iPhone or if you want to start afresh with a clean device, setting up as new may be the best option. On the other hand, if you have valuable data and settings that you want to preserve, restoring from a backup is the way to go.
Whichever option you choose, iTunes makes it easy to set up your iPhone according to your preferences. Simply follow the on-screen prompts, enter your Apple ID, and configure your device settings. Once completed, you will have a fully functional iPhone, ready to use with either a fresh start or your previous data and settings restored.
Conclusion
In conclusion, iTunes offers a convenient and effective way to reset your iPhone back to its original factory settings. Whether you want to troubleshoot issues, sell your device, or simply start fresh, using iTunes to reset your iPhone is a quick and reliable solution. By following the steps outlined in this article, you can confidently navigate the iTunes interface and perform a reset with ease.
Remember that resetting your iPhone will erase all data and settings, so it is essential to back up your device beforehand. Additionally, if you encounter any difficulties during the resetting process, Apple support is always available to assist you.
So, the next time you need to restore your iPhone to its default state, go ahead and utilize iTunes. Enjoy the benefits of a clean slate and optimize your iPhone’s performance!
FAQs
1. Can I reset my iPhone using iTunes?
Yes, you can reset your iPhone using iTunes. iTunes provides a convenient way to restore your device to its factory settings or troubleshoot any software issues you may be experiencing.
2. How do I reset my iPhone using iTunes?
First, make sure you have the latest version of iTunes installed on your computer. Connect your iPhone to your computer using a USB cable. In iTunes, select your iPhone from the list of devices. Then, click on the “Restore iPhone” button. Follow the on-screen instructions to complete the reset process.
3. Will resetting my iPhone using iTunes delete all my data?
Yes, resetting your iPhone using iTunes will erase all the data on your device. It is crucial to back up your iPhone before performing a reset to avoid losing important data such as photos, videos, contacts, and messages. You can back up your iPhone using iTunes or iCloud.
4. Can I recover my data after resetting my iPhone using iTunes?
If you have created a backup of your iPhone before resetting it, you can restore your data from the backup after the reset process is complete. You can choose to restore your data from an iTunes backup or an iCloud backup, depending on your preference. However, it’s important to note that any data or settings that were not backed up will be permanently lost.
5. Are there any alternatives to using iTunes to reset my iPhone?
Yes, there are other ways to reset your iPhone if you prefer not to use iTunes. You can reset your iPhone directly from the device’s settings by going to “Settings” > “General” > “Reset” and selecting the appropriate reset option. Additionally, you can use third-party software specifically designed for iPhone data management and recovery to reset your device.