
When it comes to getting rid of an old iPhone and ensuring that all your personal data is completely erased, it’s crucial to follow the right steps to protect your privacy. Whether you’re planning to sell or donate your iPhone, you need to make sure that you remove all your personal information, including contacts, messages, photos, and apps.
In this article, we will guide you through the process of erasing all data on your iPhone, ensuring that your personal information remains confidential. Whether you have an iPhone 12, iPhone 11, or any other model, the steps to wiping your device clean are generally the same.
By the end of this article, you’ll have a clear understanding of how to securely erase all data on your iPhone and be able to confidently hand it over without any worries about your personal information falling into the wrong hands.
Inside This Article
- Preparation before erasing
- Step 1: Backup your iPhone data
- Step 2: Sign out of iCloud and disable Find My iPhone
- Erasing all data on iPhone
- Step 1: Open the Settings app
- Step 2: Tap on General
- Step 3: Scroll down and select Reset
- Step 4: Choose Erase All Content and Settings
- Step 5: Confirm your decision and enter your passcode
- Step 6: Wait for the process to complete
- Step 7: Set up your iPhone as new or restore from backup
- Additional considerations and warnings
- Conclusion
- FAQs
Preparation before erasing
Before you proceed with erasing all data on your iPhone, it is essential to take some necessary precautions to ensure a smooth and successful process. Here are a few important steps to follow:
1. Backup your iPhone data: It’s crucial to back up all your important data before proceeding with the erasing process. This will ensure that you don’t lose any valuable information, such as contacts, photos, videos, and documents. You can back up your iPhone using iCloud or iTunes.
2. Sign out of iCloud and disable Find My iPhone: To prevent any potential issues during the erasing process, it is advisable to sign out of your iCloud account and disable the Find My iPhone feature. This will also ensure that your iPhone is no longer linked to your iCloud account after the erase.
3. Check for any pending updates: Before erasing your iPhone, make sure to check for any pending software updates. Installing the latest updates can help prevent any compatibility issues during the erasing process.
4. Remove SIM card and external storage: It is recommended to remove the SIM card and any external storage devices, such as SD cards or USB drives, from your iPhone. This will prevent any accidental erasure of data stored on these devices.
By following these preparation steps, you can ensure a smooth and hassle-free process when erasing all data on your iPhone. Once you have completed these preparations, you can proceed with the erasing process confidently.
Step 1: Backup your iPhone data
Before proceeding with erasing all data on your iPhone, it’s crucial to create a backup of your important data. This will ensure that you don’t lose any important files, photos, contacts, or messages during the process.
There are a few different methods you can use to backup your iPhone:
1. iCloud Backup: This is the easiest way to backup your iPhone data. Simply go to Settings, tap on your Apple ID at the top of the screen, select iCloud, and then choose iCloud Backup. Tap on “Back Up Now” and wait for the backup process to complete. Make sure you have enough iCloud storage available for the backup.
2. iTunes Backup: Connect your iPhone to your computer and open iTunes. Select your iPhone from the device menu, go to the Summary tab, and click on “Back Up Now.” Keep in mind that this method requires you to have iTunes installed on your computer.
3. Third-party Backup Apps: There are several third-party backup apps available on the App Store that offer additional features and flexibility for backing up your iPhone data. Research and choose the one that best suits your needs.
Whichever backup method you choose, make sure to verify that the backup is complete and contains all the necessary data.
Remember, creating a backup is essential to ensure that your valuable data is not lost during the process of erasing all data on your iPhone. It’s better to be safe than sorry!
Step 2: Sign out of iCloud and disable Find My iPhone
Before you erase all data on your iPhone, it’s important to sign out of your iCloud account and disable the Find My iPhone feature. This ensures that your device is no longer connected to your iCloud account and cannot be tracked or remotely locked.
To sign out of iCloud, go to your iPhone’s settings and tap on your name at the top of the screen. Scroll down and select “Sign Out.” You may need to enter your Apple ID password to confirm the sign out. Once you have successfully signed out, your device will no longer be associated with your iCloud account.
Next, you will need to disable the Find My iPhone feature. Go back to the main settings menu and tap on “Find My.” If Find My iPhone is enabled, you will see a toggle switch next to it. Simply toggle off the switch to disable the feature. You may be prompted to enter your Apple ID password again to confirm the change.
By signing out of iCloud and disabling Find My iPhone, you ensure that your personal information and device data remain secure during the erasure process. It also allows you to easily set up your iPhone as new or restore from a backup once the erasure is complete.
Erasing all data on iPhone
When it comes to selling or giving away your old iPhone, one crucial step is to ensure that all your personal data is securely erased. Performing a complete wipe of your iPhone will not only protect your privacy but also prevent any potential data breaches.
Luckily, Apple provides a straightforward method to erase all data on your iPhone. Follow these steps to ensure that your information is safely removed:
- Step 1: Open the Settings app
- Step 2: Tap on General
- Step 3: Scroll down and select Reset
- Step 4: Choose Erase All Content and Settings
- Step 5: Confirm your decision and enter your passcode
- Step 6: Wait for the process to complete
- Step 7: Set up your iPhone as new or restore from backup
Unlock your iPhone and locate the “Settings” app on the home screen. It is represented by a gear icon.
Within the Settings menu, scroll down and tap on “General.” It is usually located towards the top of the list.
In the General menu, scroll down until you find the “Reset” option. Tap on it to proceed.
Within the Reset menu, you will see various options. Select “Erase All Content and Settings” to initiate the process of wiping your iPhone clean.
A warning message will appear to confirm that all data, including apps, photos, and settings, will be permanently erased. Enter your passcode to proceed with the erasure.
Allow your iPhone some time to complete the erasure process. The duration may vary depending on the amount of data on your device.
After the erasure is complete, you will be prompted to set up your iPhone as new or restore from a backup. Choose the option that best suits your needs.
It’s important to note that once you erase all data on your iPhone, it cannot be recovered. Therefore, it’s crucial to have a recent backup of your device to restore your data if needed.
To ensure a smooth erasure process, it’s recommended to have your iPhone connected to a reliable Wi-Fi network and sufficient battery life.
By following these steps, you can confidently erase all data on your iPhone, protecting your privacy and ensuring a fresh start for the next user.
Step 1: Open the Settings app
When it comes to erasing all data on your iPhone, the first step is to open the Settings app. The Settings app is where you can access and customize various options and settings on your iPhone, including the ability to erase all data and settings. To open the Settings app, simply locate the app icon on your home screen and tap on it. The app icon resembles a gear or a cogwheel, making it easy to identify among your other apps.
Once you tap on the Settings app icon, the app will launch, and you will be directed to the main settings menu, where you can control and manage different aspects of your iPhone’s functionality.
It is important to note that the Settings app may be organized differently based on the version of iOS you are using. However, the general process of erasing all data on your iPhone remains the same, regardless of the layout of the app.
To ensure a smooth and successful erasure process, it is recommended to fully charge your iPhone or connect it to a power source before proceeding with the data erasure. This will prevent any interruptions or complications that may arise if the device runs out of battery during the process.
Now that you have opened the Settings app, you are ready to move on to the next step in the process of erasing all data on your iPhone.
Step 2: Tap on General
Once you have opened the Settings app on your iPhone, the next step to erase all data is to tap on the “General” option. The General tab in the Settings app contains a wide range of settings and options for your device.
By tapping on “General,” you will enter a new screen where you can access various settings related to your iPhone’s performance, security, and overall functionality. It’s important to note that the appearance of the General tab may vary slightly depending on your iPhone model and iOS version.
Once you are on the General screen, you will notice a list of options and settings. This is where you can customize your device according to your preferences. From adjusting display settings to managing battery usage, the General tab encompasses many essential aspects of your iPhone.
To proceed with erasing all data, it’s necessary to explore further settings within the General tab. This step is crucial as it will lead you to the “Reset” option, which is where you can find the functionality to erase all content from your iPhone.
Don’t rush through this step, take your time to navigate through the General settings and familiarize yourself with the various options available. This will help you gain a better understanding of your iPhone’s capabilities and enhance your overall user experience.
Remember, tapping on “General” is just the second step in the process of erasing all data on your iPhone. Keep following the subsequent steps to ensure a thorough and successful data erasure process.
Step 3: Scroll down and select Reset
After opening the Settings app and tapping on “General” in the previous step, you will need to continue scrolling down until you see the option for “Reset.” This option is typically located towards the bottom of the list, after other settings like “Display & Brightness” and “Sounds & Haptics.”
Once you have located the “Reset” option, tap on it to proceed. This will open up a new menu with several reset options for different aspects of your iPhone.
It’s important to note that the reset options available may vary depending on the model of your iPhone and the version of iOS running on it. However, the option we are looking for, “Erase All Content and Settings,” should be present on all models.
To access the “Erase All Content and Settings” option, you may need to scroll down a bit further within the “Reset” menu. It is typically located towards the bottom, after options like “Reset All Settings” and “Reset Network Settings.”
Once you have found the “Erase All Content and Settings” option, you may need to tap on it or select it to proceed with the next step. This will bring up a warning message informing you about the consequences of erasing all data on your iPhone.
Make sure you have backed up all important data, as erasing your iPhone will permanently delete all data and settings. This includes photos, videos, contacts, apps, and any other personal information stored on your device.
Take a moment to carefully read the warning message and consider if you have any data that needs to be saved. If you have already backed up your iPhone and are prepared to proceed with the erasure, you can confidently select the “Erase All Content and Settings” option.
Once you have selected the “Erase All Content and Settings” option, you may need to confirm your decision by entering your iPhone passcode. This is done to ensure that only authorized users can initiate the erasure process. Enter your passcode when prompted to proceed.
After confirming your decision and entering your passcode, the erasure process will begin. Depending on the amount of data on your iPhone, this process may take several minutes to complete. During this time, it is important not to interrupt the process or turn off your iPhone.
Once the erasure process is complete, your iPhone will be restored to its factory settings, with all data removed and all settings reset. At this point, you have successfully erased all data on your iPhone.
Now, you can choose to set up your iPhone as a new device or restore it from a previously created backup. If you have backed up your data before performing the erasure, restoring from a backup can help you regain access to your contacts, photos, apps, and other personal information.
However, if you choose to set up your iPhone as a new device, you will start with a completely clean slate. This can be beneficial in situations where you want to start fresh or if you are planning to give or sell your iPhone to someone else.
Keep in mind that once you have erased all data on your iPhone, it cannot be recovered. Therefore, it is crucial to have a backup of your important data before proceeding with the erasure process. This ensures that you have a copy of your data in case you need to restore it in the future.
Now that you have successfully completed the steps to erase all data on your iPhone, you can feel confident knowing that your personal information is no longer accessible on the device. Whether you choose to start anew or restore from a backup, you can continue using your iPhone with peace of mind.
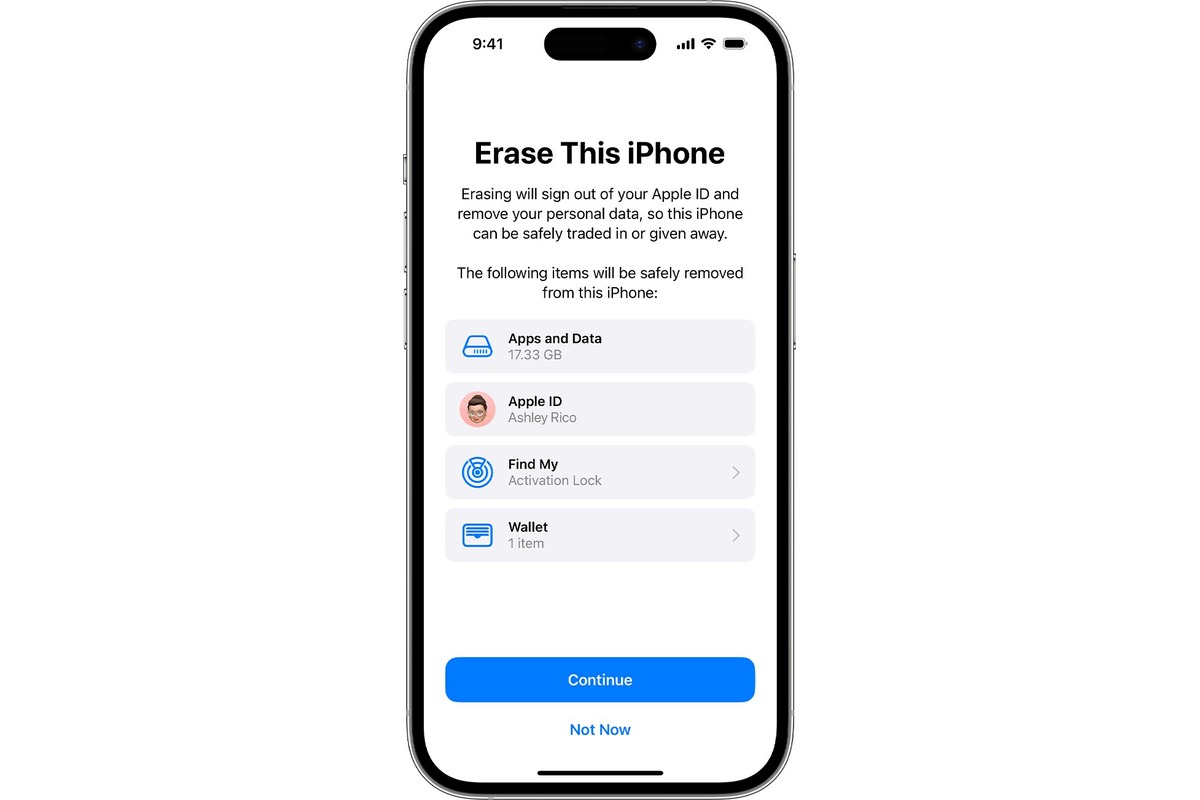
Step 4: Choose Erase All Content and Settings
After you have entered your passcode and confirmed your decision to erase all content and settings, you will be directed to the final step of the process. This step involves choosing the option to “Erase All Content and Settings.”
To do this, look for the option within the Settings app that says “Erase All Content and Settings.” It is usually located at the top of the page under the “Reset” section.
Tap on this option to initiate the erasing process. Keep in mind that choosing this option will completely wipe your iPhone, removing all data and settings. It is essential to have a backup of your data before proceeding with this step, as it cannot be undone.
By selecting “Erase All Content and Settings,” you are indicating your intention to erase your iPhone’s data permanently. This action is irreversible, so it is vital to double-check that you have backed up any important information.
Once you tap on the “Erase All Content and Settings” option, you may be prompted to enter your Apple ID password or passcode as an additional security measure to ensure that you are the authorized user making this decision.
After confirming your choice to proceed, the erasing process will begin. Depending on the amount of data stored on your iPhone, this process may take several minutes to complete.
During the erasing process, it is essential to keep your iPhone connected to a stable power source. This will help prevent any interruptions that could potentially cause data corruption or issues with the erasure.
Once the erasing process is finished, your iPhone will be restored to its original factory settings. All personal data, apps, and settings will be permanently deleted. Your iPhone will essentially be as if you just took it out of the box for the first time.
It is worth noting that erasing all content and settings on your iPhone can be a useful step to take if you plan to sell or give away your device. It ensures that the new user will have a fresh and clean device without any of your personal information.
However, it is crucial to exercise caution and make sure you have backed up any data you want to keep before proceeding with this step. Once the data is erased, it cannot be recovered.
After completing the erasing process, you will have the option to set up your iPhone as new or restore from a previous backup. This decision depends on your specific needs and preferences.
Setting up your iPhone as new means starting from scratch, without any previous data or settings. It can be a good option if you want a fresh start or if you have already backed up your data elsewhere.
On the other hand, restoring from a backup allows you to transfer your previous data, apps, and settings back onto your iPhone, making it convenient if you want to resume using your device where you left off.
Regardless of the choice you make, now that you have successfully completed the process of erasing all content and settings on your iPhone, you can begin using your device with peace of mind, knowing that your personal information has been securely removed.
Step 5: Confirm your decision and enter your passcode
After selecting the “Erase All Content and Settings” option in the previous step, you will be prompted to confirm your decision. This is a crucial step, as erasing all data on your iPhone is permanent and cannot be undone. Take a moment to ensure that you have backed up all important data and are ready to proceed.
Once you have mentally prepared yourself, you will be asked to enter your passcode. This is an additional security measure to prevent unauthorized access to your device and to confirm that you are indeed the owner of the iPhone.
Enter your passcode carefully, making sure to input the correct combination of numbers or alphanumeric characters. If you are using a six-digit passcode, be mindful of which digits you are entering to avoid any mistakes.
If you have forgotten your passcode, you will not be able to restore or erase your iPhone without using a computer and iTunes. In this case, you will need to put your device into recovery mode and connect it to a computer with iTunes installed.
Once you have successfully entered your passcode, your iPhone will proceed with erasing all data. Depending on the amount of data on your device, this process can take some time. It is important to be patient and let the iPhone complete the erasure process without interruption.
Keep in mind that entering the passcode incorrectly multiple times in a row can result in your iPhone being disabled or locked. This is a security feature designed to protect your personal information from unauthorized access. If you encounter any issues with entering your passcode, refer to the Apple Support website or contact Apple for assistance.
Once the erasure process is complete, your iPhone will be restored to its factory settings with all data wiped clean. It will be as if you are setting up a brand new device for the first time.
Note: If you have enabled two-factor authentication for your Apple ID, you may be prompted to enter a verification code during the erasure process. This is an additional security measure to ensure that only you can erase your device.
Step 6: Wait for the process to complete
After initiating the erasure process by selecting “Erase All Content and Settings,” you will need to wait patiently for the process to complete. The duration of the process depends on the amount of data on your iPhone and the speed of your device. It is essential to avoid interrupting the process or powering off your device during this time.
The erasure process involves wiping all data from your iPhone’s storage, including photos, videos, messages, contacts, apps, and settings. The process ensures that your personal information is permanently removed, leaving no trace behind.
As the process progresses, you may notice your iPhone’s screen displaying a progress bar or an Apple logo with a loading symbol. This indicates that the erasure process is underway. The duration of the process can range from a few minutes to several hours, depending on the device’s speed and the amount of data being erased.
It’s important to note that during the erasure process, your iPhone will restart multiple times. This is a normal part of the process and should not cause concern. The restarts are necessary to complete the wiping of data and ensure a thorough erasure.
While waiting for the process to complete, it’s best to keep your iPhone connected to a reliable power source to prevent it from running out of battery during the erasure. This is particularly important if your iPhone’s battery is already low.
Once the process is finished, you will see a welcome screen indicating that the erasure is complete. At this point, your iPhone is ready for setup as a new device or restoration from a previous backup.
It’s crucial to emphasize that once you have waited for the process to complete, there is no way to retrieve the erased data. Therefore, ensure that you have backed up any important information before proceeding with the erasure.
Step 7: Set up your iPhone as new or restore from backup
After erasing all data from your iPhone, you have the option to set it up as new or restore it from a backup. This step is crucial as it determines the state in which your iPhone will be after the erasing process.
If you choose to set up your iPhone as new, it means you will start with a clean slate. You will have to manually personalize your device by reinstalling apps, entering your email accounts, and configuring your settings from scratch. This can be a time-consuming process, but it guarantees a fresh start without any residual data or settings.
On the other hand, if you prefer to restore your iPhone from a backup, you can bring back all your previous data, settings, and preferences. This is an ideal option if you have recently backed up your iPhone and want to retain all your existing data and settings. To restore from a backup, make sure you have a recent backup available either on iCloud or on your computer through iTunes.
To restore from iCloud backup:
- Connect your iPhone to a stable Wi-Fi network.
- Follow the on-screen instructions to set up your iPhone until you reach the “Apps & Data” screen.
- Select “Restore from iCloud Backup” and sign in to your iCloud account using your Apple ID and password.
- Choose the most recent backup from the list of available backups.
- Wait for the restoration process to complete. This may take some time depending on the size of the backup and your internet connection.
- Once the restore is finished, follow the remaining on-screen instructions to complete the setup process.
To restore from iTunes backup:
- Connect your iPhone to your computer using a USB cable and open iTunes.
- Select your iPhone when it appears in iTunes.
- Go to the “Summary” tab and click on “Restore Backup”.
- Choose the most recent backup from the list of available backups.
- Click “Restore” and wait for the restoration process to complete.
- Once done, disconnect your iPhone from the computer and follow the on-screen instructions to finish the setup.
It’s important to note that restoring from a backup will bring back all your data, including apps, photos, messages, and settings, but it may also reintroduce any issues or problems that were present in the backup. If you were experiencing any issues prior to erasing your iPhone, it might be worth considering setting it up as new instead.
Regardless of whether you choose to set up your iPhone as new or restore from a backup, take some time to review and update your security settings, including setting a strong passcode and enabling two-factor authentication. This will help ensure the security of your device and protect your personal information.
Additional considerations and warnings
While erasing all data on your iPhone can be a straightforward process, there are a few important considerations and warnings to keep in mind:
1. Double-check your backup: Before proceeding with erasing your iPhone, make sure you have a recent backup of your data. This will ensure that you can easily restore your important files, contacts, and settings after the erase.
2. Sign out of all accounts: Besides signing out of iCloud and disabling Find My iPhone as mentioned earlier, it’s essential to sign out of all accounts linked to your iPhone. This includes social media, email, and other apps that may contain personal or sensitive information.
3. Remove any SIM or memory cards: If your iPhone has a SIM card or a memory card, make sure to remove them before initiating the erase process. This will prevent any accidental data loss or damage to these external components.
4. Beware of phishing attempts: During the erase process, be cautious of any pop-up messages or prompts asking for your personal information or login credentials. Scammers may try to take advantage of this vulnerable state to steal your data.
5. Irreversible action: Erasing all data on your iPhone is permanent and cannot be undone. Therefore, it is crucial to take the necessary precautions and double-check that you have everything backed up before proceeding.
6. Allow sufficient time: The time required to erase all data on your iPhone can vary depending on the amount of data stored. It is recommended to have your iPhone connected to a reliable power source and allow ample time for the process to complete without interruptions.
7. Keep your device secure: While waiting for the erase process to finish, ensure that your iPhone is in a safe and secure location to prevent unauthorized access or theft.
8. Confirm the erase results: After the process is complete, it’s advisable to check that all data has been successfully erased before disposing of or selling your iPhone. You can do this by setting up your iPhone as new and ensuring that no personal data remains.
By taking these additional considerations and warnings into account, you can safely and effectively erase all data on your iPhone, protecting your privacy and ensuring a fresh start for your device.
Conclusion
In conclusion, securely erasing all data on your iPhone is an essential step to protect your privacy and ensure that sensitive information doesn’t fall into the wrong hands. By following the steps outlined in this article, you can confidently wipe your device clean and start fresh without worrying about any residual data being left behind.
Remember to create a backup of your important data before proceeding with the erasing process, as it is irreversible. Whether you choose to use the built-in erase feature or a third-party tool, always double-check that your device is properly connected and powered on to avoid any issues.
Now that you know how to erase all data on your iPhone, take control of your privacy and peace of mind by regularly wiping your device or factory resetting it when needed. Stay safe and enjoy your iPhone with a clean slate!
FAQs
1. Q: Why would I need to erase all data on my iPhone?
A: There are several reasons why you might want to erase all data on your iPhone. It could be because you are selling or giving away your phone and want to ensure that your personal information is completely removed. It could also be because your iPhone is experiencing technical issues and a factory reset is recommended as a troubleshooting step. Additionally, if you are migrating to a new iPhone, you may want to erase your old device to ensure a clean start.
2. Q: How can I erase all data on my iPhone?
A: To erase all data on your iPhone, you can either perform a factory reset or use the ‘Erase All Content and Settings’ option in the iPhone settings menu. The factory reset option will completely wipe your device, including all apps, settings, and files, while the ‘Erase All Content and Settings’ option will reset your device to its default state. Both methods will delete all data on your iPhone, so it is important to backup any important information before proceeding.
3. Q: Will erasing all data on my iPhone remove my Apple ID?
A: No, erasing all data on your iPhone will not remove your Apple ID. Your Apple ID is tied to your Apple account and can be used on multiple devices. When you erase all data on your iPhone, you are essentially wiping the device clean and resetting it to its default state. You will still need to sign in with your Apple ID after the erasure process is complete.
4. Q: Does erasing all data on my iPhone remove my iCloud account?
A: Erasing all data on your iPhone will not remove your iCloud account. Your iCloud account is associated with your Apple ID and can be accessed from any device with your login details. However, if you choose to erase all data on your iPhone and set it up as a new device, you will need to sign in with your iCloud account to access your previous iCloud data and settings.
5. Q: Is it possible to retrieve erased data from an iPhone?
A: When you erase all data on your iPhone, it is generally not possible to retrieve the erased data. The erasure process is designed to overwrite the device’s memory and make data recovery extremely difficult. However, it is always recommended to backup your iPhone regularly to prevent data loss. You can use iCloud, iTunes, or third-party backup services to ensure that your important data is safely stored and can be easily restored if needed.