
Are you looking to restore your iPhone from a backup but not sure where to start? Whether you need to recover lost data, switch to a new device, or simply want to revert your iPhone to a previous state, knowing the different methods to restore your iPhone from a backup is crucial.
In this comprehensive guide, we will walk you through every possible method you should know to restore your iPhone from a backup. From using iCloud to iTunes, we will cover step-by-step instructions, tips, and precautions to ensure a successful restoration process. So, let’s dive in and explore the various ways you can restore your iPhone and regain access to your important data!
Inside This Article
- iCloud Backup
- iTunes Backup
- Finder Backup (macOS Catalina and later)
- Third-Party Backup Solutions
- Conclusion
- FAQs
iCloud Backup
iCloud Backup is a convenient and efficient method to restore your iPhone from a previous backup. It allows you to seamlessly transfer your data, settings, and apps to a new iPhone or when you need to restore your existing device to its previous state. Here, we will guide you through the steps to restore your iPhone from an iCloud backup.
Before you begin the process, ensure that you have a stable and reliable internet connection. This is crucial as the backup restoration requires downloading data from your iCloud account.
To restore your iPhone from an iCloud backup, follow these simple steps:
- Ensure that your iPhone is connected to Wi-Fi and charged or plugged into a power source.
- Turn on your iPhone and follow the on-screen instructions until you reach the “Apps & Data” screen.
- On the “Apps & Data” screen, select the “Restore from iCloud Backup” option.
- Sign in to your iCloud account using your Apple ID and password.
- Choose the most recent backup that you want to restore from. If you have multiple backups, select the one that contains the data you wish to restore.
- The restoration process will begin. This may take some time depending on the size of the backup and the speed of your internet connection.
- Once the restoration is complete, your iPhone will restart, and you can proceed with the setup process.
- Follow the on-screen instructions to complete the setup, including signing in to your Apple ID and choosing your preferences.
- After the setup is complete, your iPhone will be restored to the state it was in when the backup was created.
It’s important to note that during the restoration process, your iPhone may restart multiple times. This is normal, and you should not interrupt the process.
Additionally, iCloud Backup allows you to choose specific data to restore. For example, if you only want to restore your contacts and messages, you can selectively restore those items from the backup.
iCloud Backup is a valuable tool for iPhone users, providing a seamless way to restore your device and retain your important data. By following the simple steps outlined above, you can restore your iPhone from an iCloud backup and get up and running in no time.
iTunes Backup
If you’re an iPhone user, chances are you are familiar with iTunes. iTunes has been the go-to software for managing and syncing media content on Apple devices for years. But did you know it can also be used to create backups of your iPhone? iTunes backups offer a secure and efficient way to restore your device to a previous state, ensuring that your data and settings are preserved.
To create an iTunes backup, you will need a computer (Mac or PC) with the latest version of iTunes installed. Once you have connected your iPhone to your computer using a USB cable, follow these steps:
- Launch iTunes: Open iTunes on your computer. If prompted, make sure to update to the latest version.
- Connect Your iPhone: Use a compatible USB cable to connect your iPhone to your computer.
- Select Your iPhone: Click on the iPhone icon located in the top-left corner of the iTunes window. This will take you to the Summary page for your device.
- Back Up Your iPhone: Under the “Manually Back Up and Restore” section, click on the “Back Up Now” button. iTunes will begin creating a backup of your iPhone, including your settings, app data, and media content.
- Monitor the Backup Process: You can monitor the progress of your backup on the top bar of the iTunes window. Once the backup is complete, you will see the date and time of the last successful backup.
It’s important to note that iTunes backups do not include content that is already synced with iCloud, such as photos, videos, and music purchased from the iTunes Store. However, you can easily restore this content from the respective services after restoring your device.
To restore your iPhone from an iTunes backup, follow these steps:
- Connect Your iPhone: Use a USB cable to connect your iPhone to the computer where your iTunes backup is stored.
- Launch iTunes: Open iTunes and select your iPhone from the device list.
- Restore Your iPhone: Under the Summary tab, click on the “Restore Backup” button. Select the desired backup from the list and click “Restore.”
- Wait for the Restore Process: iTunes will begin restoring your iPhone from the selected backup. It may take some time, so be patient and make sure not to disconnect your iPhone during the process.
- Set Up Your iPhone: Once the restore is complete, your iPhone will restart. Follow the on-screen instructions to set up your device, including signing in with your Apple ID and choosing your preferences.
Restoring your iPhone from an iTunes backup can be a lifesaver in situations where your device is malfunctioning, experiencing software issues, or if you simply want to revert to a previous state. With iTunes, you can easily create backups of your iPhone and restore them whenever needed, ensuring that your data and settings are preserved.
Finder Backup (macOS Catalina and later)
If you have a Mac running macOS Catalina or later, you can use the Finder app to back up your iPhone. With this method, you can easily create a local backup of your device on your Mac. This option is especially useful if you are not keen on using iCloud or iTunes for backup purposes.
To start the backup process using Finder, you need to connect your iPhone to your Mac using a Lightning cable. Once connected, open the Finder app on your Mac, and you should see your iPhone listed under the “Locations” sidebar.
Click on your iPhone and navigate to the General tab. Here, you will find the backup options. Choose the checkbox for “Back up all the data on your iPhone to this Mac.” This will ensure that all your device settings, app data, photos, videos, and other important files are included in the backup.
After selecting the backup option, you can also choose whether you want to encrypt your backup or not. Encrypting your backup adds an extra layer of security by protecting your data with a password. This is especially useful if you have sensitive information on your iPhone that you want to keep secure.
Once you have selected the backup options, click on “Back Up Now” to start the backup process. It may take some time depending on the amount of data on your iPhone. Make sure to keep your iPhone connected to your Mac until the backup is complete.
You can check the progress of the backup under the “Backups” section in the Finder app. Once the backup is finished, you will have a local copy of your iPhone data on your Mac, ready to be restored if needed.
It is important to note that you should regularly backup your iPhone to ensure that your data is protected in case of any unforeseen circumstances like accidental data loss or device failure. With the Finder backup method, you have full control over your backups and can easily access them whenever you need them.
Third-Party Backup Solutions
While iCloud and iTunes are the default backup options for iPhone users, there are also a number of third-party backup solutions available that offer additional features and flexibility. These backup solutions can be especially useful for those who want more control over their backups or have specific data management needs.
Here are some popular third-party backup solutions for iPhone:
- iMazing: iMazing is a comprehensive iOS device management software that allows you to backup, transfer, and manage your iPhone data effortlessly. With iMazing, you can backup your iPhone to your computer and easily restore your data when needed. It also offers advanced features like selective backup and browsing your backup files.
- Dr.Fone: Dr.Fone is another powerful backup solution that provides a simple and intuitive interface for backing up and restoring your iPhone data. It supports both Windows and Mac operating systems and offers features such as selective data backup, previewing backup files, and recovering specific types of data.
- AnyTrans: AnyTrans is a versatile backup software that allows you to manage and transfer data between your iPhone, computer, and iTunes. It offers a user-friendly interface and various backup options, including full backup, incremental backup, and selective backup. AnyTrans also supports backing up and restoring other iOS devices like iPads.
These third-party backup solutions offer additional features like selective backup, browsing backup files, and cross-platform compatibility. They provide an alternative to iCloud and iTunes, allowing you to have more control over your backups and easily manage your iPhone data.
It’s important to note that while these third-party backup solutions are reliable and trusted by many users, it’s always recommended to do thorough research and read user reviews before selecting one for your specific needs.
Conclusion
Restoring your iPhone from backup is an essential process that can save you from losing important data and settings. Whether you prefer the convenience of iCloud or the control of iTunes, there are multiple methods available to ensure your iPhone is backed up and protected.
In this article, we explored various methods to restore your iPhone from backup, including using iCloud, iTunes, and Finder. We discussed the step-by-step process for each method, highlighting their advantages and limitations.
Remember to regularly back up your iPhone to avoid any unexpected data loss. It is also important to keep in mind that restoring from a backup will erase the existing data on your iPhone, so it’s crucial to proceed with caution and ensure you have a recent backup available.
With the knowledge gained from this article, you have the tools to confidently restore your iPhone from backup and get back to using your device seamlessly. Don’t let the fear of losing data hold you back – take advantage of the backup options at your disposal and keep your iPhone secure and up to date.
FAQs
1. Can I restore my iPhone from a backup without losing data?
Yes, you can restore your iPhone from a backup without losing data. When you restore your iPhone from a backup, it will overwrite the existing data on your device with the data from the backup. However, it is always recommended to backup your device before restoring to ensure you have a recent copy of your data.
2. How do I restore my iPhone from an iCloud backup?
To restore your iPhone from an iCloud backup, follow these steps:
– Ensure that your iPhone is connected to Wi-Fi and charged.
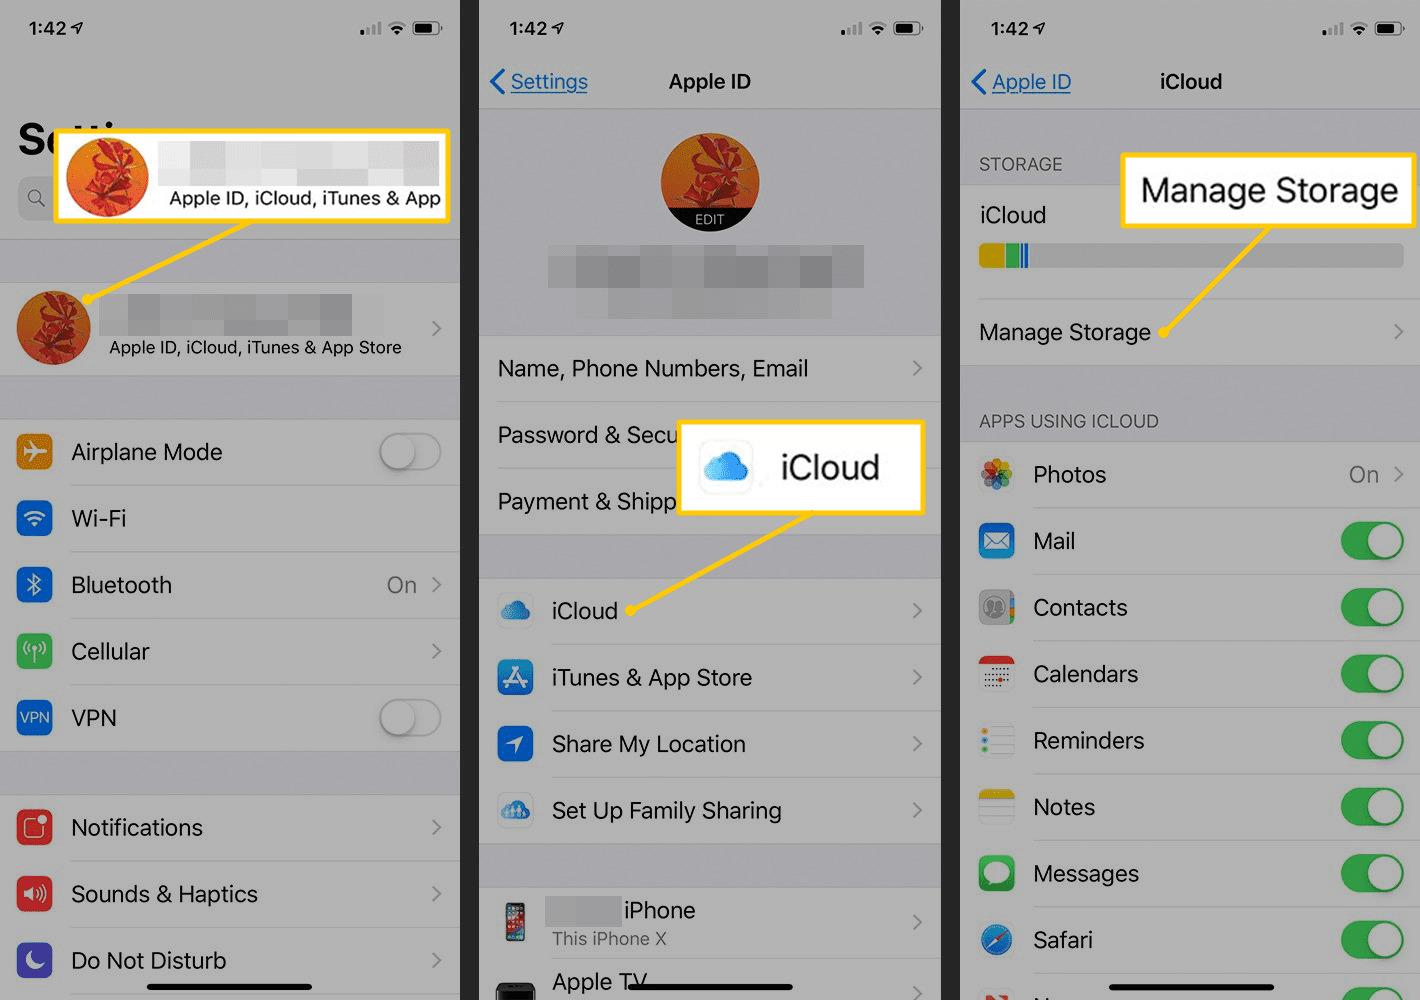
– Go to Settings on your iPhone and tap on your name at the top to access your Apple ID settings.
– Tap on “iCloud” and then “iCloud Backup”.
– Enable the “iCloud Backup” option if it is not already enabled.
– Tap on “Back Up Now” to create a new backup of your iPhone.
– Once the backup is complete, go to Settings > General > Reset and choose “Erase All Content and Settings”.
– Follow the on-screen instructions until you reach the “Apps & Data” screen.
– Select “Restore from iCloud Backup” and sign in to your iCloud account.
– Choose the backup you want to restore from and wait for the process to complete.
3. Can I restore my iPhone from an iTunes backup?
Yes, you can restore your iPhone from an iTunes backup. Here’s how:
– Connect your iPhone to your computer and open iTunes.
– Select your iPhone when it appears in iTunes.
– Click on the “Restore Backup” button.
– Choose the backup you want to restore from and click “Restore”.
– Wait for the restore process to complete. Make sure not to disconnect your iPhone during the process.
4. What should I do if my iPhone backup is not showing up?
If your iPhone backup is not showing up, here’s what you can try:
– Ensure that you are signed in to the correct Apple ID on your device.
– Check if you have a stable internet connection and enough storage space on iCloud or your computer for the backup.
– Restart your device and try again.
– If you are using iCloud, make sure that iCloud backups are enabled in your iCloud settings.
5. Can I selectively restore data from an iPhone backup?
No, you cannot selectively restore data from an iPhone backup. When you restore your iPhone from a backup, it will restore the entire backup, including all the data and settings. If you only want to restore specific data, such as contacts or photos, you can use other methods like iCloud Photos or iCloud Drive to sync or retrieve that specific data.