
Welcome to our guide on how to back up messages on iPhone! Whether you want to preserve important text conversations, save precious memories, or simply have a backup for peace of mind, backing up your iPhone messages is a smart move. With the ever-increasing reliance on our smartphones for communication, it’s essential to have a reliable method of protecting our valuable conversations. In this article, we will walk you through various methods to back up your messages on iPhone, including using iCloud, iTunes, and third-party applications. We will also provide step-by-step instructions and valuable tips to ensure a seamless and successful backup process. So let’s get started and learn how to safeguard your precious messages on your iPhone!
Inside This Article
- iCloud Backup
- iTunes Backup
- Third-Party Backup Applications
- Exporting Messages via Email
- Conclusion
- FAQs
iCloud Backup
Backing up your messages on your iPhone is crucial because it ensures that you don’t lose important conversations or valuable information. One of the easiest and most convenient ways to back up your messages is through iCloud Backup.
iCloud Backup is a built-in feature developed by Apple that automatically creates a backup of your device’s data on a regular basis. This backup includes all your apps, settings, and of course, your messages. By enabling iCloud Backup, you can rest assured that your messages will be securely stored in the cloud.
To enable iCloud Backup and ensure that your messages are included in the backup, follow these simple steps:
- First, make sure that your iPhone is connected to a stable Wi-Fi network. iCloud Backup requires an internet connection to upload your data to the cloud.
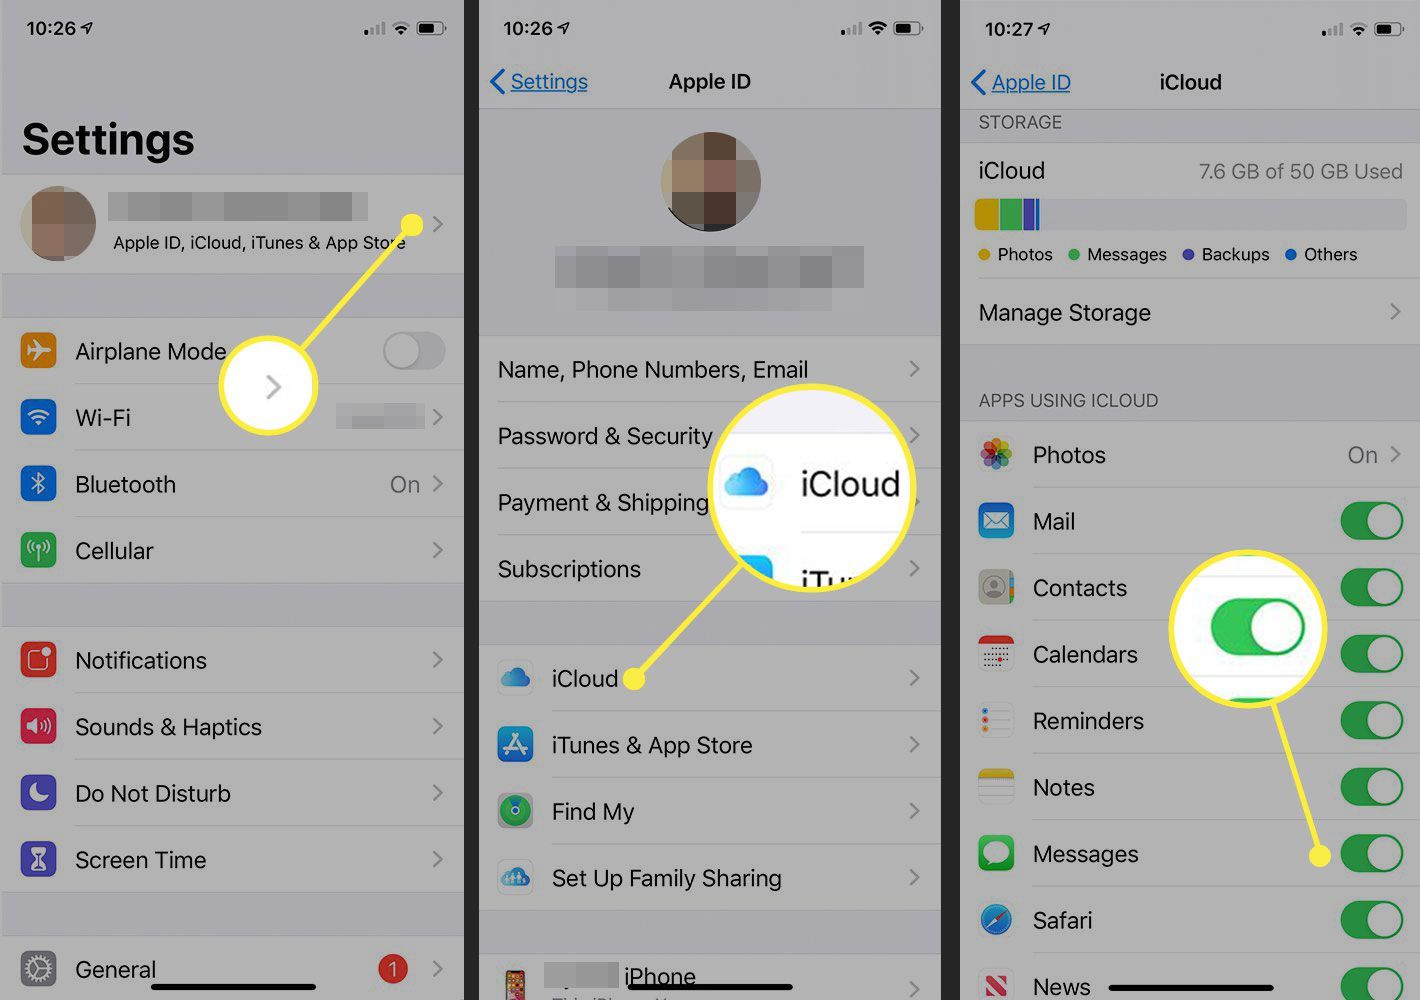
- Go to your iPhone’s Settings and tap on your name at the top of the screen.
- From the Apple ID menu, select “iCloud.”
- Scroll down and tap on “iCloud Backup.”
- Toggle the switch to turn on “iCloud Backup.”
- Lastly, tap on “Back Up Now” to initiate the backup process. Your iPhone will start backing up your data, including your messages, to iCloud.
Keep in mind that the time it takes to complete the backup depends on the size of your data and the speed of your internet connection. It’s recommended to keep your iPhone connected to Wi-Fi and plugged in to a power source to ensure the backup doesn’t get interrupted.
Once your messages are successfully backed up to iCloud, you can easily restore them to your iPhone if needed. In case you switch to a new iPhone or need to reset your current device, you can simply sign in to your Apple ID during the setup process and choose to restore from an iCloud backup. This will transfer all backed-up data, including your messages, to the new or restored device.
It’s important to note that iCloud Backup may take up your available iCloud storage space, especially if you have a large number of messages or media attachments. If you find yourself running low on storage, you can manage your storage settings by going to Settings > [your name] > iCloud > Manage Storage. From there, you can analyze the data usage and decide which apps or files to exclude from the backup to save space.
Overall, iCloud Backup provides an effortless and reliable way to back up your messages on your iPhone. By utilizing this feature, you can safeguard your conversations and important information, ensuring that nothing gets lost even if your device encounters any issues or gets lost or stolen.
iTunes Backup
Backing up your iPhone messages through iTunes is another reliable and convenient option. With iTunes, you can create an encrypted backup of your entire iPhone, including messages, and store it locally on your computer. Follow these steps to back up your messages using iTunes:
- Connect your iPhone to your computer using a USB cable.
- Launch iTunes on your computer.
- Select your iPhone when it appears in iTunes.
- Click on the “Summary” tab.
- Under the “Backups” section, choose “This computer”.
- Enable the “Encrypt iPhone backup” option to include your messages in the backup.
- Set a password for the encrypted backup for added security.
- Click on the “Back Up Now” button and wait for the backup process to complete.
- Once the backup is finished, you can view and restore your messages whenever needed.
It’s important to note that an iTunes backup will overwrite any existing backup files on your computer. Therefore, if you want to keep multiple backups of your messages, make sure to rename or move the previous backup files to a different location before creating a new one.
Additionally, iTunes backups are not incremental, so every time you back up your iPhone, it will create a full backup of all your data, including messages. This may result in larger backup files and may take more time to complete, especially if you have a large message history.
Remember to regularly back up your iPhone using iTunes to ensure that your messages are safely stored and can be easily restored in the event of accidental deletion, device loss, or system failure.
Third-Party Backup Applications
While iCloud and iTunes offer convenient options for backing up your iPhone messages, there are also third-party backup applications that provide additional features and flexibility. These applications are designed specifically to help users securely store and manage their messages, ensuring that they are easily accessible when needed. Here are a few popular third-party backup applications to consider:
1. iMazing: iMazing is a comprehensive backup app that allows you to back up and restore not only your messages, but also your entire iPhone data. It offers advanced options such as selective data backup, incremental backups, and the ability to export messages in multiple formats like PDF or CSV.
2. AnyTrans: AnyTrans is another reliable choice for backing up your iPhone messages. It offers a user-friendly interface and allows you to selectively backup, restore, and transfer your messages between devices. AnyTrans also supports exporting your messages in various formats, making it easy to manage and access your messages on different platforms.
3. iExplorer: iExplorer is a popular tool that not only enables you to back up your messages, but also provides options to export and browse through them on your computer. It allows for easy searching, sorting, and printing of messages, making it a handy tool for managing your iPhone conversations.
4. PhoneRescue: PhoneRescue is a versatile backup and data recovery tool that can help retrieve and save your messages in case of accidental deletion or device failure. It supports both iCloud and iTunes backups, giving you multiple ways to safeguard your messages and other important data.
5. Dr.Fone: Dr.Fone is an all-in-one toolkit that offers various features, including the ability to back up and restore your iPhone messages. It also provides options to transfer messages between devices and export them in different formats. With its simple interface and wide range of capabilities, Dr.Fone is a popular choice among iPhone users.
Before choosing a third-party backup application, it’s essential to ensure that it is compatible with your iPhone model and iOS version. Additionally, consider features like ease of use, security, and customer reviews to make an informed decision. These backup applications offer added convenience and functionality, giving you more control over managing and safeguarding your iPhone messages.
Exporting Messages via Email
If you prefer a simple and straightforward method to back up your messages on iPhone, you can use the option of exporting messages via email. This method allows you to save your messages in a readable format and conveniently access them whenever needed. Here’s a step-by-step guide on how to export your messages via email:
- Open the Messages app on your iPhone and navigate to the conversation that contains the messages you want to back up.
- Long-press on a specific message within the conversation, then tap on “More” when the options menu appears. This will enable you to select multiple messages if desired.
- Once you have selected the desired messages, tap on the share button (usually indicated by an arrow pointing upward) located at the bottom of the screen.
- From the share options, choose the “Mail” app. This will open a new email composition window.
- In the email composition window, enter your own email address as the recipient. This ensures that the email containing the exported messages will be sent to your own inbox.
- Finally, tap on the “Send” button to email the selected messages to yourself.
By following these steps, you can export your messages as an email attachment, allowing you to create a backup that can be easily accessed and stored. It’s important to note that depending on the number of messages selected, the export process may take some time.
Once you receive the email, you can download the attachment containing your messages and save it to your desired location, such as your computer or an external storage device. This way, you have a reliable backup of your important conversations.
Remember to regularly perform this backup method to ensure that you have the most up-to-date copies of your messages in case of any device issues or accidental deletion.
Conclusion
In conclusion, understanding how to back up messages on your iPhone is essential to ensure the safety and accessibility of your valuable conversations. By utilizing the built-in iCloud or iTunes backup options, you can easily create a backup of your messages and restore them whenever needed. Taking the time to set up automatic backups or manually initiating backups on a regular basis can save you from potential data loss caused by device damage, loss, or software issues.
Remember to keep your iCloud storage space in check and ensure you have a stable internet connection when performing backups. Moreover, explore the third-party apps available for message backup to find the best solution that fits your specific needs. By following these steps, you can have peace of mind knowing that your messages are safely backed up, allowing you to cherish and revisit your valuable conversations at any time.
FAQs
1. Can I back up my messages on iPhone?
Yes, you can back up your messages on iPhone using various methods. You can either use iCloud to automatically back up your messages or use third-party applications and software to create a backup.
2. How do I back up my messages using iCloud?
To back up your messages using iCloud, follow these steps:
- Open the “Settings” app on your iPhone.
- Tap on your name at the top of the screen.
- Select “iCloud” and then choose “iCloud Backup”.
- Toggle on the “iCloud Backup” option.
- Tap on “Back Up Now” to initiate the backup process.
3. Can I back up my messages without using iCloud?
Yes, you can back up your messages without using iCloud by using third-party applications and software. There are several applications available on the App Store that allow you to create backups of your messages and other data.
4. Is it possible to transfer my messages from one iPhone to another?
Yes, it is possible to transfer your messages from one iPhone to another. You can use iCloud or iTunes to create a backup of your messages on your old iPhone and then restore the backup on your new iPhone. Alternatively, you can use third-party applications and software to transfer specific messages or chat history between devices.
5. Are my messages safe when I back them up?
When you back up your messages using iCloud or other reputable backup methods, your messages are encrypted and stored securely. However, it is always recommended to use strong passwords and enable two-factor authentication for added security.