
Are you the proud owner of a Sony Xperia D6503? If you’re ready to start using your new smartphone, one of the first things you’ll need to do is insert a SIM card. The SIM card is an essential component that allows your phone to connect to a cellular network and make calls, send messages, and access the internet. In this article, we will guide you through the process of inserting a SIM card into your Sony Xperia D6503, ensuring a smooth and hassle-free experience. Whether you’re a first-time smartphone user or simply need a refresher, we’ve got you covered. Let’s get started!
Inside This Article
- Overview
- Step 1: Locate the SIM card tray
- Step 2: Insert the SIM card
- Step 3: Secure the SIM card tray
- Troubleshooting tips for SIM card installation
- Conclusion
- FAQs
Overview
The Sony Xperia D6503 is a popular mobile phone model known for its sleek design, advanced features, and excellent performance. One of the essential aspects of owning a mobile phone is the ability to make and receive calls, send messages, and connect to the internet. However, to enjoy these functionalities, you need to properly insert a SIM card into your Sony Xperia D6503.
A SIM card, also known as a Subscriber Identity Module, is a small chip that stores information such as your phone number, contacts, and mobile network details. It is required to establish a connection between your phone and the cellular network. Properly inserting your SIM card ensures that your phone can access the network and allows you to use your phone as intended.
In this guide, we will walk you through the steps to insert a SIM card into your Sony Xperia D6503, ensuring a seamless and hassle-free experience. Whether you are a new Sony Xperia user or simply need a refresher, follow these steps to get your SIM card up and running.
Step 1: Locate the SIM card tray
Before you can insert a SIM card into your Sony Xperia D6503, you need to locate the SIM card tray. The SIM card tray is a small slot or compartment where you can safely place your SIM card. It is typically located on the side or top edge of your device, depending on the model.
To find the SIM card tray on your Sony Xperia D6503, you can start by examining the sides of the phone. Look for a small pinhole or a small indentation that indicates the presence of the SIM card tray. This pinhole is designed to accommodate a SIM card ejection tool, which helps you to safely remove and insert the SIM card.
If you are unable to locate the SIM card tray on the sides of your device, try checking the top edge of your Sony Xperia D6503. Some models may have the SIM card tray placed on the top edge to provide easy access. Carefully run your fingers along the top edge to feel for any small compartments or slots specifically designed to hold the SIM card tray.
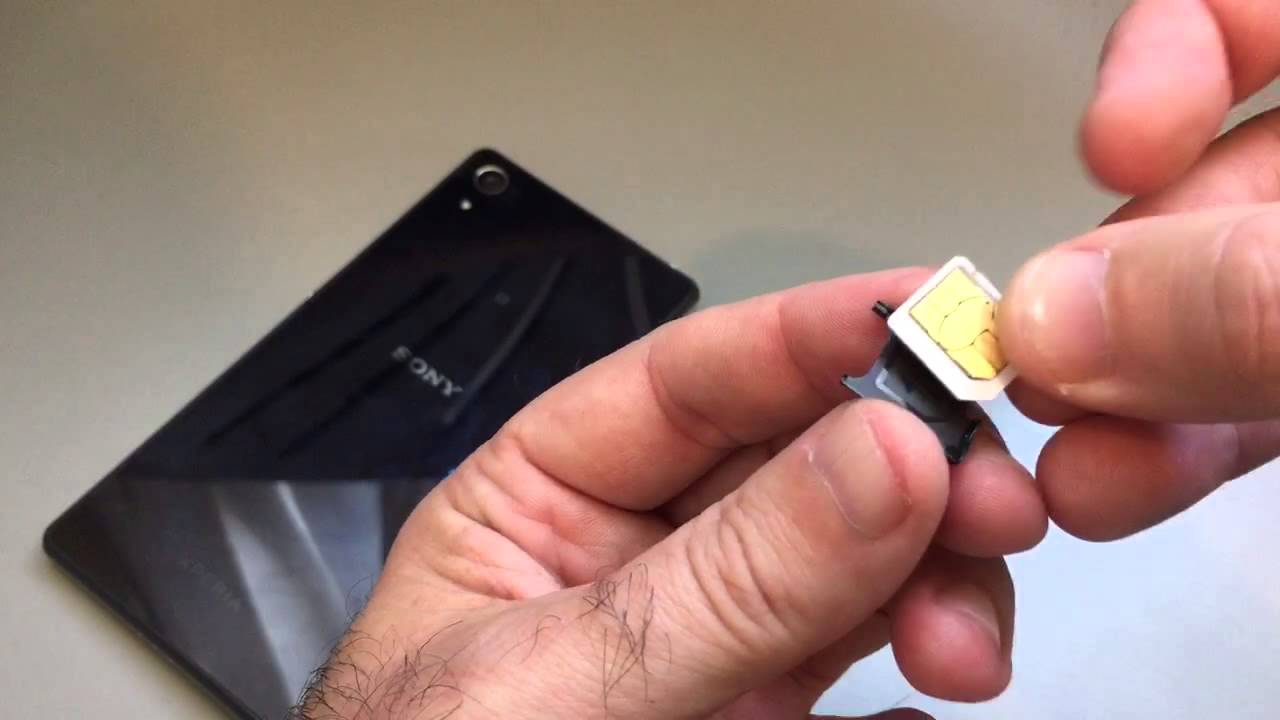
Step 2: Insert the SIM card
Now that you have located the SIM card tray in your Sony Xperia D6503, it’s time to insert the SIM card and get your phone ready for use. Follow these simple steps to ensure a smooth and successful installation:
1. Gently remove the SIM card tray by using a SIM card ejector tool or a small paperclip. Insert the tool into the small hole located on the side of the phone, applying a slight amount of pressure to release the tray.
2. Once the SIM card tray is ejected, carefully place your SIM card onto the tray. Make sure that the gold contacts on the SIM card are facing downwards, as this is the side that will make contact with the phone’s SIM card reader.
3. Align the SIM card with the designated area on the tray, ensuring that it fits securely without any gaps. Be cautious not to force the SIM card into place, as this may cause damage to both the card and the phone.
4. Once the SIM card is properly positioned on the tray, gently slide the tray back into the SIM card slot of your Sony Xperia D6503. Make sure it is inserted all the way until it clicks into place.
5. After inserting the SIM card, close the SIM card tray by pushing it gently towards the phone until it is snugly fitted. Ensure that the tray is aligned and flush with the edges of the phone to maintain its water and dust resistance capabilities.
6. Congratulations! You have successfully inserted the SIM card into your Sony Xperia D6503. Now you can power on your phone and begin enjoying the mobile services provided by your network provider.
Remember to follow the same process when replacing or changing your SIM card in the future. Always handle the SIM card with care to avoid any accidental damage.
Step 3: Secure the SIM card tray
After inserting the SIM card into the tray of your Sony Xperia D6503, the next step is to securely place the SIM card tray back into the phone. Follow the steps below to ensure a proper and secure fit:
1. Carefully align the SIM card tray with the slot in the phone.
2. Gently slide the tray back into the phone, making sure it goes in smoothly without any resistance.
3. Once the tray is fully inserted, use your fingers to press it down until it clicks into place. You may feel a slight resistance, but this is normal and indicates that the tray is securely locked.
4. Give the tray a gentle tug to ensure that it is properly secured. If it moves or comes out easily, repeat the previous steps to reinsert and secure it.
By securely locking the SIM card tray, you can prevent any accidental dislodgement or loss of connectivity. It is important to ensure that the tray is properly inserted and locked to maintain a reliable connection for calls, messages, and data usage on your Sony Xperia D6503.
Troubleshooting tips for SIM card installation
Inserting a SIM card into your Sony Xperia D6503 can sometimes be a tricky process. If you’re experiencing any issues with SIM card installation, don’t worry – we’ve got you covered. Below are some troubleshooting tips to help you successfully insert your SIM card into your Sony Xperia D6503:
1. Check SIM card compatibility: Before attempting to insert the SIM card, ensure that it is compatible with your Sony Xperia D6503. Check the SIM card size and format (nano-SIM, micro-SIM, etc.) required by your device.
2. Properly prepare the SIM card: Make sure that the SIM card is clean and free from dirt or debris. Wipe it gently with a soft, lint-free cloth if necessary. Avoid bending or damaging the SIM card contacts as this can affect its functionality.
3. Align the SIM card correctly: Ensure that the SIM card is inserted in the correct orientation. The metal contacts on the SIM card should face downwards and align with the corresponding contacts in the SIM card tray.
4. Firmly press the SIM card: Apply gentle pressure to firmly insert the SIM card into the SIM card tray. Make sure it is properly seated and does not stick out from the tray. Avoid using excessive force as this may damage the SIM card or the device.
5. Check the SIM card tray: Inspect the SIM card tray to ensure that it is clean and free from any obstructions. Clear away any debris or foreign objects that may prevent the SIM card tray from closing properly.
6. Restart your device: If you have followed all the above steps and are still experiencing issues with SIM card installation, try restarting your Sony Xperia D6503. Sometimes a simple restart can resolve minor glitches or software-related problems.
7. Seek professional assistance: If you have tried all the troubleshooting tips and are still unable to insert the SIM card into your Sony Xperia D6503, it may be helpful to seek assistance from a professional technician or contact Sony support for further guidance.
By following these troubleshooting tips, you should be able to successfully insert your SIM card into your Sony Xperia D6503 and get back to enjoying all its features and functionalities.
After going through the detailed steps on how to insert a SIM card into the Sony Xperia D6503, it is clear that the process is straightforward and user-friendly. By following these simple instructions, users can easily enjoy the benefits of a functioning SIM card, allowing them to make calls, send messages, and access various mobile services on their Sony Xperia device.
The Sony Xperia D6503 is a powerful and versatile smartphone that offers an exceptional user experience. With its sleek design, high-quality camera, and advanced features, it is a popular choice among smartphone enthusiasts. The ability to easily insert and use a SIM card further enhances its functionality and convenience.
Whether you’re a new Sony Xperia D6503 user or someone looking to upgrade their device, knowing how to insert a SIM card is essential. By following the steps outlined in this guide, you can ensure a seamless and hassle-free experience. So go ahead, get your SIM card ready, and enjoy the full potential of your Sony Xperia D6503!
FAQs
Q: How do I insert a SIM card into the Sony Xperia D6503?
A: Inserting a SIM card into the Sony Xperia D6503 is a simple process. Follow these steps:
- Power off your Sony Xperia D6503.
- Locate the SIM card slot on the device. It is usually on the side, covered by a small flap.
- Use a SIM card ejector tool, or a small paperclip, to gently open the SIM card tray.
- Place your SIM card into the tray, making sure that the gold contacts are facing downwards and the notched corner aligns with the tray’s guidelines.
- Gently push the tray back into the slot until it clicks into place.
- Power on your Sony Xperia D6503, and you should now have successfully inserted your SIM card.
Q: What type of SIM card does the Sony Xperia D6503 use?
A: The Sony Xperia D6503 uses a nano SIM card. It is the smallest SIM card size available and is commonly used in modern smartphones.
Q: Can I use a micro SIM card in the Sony Xperia D6503?
A: No, the Sony Xperia D6503 requires a nano SIM card, which is smaller than a micro SIM card. If you have a micro SIM card, you will need to either obtain a nano SIM card from your service provider or use a SIM card adapter to fit your micro SIM card into the nano SIM card slot.
Q: Is it possible to use two SIM cards in the Sony Xperia D6503?
A: No, the Sony Xperia D6503 only supports a single SIM card. It does not have dual SIM capabilities.
Q: How do I remove the SIM card from the Sony Xperia D6503?
A: To remove the SIM card from the Sony Xperia D6503, follow these steps:
- Power off your Sony Xperia D6503.
- Locate the SIM card slot on the device.
- Use a SIM card ejector tool, or a small paperclip, to gently open the SIM card tray.
- Gently pull the SIM card tray out of the slot.
- Remove the SIM card from the tray.
- Insert the empty tray back into the slot until it clicks into place.
- Power on your Sony Xperia D6503, and your SIM card has now been successfully removed.