
Are you excited about getting a new Sony Xperia smartphone and eager to start using it with your mobile carrier? One of the first things you’ll need to do is insert a SIM card into your device. The SIM card is essential for connecting to your network provider, allowing you to make calls, send messages, and access the internet. While it may seem like a simple task, inserting a SIM card on your Sony Xperia requires a bit of know-how to ensure it is done correctly. In this article, we will guide you through the process step by step, so you can quickly start enjoying all the features and functionality of your new phone. Let’s get started!
Inside This Article
- # How to Insert a SIM Card on Sony Xperia
- Overview
- Step 1: Locate the SIM card slot
- Step 2: Power off the Sony Xperia
- Step 3: Open the SIM card tray
- Step 4: Insert the SIM card
- Step 5: Close the SIM Card Tray
- Step 6: Power on the Sony Xperia
- Conclusion
- FAQs
# How to Insert a SIM Card on Sony Xperia
If you’ve recently purchased a Sony Xperia smartphone and you’re ready to set it up, one of the first things you’ll need to do is insert a SIM card. The SIM card is essential for connecting to a mobile network and making calls, sending messages, and accessing mobile data. In this article, we’ll guide you through the step-by-step process of inserting a SIM card on a Sony Xperia device.
Before you begin, make sure you have the necessary tools – a SIM card ejector tool or a small paperclip. These tools will help you open the SIM card tray, which is usually located on the side or the top of the Sony Xperia device. Once you have the tools ready, follow the steps below:
Step 1: Locate the SIM card slot
The SIM card slot is typically located on the side or the top of the Sony Xperia device. Look for a small pinhole or a tray with a tiny ejector symbol next to it. This is where you’ll insert the SIM card.
Step 2: Power off the Sony Xperia
Before inserting the SIM card, it’s important to power off your Sony Xperia device. This will prevent any potential damage to the SIM card or the device.
Step 3: Open the SIM card tray
Take the SIM card ejector tool or the small paperclip and insert it into the pinhole or the ejector symbol next to the SIM card slot. Apply gentle pressure until the SIM card tray pops out.
Step 4: Insert the SIM card
Take your SIM card and align it with the SIM card tray. Ensure that the gold contacts on the SIM card are facing downwards. Carefully place the SIM card onto the tray and push it in until it fits securely.
Step 5: Close the SIM card tray
Gently push the SIM card tray back into the Sony Xperia device until it clicks into place. Make sure it is flush with the device’s frame.
Step 6: Power on the Sony Xperia
Now that the SIM card is inserted, you can power on your Sony Xperia device. Once it is powered on, your device should recognize the SIM card and connect to the mobile network.
And that’s it! You’ve successfully inserted a SIM card on your Sony Xperia device. You can now enjoy making calls, sending messages, and using mobile data with your new smartphone. If you ever need to remove or replace the SIM card in the future, simply repeat these steps. Happy smartphone usage!
- Inserting a SIM card on Sony Xperia is a simple process, but make sure to power off the device before starting.
- Use a SIM card ejector tool or a small paperclip to open the SIM card tray.
- Align the SIM card with the tray, with the gold contacts facing downwards, and insert it securely.
- Push the SIM card tray back into the device until it clicks into place.
- Power on the Sony Xperia and enjoy using your new smartphone with a connected SIM card.
Overview
The Sony Xperia is a popular smartphone known for its sleek design and advanced features. One of the essential tasks when setting up a new Xperia is inserting the SIM card. The SIM card provides connectivity to your mobile network, allowing you to make calls, send messages, and access the internet.
In this guide, we will walk you through the process of inserting a SIM card on your Sony Xperia device. Whether you have a new Xperia or need to replace your existing SIM card, this step-by-step tutorial will help you get connected in no time.
Before we dive into the steps, it’s important to note that different Xperia models may have slightly different configurations. While the general process remains the same, there might be slight variations in the placement of the SIM card slot or the SIM card tray. Refer to your Xperia’s user manual or the manufacturer’s website for specific instructions tailored to your device.
Now, let’s get started with the step-by-step guide on how to insert a SIM card on your Sony Xperia.
Step 1: Locate the SIM card slot
Before you can insert a SIM card into your Sony Xperia, you need to locate the SIM card slot. The location of the slot may vary depending on the specific model of your Xperia device. In most cases, you can find the SIM card slot either on the side of the device or underneath the back cover.
If the SIM card slot is located on the side of your Sony Xperia, it is usually accompanied by a small pinhole. This pinhole is used to eject the SIM card tray.
On the other hand, if the SIM card slot is located under the back cover, you will need to remove the back cover to access it. In such cases, look for a small notch or groove on the back cover that you can grip or pry open with your fingers.
Once you have located the SIM card slot, you can proceed to the next step of inserting the SIM card into your Sony Xperia.
Step 2: Power off the Sony Xperia
To insert a SIM card on your Sony Xperia, you’ll first need to power off the device. This step is important to prevent any damage to your phone or the SIM card. Follow the instructions below to power off your Sony Xperia:
1. Press and hold the power button located on the side or top of the device.
2. A menu will appear on the screen displaying various options, such as power off, restart, and airplane mode.
3. Tap on the “Power off” option to initiate the shutdown process.
4. A confirmation message will appear asking if you want to turn off the device. Tap on “OK” to proceed.
5. Your Sony Xperia will now begin to power off. This may take a few seconds, so be patient.
6. Once the device is completely powered off, you can now proceed to the next step of inserting the SIM card.
It is important to note that during the power off process, any unsaved data or applications may be lost. Make sure to save any important files or documents before powering off your Sony Xperia.
Step 3: Open the SIM card tray
Now that you have located the SIM card slot on your Sony Xperia, it’s time to open the SIM card tray. Opening the SIM card tray will allow you to easily insert or remove your SIM card. Follow these steps to open the SIM card tray:
- Look for a small pinhole on the side or top of your Sony Xperia. This pinhole is the SIM card tray eject mechanism.
- Take a SIM card ejection tool, or a small paperclip, and insert it into the pinhole. Apply a gentle amount of pressure to press the button inside.
- With the button pressed, the SIM card tray should pop out slightly.
- Gently pull out the SIM card tray from the Sony Xperia. You may need to use your fingers to grip the tray and pull it out completely.
It’s important to handle the SIM card tray and the SIM card with care to avoid any damage. Ensure that your hands are clean and dry to prevent any dirt or moisture from getting inside the device.
Once the SIM card tray is open, you are ready to insert your SIM card. Keep the SIM card tray in a safe place while you prepare the SIM card for installation. In the next step, we will guide you on how to insert the SIM card into the Sony Xperia.
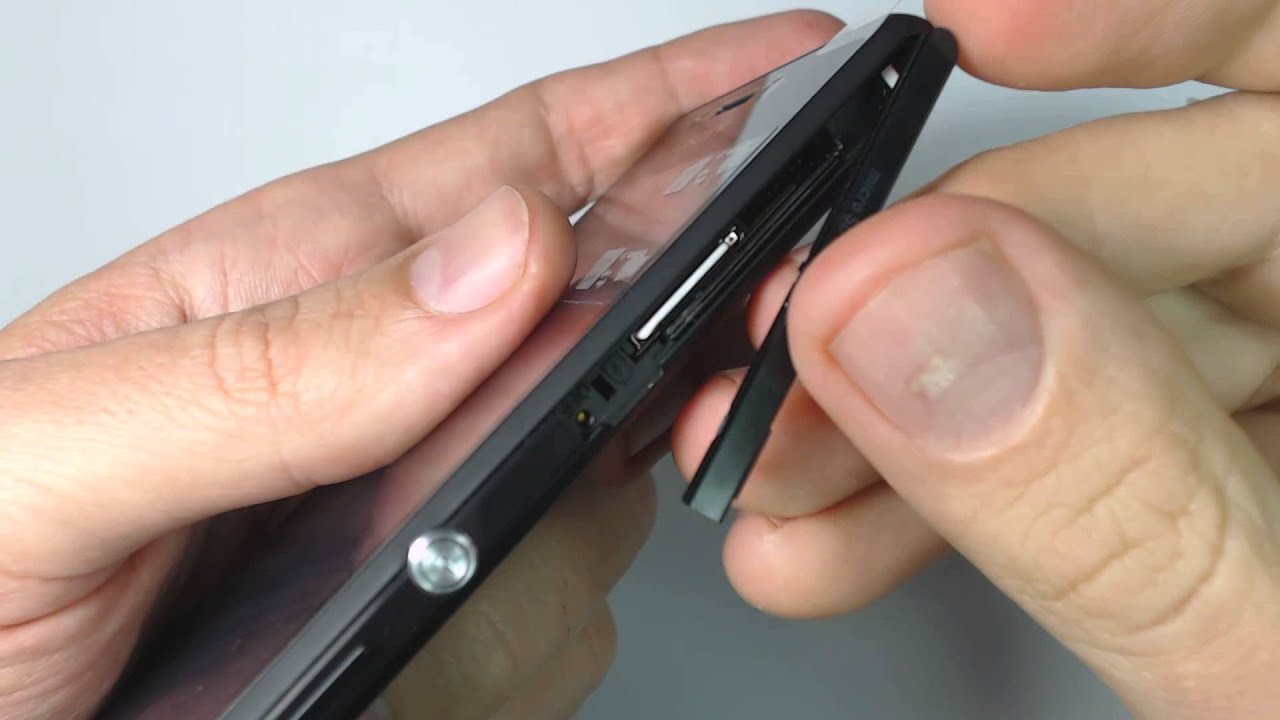
Step 4: Insert the SIM card
Now that you have opened the SIM card tray on your Sony Xperia, it’s time to insert the SIM card. Follow the steps below to ensure a smooth and successful insertion:
1. Take your SIM card. You will notice a small metal chip on the back of the card. This chip contains important information and needs to face down when inserting it into the phone.
2. Carefully align the SIM card with the designated slot in the SIM card tray. Make sure that the notched corner of the SIM card matches the corresponding corner on the tray. This ensures that the SIM card is properly oriented for insertion.
3. Gently push the SIM card into the slot. Use your finger or a small tool to slide it in until it is fully inserted and flush with the tray.
4. Once the SIM card is in place, make sure it is secure by giving the tray a light push to ensure it is properly seated.
5. If your Sony Xperia supports dual SIM functionality, repeat the above steps for the second SIM card slot.
6. Finally, close the SIM card tray by pushing it back into the phone until it clicks into place.
You have now successfully inserted the SIM card into your Sony Xperia. The next step is to power on the phone and set it up. Follow the final step in this guide to complete the process.
Step 5: Close the SIM Card Tray
After successfully inserting your SIM card into the Sony Xperia, it is now time to close the SIM card tray. Follow the steps below:
Option 1: Using a SIM ejection tool
If you used a SIM ejection tool to open the SIM card tray, you can use the same tool to close it. Simply insert the tool back into the small hole and gently push until you hear a click. This indicates that the tray is securely closed.
Option 2: Manually closing the SIM card tray
If you do not have a SIM ejection tool, don’t worry! You can still close the SIM card tray manually. Carefully align the tray with the slot on your Sony Xperia device and ensure that the small notch on the tray matches with the corresponding notch on the device. Apply gentle pressure using your finger to push the tray back into its original position until it clicks into place.
It’s important to note that you should avoid applying too much force while closing the tray, as this could potentially damage the device or the SIM card itself.
Once the SIM card tray is closed, you can proceed to the next and final step.
Step 6: Power on the Sony Xperia
After successfully inserting the SIM card into your Sony Xperia, it’s time to power on the device and start enjoying its features and functionalities. Powering on the Sony Xperia is a straightforward process that can be done in just a few simple steps. Let’s delve into the details.
1. Press and hold the power button located on the side or top of your Sony Xperia. This button is usually indicated by a small power symbol.
2. Keep holding the power button until you see the Sony logo appear on the screen. This indicates that the device is booting up and preparing for use.
3. Once the Sony logo disappears, your Sony Xperia will begin to load the operating system. You may see a loading screen or a progress bar, depending on the model and software version.
4. After a short loading period, you will be greeted with the setup screen. This is where you will configure initial settings such as language preferences, Wi-Fi connectivity, and Google account integration. Follow the on-screen instructions to complete the setup process.
5. Once you have finished setting up your Sony Xperia, you will be taken to the home screen. From here, you can access all the features and applications of your device.
6. Congratulations! You have successfully powered on your Sony Xperia and are ready to explore all its capabilities. Take some time to familiarize yourself with the device and customize it to your liking.
7. If you encounter any issues during the power-on process, such as the device not turning on or getting stuck on a screen, try performing a hard reset. This involves holding down the power button and volume up button simultaneously until the device restarts.
Remember to periodically charge your Sony Xperia to ensure that you always have enough battery power to keep your device running smoothly. Additionally, it’s a good idea to keep the device’s software up to date by installing the latest system updates when they become available.
Now that you know how to power on your Sony Xperia, you can start enjoying all its amazing features and staying connected with the world.
In conclusion, knowing how to insert a SIM card on your Sony Xperia device is essential for ensuring seamless connectivity and access to mobile services. By following the steps outlined in this article, you can easily and confidently insert a SIM card into your Sony Xperia smartphone. Whether you are upgrading your device, changing carriers, or simply need to replace your SIM card, this process can be accomplished with ease.
Remember to handle your SIM card with care and ensure proper alignment when inserting it into the SIM card slot. With this knowledge, you can enjoy uninterrupted communication, access to mobile data, and the ability to use your Sony Xperia device to its full potential.
For any further assistance or troubleshooting, refer to the Sony Xperia user manual or reach out to Sony customer support. Now that you are equipped with the knowledge to insert a SIM card on your Sony Xperia, you can embark on your mobile phone journey and stay connected wherever you go.
FAQs
1. How do I insert a SIM card on Sony Xperia?
To insert a SIM card on a Sony Xperia phone, follow these steps:
– Locate the SIM card tray on the side of your phone. It may be on the left or right side, depending on the model.
– Use a SIM card ejector tool or a small paperclip to open the SIM card tray.
– Place the SIM card into the tray, ensuring that the gold contacts are facing down and aligned with the tray’s pins.
– Gently push the SIM card tray back into the phone until it clicks into place.
2. What type of SIM card does Sony Xperia use?
Sony Xperia phones typically use nano SIM cards, which are the smallest SIM card size available. However, some older models may use micro SIM cards. Before inserting a SIM card, check the specifications of your specific Sony Xperia model to determine the required SIM card size.
3. Can I use a dual SIM card on Sony Xperia?
Yes, many Sony Xperia models support dual SIM functionality, allowing you to use two SIM cards simultaneously. This is particularly useful for those who need separate phone numbers or want to use different carriers for voice and data. However, not all Sony Xperia models support dual SIM capability, so it’s important to check the specifications of your particular device.
4. Do I need to power off my Sony Xperia phone to insert a SIM card?
It’s generally recommended to power off your Sony Xperia phone before inserting or removing a SIM card. This ensures that no electrical damage occurs and reduces the risk of accidentally triggering any unwanted actions on your phone. Remember to always power off your device and remove any connected chargers before handling the SIM card tray.
5. Can I switch SIM cards on my Sony Xperia without affecting my data?
Switching SIM cards on your Sony Xperia should not affect your data, as long as the new SIM card is from the same carrier or a compatible carrier. However, if you are switching to a different carrier, you may need to configure your phone’s APN settings to ensure proper data connectivity. It’s always a good idea to back up your important data before making any changes to your SIM card.