
Are you struggling to connect your Dell desktop to a wireless network? Don’t worry, you’re not alone. It can be frustrating when you’re ready to go online, but you can’t seem to get your desktop to connect wirelessly. The good news is that connecting your Dell desktop to a wireless network is easier than you might think. In this article, we’ll guide you through the step-by-step process of connecting your Dell desktop to a wireless network, so you can enjoy the convenience of wireless internet access. From ensuring your wireless adapter is enabled to entering the correct network credentials, we’ll cover it all. So, let’s get started and get your Dell desktop connected to a wireless network in no time!
Inside This Article
- Getting started
- Step 1: Check for wireless connectivity
- Step 2: Connect the wireless adapter
- Step 3: Access the wireless network settings
- Step 4: Choose the wireless network
- Step 5: Enter the network password
- Troubleshooting common issues
- Conclusion
- FAQs
Getting started
Connecting your Dell desktop to a wireless network is a simple and convenient way to access the internet without the need for a physical connection. Whether you’re setting up a new computer or looking to switch from a wired to a wireless connection, here are the steps to get started:
Step 1: Check for wireless connectivity
Before you begin, ensure that your Dell desktop has built-in wireless connectivity. Look for indicators such as a Wi-Fi symbol or a dedicated wireless button on your computer. If you don’t have built-in wireless capability, you can purchase a USB wireless adapter that plugs into an available USB port.
Step 2: Connect the wireless adapter
If your Dell desktop doesn’t have built-in wireless connectivity, connect the USB wireless adapter to an available USB port. The adapter should be recognized by your computer automatically. It may prompt you to install any necessary drivers, so ensure you have an internet connection through a wired connection before proceeding.
Step 3: Access the wireless network settings
Once your wireless adapter is connected, navigate to the network settings on your Dell desktop. You can access these settings by clicking on the network icon in the system tray or by going to the Control Panel and selecting the Network and Internet category.
Step 4: Choose the wireless network
In the network settings, look for a list of available wireless networks in your area. These networks are typically identified by their SSID (Service Set Identifier). Choose the network you want to connect to from the list. If the network is secured, you will need the network password to proceed.
Step 5: Enter the network password
If the wireless network you selected is secured, enter the network password when prompted. This password is typically case-sensitive, so ensure you enter it correctly. Once the password is entered, your Dell desktop will attempt to connect to the network. If successful, you will be connected to the wireless network.
Now that you’re connected to a wireless network, you can enjoy the flexibility and convenience of accessing the internet without being tethered to a physical connection. Remember to keep your Dell desktop updated with the latest drivers and security patches to ensure optimal performance and security.
Step 1: Check for wireless connectivity
Before connecting your Dell desktop to a wireless network, it is important to check if it has built-in wireless capabilities or if you need to install a wireless adapter. Here are the steps to check for wireless connectivity:
1. Look for the wireless icon: Check if your Dell desktop has a wireless icon on the front or back panel. The icon may resemble a signal strength indicator or waves radiating from a satellite dish.
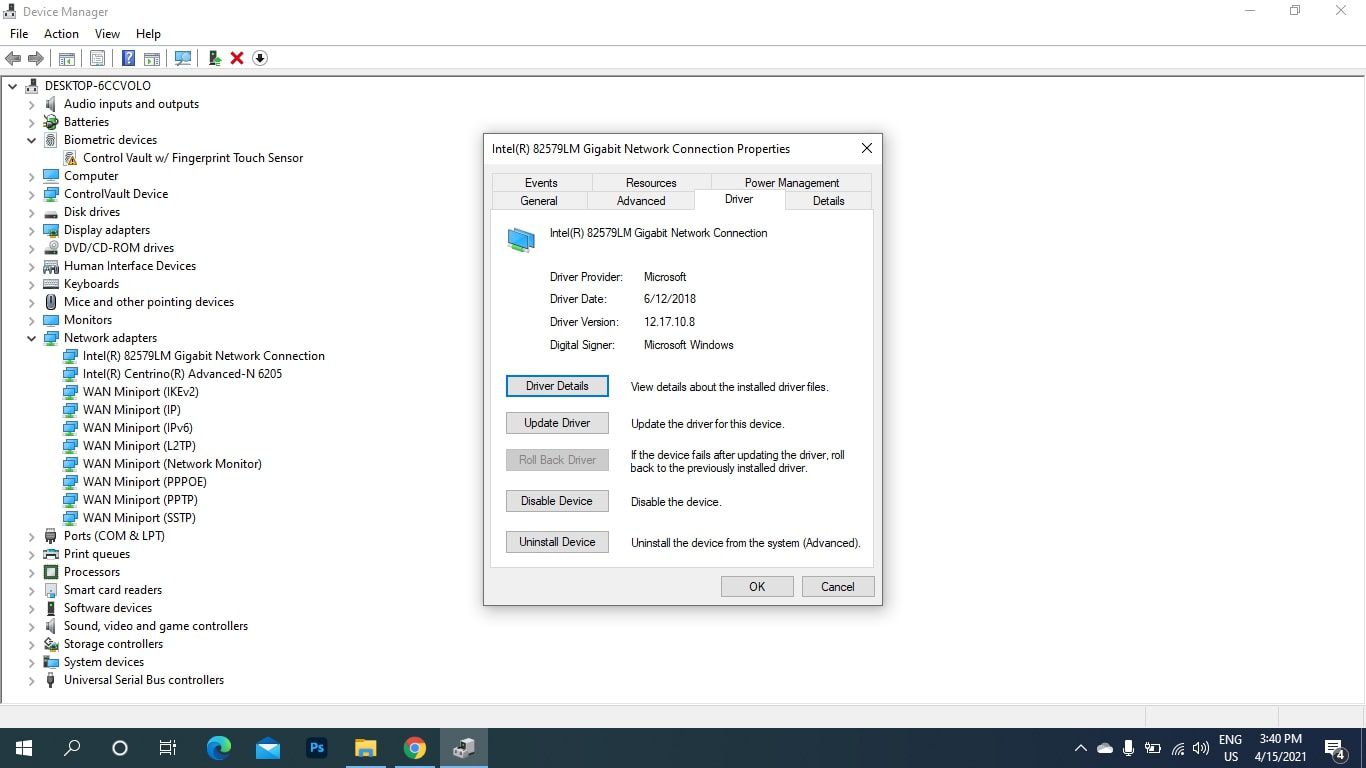
2. Check Device Manager: Press the Windows key + X and select Device Manager from the options. In the Device Manager window, expand the Network adapters category and look for a wireless network adapter. If you see one, it means your Dell desktop has built-in wireless capabilities.
3. Check the specifications: If you are unsure whether your Dell desktop has wireless capabilities, refer to the product documentation or visit the Dell website. Look for the specifications section and check if it mentions Wi-Fi or wireless connectivity.
4. Consult the manufacturer: If you still can’t determine if your Dell desktop has wireless capabilities, you can contact the Dell customer support or visit their online forums. They will provide you with the necessary information based on your model.
Once you have confirmed that your Dell desktop has wireless connectivity, you can proceed to the next steps to connect it to a wireless network.
Step 2: Connect the wireless adapter
Once you have confirmed that your Dell desktop computer has the capability to connect to a wireless network, the next step is to connect the wireless adapter. The wireless adapter, also known as a wireless network card or Wi-Fi card, allows your desktop to communicate wirelessly with the router and other devices on the network.
The process of connecting the wireless adapter may vary depending on the specific model of your Dell desktop. However, the general steps remain the same. Here’s how you can connect the wireless adapter to your Dell desktop:
1. Locate the wireless adapter slot on your desktop. It is usually located at the back of the computer tower. The slot is typically a small opening with metal contacts inside.
2. Carefully align the wireless adapter with the slot and gently push it in. Make sure it is fully inserted to ensure a secure connection.
3. Once the wireless adapter is inserted, you may need to attach the antennas to the designated ports on the adapter. This step is necessary for ensuring optimal signal strength and reception.
4. After attaching the antennas, secure them in place by tightening any screws or connectors provided. This will help prevent them from coming loose during use.
5. Finally, double-check the connections to ensure everything is securely in place.
Once the wireless adapter is properly connected to your Dell desktop, you can proceed to the next step of accessing the wireless network settings.
Step 3: Access the wireless network settings
After ensuring that your Dell desktop has a wireless adapter and is properly connected to the power source, it’s time to access the wireless network settings. This step will allow you to search for available networks and connect to the one you desire.
To access the wireless network settings, follow these simple steps:
- Click on the network icon located in the system tray, usually found on the bottom right corner of your desktop screen. The network icon typically looks like a Wi-Fi signal or a series of bars indicating signal strength.
- A list of available wireless networks will appear. This list may take a few moments to load, so be patient. The networks will be displayed with their respective names or SSIDs (Service Set Identifiers).
- Identify the network you want to connect to from the list. If you are unsure which network to choose, look for the network name provided by your internet service provider (ISP) or consult the documentation that came with your wireless router.
- Once you have identified the network, click on its name to select it.
- If the wireless network you selected is secured with a password, you will be prompted to enter it. Simply input the correct password and click “Connect” or “Join” to establish the connection.
Note: If the network is an open network without a password, you will automatically connect to it once selected. However, it’s always recommended to secure your network with a password for added privacy and security.
After successfully completing these steps, your Dell desktop will be connected to the wireless network. You should now be able to browse the internet, stream media, and enjoy the benefits of wireless connectivity.
Step 4: Choose the wireless network
Once you have accessed the wireless network settings on your Dell desktop, the next step is to choose the wireless network you want to connect to. Follow these simple steps to select your desired network:
- Look for a list of available wireless networks. This list can usually be found under the “Available Networks” or “Choose a Network” section of the wireless network settings.
- Review the list of available networks. Each network will be identified by its name or SSID (Service Set Identifier). This helps you identify and differentiate between different networks in your vicinity.
- If you see your desired network listed, click on it to select it. If you don’t see your network, try clicking on the “Refresh” or “Scan” button to update the list of available networks.
- After selecting your network, you may be prompted to confirm your choice or enter additional information. Follow any on-screen instructions to proceed with the connection process.
It’s important to note that if you’re connecting to a public or shared wireless network, such as those found in cafes, airports, or hotels, make sure you select the correct network and exercise caution to safeguard your personal information.
Additionally, if your desired network is password-protected, you will be prompted to enter the network password during the connection process. Be sure to enter the password correctly, taking note of uppercase and lowercase letters, as passwords are case-sensitive.
Once you have successfully selected and entered the necessary information for your desired network, your Dell desktop will begin the connection process. It may take a few seconds for the connection to establish, so be patient. Once connected, you will be able to enjoy all the benefits of a wireless network, including internet access and seamless data transfer.
Remember, if you have multiple wireless networks available in your vicinity, always choose the one that you have permission to access and that provides the best signal strength and security for your needs.
Step 5: Enter the network password
Once you have selected the wireless network you want to connect to, the next step is to enter the network password. This password is necessary to ensure the security of your wireless connection and prevent unauthorized access to your network. Here’s how you can enter the network password on your Dell desktop:
1. After choosing the wireless network, a window will pop up prompting you to enter the network password. The password may also be referred to as the network key or passphrase. It is usually a combination of letters, numbers, and special characters.
2. Carefully type in the network password in the provided field. Take your time and double-check each character to ensure accuracy. Remember, passwords are case-sensitive, so be mindful of uppercase and lowercase letters.
3. If you are unsure about the password, you can click on the “Show Password” option to display the characters instead of asterisks. This can help you verify that you have entered the correct password.
4. Once you have entered the network password correctly, click on the “Connect” or “Join” button. This will initiate the connection process. Your Dell desktop will then attempt to establish a secure connection with the wireless network using the provided password.
5. If the password is correct and the network connection is successful, you will see a notification indicating that you are connected to the wireless network. Congratulations! You can now enjoy the benefits of a wireless connection on your Dell desktop.
Please note that the network password is usually set by the administrator or the person who set up the wireless network. If you are having trouble finding or accessing the correct password, it is advisable to reach out to the network administrator or refer to any documentation provided with the network.
Remember to keep your network password secure and regularly update it to ensure the ongoing security of your wireless network. Avoid sharing your password with unauthorized individuals and change it periodically to prevent any potential security breaches.
By following these steps and entering the correct network password, you will be able to successfully connect your Dell desktop to a wireless network and enjoy the convenience of wireless connectivity.
Troubleshooting common issues
While connecting your Dell desktop to a wireless network, you may encounter certain issues that can hinder the connection process. Don’t worry; we’ve got you covered. Here are some common issues you may face and their troubleshooting steps:
1. Weak wireless signal: If you are experiencing a weak wireless signal, try moving your desktop closer to the wireless router. Obstacles such as walls or metal objects can interfere with the signal strength. Alternatively, you can consider using a Wi-Fi range extender to boost the signal.
2. Incorrect network settings: Double-check that you have entered the correct network name (SSID) and password. Mismatched or misspelled information can prevent your Dell desktop from connecting to the wireless network. It’s also worth verifying that your desktop’s network adapter is enabled.
3. Outdated network adapter driver: An outdated or incompatible network adapter driver can cause connectivity issues. Visit the Dell website, locate the support page for your specific model, and download the latest driver for your network adapter.
4. IP address conflict: If you are experiencing network connection problems, there may be an IP address conflict. To resolve this, open the Command Prompt on your Dell desktop and type “ipconfig /release” followed by “ipconfig /renew”. This will release and renew your IP address, resolving any conflicts.
5. Router issues: Sometimes, the problem may lie with the wireless router itself. Try restarting the router by unplugging it from the power source for a few seconds and then plugging it back in. If the issue persists, you may need to contact your internet service provider for assistance.
6. Firewall blocking the connection: Your firewall settings may be preventing your Dell desktop from connecting to the wireless network. Temporarily disable the firewall and try connecting again. If successful, add the network to the firewall’s exception list to allow future connections.
7. Interference from other devices: Nearby electronic devices such as cordless phones, microwave ovens, or baby monitors can interfere with Wi-Fi signals. Keep these devices away from your wireless router and desktop to avoid signal interference.
8. Resetting network settings: As a last resort, you can reset the network settings on your Dell desktop. Go to the Control Panel, navigate to “Network and Internet,” and select “Network and Sharing Center.” From there, choose “Change adapter settings” and right-click on your wireless adapter. Select “Disable” and then “Enable” to reset the network settings.
By following these troubleshooting steps, you should be able to resolve common issues and successfully connect your Dell desktop to a wireless network. If you continue to experience problems, it may be helpful to consult Dell’s customer support for further assistance.
Conclusion
In today’s fast-paced digital world, staying connected to the internet is essential. This is especially true when it comes to desktop computers like the Dell Desktop. Fortunately, connecting your Dell Desktop to a wireless network is a relatively simple process.
By following the steps outlined in this guide, you can ensure that your Dell Desktop is properly connected to your wireless network, allowing you to take advantage of all the benefits of being online. From browsing the web to streaming media and accessing cloud-based services, a wireless connection provides the flexibility and convenience you need in a modern computing environment.
Remember to always consult the user manual or Dell’s official support documentation for specific instructions related to your Dell Desktop model. With a stable and secure wireless network connection, you can unlock the full potential of your Dell Desktop and enjoy seamless online experiences for work, entertainment, and everything in between.
FAQs
1. How do I connect my Dell desktop to a wireless network?
To connect your Dell desktop to a wireless network, follow these steps:
- Make sure your desktop has a wireless network adapter. If not, you may need to purchase and install a wireless network card.
- Check if your desktop has built-in Wi-Fi capability. If it does, look for the Wi-Fi icon in the system tray/notification area of your desktop.
- If Wi-Fi is not enabled, right-click on the Wi-Fi icon, select “Enable,” and wait for your desktop to detect available networks.
- Click on the Wi-Fi icon again and select the desired wireless network from the list of available networks.
- Enter the network password (if required) and click “Connect.”
- Once connected, you should see a notification confirming your successful connection to the wireless network.
2. Why can’t my Dell desktop find any wireless networks?
If your Dell desktop is not detecting any wireless networks, it could be due to the following reasons:
- Make sure the Wi-Fi adapter on your desktop is turned on.
- Check if the Wi-Fi router is turned on and broadcasting the wireless signal.
- Ensure that your desktop is within a reasonable range from the Wi-Fi router. Walls and other obstacles can weaken the signal strength.
- Update the Wi-Fi driver on your Dell desktop. Visit the Dell support website and download the latest driver for your specific desktop model.
- If none of the above solutions work, there could be a hardware issue with your desktop’s wireless adapter. Consider seeking professional assistance for further troubleshooting.
3. How can I improve the Wi-Fi signal strength on my Dell desktop?
To improve the Wi-Fi signal strength on your Dell desktop, try the following tips:
- Position your desktop closer to the Wi-Fi router to reduce obstructions.
- Make sure there are no other devices that could cause interference, such as cordless phones or microwave ovens, near your desktop or Wi-Fi router.
- Consider using Wi-Fi range extenders or mesh Wi-Fi systems to expand the coverage area of your network.
- Update the firmware of your Wi-Fi router to the latest version to ensure optimal performance.
- If possible, connect your Dell desktop to the router using an Ethernet cable for a more stable and faster connection.
4. What do I do if I forgot the Wi-Fi password for my Dell desktop?
If you forgot the Wi-Fi password for your Dell desktop, you can retrieve it by following these steps:
- Access your Wi-Fi router’s administration settings. You can usually do this by typing the router’s IP address into a web browser.
- Log in to the router’s administration interface using the administrator username and password. If you don’t know these details, check the router’s documentation or contact the manufacturer.
- Navigate to the wireless settings or security section in the router’s interface.
- Locate the Wi-Fi password or passphrase and make note of it.
- Use the retrieved password to connect your Dell desktop to the Wi-Fi network.
5. Can I connect my Dell desktop to a Wi-Fi network without a Wi-Fi adapter?
If your Dell desktop does not have a built-in Wi-Fi adapter, you can still connect it to a Wi-Fi network by using an external USB Wi-Fi adapter. Simply plug the USB adapter into an available USB port on your desktop, install any necessary drivers, and follow the same steps for connecting to a wireless network as mentioned earlier in this article.