
In today’s digital age, the ability to connect to the internet wirelessly has become an essential component of our daily lives. Whether it’s for work, entertainment, or simply staying connected with loved ones, having wireless internet access on your computer can greatly enhance your online experience. In this article, we will explore the various methods and steps to connect your computer to wireless internet. From setting up your wireless network adapter to troubleshooting connection issues, we have got you covered. So, if you’re ready to cut the cords and enjoy the freedom of wireless browsing, read on to discover how you can easily connect to wireless internet on your computer.
Inside This Article
- How To Connect Wireless Internet On Computer
- Step 1: Ensure Wireless Adapter is Enabled
- Step 2: Scan for Available Networks
- Step 3: Connect to the Wireless Network
- Step 4: Enter Wi-Fi Password (if applicable)
- Step 5: Troubleshooting Tips
- Conclusion
- FAQs
How To Connect Wireless Internet On Computer
Connecting to wireless internet on a computer is a relatively simple process. By following a few steps, you can quickly get your computer online and enjoy the benefits of wireless connectivity. Here’s a step-by-step guide to help you connect to a wireless network on your computer.
Step 1: Ensure Wireless Adapter is Enabled
The first thing you need to do is make sure that the wireless adapter on your computer is enabled. Most laptops have a button or a switch on the side or top of the device that allows you to turn the wireless adapter on or off. If you are using a desktop computer, your wireless adapter may be a separate device that you plug into a USB port.
Step 2: Scan for Available Networks
Once your wireless adapter is enabled, you need to scan for available wireless networks. This can usually be done by clicking on the network icon in the system tray (usually located in the bottom right corner of the screen) and selecting “Scan for Networks” or a similar option. Your computer will then search for nearby wireless networks and display a list of available networks.
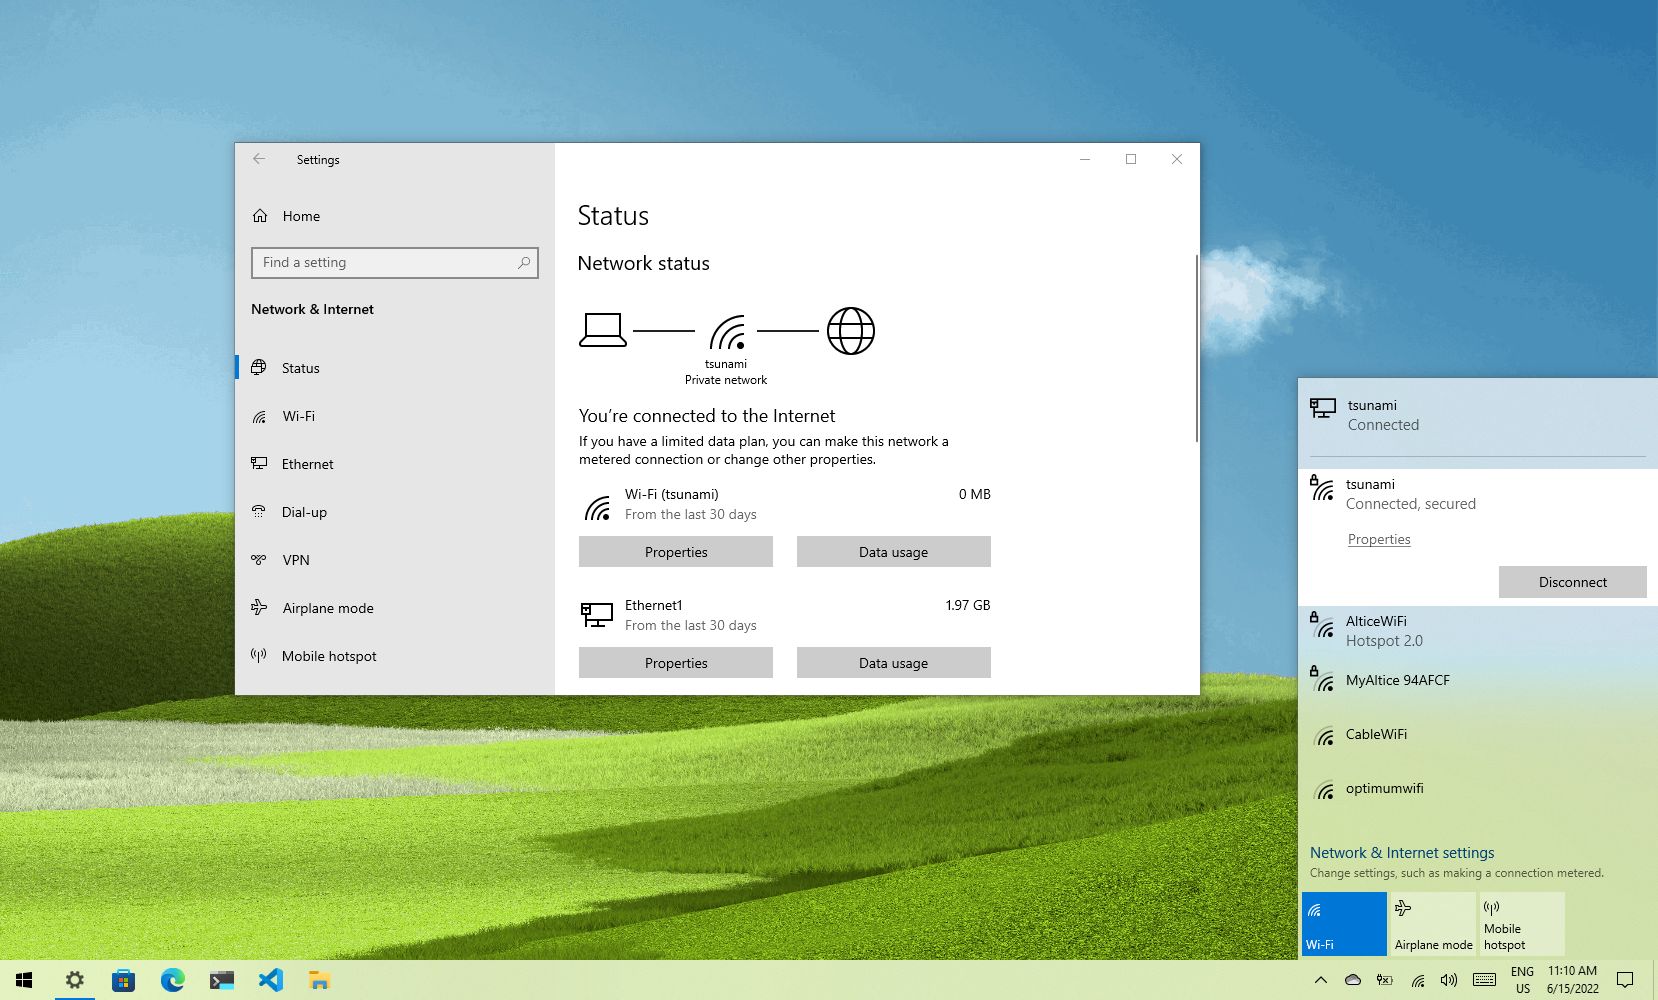
Step 3: Connect to the Wireless Network
After scanning for wireless networks, you will see a list of available networks on your screen. Click on the network that you want to connect to. If the network is secured, you may be prompted to enter a password or network key. If you have the correct credentials, click on “Connect” and your computer will attempt to establish a connection with the selected network.
Step 4: Enter Wi-Fi Password (if applicable)
If the wireless network you are connecting to is secured with a password, you will need to enter it to establish a connection. The password is usually provided by the network owner or can be found on the back of the Wi-Fi router. Make sure you enter the password correctly, paying attention to uppercase and lowercase letters, as well as any special characters.
Step 5: Troubleshooting Tips
If you are having trouble connecting to a wireless network, here are a few troubleshooting tips:
- Make sure your computer’s wireless adapter is turned on and enabled.
- Move closer to the wireless router to improve signal strength.
- Restart your computer and try connecting again.
- Double-check that you have entered the correct password.
- Try resetting your Wi-Fi router by turning it off and on again.
- If all else fails, contact your internet service provider for assistance.
By following these steps and troubleshooting tips, you should be able to successfully connect your computer to a wireless network. Enjoy the convenience of wireless internet and stay connected wherever you go!
Step 1: Ensure Wireless Adapter is Enabled
In order to connect to a wireless internet network on your computer, the first step is to ensure that your wireless adapter is enabled. The wireless adapter is a hardware component that allows your computer to connect to wireless networks. Make sure that it is turned on and functioning properly.
Depending on your operating system, there are different ways to check if the wireless adapter is enabled. In Windows, you can go to the Control Panel and navigate to the Network and Internet settings. Look for an option called “Network and Sharing Center” or “Network Connections.” Within these settings, you should be able to see if the wireless adapter is enabled or disabled.
On a Mac, you can click on the Wi-Fi icon in the menu bar to open the wireless network options. From there, you can check if the wireless adapter is turned on.
If you find that the wireless adapter is disabled, you can usually enable it by right-clicking on the adapter and selecting the “Enable” option. In some cases, you may need administrative privileges to enable the adapter.
Once the wireless adapter is enabled, you can proceed to the next step of scanning for available networks.
Step 2: Scan for Available Networks
Once you have ensured that your wireless adapter is enabled, the next step is to scan for available networks. This process allows your computer to detect nearby Wi-Fi networks that are within range.
To scan for available networks, follow these steps:
- Click on the Wi-Fi icon in the taskbar or system tray. It usually looks like a series of bars or a wireless signal icon.
- A list of available Wi-Fi networks will appear. This list may include networks from your own router as well as nearby public networks.
- Wait a few seconds for the list to populate and display all the available networks.
Alternatively, you can access the Wi-Fi settings through the Control Panel or Network and Sharing Center on Windows computers. On Mac computers, you can access it through the Wi-Fi menu in the top menu bar.
It is important to note that the available Wi-Fi networks may vary depending on your location and the range of your wireless adapter. If you are in a densely populated area or a public space, you may see a longer list of available networks compared to being in a more remote or rural location.
When scanning for available networks, it’s common to see network names (SSIDs) that are unique to specific routers or Internet service providers (ISPs). These names can be a combination of characters and numbers or may include the name of the ISP.
Take the time to carefully review the available networks and choose the one that corresponds to your own router or the network you wish to connect to. Make sure you select the correct network to avoid unintentionally connecting to someone else’s network.
Once you have identified the network you want to connect to, proceed to the next step to establish a connection.
###
Step 3: Connect to the Wireless Network
Once you have identified the wireless network you want to connect to, it’s time to establish the connection. Follow these steps to connect to a wireless network on your computer:
1. Click on the network name or SSID (Service Set Identifier) of the network you want to join. This will initiate the connection process.
2. If the network is secured with a password, you will be prompted to enter it. Type in the correct Wi-Fi password and click on “Connect” or “Join.”
3. Your computer will now attempt to establish a connection to the wireless network. This process may take a few seconds.
4. If the connection is successful, you will see a notification confirming the connection. You may also see signal bars or a Wi-Fi icon indicating the strength of the connection.
5. Open a web browser or any online application to test your internet connection. If you can access websites or perform online tasks, then congratulations! You have successfully connected to the wireless network.
It’s worth noting that some networks may require additional steps for authentication or configuration. In such cases, you may need to provide additional credentials, such as a username and password, or adjust specific settings in your computer’s network preferences.
Keep in mind that if you are connecting to a public or shared network, it is essential to practice good security measures. Avoid accessing sensitive information or performing financial transactions on these networks, as they may not be secure.
If you encounter any issues during the connection process, refer to the troubleshooting tips mentioned in step 5 or consult the technical support of your network provider.
Step 4: Enter Wi-Fi Password (if applicable)
Once you have selected the wireless network that you want to connect to, you may be prompted to enter a Wi-Fi password. This added layer of security ensures that only authorized users can access the network.
If the network is password protected, it means that the owner of the network has set up a security measure to prevent unauthorized access.
To enter the Wi-Fi password, you will need to locate the input field where you can input the password. This can vary depending on the operating system and device you are using.
Usually, when connecting to a secured network, a pop-up window or prompt will appear asking for the password. In some cases, you may need to access the network settings or Wi-Fi settings to manually enter the password.
Make sure to type in the Wi-Fi password correctly. Passwords are case-sensitive, so be mindful of uppercase and lowercase letters. If you are unsure about the password, you can reach out to the owner of the network for assistance.
If you have entered the correct password, your computer will establish a connection to the wireless network. You may see a message indicating that you are connected or the Wi-Fi symbol in the taskbar will show that you are connected to the network.
If you encounter an error or are unable to connect to the network after entering the password, double-check the password and try again. If the issue persists, you may need to troubleshoot or seek further assistance.
Step 5: Troubleshooting Tips
Even with the best intentions and preparations, sometimes connecting to a wireless network on your computer can still fall into a sticky situation. But fret not, as there are several troubleshooting tips you can employ to get you back online in no time. Here are some common issues you might encounter and how to resolve them:
- No Wi-Fi signal: If you can’t detect any available networks, make sure your Wi-Fi is turned on and your computer’s wireless adapter is properly enabled. Check if other devices can connect to Wi-Fi, as it could indicate a problem with your router or modem.
- Weak or unstable connection: If you notice that your connection is weak or keeps dropping, try moving closer to the Wi-Fi router to maximize signal strength. Additionally, reduce interference by staying away from appliances, electronic devices, or thick walls that can obstruct the Wi-Fi signal.
- Incorrect password: Double-check that you have entered the correct password for the wireless network. Remember that passwords are case-sensitive, so ensure the capitalization is accurate. If you’re unsure of the password, contact the network owner or administrator.
- Outdated drivers: Sometimes, outdated or incompatible drivers can cause connectivity issues. Visit the manufacturer’s website of your wireless adapter and download the latest drivers for your specific model and operating system.
- Restart your devices: Frequently, a simple restart of your computer, router, and modem can resolve connection problems. Turn off all devices, wait a few minutes, then turn them back on in the following order: modem, router, and computer.
- Reset network settings: Resetting your network settings can often solve stubborn connection problems. Go to your computer’s network settings and select the option to reset network settings. Note that this will remove any saved Wi-Fi passwords and configurations, so be prepared to re-enter them.
- Check for hardware issues: If all else fails, it’s possible that there may be an issue with your wireless adapter or router. Try connecting to a different Wi-Fi network or use a different computer to test if the problem lies in your specific device.
By following these troubleshooting tips, you should be able to overcome most common wireless network connectivity issues on your computer. However, if you continue to experience problems, it may be helpful to contact your internet service provider or consult with a technician for further assistance.
Conclusion
Connecting wireless internet on your computer is a simple and convenient way to access the online world. By following the steps outlined in this article, you can seamlessly connect to a wireless network and enjoy fast and reliable internet connectivity.
Remember to ensure that your computer has a compatible wireless network adapter and that you are within range of a wireless network. Whether you are at home, at work, or on the go, having the ability to connect wirelessly opens up a world of possibilities for browsing the web, streaming media, and staying connected with friends and family.
So go ahead, give it a try! Stay connected and experience the convenience and freedom of wireless internet on your computer.
FAQs
1. Can I connect to wireless internet on my computer without a Wi-Fi adapter?
Yes, it is possible to connect to wireless internet on your computer even if it doesn’t have a built-in Wi-Fi adapter. You can use an external Wi-Fi adapter that plugs into a USB port on your computer to connect to a wireless network.
2. How do I check if my computer has a Wi-Fi adapter?
To check if your computer has a Wi-Fi adapter, you can go to the Device Manager on your Windows computer. Look for the “Network adapters” section, and if you see a Wi-Fi adapter listed, then your computer has one. On a Mac, you can go to the Apple menu, select “About This Mac,” click on “System Report,” and look for the Wi-Fi or AirPort section.
3. What should I do if I can’t connect to a wireless network on my computer?
If you’re having trouble connecting to a wireless network on your computer, there are a few things you can try. First, make sure that the Wi-Fi adapter on your computer is enabled and working properly. You can do this by going to the network settings on your computer and checking the Wi-Fi settings. Additionally, you can try resetting your Wi-Fi router and restarting your computer. If the problem persists, you may need to troubleshoot the network settings or contact your internet service provider for further assistance.
4. Can I connect to a secured wireless network on my computer?
Yes, you can connect to a secured wireless network on your computer by entering the correct network password or passphrase. When you try to connect to a secured network, your computer will prompt you to enter the password. Make sure you have the correct password, as it is case-sensitive. If you don’t know the password, you will need to contact the owner or administrator of the network for the correct information.
5. Is it safe to connect to public Wi-Fi networks on my computer?
Connecting to public Wi-Fi networks on your computer can pose some security risks. Public Wi-Fi networks are often unsecured, which means that your data could be intercepted by hackers or malicious individuals. To protect your data and maintain your privacy, it is recommended to avoid accessing sensitive information, such as online banking or personal emails, while connected to a public Wi-Fi network. It is also advisable to use a virtual private network (VPN) when connecting to public Wi-Fi to encrypt your internet connection and add an extra layer of security.