
If you’re experiencing slow internet speeds or frequent disconnections on your Windows 7 computer, you may want to consider switching from a wireless connection to a wired connection. While wireless connections offer convenience, a wired connection can provide a more stable and reliable internet connection. In this article, we will guide you through the process of switching from a wireless connection to a wired connection on your Windows 7 computer. Whether you’re an online gamer looking for a more consistent connection or just someone who wants faster and more reliable internet, this guide will walk you through the steps to get your Windows 7 computer connected via a wired connection. So, grab an Ethernet cable and let’s get started!
Inside This Article
- Why Switch to Wired Connection?
- Checking for Ethernet Port and Cable Compatibility- Locating the Ethernet port on your Windows 7 computer- Checking if your Ethernet cable is compatible with your device- Ensuring the cable is in good condition and properly connected
- Configuring Wired Connection on Windows 7- Accessing the Network and Sharing Center- Choosing and enabling the Ethernet connection- Configuring IP address and DNS settings if necessary- Troubleshooting common issues during configuration
- Testing and Optimizing Wired Connection
- Conclusion
- FAQs
Why Switch to Wired Connection?
There are several compelling reasons to switch from a wireless connection to a wired connection on your Windows 7 computer. Let’s explore the benefits:
Faster and more stable internet connection: One of the primary advantages of using a wired connection is the speed and stability it offers. Unlike wireless connections that can be affected by distance, obstructions, and signal interference, a wired connection provides a direct and dedicated connection to your network. This translates to faster download and upload speeds, smoother streaming, and reduced buffering.
Enhanced security and privacy: Wired connections are inherently more secure compared to their wireless counterparts. When you connect your device via an Ethernet cable, your data travels through a physical connection that is less susceptible to unauthorized access or interception. This is especially important for sensitive activities like online banking, transmitting private information, or accessing confidential documents.
Reduced interference and latency: Wireless connections can be affected by various sources of interference, such as neighboring networks, electronic devices, or even physical barriers. These factors can result in data loss, signal fluctuations, and increased latency. With a wired connection, you can avoid these issues and enjoy a more consistent and reliable connection.
Option to connect devices that don’t support wireless connectivity: While most modern devices support wireless connections, there are still some gadgets, like gaming consoles, smart TVs, and network printers, that primarily rely on wired connections. By switching to a wired connection, you can easily connect these devices to your network and take full advantage of their functionalities.
Checking for Ethernet Port and Cable Compatibility- Locating the Ethernet port on your Windows 7 computer- Checking if your Ethernet cable is compatible with your device- Ensuring the cable is in good condition and properly connected
Before switching to a wired connection on your Windows 7 computer, it is essential to ensure that your device has an Ethernet port and that your Ethernet cable is compatible and properly connected. Here are the steps to check for Ethernet port and cable compatibility:
1. Locating the Ethernet port on your Windows 7 computer: The Ethernet port is commonly found on the back or side of your computer. It looks similar to a telephone jack, but larger in size. Take a close look at the ports available and locate the one labeled “Ethernet” or “LAN.”
2. Checking if your Ethernet cable is compatible with your device: Ethernet cables come in various types, including Cat5, Cat5e, Cat6, and Cat7. Check the cable type you have and verify if it matches the specifications of your Ethernet port. Generally, newer port types are backwards compatible with older cable types.
3. Ensuring the cable is in good condition and properly connected: Inspect the Ethernet cable for any signs of damage, such as frayed or bent connectors, exposed wires, or loose connections. If you notice any issues, it is recommended to replace the cable with a new one. Next, connect one end of the cable to the Ethernet port on your computer and the other end to the Ethernet port on your modem or router. Make sure the connection is securely plugged in.
By following these steps, you can ensure that your Windows 7 computer is equipped with a compatible Ethernet port and that your Ethernet cable is in good condition and properly connected. This will pave the way for a smooth transition to a wired connection and improve your internet experience.
Configuring Wired Connection on Windows 7- Accessing the Network and Sharing Center- Choosing and enabling the Ethernet connection- Configuring IP address and DNS settings if necessary- Troubleshooting common issues during configuration
Configuring a wired connection on Windows 7 can provide you with a more stable and reliable internet connection. Follow these steps to access the Network and Sharing Center and configure your Ethernet connection:
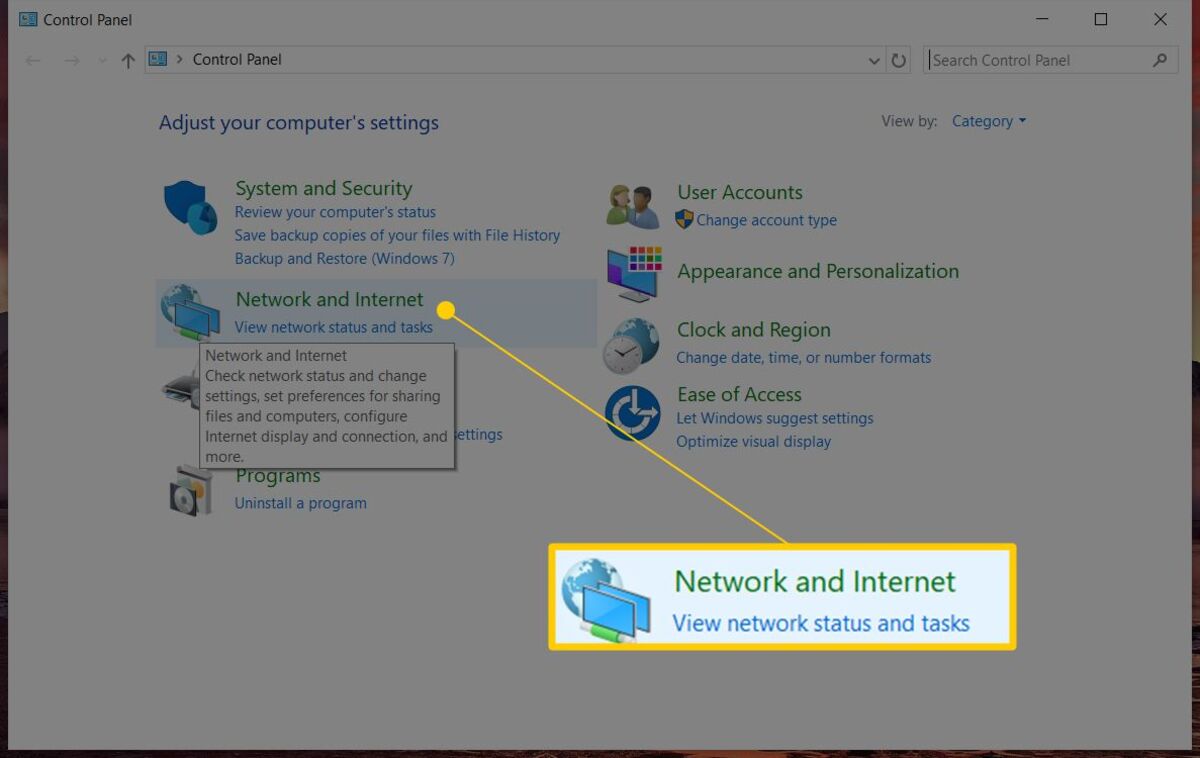
1. Accessing the Network and Sharing Center: To begin, click on the Windows Start button and select Control Panel. In the Control Panel window, locate and click on the “Network and Sharing Center” option.
2. Choosing and enabling the Ethernet connection: Once you are in the Network and Sharing Center, you will see various options. Look for the “Change adapter settings” link and click on it. In the new window, you will find a list of network connections. Identify the Ethernet connection and right-click on it. Select “Enable” to activate the Ethernet connection.
3. Configuring IP address and DNS settings if necessary: In some cases, you may need to configure the IP address and DNS settings for your Ethernet connection. To do so, right-click on the Ethernet connection again and select “Properties.” In the Properties window, locate and click on “Internet Protocol Version 4 (TCP/IPv4)” and then click on the “Properties” button. Here, you can manually enter the IP address and DNS server information provided by your network administrator or Internet Service Provider.
4. Troubleshooting common issues during configuration: If you encounter any issues while configuring your wired connection, there are a few troubleshooting steps you can try. First, double-check all the cable connections to ensure they are secure. You can also try restarting your computer and modem/router. If the issue persists, you can try updating your network driver or seeking assistance from your network administrator or technical support.
With these steps, you can easily configure a wired connection on Windows 7. Enjoy the benefits of a more stable and reliable internet connection!
Testing and Optimizing Wired Connection
Once you have configured the wired connection on your Windows 7 computer, it’s essential to test and optimize the connection for the best possible performance. This ensures that you can enjoy a fast, reliable, and stable internet experience. Here are some steps to help you verify the successful connection, test internet speed and latency, optimize settings, and maintain a reliable wired connection.
Verifying the successful connection to the network
The first step in testing your wired connection is to verify that you are successfully connected to the network. To do this, check if your computer displays the network icon in the system tray. The network icon typically appears as a series of bars or as a computer monitor with Ethernet cables. If the icon is present, you can be confident that your computer has established a connection to the network.
Next, try accessing a website or opening a web page to ensure that you have internet connectivity. If you’re able to browse the web without any issues, it means that your wired connection is working properly. However, if you encounter any errors or are unable to access the internet, you may need to troubleshoot further.
Testing internet speed and latency
Once you have confirmed the successful connection, it’s beneficial to test the speed and latency of your internet connection. This will give you a clear understanding of the performance you can expect from your wired connection. There are various online tools and websites that offer internet speed tests. Simply search for “internet speed test” in your preferred search engine and select one of the reliable options available.
Clicking on the speed test website will initiate the test, which usually measures the download and upload speeds of your internet connection. It will also provide information on latency, which is the time it takes for data to travel from your device to the server and back. A lower latency indicates better responsiveness and less lag when using online applications or gaming.
Take note of the results you receive from the speed test and compare them to the expected speeds provided by your internet service provider. If there is a significant discrepancy, it may be worth contacting your provider to investigate the issue or consider upgrading your internet package for faster speeds.
Optimizing settings for the best performance
To optimize your wired connection for the best performance, you can make a few adjustments to your Windows 7 settings. Start by checking the network adapter settings on your computer. Right-click on the network icon in the system tray and select “Open Network and Sharing Center.” Then, click on “Change adapter settings” in the left-hand menu.
Locate your Ethernet connection in the list of network adapters and right-click on it. Select “Properties” and navigate to the “Advanced” tab. Here, you may find options to adjust the speed and duplex settings. Ensure that the settings match the capabilities of your Ethernet cable and the network you are connecting to. If you are unsure, leave these settings to their default values.
Additionally, you can optimize your DNS settings for faster internet browsing. Right-click on your Ethernet connection and select “Properties.” Select “Internet Protocol Version 4 (TCP/IPv4)” from the list and click on “Properties” again. Choose the option to “Use the following DNS server addresses” and enter the DNS server addresses provided by your internet service provider or use reputable public DNS servers like Google DNS (8.8.8.8 and 8.8.4.4).
Additional tips for maintaining a reliable wired connection
To ensure a consistently reliable wired connection, consider these additional tips:
- Keep the Ethernet cable away from potential sources of interference, such as power cables or other electronic devices.
- Regularly check the condition of your Ethernet cable for any signs of damage or wear. Replace it if necessary.
- Restart your modem and router periodically to refresh the network connection.
- Keep your computer’s operating system and network drivers up to date to ensure compatibility and optimal performance.
- Consider using a gigabit Ethernet adapter if you require faster speeds or plan to transfer large amounts of data over your wired connection.
By following these steps and implementing these tips, you can test and optimize your wired connection on Windows 7 for the best possible performance. Enjoy a fast and reliable internet experience with your wired connection.
Switching to a wired connection from wireless on Windows 7 has numerous benefits, including increased stability and faster internet speeds. By following the step-by-step instructions provided in this article, you can seamlessly transition from a wireless connection to a wired one.
Remember to gather all the necessary equipment, such as an Ethernet cable and a compatible router or modem, before proceeding. Take the time to familiarize yourself with the network settings on your Windows 7 computer and make the necessary adjustments to allow for a wired connection.
With a wired connection, you can enjoy a more reliable internet connection, particularly when participating in activities that require consistent and high-speed data transfer, such as online gaming or video streaming. Additionally, a wired connection can minimize the interference caused by other wireless devices, ensuring a stable and secure network connection.
By following the steps outlined in this article, you can enhance your online experience and enjoy the benefits of a wired connection on your Windows 7 device.
FAQs
Here are some frequently asked questions about switching to a wired connection from wireless on Windows 7:
Q: Why would I want to switch to a wired connection from wireless on Windows 7?
A: There could be several reasons why you might want to switch to a wired connection. Wired connections generally provide faster and more stable network speeds compared to wireless connections. They are also less prone to interference, making them more reliable for activities such as online gaming, video streaming, and large file transfers.
Q: Can I use a wired connection on my Windows 7 computer?
A: Yes, you can definitely use a wired connection on a Windows 7 computer. Most computers have Ethernet ports that allow you to connect an Ethernet cable directly to your router or modem. Windows 7 has built-in support for wired connections and will automatically detect and configure the network settings.
Q: How do I switch from wireless to wired connection on Windows 7?
A: To switch from a wireless to a wired connection on Windows 7, follow these steps:
- Ensure that you have an Ethernet cable and an available Ethernet port on your computer.
- Connect one end of the Ethernet cable to the Ethernet port on your computer.
- Connect the other end of the Ethernet cable to the Ethernet port on your router or modem.
- Windows 7 will automatically detect the wired connection. To confirm the connection, right-click on the network icon in the system tray and select “Open Network and Sharing Center.” Your Wired network should be listed as an active connection.
Q: Do I need to disable my wireless connection when switching to a wired connection on Windows 7?
A: It is not necessary to disable your wireless connection when switching to a wired connection on Windows 7. However, to avoid any conflicts or confusion, you may choose to disable your wireless connection temporarily. You can do this by right-clicking on the network icon in the system tray, selecting “Open Network and Sharing Center,” and then disabling the wireless network adapter.
Q: Will switching to a wired connection affect my internet speed on Windows 7?
A: In most cases, switching to a wired connection will actually improve your internet speed on Windows 7. Wired connections offer faster and more stable network speeds compared to wireless connections. However, if you already have a fast and reliable wireless network, the difference in speed may not be noticeable.