
If you’re an avid Mac user, you may have noticed that over time your system starts accumulating data and files that are no longer needed. This can cause your Mac to slow down and affect its performance. One way to improve the speed and efficiency of your Mac is by emptying the system data.
Emptying the system data on your Mac involves removing temporary files, caches, logs, and other unnecessary data that accumulates over time. By doing so, you can free up valuable storage space, optimize your system’s performance, and ensure a smooth user experience.
In this article, we will guide you through the process of emptying system data on your Mac. From clearing caches to deleting temp files, we’ll cover all the necessary steps to keep your Mac running like new. So let’s dive in and learn how to declutter and optimize your Mac by emptying system data.
Inside This Article
- Method 1: Clear System Cache
- Method 2: Delete System Logs
- Method 3: Remove System Junk Files
- Method 4: Reset NVRAM and PRAM
- Conclusion
- FAQs
Method 1: Clear System Cache
Clearing the system cache on your Mac is a simple yet effective way to improve its overall performance. The system cache consists of temporary files and data that are stored to help your Mac run more efficiently. However, over time, this cache can become bloated and potentially slow down your system. Clearing the system cache can help free up valuable disk space and improve the responsiveness of your Mac.
To clear the system cache on your Mac, follow these steps:
- Close all open applications to ensure that no files are in use.
- Click on the “Finder” icon in the Dock to open a new Finder window.
- In the menu bar at the top of the screen, click on “Go” and select “Go to Folder”.
- Type in “~/Library/Caches” and press Enter.
- A new window will open, displaying various cache folders.
- Select all the folders inside the “Caches” folder and move them to the Trash.
- Go back to the “Go” menu and select “Go to Folder” again.
- Type in “/Library/Caches” and press Enter.
- Once again, select all the folders inside the “Caches” folder and move them to the Trash.
- Empty the Trash to permanently delete the cache files.
After emptying the system cache, you may notice an improvement in the speed and performance of your Mac. It is recommended to clear the system cache periodically to keep your Mac running smoothly.
Method 2: Delete System Logs
Over time, your Mac generates various system logs that accumulate and take up valuable disk space. These logs contain information about system processes, errors, and performance metrics. While they are useful for troubleshooting, they can grow in size and become unnecessary clutter. Deleting system logs can help free up storage space and potentially improve system performance.
To delete system logs on your Mac, follow these steps:
- Open Finder.
- Click on the “Go” menu in the menu bar and select “Go to Folder…”
- Type “/var/log” in the dialog box and click “Go”.
- You will now see a list of log files in the “/var/log” folder.
- Select the logs that you want to delete. You can either delete individual log files or delete all logs by selecting all files.
- Right-click on the selected logs and choose “Move to Trash”.
- Empty the Trash to permanently delete the logs from your system.
Note that deleting system logs will not cause any harm to your Mac. However, it is recommended to only delete logs that you are certain are no longer needed. If you are unsure about a particular log file, it is better to leave it as is.
By regularly deleting unnecessary system logs, you can maintain a cleaner and more optimized system, ensuring that your Mac can operate at its best.
Method 3: Remove System Junk Files
Over time, your Mac can accumulate a significant amount of junk files that can take up valuable storage space and slow down system performance. These junk files include temporary files, caches, old application data, and more. Removing these files can help optimize your Mac’s performance and free up storage space.
Here are some steps to remove system junk files on your Mac:
- Empty the Trash: The first step is to empty the Trash on your Mac. Deleted files are moved to the Trash, and they continue to take up storage space until the Trash is emptied. To do this, simply click on the Trash icon in the Dock and select “Empty Trash.”
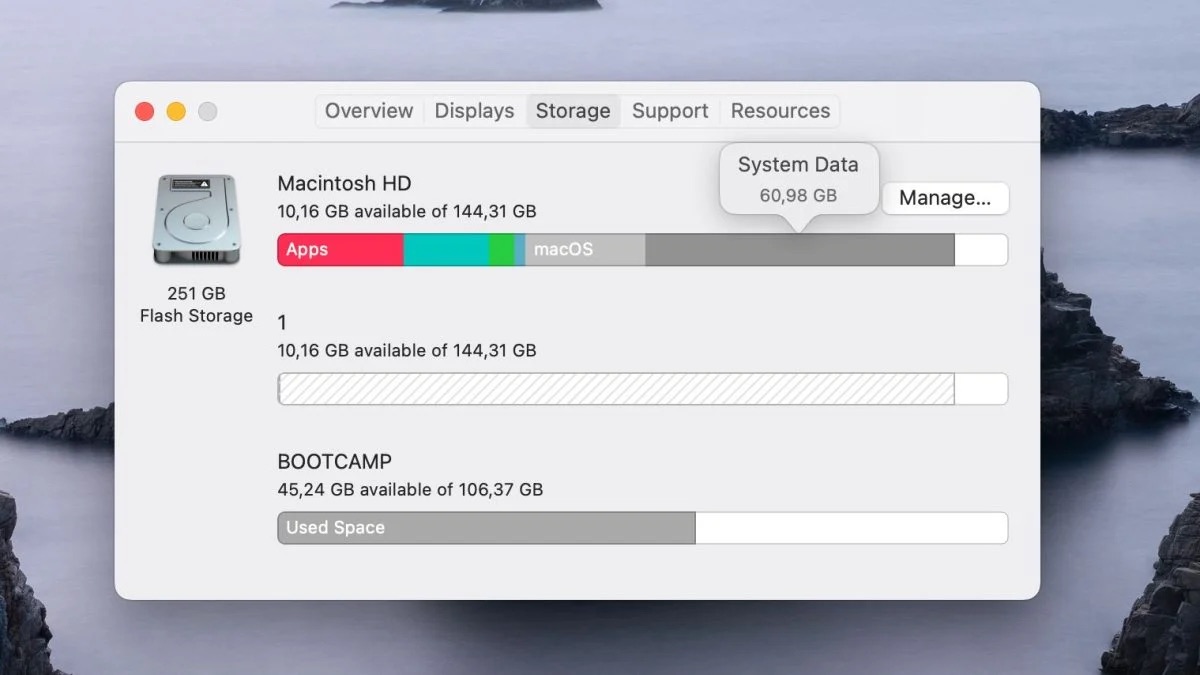
- Use the Built-in Storage Management Tool: macOS comes with a built-in Storage Management tool that allows you to easily identify and remove unnecessary files. To access this tool, go to the Apple menu, select “About This Mac,” and click on the “Storage” tab. From there, click on “Manage” to open the Storage Management tool. Here, you can review recommendations for optimizing storage, including removing system junk files.
- Manually Delete Temporary Files: You can also manually delete temporary files on your Mac. These files are typically created by apps and are not necessary for the functioning of your system. To do this, open Finder, click on “Go” in the menu bar, and select “Go to Folder.” Enter “~/Library/Caches” and delete the contents of this folder. Be cautious when deleting files manually, as deleting the wrong files could cause issues with your system.
- Use Third-Party Cleaning Apps: If you prefer a more automated approach, you can use third-party cleaning apps specifically designed to remove system junk files. There are various apps available, such as CleanMyMac, CCleaner, and Onyx, which can scan your system for unnecessary files and safely remove them.
Remember to review the files before deleting them, as some files may be needed by certain apps or for system functionality. It’s also recommended to create a backup of your important files before cleaning your Mac to prevent any accidental data loss.
By regularly removing system junk files, you can keep your Mac running smoothly and free up storage space for more important files and applications.
Method 4: Reset NVRAM and PRAM
If you are looking for a more comprehensive way to clear system data on your Mac, resetting the NVRAM (Non-Volatile Random Access Memory) and PRAM (Parameter RAM) can be a great option. These are small portions of memory that store various settings and preferences for your Mac, and resetting them can help resolve certain issues and improve system performance.
To reset the NVRAM and PRAM on your Mac, follow these steps:
- Shut down your Mac completely.
- Press the power button to turn on your Mac and immediately press and hold the Option + Command + P + R keys simultaneously.
- Keep holding the keys until you hear the startup sound for the second time or see the Apple logo appear and disappear for the second time.
- Release the keys and let your Mac continue to boot up normally.
After resetting the NVRAM and PRAM, your Mac will boot up and load the system settings with default values. This can help clear any corrupted or outdated settings that may be causing system issues or performance slowdowns.
Please note that resetting the NVRAM and PRAM will not delete any of your personal files or applications. It simply resets system preferences and settings. However, you may need to reconfigure some settings after the reset, such as display resolution, time zone, and startup disk preferences.
If you are experiencing specific issues with your Mac, such as startup problems, display issues, or keyboard/mouse glitches, resetting the NVRAM and PRAM can often be a helpful troubleshooting step. It is a safe and non-destructive process that can help resolve various system-related problems.
Remember to always back up your important files before performing any system resets or changes, just to be on the safe side.
Conclusion
Emptying system data on your Mac is a crucial step in maintaining its performance and functionality. By removing unnecessary files and freeing up space, you can enhance your Mac’s speed and efficiency, ensuring a smooth user experience.
Throughout this article, we have explored various methods to empty system data on your Mac. From clearing caches to deleting temporary files and managing large attachments, each technique plays a vital role in optimizing your system’s storage.
Remember, regular maintenance is key to keeping your Mac running smoothly. By incorporating these practices into your routine, you can prevent your system from becoming cluttered and sluggish.
So, take some time to declutter your Mac and enjoy the benefits of a clean and efficient system. Start by implementing the techniques discussed here, and don’t forget to make use of the built-in optimization tools available on macOS. Your Mac will thank you for it!
FAQs
Q: What is system data on Mac?
System data on Mac refers to the temporary files, caches, logs, and other unnecessary data that accumulates over time as you use your computer. These files take up valuable disk space and can slow down your system’s performance.
Q: Why should I empty system data on my Mac?
Emptying system data on your Mac can help improve the overall performance and speed of your computer. It frees up valuable disk space, eliminates unnecessary files and caches, and can prevent potential issues related to system slowdowns or errors.
Q: How can I empty system data on my Mac?
There are several ways to empty system data on your Mac. One common method is to use the built-in tool called “Disk Utility” to run a disk cleanup. You can also manually delete temporary files, clear browser caches, and uninstall unnecessary applications to free up space.
Q: Is it safe to delete system data on a Mac?
Yes, it is generally safe to delete system data on a Mac. However, it is important to exercise caution and ensure you are not deleting any important system files or data that is required for the normal functioning of your computer. It is recommended to back up your important files before performing any system data cleanup.
Q: How often should I empty system data on my Mac?
The frequency of emptying system data on your Mac depends on your usage patterns and the amount of data accumulated. It is recommended to perform a cleanup at least once every few months or whenever you notice a significant decrease in performance or available disk space.