
With the increasing use of cloud storage services, keeping our personal data secure is paramount. iCloud, Apple’s cloud storage platform, is no exception. There may come a time when you need to erase your iCloud data, whether it’s to protect your privacy or because you’re switching to a new device.
However, knowing how to erase iCloud data can be a confusing and daunting task for many people. That’s why we’ve put together this comprehensive guide, providing you with step-by-step instructions on how to effectively erase your iCloud data to ensure it is completely removed from Apple’s servers.
In this article, we’ll walk you through the process of erasing iCloud data, including how to delete iCloud backups, photos, documents, and other personal data. By following the steps outlined here, you can have peace of mind knowing that your iCloud data is securely erased and no longer accessible to anyone else.
Inside This Article
- Understanding iCloud Data
- Steps to Erase iCloud Data
- Sign Out of iCloud on All Devices
- Remove iCloud Data from iPhone or iPad
- Delete iCloud Data on Mac
- Clear iCloud Data on Windows
- Conclusion
- FAQs
Understanding iCloud Data
Before we delve into the steps to erase iCloud data, let’s first understand what iCloud data entails. iCloud is a cloud-based storage service provided by Apple that allows users to store and sync their data across multiple devices. This includes photos, videos, documents, contacts, calendars, notes, and more.
When you enable iCloud on your Apple devices, such as iPhones, iPads, Macs, or even Windows computers, your data is automatically backed up to the cloud. This ensures that your valuable information is secure and accessible from any device, as long as you have an internet connection.
iCloud data also includes device settings, app data, and even your iCloud Drive files. It essentially creates a seamless experience across all your Apple devices, making it convenient to access and share your data.
One important thing to note is that iCloud data is tied to your Apple ID, and it occupies storage space on your iCloud account. You are given a limited amount of free iCloud storage, typically 5 GB, but you can upgrade to a higher storage plan if needed.
Understanding the different types of data that iCloud encompasses is crucial when considering erasing it. Now that we have a solid understanding of what iCloud data is, let’s move on to the steps required to erase it.
Steps to Erase iCloud Data
Deleting your iCloud data is a straightforward process that ensures the security and privacy of your information. Whether you are selling your device, upgrading, or simply want a fresh start, follow these simple steps to erase your iCloud data:
Step 1: Sign Out of iCloud on All Devices
The first and most important step is to sign out of iCloud on all your devices. This will ensure that your data is no longer synced to the cloud and will not be accessible to anyone else. To sign out, go to Settings on your iPhone or iPad, System Preferences on your Mac, or the iCloud for Windows app on your computer.
Step 2: Remove iCloud Data from iPhone or iPad
To remove iCloud data from your iPhone or iPad, follow these steps:
- Go to Settings on your device.
- Tap on your name at the top of the screen.
- Scroll down and select “Sign Out”.
- Enter your Apple ID password when prompted.
- You will be asked if you want to keep a copy of your data on your device or delete it. Choose “Delete from My iPhone” or “Delete from My iPad” to remove all iCloud data from your device.
Step 3: Delete iCloud Data on Mac
If you use a Mac, follow these steps to delete iCloud data:
- Click on the Apple menu and select “System Preferences”.
- Click on your Apple ID.
- In the left sidebar, select “iCloud”.
- Uncheck the boxes next to the apps and services you want to stop syncing with iCloud.
- Click on “Sign Out”.
- You will be asked if you want to keep a copy of your iCloud data on your Mac. Choose “Keep a Copy” or “Delete from Mac” based on your preference.
- Enter your Apple ID password and click on “Continue”.
Step 4: Clear iCloud Data on Windows
If you use a Windows computer, you can clear iCloud data by following these steps:
- Open the iCloud for Windows app.
- Uncheck the boxes next to the apps and services you want to stop syncing with iCloud.
- Click on “Apply”.
- You will be asked if you want to keep a copy of your iCloud data on your computer. Choose “Remove” or “Keep a Copy” based on your preference.
- Click on “Apply” again to confirm the changes.
By following these steps, you can ensure that your iCloud data is successfully erased and your privacy is protected. Remember to back up any important data before erasing it, as it cannot be recovered once deleted. Happy cleaning!
Sign Out of iCloud on All Devices
Signing out of iCloud on all your devices is the first step to erasing your iCloud data. By doing this, you ensure that no new data is being synced to your iCloud account while you proceed with the deletion process. Here’s how you can sign out of iCloud on different devices:
1.1 Sign Out of iCloud on iPhone or iPad:
To sign out of iCloud on your iPhone or iPad, follow these steps:
- Go to “Settings” on your device.
- Tap on your name or Apple ID at the top of the screen.
- Scroll down and tap on “Sign Out.”
- Enter your Apple ID password when prompted and tap “Turn Off.”
- You will be asked if you want to keep your data on the device or delete it from the device. Choose the option that suits your preferences.
- Finally, tap on “Sign Out” again to confirm.
1.2 Sign Out of iCloud on Mac:
To sign out of iCloud on your Mac, follow these steps:
- Open the Apple Menu and click on “System Preferences.”
- Click on your Apple ID.
- In the sidebar, click on “iCloud.”
- Click on the “Sign Out” button.
- A pop-up will appear, asking if you want to keep a copy of your iCloud data on your Mac. Choose the option that suits your preferences.
- Click on “Continue” and follow the on-screen instructions to complete the sign-out process.
1.3 Sign Out of iCloud on Windows:
To sign out of iCloud on your Windows computer, follow these steps:
- Open iCloud for Windows.
- Click on “Sign Out.”
- A pop-up will appear, asking if you want to keep a copy of your iCloud data on your computer. Choose the option that suits your preferences.
- Click on “Apply” and then “Ok” to confirm the sign-out process.
By signing out of iCloud on all your devices, you ensure that no new data will be synced to your iCloud account as you proceed with deleting the data. It’s an essential step to maintain the integrity of your data and prevent any unwanted syncing or backup during the deletion process.
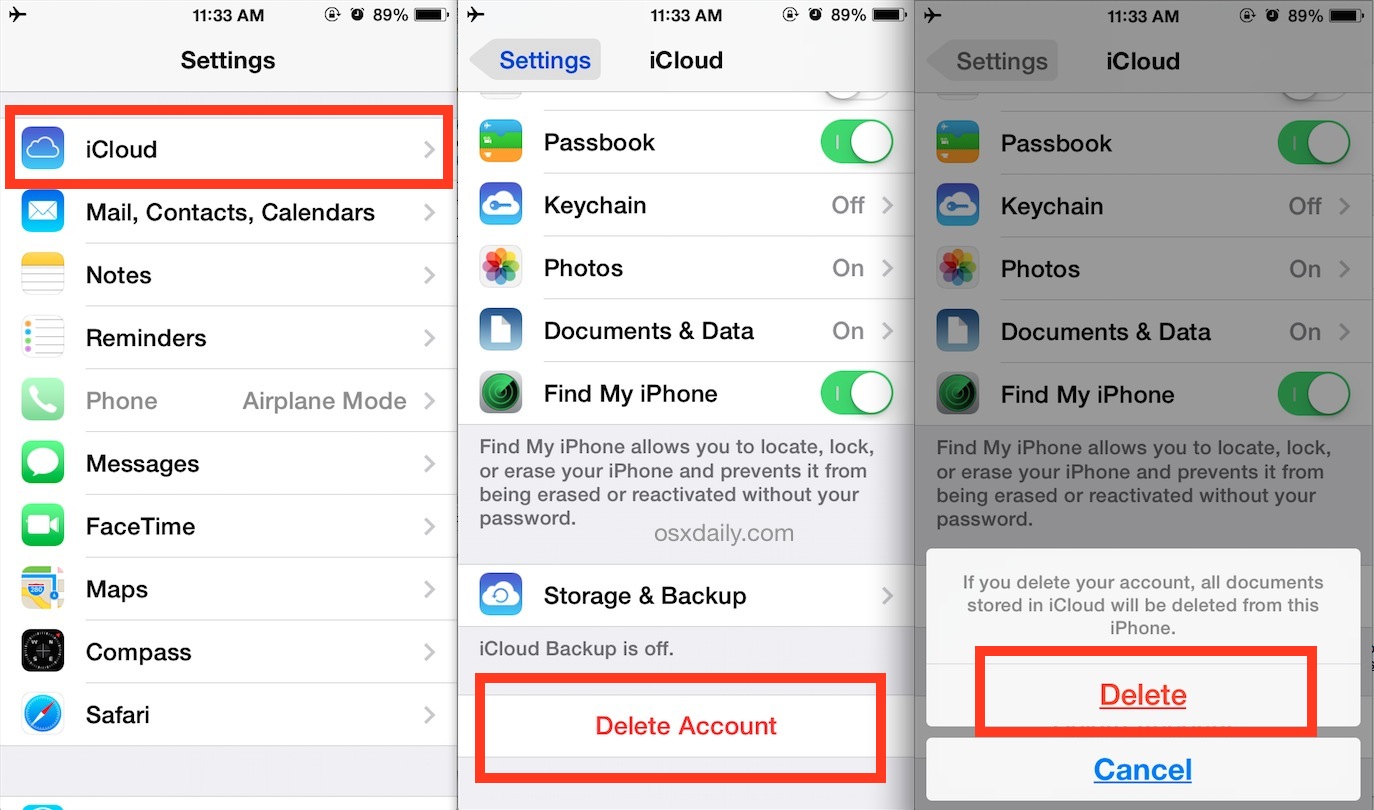
Remove iCloud Data from iPhone or iPad
When it comes to removing iCloud data from your iPhone or iPad, the process is relatively straightforward. By following these steps, you can ensure that your personal information is wiped clean from iCloud:
1. Go to the “Settings” app on your iPhone or iPad.
2. Scroll down and tap on your name at the top of the screen for devices running iOS 13 and newer. For older devices, tap on “iCloud.”
3. In the next menu, you will see the various apps and data that are synced with your iCloud account. Select the app or data you want to remove.
4. Tap on the switch next to the app or data to disable iCloud synchronization.
5. A pop-up will appear asking if you want to keep or delete the data on your device. Select “Delete from My [device]” to remove the data from your iPhone or iPad.
6. Repeat steps 3-5 for any additional apps or data you want to remove from iCloud.
7. Once you have disabled the synchronization for all desired apps and data, you can choose to sign out of iCloud altogether by scrolling to the bottom of the menu and tapping “Sign Out.”
8. You will be prompted to enter your Apple ID password to confirm the sign out. Follow the on-screen instructions to complete the process.
It’s important to note that removing iCloud data from your iPhone or iPad does not delete the data stored on other devices or iCloud servers. It simply stops the synchronization between your device and iCloud. If you want to delete the data permanently, you can follow the steps mentioned in the previous section to clear iCloud data on other devices.
By following these steps, you can ensure that your iCloud data is securely removed from your iPhone or iPad, providing you with peace of mind knowing that your personal information is no longer accessible through your iCloud account.
Delete iCloud Data on Mac
If you are a Mac user and want to delete iCloud data from your device, follow the steps below:
Step 1: Sign Out of iCloud
The first step is to sign out of your iCloud account on your Mac. To do this, go to the Apple menu at the top left corner of the screen and select “System Preferences.” In the System Preferences window, click on “Apple ID” and then select “Overview.” Finally, click on “Sign Out” at the bottom left corner. This will remove all iCloud data from your Mac.
Step 2: Delete Local iCloud Files
After signing out of iCloud, you’ll need to delete any local files that are still stored on your Mac. Open Finder and navigate to the “Library” folder. To access this folder, click on the “Go” menu at the top of the screen and hold down the “Option” key. You should see the “Library” option appear in the dropdown menu. Click on it to open the folder.
Once you’re in the Library folder, locate the “Mobile Documents” folder and delete it. This folder contains all the iCloud files that were previously synced to your Mac. Deleting this folder will permanently remove the iCloud data from your Mac.
Step 3: Empty Trash
After deleting the Mobile Documents folder, remember to empty your Trash. Simply right-click on the Trash icon on your Dock and select “Empty Trash” to permanently remove the deleted files.
By following these steps, you can effectively delete iCloud data from your Mac, ensuring that no remnants of your iCloud files are left behind.
Clear iCloud Data on Windows
If you’re using an iCloud account on your Windows PC, you may want to clear your iCloud data at some point. Whether you’re changing iCloud accounts, switching to a new device, or simply want to start fresh, clearing your iCloud data on Windows is a straightforward process. Here’s how you can do it:
1. Open the iCloud for Windows application on your computer.
2. Sign in to your iCloud account using your Apple ID and password.
3. Once you’re signed in, you’ll see different options for syncing your iCloud data. To clear your iCloud data, uncheck the boxes next to the items you want to remove.
4. You can choose to remove iCloud data such as Mail, Contacts, Calendars, and Tasks. Simply uncheck the corresponding boxes to remove the data from your Windows PC.
5. If you want to delete all your iCloud data from your Windows PC, click on “Apply” at the bottom right corner of the iCloud for Windows application.
6. A confirmation window will appear asking if you want to keep a copy of your iCloud data on your PC. Select the appropriate option based on your preference.
7. Once you’ve made your selection, click on “Apply” again to proceed with clearing your iCloud data on Windows.
8. The iCloud for Windows application will begin removing your selected iCloud data from your computer. The process may take some time, depending on the amount of data being cleared.
9. Once the process is complete, you’ll receive a notification confirming the successful removal of your iCloud data.
By following these steps, you can easily clear your iCloud data on your Windows PC. Remember, clearing your iCloud data will remove it from your Windows computer only, and it will still be accessible on other devices connected to your iCloud account.
Conclusion
In conclusion, erasing iCloud data is an important step to ensure the security and privacy of your personal information and digital footprint. Whether you are switching to a new device, selling your old one, or simply want to tidy up your iCloud storage, following the steps outlined in this article will help you effectively and permanently erase your iCloud data.
Remember, before proceeding with the deletion process, make sure to back up any important data you wish to keep, as erasing iCloud data is irreversible. By taking the time to properly erase your iCloud data, you can have peace of mind knowing that your sensitive information is no longer accessible by others.
By following the step-by-step guide, you can confidently manage and secure your iCloud data while optimizing your device’s performance. So take the necessary precautions and protect your personal information by erasing your iCloud data when needed.
FAQs
1. What happens when I erase iCloud data?
When you erase iCloud data, all the information stored in your iCloud account, including photos, files, contacts, emails, and app data will be permanently deleted. It is essential to make sure you have backups of any important data before proceeding with the erasure process.
2. How can I erase iCloud data from my iPhone or iPad?
To erase iCloud data from your iPhone or iPad, go to the Settings app, tap on your name at the top of the screen, then select “iCloud.” From there, scroll down and choose “Manage Storage,” followed by “Backups.” Finally, select the device you want to erase data from and tap “Delete Backup.”
3. Can I erase iCloud data remotely?
Yes, you can erase iCloud data remotely using the Find My app or the Find My iPhone/iPad feature. Simply log in to your iCloud account on another device or through iCloud.com, select the device you wish to erase, and choose the option to remotely erase all data. This feature is useful if you lose your device and want to ensure that your personal information remains secure.
4. Will erasing iCloud data affect my device’s settings and apps?
Erasing iCloud data does not directly affect your device’s settings and apps. However, if you have enabled certain iCloud features for specific apps or services, such as syncing app data or using iCloud as a backup, those settings may be affected. Additionally, if you have iCloud Drive enabled, any files stored in iCloud Drive may be deleted when erasing iCloud data.
5. What precautions should I take before erasing iCloud data?
Before erasing iCloud data, it is crucial to back up any important files, photos, or data that you want to keep. You can back up your device using iCloud or iTunes. Additionally, ensure that you have a record of any important passwords, as you may need them to sign in to iCloud after erasing the data.