
Welcome to our comprehensive guide on how to enable wireless capability on Dell laptops! Having a reliable Wi-Fi connection is essential for staying connected, whether you’re working, browsing the web, or streaming your favorite content. Dell laptops are known for their excellent performance and advanced features, including wireless connectivity options. In this article, we will explore the step-by-step process to enable wireless capability on your Dell laptop, ensuring you can enjoy seamless internet access wherever you go. Whether you’re a seasoned Dell user or a newcomer to their devices, we’ve got you covered. So, let’s dive in and get your Dell laptop connected to the wireless network!
Inside This Article
- Method 1: Using the Hardware Switch
- Method 2: Enabling Wireless Capability via Windows Settings
- Method 3: Enabling Wireless Capability via Device Manager
- Method 4: Enabling Wireless Capability via Dell Quickset (for older models)
- Troubleshooting Tips
- Conclusion
- FAQs
Method 1: Using the Hardware Switch
One of the simplest ways to enable wireless capability on your Dell device is by using the hardware switch. Most Dell laptops and tablets are equipped with a physical switch or a toggle button that allows you to turn on or off the wireless connectivity. This switch is usually located on the side or front panel of the device, and it is marked with a wireless icon.
To enable wireless capability, follow these steps:
- Locate the hardware switch on your Dell device.
- Make sure the switch is set to the “On” position. If the switch is already set to “On” and you are still experiencing connectivity issues, try toggling it off and on again.
- Wait for a few seconds to allow the device to detect and establish a connection with the wireless network.
Once the wireless capability is enabled, you should see the Wi-Fi icon displayed on your device’s taskbar or system tray. You can now connect to available Wi-Fi networks and enjoy wireless internet access on your Dell device.
It’s important to note that the location of the hardware switch may vary slightly depending on the specific model of your Dell device. If you’re unable to locate the switch, refer to the user manual or the Dell support website for detailed instructions.
Method 2: Enabling Wireless Capability via Windows Settings
If you’re looking for a way to enable wireless capability on your Dell device, using the Windows Settings is a straightforward method. Follow the step-by-step guide below to do so:
- Click on the Start Menu icon on your desktop.
- Select the “Settings” option, which is represented by a gear icon.
- In the Settings window, click on the “Network & Internet” option.
- On the left-hand side pane, click on the “Wi-Fi” option.
- In the Wi-Fi settings, make sure the toggle switch next to “Wi-Fi” is set to “On”.
- If it is already turned on and you’re still not able to connect to a wireless network, try turning it off and then back on again.
- Next, scroll down and click on the “Advanced network settings” option.
- Under the “Wi-Fi” section, click on the “Manage known networks” option.
- A list of the Wi-Fi networks you’ve connected to will appear. Click on the network you want to connect to.
- Click on the “Forget” button to remove the network from the list (optional).
- Now, close the Settings window and try connecting to your desired Wi-Fi network again.
By following these steps, you should be able to enable wireless capability on your Dell device using the Windows Settings. If you’re still experiencing issues, you can try the other methods mentioned in this article or consult the Dell support team for further assistance.
Method 3: Enabling Wireless Capability via Device Manager
If you’re unable to enable wireless capability on your Dell laptop using the hardware switch or Windows settings, you can try enabling it through the Device Manager. The Device Manager is a Windows tool that allows you to manage hardware devices on your laptop, including the wireless adapter.
Here’s how you can enable wireless capability via Device Manager:
- Press the Windows key + R on your keyboard to open the Run dialog box.
- Type “devmgmt.msc” in the Run dialog box and press Enter. This will open the Device Manager.
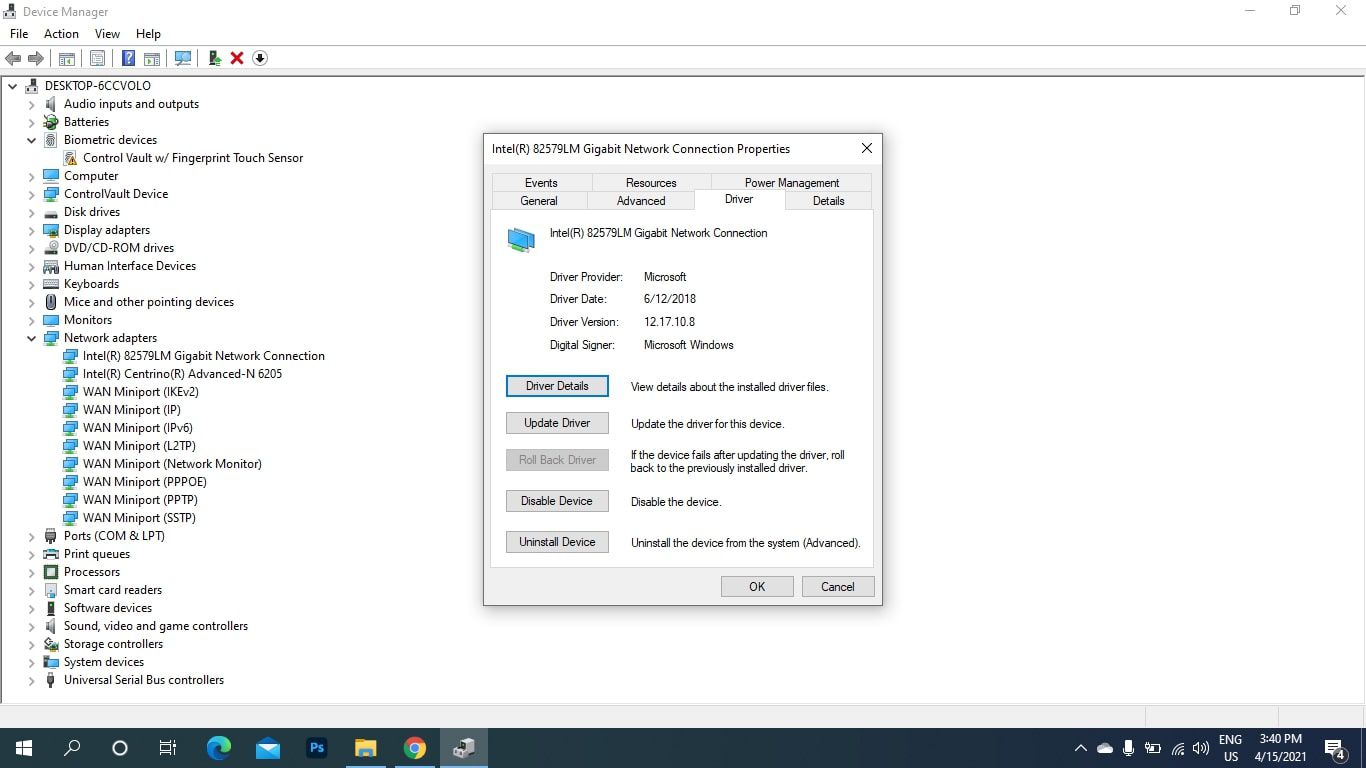
- In the Device Manager window, expand the “Network adapters” category by clicking on the arrow next to it.
- Locate your wireless adapter from the list of devices. It is usually named “Wireless adapter,” “Wi-Fi adapter,” or something similar.
- Right-click on the wireless adapter and select “Enable” from the context menu. This will enable the wireless capability of your Dell laptop.
- Once the wireless adapter is enabled, you should see the wireless icon appear in the system tray, indicating that Wi-Fi is now available.
It’s worth mentioning that if the wireless adapter is already enabled in Device Manager but you’re still unable to connect to Wi-Fi, you may need to troubleshoot the issue further. You can try updating the driver for the wireless adapter or performing a network reset to resolve any connectivity problems.
Remember to restart your laptop after making any changes in the Device Manager to ensure the changes take effect.
Enabling wireless capability via Device Manager can be a helpful solution if the hardware switch or Windows settings are not working for you. By utilizing the Device Manager, you have more control over the management and configuration of your wireless adapter.
Method 4: Enabling Wireless Capability via Dell Quickset (for older models)
If you own an older Dell model laptop or desktop, you may still have access to a handy utility called Dell Quickset. This software allows you to easily toggle various settings on your device, including your wireless capability. By following these steps, you can enable wireless capability on your Dell computer using Dell Quickset:
1. First, make sure that Dell Quickset is installed on your device. If it is not already installed, you can download it from the Dell support website or the original software disc that came with your computer.
2. Once you have Dell Quickset installed, open the application by searching for it in the Start menu or double-clicking its icon on your desktop.
3. In the Dell Quickset interface, locate and click on the “Wireless Controls” or “Wireless Settings” option. This will open a submenu where you can adjust the wireless settings of your Dell device.
4. Look for the option labeled “Wireless On/Off” or similar. Click on this option to toggle the wireless capability on or off. If the option is currently set to “Off,” click on it to enable wireless capability.
5. After enabling wireless capability, you should see a notification or indicator that confirms your wireless connection is now active. You can verify this by checking for the wireless icon on your taskbar or by attempting to connect to a Wi-Fi network.
Please note that Dell Quickset may not be available for all Dell models, especially newer ones. If you have a newer Dell laptop or desktop, it’s recommended to try other methods mentioned in this article for enabling wireless capability.
By following these steps, you can utilize Dell Quickset to enable wireless capability on your older Dell device. Enjoy the freedom of connecting to Wi-Fi networks hassle-free!
Troubleshooting Tips
Encountering issues with your Dell wireless capability can be frustrating, but fret not! Here are some troubleshooting tips to get your wireless connection up and running smoothly.
1. Restart your device: Sometimes, a simple restart can solve the problem. Turn off your Dell device, wait for a few seconds, and then power it back on. This can help refresh the system and address any temporary glitches.
2. Check the physical connections: Ensure that your wireless adapter is properly inserted into the designated slot. If you are using an external wireless adapter, make sure it is securely connected to the USB port. Additionally, verify that the antenna cables are properly connected.
3. Update device drivers: Outdated or incompatible drivers can affect the functionality of your wireless capability. Visit the Dell support website and download the latest drivers for your specific device model. Install the drivers and restart your device to see if it resolves the issue.
4. Reset the wireless router: If you are unable to connect to any wireless network, try resetting the wireless router. Locate the reset button on the router (usually a small hole) and hold it down for about 10 seconds. This will restore the router to its default settings, allowing you to set up a new connection.
5. Disable VPN or firewall: Virtual Private Network (VPN) or firewall settings can sometimes interfere with wireless connectivity. Disable any active VPN connections or firewall settings temporarily and check if your wireless capability is restored.
6. Run network troubleshooter: Windows operating systems offer a built-in network troubleshooter that can automatically detect and fix common connectivity issues. Go to your device’s Control Panel, navigate to “Network and Internet,” and select “Network and Sharing Center.” From there, click on “Troubleshoot problems” to let Windows diagnose and resolve the problem.
7. Scan for malware: Malicious software can disrupt your wireless connection. Run a full system scan using reliable antivirus software to detect and remove any malware that may be causing the issue.
8. Contact Dell support: If none of the above steps solve the problem, it may be best to reach out to Dell’s customer support. Their trained technicians can provide further guidance and assistance in resolving the wireless capability issue with your Dell device.
By following these troubleshooting tips, you can troubleshoot and resolve wireless connectivity issues on your Dell device, enabling you to stay connected without any interruptions.
Conclusion
In conclusion, enabling the wireless capability on your Dell device is a straightforward process that allows you to connect to the internet and make the most out of your device’s wireless capabilities. Whether you’re using a Dell laptop, desktop, or tablet, the steps discussed in this article can guide you through the process. By following these instructions, you can activate the wireless functionality and enjoy the freedom of connecting to Wi-Fi networks, browsing the web, and staying connected on the go.
Remember to double-check that your device’s Wi-Fi switch or key combination is turned on, update the wireless drivers if necessary, and ensure that the wireless adapter is enabled in the system settings. By taking these simple steps, you can ensure a seamless and hassle-free wireless experience on your Dell device.
Now that you have the knowledge to enable wireless capability on your Dell, you can take full advantage of the convenience and flexibility that wireless connectivity offers. Enjoy the freedom to connect, browse, and stay connected with your Dell device!
FAQs
1. How do I enable wireless capability on my Dell laptop?
To enable wireless capability on a Dell laptop, follow these steps:
– Click on the start menu and go to Settings.
– In the settings menu, select Network & Internet.
– Under Network & Internet, click on Wi-Fi.
– Toggle the switch to turn on Wi-Fi and enable wireless capability.
2. Why is my Dell laptop not detecting any wireless networks?
If your Dell laptop is not detecting any wireless networks, it could be due to a few reasons:
– Ensure that the wireless switch on your laptop is turned on. It is usually located on the side or front of the laptop.
– Check if the Wi-Fi adapter is enabled. Go to Device Manager, expand the Network adapters section, and verify if the wireless adapter is enabled.
– Make sure that your Wi-Fi router is functioning properly. Restart the router or try connecting to a different Wi-Fi network to see if the issue persists.
3. How do I update the wireless driver on my Dell laptop?
To update the wireless driver on your Dell laptop, you can follow these steps:
– Go to the Dell Support website and enter your laptop’s model number.
– Locate the wireless driver under the “Network” category.
– Download the latest version of the driver compatible with your operating system.
– Once downloaded, run the installer and follow the on-screen instructions to complete the installation.
4. Can I use a USB wireless adapter on my Dell laptop?
Yes, you can use a USB wireless adapter on your Dell laptop. USB wireless adapters are convenient options for adding wireless capability to laptops that lack built-in Wi-Fi connectivity. Simply plug the USB adapter into an available USB port on your laptop, and it will detect and connect to available Wi-Fi networks.
5. How do I troubleshoot wireless connectivity issues on my Dell laptop?
If you are experiencing wireless connectivity issues on your Dell laptop, you can try the following troubleshooting steps:
– Restart your laptop and Wi-Fi router.
– Ensure that the wireless switch on your laptop is turned on.
– Update the wireless driver to the latest version.
– Disable and re-enable the wireless adapter in the Device Manager.
– Remove any wireless network profiles that you are no longer using and reconnect to the network.
– If the issue persists, contact Dell customer support for further assistance.