
When it comes to privacy and security, many iPhone users may wonder how to erase their documents and data from their devices. Whether you’re selling your iPhone, giving it away, or simply want to start fresh with a clean slate, it’s important to know how to properly remove all traces of your personal information.
In this article, we will guide you through the steps to securely erase documents and data from your iPhone. We’ll provide you with expert tips and methods to ensure that your data is permanently deleted, making it virtually impossible for anyone to recover.
So, whether you’re looking to protect your privacy or comply with industry standards, keep reading to discover the best ways to wipe your iPhone clean and safeguard your sensitive information.
Inside This Article
- Why you should erase documents and data from your iPhone
- Methods to erase documents and data from iPhone
- Method 1: Resetting your iPhone to factory settings
- Method 2: Using a professional data eraser tool
- Method 3: Deleting specific files and data manually
- Method 4: Utilizing iCloud or iTunes backups to erase data
- Tips for secure data erasure on iPhone
- Conclusion
- FAQs
Why you should erase documents and data from your iPhone
When it comes to smartphones, our iPhones hold a significant amount of personal and sensitive information. From personal photos and videos to text messages, emails, and even financial data, our devices are a virtual treasure trove of our digital lives. With the ever-present threat of cyber attacks and privacy breaches, it is essential to take proactive measures in protecting our data. One such measure is regularly erasing documents and data from our iPhones. Let’s explore why it is important to do so:
1. Protect your privacy: Erasing documents and data from your iPhone helps safeguard your personal information from falling into the wrong hands. Whether you’re upgrading to a new device, selling or donating your iPhone, or simply wanting to maintain your privacy, wiping out your data ensures that sensitive information remains inaccessible.
2. Prevent data breaches: By erasing documents and data, you reduce the risk of data breaches. Cybercriminals are continually evolving their techniques, trying to gain access to valuable information stored on mobile devices. By regularly erasing data, you can minimize the chances of falling victim to such malicious attacks.
3. Free up storage space: Over time, our iPhones can become cluttered with unnecessary documents and data, taking up valuable storage space. Deleting unused files and clearing out data not only helps optimize the performance of your device but also frees up space for important files and apps.
4. Maintain device speed: The accumulation of documents and data on your iPhone can impact its overall performance, leading to slower response times and decreased efficiency. By regularly erasing unnecessary data, you can help maintain the speed and responsiveness of your device.
5. Ensure data accuracy: Deleting outdated and redundant documents and data ensures that you have accurate and up-to-date information on your device. This is particularly important for files such as contacts, calendar entries, and notes, where outdated information can lead to confusion and potential mistakes.
Overall, regularly erasing documents and data from your iPhone is crucial for protecting your privacy, preventing data breaches, optimizing device performance, and maintaining accurate information. Fortunately, there are several methods available to securely erase data from your iPhone, which we will explore in the next sections.
Methods to erase documents and data from iPhone
When it comes to erasing documents and data from your iPhone, there are several methods you can use to ensure that your personal information remains secure. Whether you’re planning to sell your device, give it away, or simply want to start fresh, it’s important to have a clear understanding of these methods so you can choose the one that best suits your needs. In this article, I will outline four effective methods for erasing files and data from your iPhone.
Method 1: Resetting your iPhone to factory settings
One of the simplest ways to erase documents and data from your iPhone is by resetting it to its factory settings. This method will remove all the content and settings on your device, essentially returning it to its original state when you first bought it. To do this, go to “Settings” > “General” > “Reset” > “Erase All Content and Settings.” Keep in mind that this method will erase everything on your iPhone, so make sure to back up any important files or data before proceeding.
Method 2: Using a professional data eraser tool
If you want a more secure and thorough way to erase documents and data from your iPhone, you can consider using a professional data eraser tool. These tools are specifically designed to permanently delete files, ensuring that they cannot be recovered by any means. They overwrite the deleted data with random characters, making it virtually impossible for anyone to retrieve your personal information. Some popular data eraser tools for iPhone include iMyFone Umate Pro, dr.fone, and Coolmuster iOS Cleaner.
Method 3: Deleting specific files and data manually
If you prefer a more manual approach, you can delete specific files and data manually from your iPhone. This method allows you to selectively remove items such as photos, videos, messages, and app data. Simply go to the respective apps or settings on your device and delete the desired files or data. Keep in mind that this method may not completely erase the data, as traces may still remain on the device. Therefore, it’s important to combine this method with a data eraser tool or another method for a more comprehensive deletion.
Method 4: Utilizing iCloud or iTunes backups to erase data
If you regularly back up your iPhone using iCloud or iTunes, you can use these backups to aid in the data erasure process. By restoring your device from a backup that was created prior to the files and data you want to erase, you can effectively remove them from your iPhone. However, it’s worth noting that this method will delete all the current content on your device, so make sure to back up any important data before proceeding.
Tips for secure data erasure on iPhone
Regardless of the method you choose, there are a few tips to keep in mind to ensure a secure data erasure process on your iPhone. Firstly, remember to back up any important files or data before performing any deletion. Secondly, make sure to log out of all your online accounts and services to prevent any unauthorized access after the data is erased. Finally, consider using a data eraser tool to ensure the permanent and irreversible deletion of your personal information.
Method 1: Resetting your iPhone to factory settings
Resetting your iPhone to factory settings is a reliable and effective method to erase all documents and data stored on your device. This process will restore your iPhone to its original factory settings, removing all personal information, apps, and settings from your device.
To reset your iPhone to factory settings, follow these steps:
- Make sure you have a backup of your important data. Resetting your iPhone will erase everything, so it’s important to have a recent backup to restore your data afterward.
- Go to the “Settings” app on your iPhone and tap on your name at the top.
- Scroll down and tap on “General”.
- Scroll to the bottom and tap on “Reset”.
- Choose “Erase All Content and Settings”.
- If prompted, enter your passcode and Apple ID password to confirm the reset.
- Wait for the reset process to complete. Your iPhone will restart and display the initial setup screen.
Once your iPhone has been reset to factory settings, all of your documents, app data, and personal settings will be completely wiped from the device. This ensures that your data cannot be accessed by anyone else.
Remember, resetting your iPhone will also remove any jailbreak or unauthorized modifications made to the device. It’s essential to understand that this process cannot be undone, so make sure to have a backup of any data you wish to keep.
After resetting your iPhone to factory settings, you can set it up as a new device or restore from your backup during the initial setup process. Whether you choose to start fresh or restore your data, your iPhone will be free from any existing documents and data.
Method 2: Using a professional data eraser tool
If you want a more secure and efficient way to erase documents and data from your iPhone, using a professional data eraser tool is the way to go. These tools are specifically designed to permanently remove all traces of data from your device, ensuring that it cannot be recovered by any means. Here are the steps to follow when using a professional data eraser tool:
1. Research and select a reliable data eraser tool: There are several data eraser tools available in the market, so it’s important to do some research and choose a reputable one. Look for tools that have positive user reviews, a high success rate, and good customer support.
2. Install and launch the data eraser tool: Once you’ve selected a tool, follow the instructions provided by the developer to install it on your computer. After installation, launch the tool to start the data erasure process.
3. Connect your iPhone to the computer: Use a USB cable to connect your iPhone to the computer. The data eraser tool will detect your device and display it on the interface.
4. Choose the erasure method: Most data eraser tools offer multiple erasure methods, such as Quick Erase, Medium Erase, and Advanced Erase. Each method varies in terms of the level of data overwriting and the time it takes. Select the method that suits your needs and preferences.
5. Start the erasure process: Once you’ve selected the erasure method, click on the “Start” or “Erase” button to begin the data erasure process. The tool will begin overwriting your iPhone’s data with random characters, making it virtually impossible to recover.
6. Wait for the process to complete: The data erasure process may take some time depending on the size of the data on your iPhone. It’s important to be patient and let the tool complete the process without interruptions.
7. Verify the erasure: Once the data erasure process is complete, the tool will notify you. To ensure that all data has been successfully erased, you can disconnect your iPhone from the computer and check if the device is completely wiped clean. You can also use data recovery software to try and recover any data, just to see if the erasure was successful.
Using a professional data eraser tool is an effective way to ensure that your documents and data are permanently erased from your iPhone, leaving no chance of recovery. It provides you with peace of mind knowing that your personal information is protected even if your device falls into the wrong hands.
Method 3: Deleting specific files and data manually
Deleting specific files and data manually is another method you can use to erase documents and data from your iPhone. This method allows you to have more control over the items you want to delete, giving you a personalized approach to managing your data.
To delete specific files and data manually, follow these steps:
- Open the specific app or folder where the files or data you want to delete are located.
- Identify the files or data you wish to remove. This can include photos, videos, music, documents, and more.
- Select the individual files or data you want to delete by tapping on them.
- Once selected, locate the delete option. This can vary depending on the app or file type. In many cases, you can find the delete option by tapping on the trash can icon.
- Confirm the deletion by following the on-screen prompts or entering your device passcode if required.
It’s crucial to keep in mind that manually deleting files and data doesn’t guarantee complete erasure. Deleted files can still be recoverable through various data recovery techniques. If you want to ensure the permanent erasure of your data, consider utilizing a professional data eraser tool or resetting your iPhone to factory settings.
Moreover, it’s essential to double-check and confirm the deletion of files and data, as once they are deleted, they cannot be recovered unless you have a backup stored.
This method of deleting specific files and data manually provides a convenient way to remove unwanted content from your iPhone. It can help you declutter your device and make room for new files and data.
However, if you’re concerned about sensitive or confidential information, it’s recommended to use more secure methods like data eraser tools or factory reset to ensure that your data is completely and permanently erased from your iPhone.
Method 4: Utilizing iCloud or iTunes backups to erase data
If you’re looking for a convenient and comprehensive way to erase documents and data from your iPhone, utilizing iCloud or iTunes backups can be an effective method. Both iCloud and iTunes provide options to create backups of your device, which can be used to overwrite and erase the existing data on your iPhone. Here’s how you can use these methods:
1. iCloud Backup:
iCloud allows you to back up your iPhone data wirelessly and automatically. To utilize iCloud backup for erasing your data, follow these steps:
- Connect your iPhone to a Wi-Fi network.
- Go to Settings on your iPhone and tap on your name at the top of the screen.
- Select “iCloud” and then “iCloud Backup”.
- Toggle on the “iCloud Backup” option if it’s not already enabled.
- Tap on “Back Up Now” to create a backup of your iPhone data.
- Once the backup is complete, you can choose to “Erase All Content and Settings” on your iPhone by going to “Settings” > “General” > “Reset”. This will erase all the data on your device.
- After the reset, during the setup process, use the “Restore from iCloud Backup” option and select the backup you just created to restore your device with the erased data.
2. iTunes Backup:
If you prefer using iTunes to create backups and erase data, follow these steps:
- Connect your iPhone to your computer and open iTunes.
- Select your iPhone device in iTunes.
- In the Summary tab, click on “Back Up Now” to create a backup of your iPhone’s data.
- Once the backup is complete, go to “Settings” > “General” > “Reset” on your iPhone.
- Select “Erase All Content and Settings” to erase all the data on your device.
- During the setup process, select the “Restore from iTunes Backup” option and choose the backup you just created to restore your device, effectively erasing the previous data.
It is important to note that when utilizing iCloud or iTunes backups to erase data from your iPhone, the backup you restore from will contain the erased data. Therefore, it’s essential to create a new backup after erasing your data if you don’t want it to be accessible.
By utilizing iCloud or iTunes backups, you can easily erase documents and data from your iPhone while ensuring a smooth restoration process. Just make sure to follow the steps carefully and create a new backup if you want to safeguard your data from being accessible in the future.
Tips for secure data erasure on iPhone
When it comes to erasing documents and data from your iPhone, it is crucial to ensure that the process is secure and thorough. Here are some tips to help you securely erase your data and maintain your privacy:
1. Backup your data: Before proceeding with any data erasure method, it is essential to create a backup of your iPhone data. This will prevent any accidental loss of important information and allow you to restore your data if needed in the future.
2. Encrypt your backup: When creating a backup of your iPhone data, make sure to enable the encryption option. Encryption adds an extra layer of security to your backup and protects your sensitive information from being accessed by unauthorized persons.
3. Use a professional data eraser tool: To ensure complete and secure data erasure, consider using a professional data eraser tool. These tools are specifically designed to permanently erase data from your iPhone, leaving no traces behind. They use advanced algorithms to overwrite the existing data multiple times, making it virtually impossible to recover.
4. Perform a factory reset: If you prefer a built-in solution, you can perform a factory reset on your iPhone. This will restore your device to its original settings and erase all data and documents. Remember to disable iCloud or Find My iPhone before performing a factory reset to avoid activation lock issues.
5. Verify data erasure: After completing the data erasure process, it is important to verify that the data has been completely erased. You can do this by checking the storage space on your iPhone and ensuring that all previous files and data have been removed.
6. Remove associated accounts: Before selling or giving away your iPhone, make sure to remove all associated accounts and credentials. This includes signing out of iCloud, iTunes, and other apps or services. This will prevent the new owner from accessing your personal data.
7. Wipe app cache and browsing data: In addition to erasing documents and data, consider clearing app cache and browsing data on your iPhone. This will remove any temporary files, cookies, and browsing history, further enhancing your privacy.
8. Consider remote erase options: If your iPhone is lost or stolen, take advantage of remote erase options. With features like Find My iPhone, you can remotely erase all data on your device to prevent it from falling into the wrong hands.
9. Keep your software updated: Regularly updating your iPhone’s software is essential for security purposes. Software updates often include security patches and bug fixes that can protect your device from potential vulnerabilities.
10. Seek professional assistance: If you are uncertain about the data erasure process or need assistance, it is always advisable to seek professional help. There are specialized services available that can securely erase your data and ensure your privacy.
By following these tips, you can securely erase your documents and data from your iPhone and maintain your privacy. Remember to take the necessary precautions and use the right tools to ensure that your personal information remains protected.
Conclusion
In conclusion, erasing documents and data from your iPhone is a crucial step in maintaining your privacy and ensuring the security of your personal information. By following the steps outlined in this article, you can confidently delete sensitive files, clear cache and cookies, and reset your device without the fear of your data falling into the wrong hands. Remember to always back up important files before proceeding with any data erasing process, and be aware that once data is permanently deleted, it cannot be recovered.
By regularly clearing your iPhone of unnecessary data and staying vigilant about personal information security, you can keep your device running smoothly and protect your privacy in the digital age. Take the time to review your device’s storage and perform data clean-ups periodically to maintain optimal performance and peace of mind.
FAQs
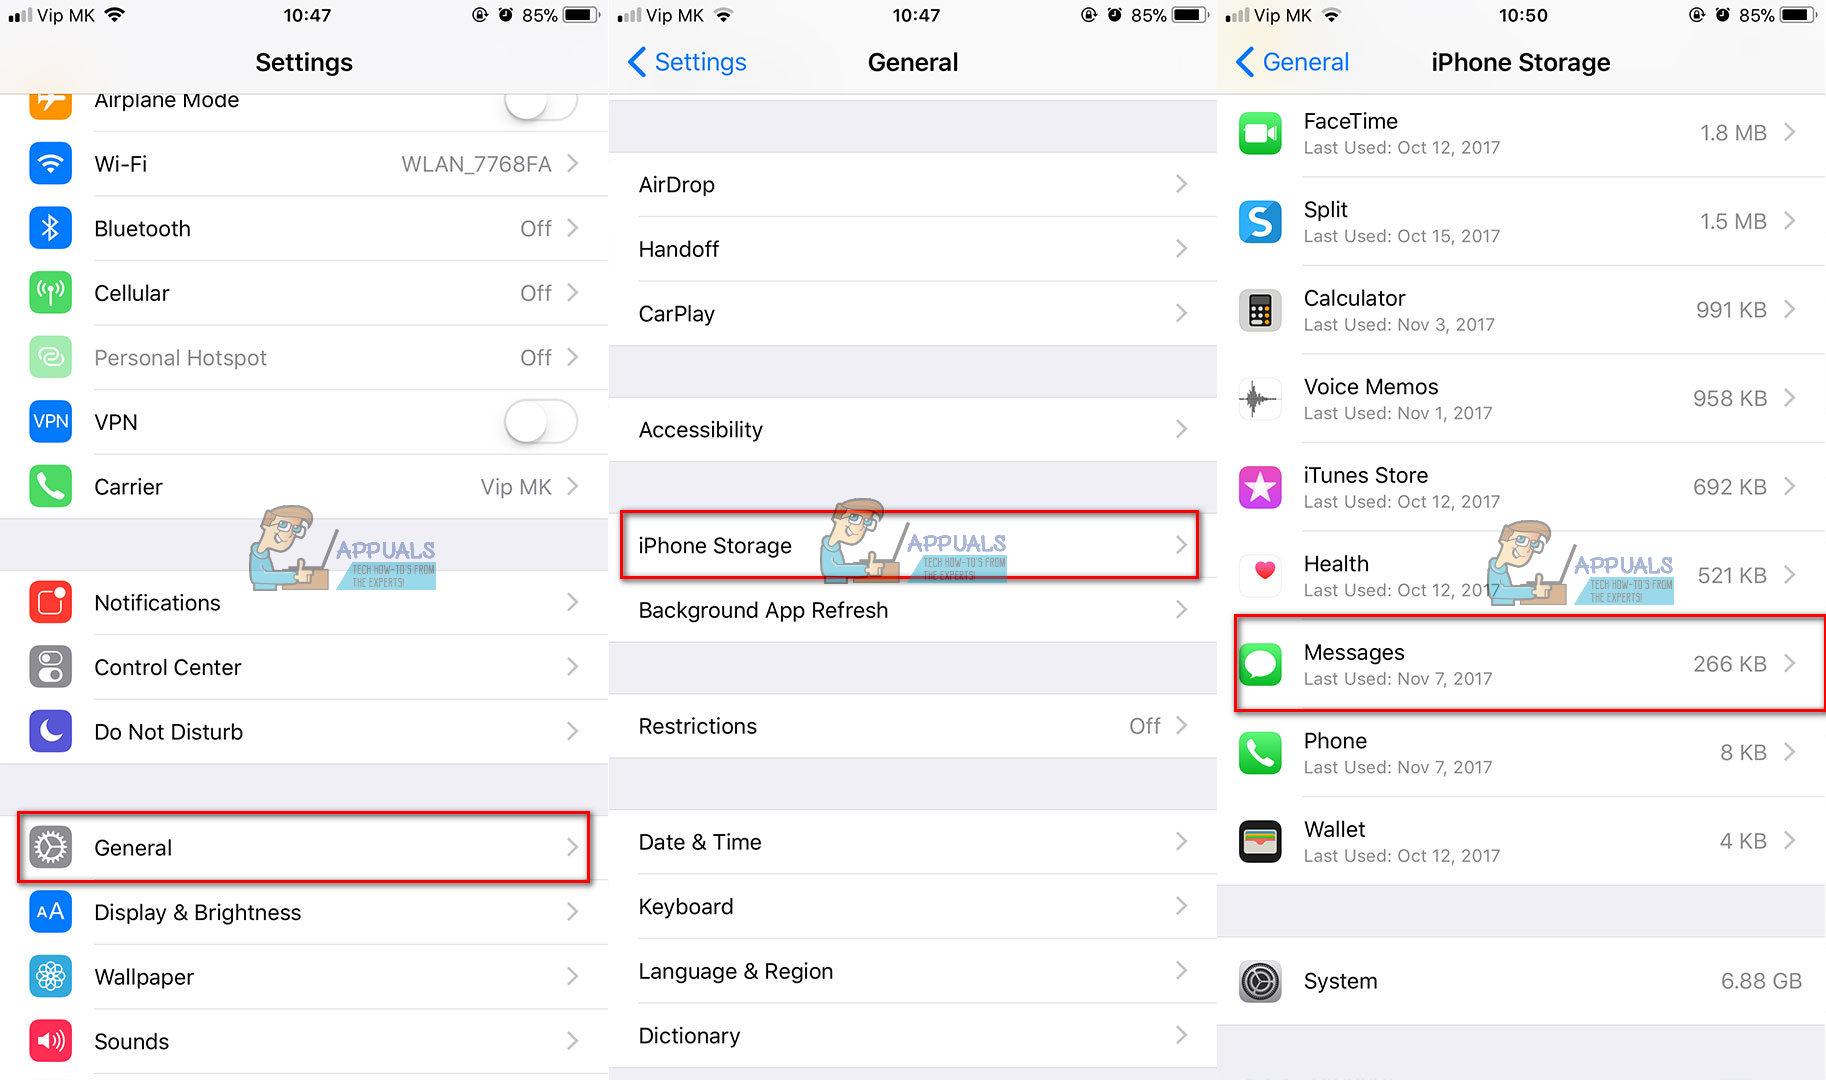
1. How do I erase documents and data from my iPhone?
To erase documents and data from your iPhone, you can follow these steps:
- Go to the Settings app on your iPhone.
- Scroll down and tap on “General”.
- Scroll down again and tap on “iPhone Storage”.
- Here you will see a list of apps on your iPhone. Tap on the app that you want to delete its documents and data.
- On the next screen, you will have the option to “Offload App” or “Delete App”. If you choose “Offload App”, it will remove the app but keep the documents and data. If you choose “Delete App”, it will remove the app and all its documents and data.
- Confirm your selection by tapping on “Offload App” or “Delete App” again.
This process may vary slightly depending on the version of iOS you are using, but the above steps should work for most iPhones. It’s always a good idea to back up your important documents and data before deleting them.
2. Will erasing documents and data from my iPhone delete everything on my device?
No, erasing documents and data from your iPhone will not delete everything on your device. It will only remove the documents and data associated with the specific app you choose to delete. Your photos, contacts, messages, and other personal data will remain unaffected.
3. Can I recover the documents and data after erasing them from my iPhone?
No, once you erase the documents and data from your iPhone, they cannot be recovered. Therefore, it’s important to make sure you have a backup of any important documents or data before deleting them.
4. Why should I erase documents and data from my iPhone?
Erasing documents and data from your iPhone can help free up storage space, improve performance, and enhance privacy. Over time, apps accumulate data such as caches, logs, and temporary files that can take up a significant amount of space on your device. By erasing these documents and data, you can reclaim storage space and ensure that your iPhone runs smoothly.
5. How often should I erase documents and data from my iPhone?
The frequency of erasing documents and data from your iPhone depends on your usage and storage requirements. If you frequently use resource-intensive apps or your device starts to feel sluggish, it may be a good idea to clear out the documents and data more frequently. It’s also a good practice to periodically review the storage usage on your iPhone and delete unnecessary data to optimize performance.