
Are you looking for a convenient way to wipe out all the content and settings on your iPhone? With the rapidly evolving technology, it’s crucial to ensure that your personal data is secure and your device is running smoothly. Luckily, Apple has introduced a feature that allows you to automatically erase all content and settings on your iPhone.
By enabling this feature, you can have peace of mind knowing that your iPhone will be reset to its factory settings, erasing all data, including contacts, photos, apps, and personal settings. Whether you’re preparing to sell your iPhone, pass it on to someone else, or simply want to start fresh, this comprehensive guide will walk you through the process of setting your iPhone to automatically erase all content and settings.
Inside This Article
- Overview
- Benefits of Automatic Content Erasure
- Step-by-Step Guide to Setting Your iPhone for Automatic Erasure
- Important Considerations
- Troubleshooting and FAQ
- Conclusion
- FAQs
Overview
In this digital age, our smartphones contain a treasure trove of personal information, from contacts and messages to photos and sensitive documents. Protecting this data is paramount, especially in the event of loss, theft, or when selling your iPhone. Fortunately, Apple provides an invaluable feature that allows you to automatically erase all content and settings on your device, ensuring that your personal information remains secure.
By setting your iPhone to automatically erase all content and settings, you can have peace of mind knowing that your data will be wiped clean, rendering it virtually impossible for anyone to retrieve. This feature is available on iPhone models running iOS 7 and above, making it accessible to a vast majority of iPhone users.
With just a few simple steps, you can enable automatic content erasure on your iPhone, safeguarding your personal information from falling into the wrong hands. In this article, we will guide you through the process, highlighting the benefits and important considerations along the way.
Benefits of Automatic Content Erasure
Automatic content erasure on your iPhone offers several benefits that can greatly enhance your device’s security and privacy. Here are some key advantages of enabling this feature:
- Protects your personal information: When you activate automatic content erasure, your iPhone will erase all data and settings after a specified number of failed passcode attempts. This ensures that if your device falls into the wrong hands, your personal information remains secure. It prevents unauthorized access to sensitive data like emails, photos, messages, and login credentials.
- Reduces the risk of identity theft: By automatically erasing data, including your app preferences and stored passwords, you minimize the risk of identity theft. This feature ensures that even if someone manages to access your device, they won’t be able to retrieve your personal information or impersonate you.
- Prevents data breaches: With automatic content erasure, you can safeguard your iPhone against potential data breaches. In the event that your device is lost or stolen, the automatic erasure feature will wipe all the data, leaving no trace of your sensitive information behind. This eliminates the risk of unauthorized individuals accessing and misusing your data.
- Offers peace of mind: Enabling automatic content erasure provides a sense of security and peace of mind. You no longer have to worry about the potential consequences of losing your device or having it stolen. With the knowledge that all your data will be erased, you can feel confident that your personal information is safe from prying eyes.
- Facilitates device renewal or resale: If you plan to sell or upgrade your iPhone in the future, automatic content erasure ensures that your device is wiped clean and ready for the next user. This feature saves you time and effort in manually deleting data, ensuring that your device is in its original state when passed on to someone else.
By taking advantage of the benefits provided by automatic content erasure, you can create an additional layer of protection for your personal information, enhance the security of your iPhone, and have peace of mind knowing that your data is safe.
Step-by-Step Guide to Setting Your iPhone for Automatic Erasure
Setting your iPhone for automatic erasure is a smart and convenient way to protect your privacy and secure sensitive data. Whether you’re selling your phone or simply want the peace of mind that comes with knowing your information will be wiped clean, this feature is a must-have. Follow these simple steps to set your iPhone for automatic erasure:
Step 1: Open the Settings app
Swipe up on your iPhone screen to access the Control Center. Tap on the gear icon to open the Settings app.
Step 2: Tap on your Apple ID
Scroll down and tap on your Apple ID at the top of the Settings menu. This will open a new page with various options.
Step 3: Go to iCloud Settings
On the new page, look for the “iCloud” section and tap on it. This will take you to the iCloud settings menu.
Step 4: Find and select “Find My iPhone”
Scroll down on the iCloud settings menu until you find the “Find My iPhone” option. Tap on it to proceed.
Step 5: Enable “Find My iPhone”
In the “Find My iPhone” settings, you will see an option to enable this feature. Make sure the toggle switch is turned on (highlighted in green) to enable it.
Step 6: Enable “Erase iPhone”
Below the “Find My iPhone” toggle switch, you will see another option called “Erase iPhone.” Tap on it to continue.
Step 7: Confirm the erasure
A pop-up window will appear to confirm your decision. Read the information carefully and understand that enabling this feature will erase all the content and settings on your iPhone. If you’re ready to proceed, tap on the “Enable” button.
Step 8: Re-enter your Apple ID password
You will be prompted to re-enter your Apple ID password as a security measure. Enter your credentials accurately and tap on “OK” to confirm.
Step 9: Automatic erasure is set!
Congratulations! You have successfully set your iPhone for automatic erasure. From now on, if your iPhone is lost, stolen, or in someone else’s possession, it will automatically erase all content and settings remotely, ensuring your data remains secure.
Now, you can sell your iPhone or lend it to others without the fear of personal information falling into the wrong hands. Remember, however, that once you enable automatic erasure, there’s no turning back. Make sure to create a backup of all important data before proceeding with this setting.
Important Considerations
Before setting your iPhone to automatically erase all content and settings, there are a few important considerations to keep in mind:
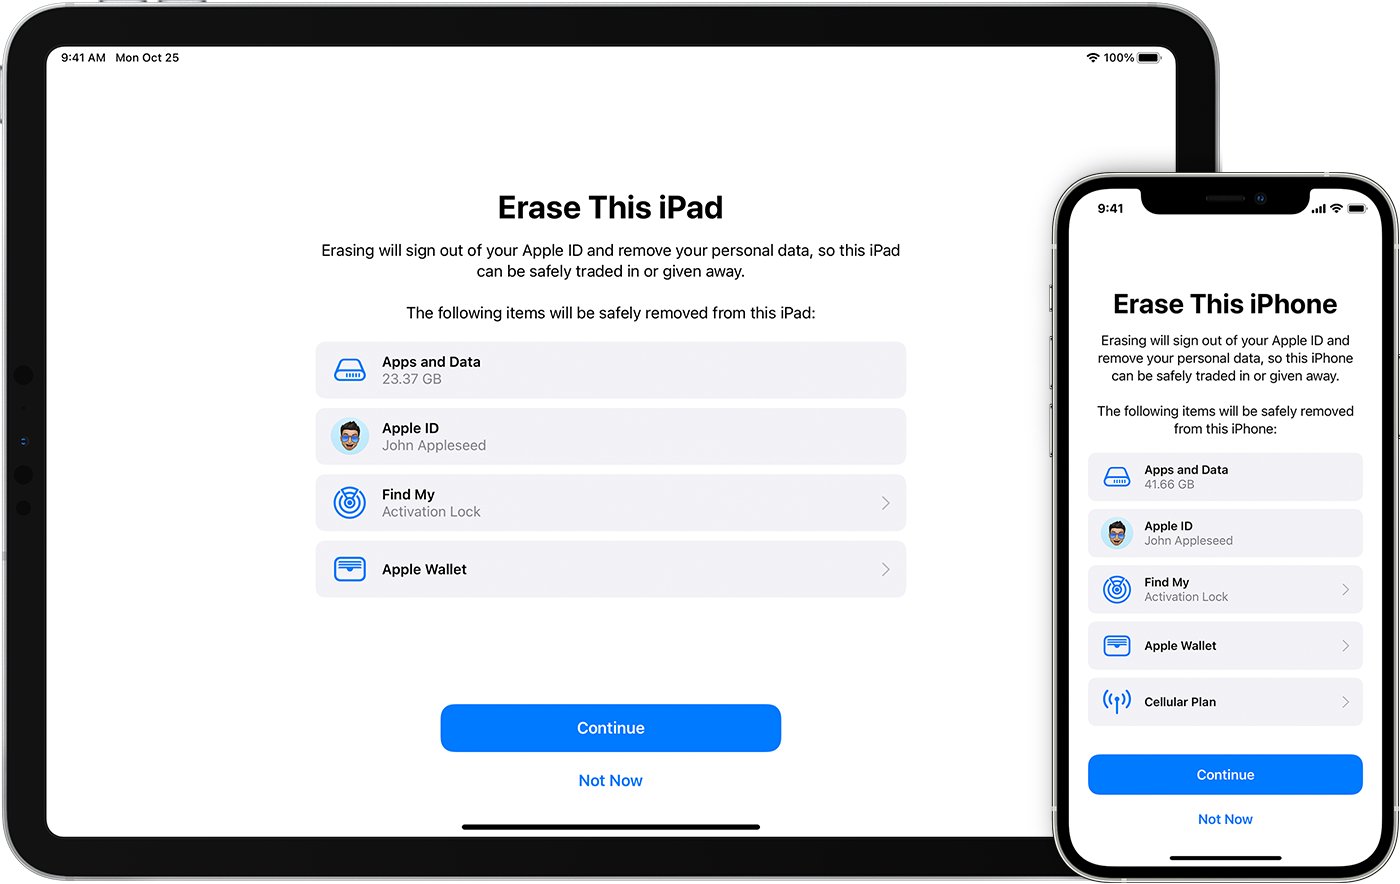
1. Backup Your Data: When your iPhone is set to automatically erase all content and settings, it will erase everything on the device, including apps, photos, contacts, and settings. Therefore, it is crucial to regularly back up your important data to iCloud or your computer. This way, you can easily restore your information after the erasure process is complete.
2. Verify your iCloud Storage: Make sure you have sufficient iCloud storage space available to back up your data. If your iCloud storage is full, you may need to upgrade to a higher storage plan or free up space by deleting unnecessary files or photos. This will ensure a seamless backup process and prevent data loss during the content erasure.
3. Sign out of iCloud: Before initiating the automatic content erasure, it is recommended to sign out of your iCloud account. This will dissociate your device from your iCloud account, preventing any potential data sync issues or conflicts during the erasure process.
4. Remove Activation Lock: If you have enabled the Activation Lock feature on your iPhone, it is important to disable it before setting your device for automatic content erasure. This will ensure that the device can be easily set up by a new user after the erasure process.
5. Disable Find My iPhone: Find My iPhone is a useful feature that allows you to locate your device if it is lost or stolen. However, it must be disabled before initiating the content erasure. To do this, go to Settings, tap on your name, select Find My, and then turn off Find My iPhone.
6. Update to the Latest iOS Version: It is advisable to update your iPhone’s software to the latest iOS version before setting it for automatic content erasure. This will ensure that you have the most up-to-date security features and fixes, providing an added layer of protection for your data.
7. Be Patient: The process of automatically erasing all content and settings may take some time, depending on the storage capacity of your device. It is important to be patient and avoid interrupting the process. Allow your iPhone to complete the erasure process fully to ensure a successful reset.
8. Verify Your Reset: After the automatic content erasure is complete, double-check to ensure that all data and settings have been erased successfully. This will give you peace of mind that no personal or sensitive information remains on your device before transferring or selling it.
By keeping these important considerations in mind, you can set your iPhone for automatic content erasure confidently, knowing that your data is backed up and your device will be ready for a fresh start.
Troubleshooting and FAQ
Even with the automated content erasure feature on your iPhone, you may encounter some issues or have questions. Here are some troubleshooting tips and frequently asked questions to help you navigate any challenges you might face:
1. Content not being erased automatically: If you have set your iPhone to automatically erase content and settings, but it’s not happening, ensure that you have enabled the feature correctly. Go to Settings > General > Reset > Erase All Content and Settings, and make sure the toggle switch is turned on. If the issue persists, restart your iPhone and try again.
2. Erasure taking too long: The duration of the automatic content erasure process depends on the amount of data on your iPhone. If you have a large number of photos, videos, or other files, it may take longer to complete the erasure. Be patient and let the process finish without interruptions. If it’s taking exceptionally long, consider performing a manual content erasure instead.
3. Backup retrieval: When your iPhone undergoes automatic content erasure, all data, including backups, gets permanently deleted. Therefore, it’s important to regularly back up your iPhone using iCloud or iTunes to ensure you have a copy of your data in case of emergency or accidental erasure.
4. Recovery after accidental erasure: If you accidentally trigger the content erasure process and don’t have a backup, it can be challenging to recover your data. Consider using data recovery software or contacting professional services that specialize in retrieving deleted information from iPhones. However, be aware that the success of data recovery may vary depending on the circumstances.
5. Security concerns: While automatic content erasure can enhance your privacy and security, it’s still crucial to take other security measures to protect your iPhone. Set a passcode or enable Face ID/Touch ID to prevent unauthorized access, regularly update your software to stay protected against vulnerabilities, and be cautious while installing apps from unknown sources.
6. Compatibility: The automatic content erasure feature is available on iPhones running iOS 15 or newer. If your iPhone is running an older version of iOS, you may need to update your device software to access this feature. Check for software updates regularly to ensure your iPhone is up to date with the latest security features and improvements.
7. Losing important data: Before enabling automatic content erasure, ensure that you have a backup of any important data you want to preserve. Double-check that your photos, documents, contacts, and other essential files are synced with iCloud or backed up on your computer through iTunes. By maintaining a reliable backup, you can mitigate the risk of losing crucial information in the event of accidental erasure.
By troubleshooting any issues and being knowledgeable about the automated content erasure feature on your iPhone, you can ensure a smooth and secure user experience. Don’t hesitate to reach out to Apple support if you encounter any persistent difficulties or have specific inquiries regarding content erasure on your iPhone.
Conclusion
The ability to set your iPhone to automatically erase all content and settings is a valuable feature that provides peace of mind and security. In today’s digitally connected world, protecting our personal information is of utmost importance, and this feature allows you to do just that.
By enabling this setting, you can ensure that in the event your iPhone falls into the wrong hands or is lost, your sensitive information remains secure. The process of erasing all content and settings on your iPhone is quick and efficient, allowing you to maintain control over your personal data.
So, whether you’re selling your iPhone, giving it away, or just want to start fresh, setting your iPhone to automatically erase all content and settings in 2023 is a wise move. Take control of your privacy and enjoy the peace of mind that comes with knowing your personal information is always protected.
FAQs
1. Why would I want to set my iPhone to automatically erase all content and settings?
Setting your iPhone to automatically erase all content and settings can be useful in situations where you want to completely wipe your device, such as when selling or giving it away. This ensures that all your personal data, including photos, contacts, messages, and accounts, are permanently erased, providing peace of mind and preventing unauthorized access to your information.
2. How do I enable the automatic erase feature on my iPhone?
To enable the automatic erase feature on your iPhone, go to the “Settings” app, then tap on “General,” followed by “Reset.” From there, select “Erase All Content and Settings.” You may be prompted to enter your passcode or Apple ID password to proceed. Once enabled, your iPhone will automatically erase all data and settings after a specified period of inactivity.
3. Can I set a specific time frame for the automatic erase to occur?
No, currently, Apple does not offer the option to set a specific time frame for the automatic erase feature. However, you can customize the timing by adjusting the “Auto-Lock” setting, which determines how long your iPhone stays active before it goes to sleep. Setting a shorter auto-lock time will make the automatic erase occur more quickly after your iPhone is inactive.
4. Will the automatic erase feature delete my iCloud data as well?
No, the automatic erase feature on your iPhone will not delete your iCloud data. It only removes the content and settings from your device itself. You can choose to sign out of iCloud separately if you want to remove your data from the cloud.
5. Can I cancel the automatic erase process once it has started?
No, once the automatic erase process has started, it cannot be canceled. It is crucial to make sure you have backed up any necessary data before enabling this feature, as there is no way to retrieve the erased content once it is deleted.