
If you’re an avid gamer, you know how important it is to have a seamless and immersive gaming experience. And one key aspect of that experience is having the perfect set of headphones. In the world of gaming, wireless headphones are becoming increasingly popular due to their convenience and freedom of movement. Xbox One, being one of the most popular gaming consoles, offers the option to connect wireless headphones for an enhanced gaming experience. In this article, we’ll guide you through the process of hooking up wireless headphones to your Xbox One, so you can enjoy a truly immersive gaming session without any wires holding you back. Whether you’re a casual gamer looking for an upgrade or a hardcore gamer wanting to take your gameplay to the next level, we’ve got you covered with easy-to-follow steps and helpful tips. Let’s dive in and explore how you can elevate your gaming experience with wireless headphones for your Xbox One.
Inside This Article
- # How To Hook Up Wireless Headphones To Xbox One
- Step 1: Check Compatibility
- Step 2: Connect the Wireless Transmitter
- Step 3: Adjust Audio Settings on Xbox One
- Troubleshooting Tips
- Conclusion
- FAQs
# How To Hook Up Wireless Headphones To Xbox One
Are you tired of playing Xbox One games with a wired headset, restricting your movement and causing you to accidentally unplug your headphones during intense gaming sessions? Well, you’re in luck! In this article, we will guide you through the process of hooking up wireless headphones to your Xbox One, giving you the freedom to move around and immerse yourself fully in your gaming experience.
Before we get started, it’s important to note that not all wireless headphones are compatible with the Xbox One. However, there are a few models that are specifically designed to work seamlessly with this gaming console. Let’s take a look at some of the recommended wireless headphones for Xbox One.
- 1. Corsair Void RGB Elite Wireless: This headset offers a comfortable fit, excellent audio quality, and a reliable wireless connection. It comes with a USB dongle that plugs into the Xbox One console, allowing for easy setup.
- 2. SteelSeries Arctis 9X: Engineered with Xbox Wireless technology, this headset offers lag-free audio and a long-lasting battery life. Simply connect it to your Xbox One using the wireless connection option.
- 3. Turtle Beach Stealth 600 Gen 2: This budget-friendly headset provides great audio performance, wireless connectivity, and a lightweight design. It connects directly to the Xbox One console without the need for additional adapters.
Once you have your compatible wireless headphones ready, it’s time to connect them to your Xbox One. There are two common methods for doing this – via Bluetooth or with the help of an adapter. Let’s explore both options.
Connecting Wireless Headphones to Xbox One via Bluetooth
If your wireless headphones have Bluetooth capability, you can easily pair them with your Xbox One console. Here’s how:
- 1. Put your wireless headphones in pairing mode. Refer to the user manual for instructions on how to do this, as it may vary depending on the brand and model.
- 2. On your Xbox One, go to the “Settings” menu and select “Devices & connections.”
- 3. Choose “Bluetooth & other devices” and select “Add Bluetooth or other device.”
- 4. Select “Everything else” and wait for your Xbox One to detect your wireless headphones.
- 5. Once your headphones appear, select them from the list and follow any additional on-screen instructions to complete the pairing process.
Connecting Wireless Headphones to Xbox One with an Adapter
If your wireless headphones do not have Bluetooth functionality, you can still connect them to your Xbox One using an adapter. Here’s what you need to do:
- 1. Purchase an Xbox One headset adapter that is compatible with your wireless headphones. This adapter typically plugs into the controller and allows you to connect your headphones via a wired connection.
- 2. Plug the adapter into the audio output port on your Xbox One controller. Make sure it is securely connected.
- 3. Turn on your wireless headphones and put them in pairing mode.
- 4. On your Xbox One, go to the “Settings” menu and select “Devices & connections.”
- 5. Choose “Audio” and select “Headset format.”
- 6. Select “Windows Sonic for Headphones” or “Dolby Atmos for Headphones” for the best audio experience.
- 7. Follow any additional on-screen instructions to complete the setup process.
Congratulations! You have successfully hooked up your wireless headphones to your Xbox One. Now you can enjoy an immersive gaming experience without the constraints of a wired headset.
Troubleshooting Wireless Headphone Connectivity Issues
If you experience any connectivity issues with your wireless headphones on the Xbox One, here are a few troubleshooting steps you can take:
- 1. Ensure that your wireless headphones are fully charged or have fresh batteries.
- 2. Move closer to the Xbox One console to improve the wireless signal reception.
- 3. Check for any firmware updates for both your Xbox One console and wireless headphones.
- 4. Try unpairing and pairing your headphones again to establish a new connection.
- 5. If using an adapter, make sure it is properly connected to the Xbox One controller.
- 6. Consult the user manual or contact customer support for further assistance.
Now you have all the information you need to hook up your wireless headphones to your Xbox One. Follow the steps outlined above, choose the method that suits your headphone’s capabilities, and get ready to elevate your gaming experience to the next level!
Step 1: Check Compatibility
Before you can hook up your wireless headphones to your Xbox One, it’s essential to verify if they are compatible with the console. Not all wireless headphones are designed to work seamlessly with Xbox One, so it’s crucial to check for any specific requirements or compatibility issues.
Start by referring to the user manual or product documentation that came with your wireless headphones. Look for any mentions of Xbox One compatibility or gaming consoles in general. If the headphones are explicitly stated to be compatible with Xbox One, you’re off to a good start.
If the manual doesn’t provide clear information about compatibility, you can visit the manufacturer’s website. Look for a dedicated Xbox One compatibility section or a support page that lists compatible devices. This can help you determine if your wireless headphones are officially supported by Xbox One.
Additionally, consider checking online forums or communities where users share their experiences with different wireless headphones and gaming consoles. Sometimes, other users have already tested and confirmed compatibility for a specific headphone model, which can provide helpful insights.
In some cases, compatibility issues may arise due to specific requirements or limitations. For example, some wireless headphones require firmware updates or specific settings to work correctly with Xbox One. Make sure to check if your headphones have any such requirements and follow the necessary steps to ensure compatibility.
By taking the time to check compatibility and address any specific requirements or compatibility issues, you can avoid frustration and ensure that your wireless headphones will work seamlessly with your Xbox One gaming experience.
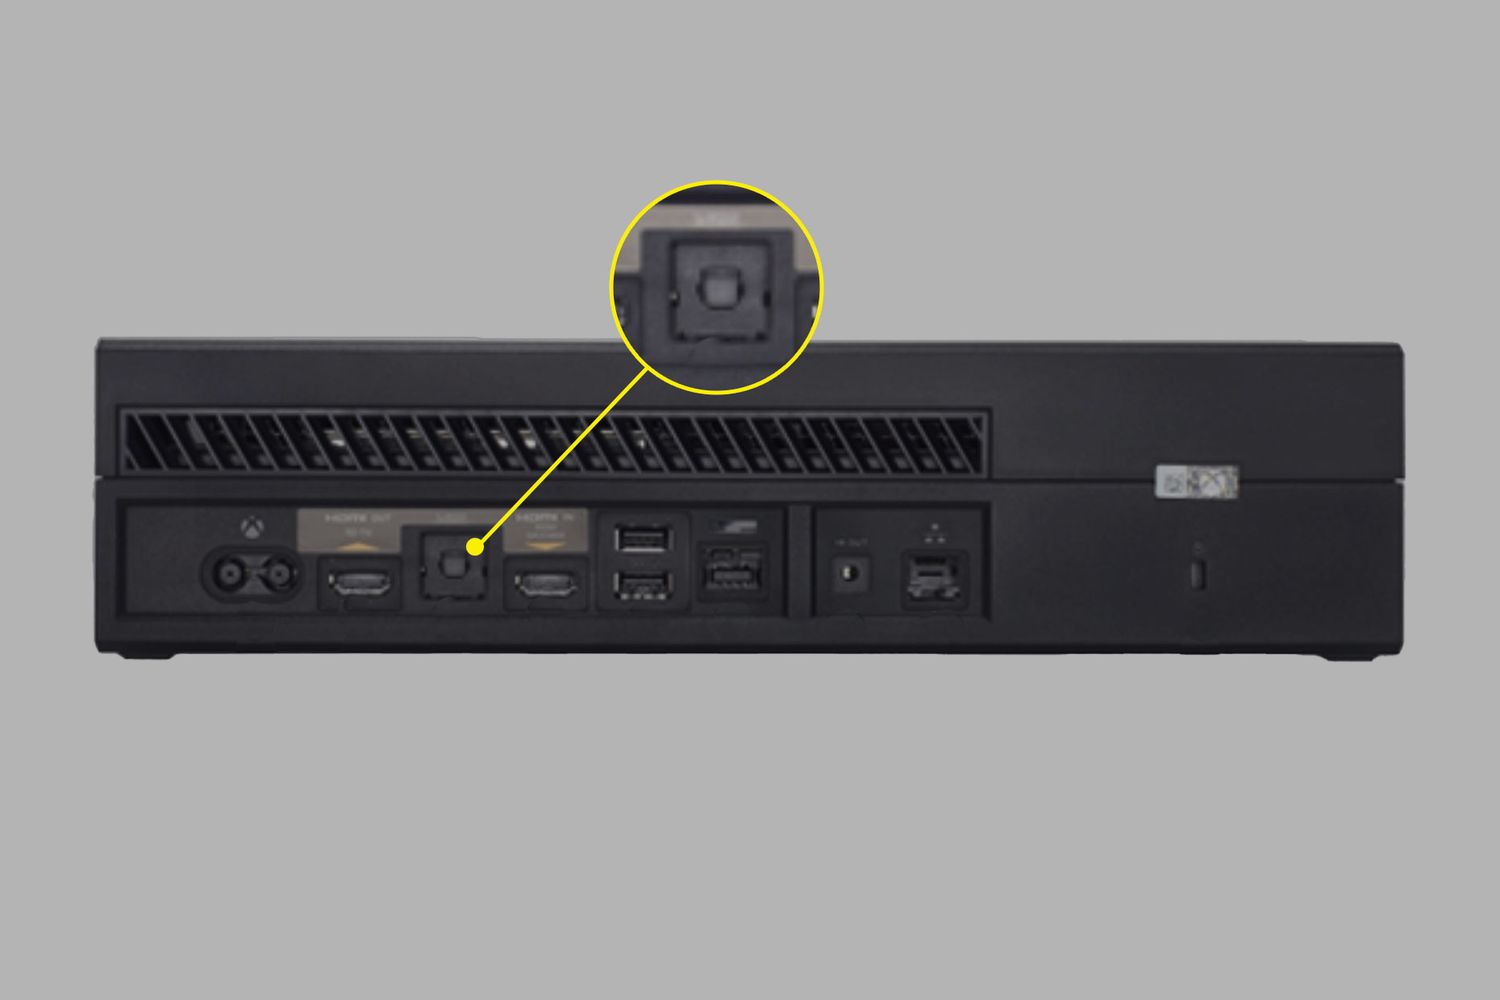
Step 2: Connect the Wireless Transmitter
Once you have chosen your wireless headphones and received the wireless transmitter, it’s time to connect it to your Xbox One console. Follow these simple steps to get your wireless headphones up and running:
1. Plug the wireless transmitter into the USB port on the Xbox One console. Locate the USB port on the console and insert the wireless transmitter firmly into the slot. Make sure you have a good connection to ensure optimal performance.
2. Follow the manufacturer’s instructions for pairing the transmitter with your headphones. Each brand and model may have slightly different pairing instructions, so it’s essential to consult the user manual or guide that comes with your specific headphones.
3. Depending on your headphones, you may need to press a pairing button on the wireless transmitter or on the headphones themselves. This initiates the pairing process and allows the transmitter and headphones to establish a connection.
4. Once the headphones and transmitter are paired successfully, you should see a notification or indicator light on both devices confirming the connection. Some headphones might have an audio cue, while others may display a Bluetooth or wireless symbol.
5. Test the connection by playing audio or a game on the Xbox One console. Make sure the volume is adjusted on both the console and the headphones to ensure an optimal listening experience. If you can hear the audio clearly through the wireless headphones, then congratulations, your setup is complete!
Remember to keep your wireless headphones and transmitter within a reasonable range to maintain a stable connection. Some wireless headphones have a limited range, so make sure to stay within the specified distance to avoid audio cutouts or interruptions.
If you encounter any issues during the pairing process or face connectivity problems, consult the troubleshooting section of your headphone’s user manual or reach out to the manufacturer’s customer support for further assistance.
Step 3: Adjust Audio Settings on Xbox One
After successfully connecting your wireless headphones to the Xbox One, it’s important to adjust the audio settings to optimize your gaming experience. Follow these simple steps:
-
Access the Xbox One settings menu by pressing the Xbox button on your controller to open the guide. From there, navigate to the “Settings” tab.
-
In the settings menu, scroll down and select “General” to access a range of options.
-
Within the “General” settings, locate and select “Volume & audio output.”
-
Here, you’ll find various audio options, including volume controls, audio output settings, and more. Take your time to explore these settings and customize them according to your preferences.
-
For example, you can adjust the master volume level, game/chat mix, headset volume, and mic monitoring. Play around with these options to find the perfect audio balance that suits your gaming needs.
-
If you’re using a wireless headset that supports virtual surround sound or other audio enhancements, make sure to enable these features in the audio settings for an immersive gaming experience.
By accessing and adjusting the audio settings on your Xbox One, you can enhance the sound quality, customize audio preferences, and ensure a more enjoyable gaming session with your wireless headphones.
Troubleshooting Tips
Are you experiencing audio lag or connectivity problems with your wireless headphones connected to your Xbox One? Don’t worry, we’ve got you covered! Here are some troubleshooting tips to help you resolve common issues and ensure a smooth gaming experience:
1. Check for Audio Lag: If you notice a delay between the audio you hear and the actions on the screen, there are a few things you can try. Firstly, make sure your wireless headphones are fully charged. Low battery levels can sometimes cause audio lag. Additionally, check the distance between your headphones and the Xbox One console. Being too far away can result in a weaker signal, leading to audio lag. Finally, try reducing the number of devices that may be causing interference, such as other wireless devices or nearby routers.
2. Ensure Proper Connectivity: Double-check that all devices involved in the connection are properly connected. Ensure that your wireless headphones are paired correctly with the Xbox One console. Follow the manufacturer’s instructions to establish a secure connection. If you are using Bluetooth headphones, make sure that Bluetooth is enabled on both the headphones and the Xbox One. Additionally, ensure that your headphones are set as the default audio device on the Xbox One console. Sometimes, audio can route to other devices, leading to connectivity issues.
3. Charge Your Devices: While this may seem obvious, it’s worth mentioning. If you’re experiencing connectivity issues, make sure that all devices, including the wireless headphones and the Xbox One controller, are properly charged. Low battery levels can impact the stability of the wireless connection, resulting in drops or intermittent connectivity. Keep your devices charged regularly to avoid any potential issues.
By following these troubleshooting tips, you can overcome common issues that may arise when using wireless headphones with your Xbox One. Remember to maintain a proper connection, ensure that all devices are charged, and minimize potential sources of interference. Happy gaming!
Conclusion
Wireless headphones provide a convenient and immersive gaming experience on the Xbox One. By following the simple steps outlined in this guide, you can easily hook up your wireless headphones and enjoy crisp, high-quality sound without the hassle of cables. Whether you prefer the freedom to move around without being tethered to your console or the ability to play late into the night without disturbing others, wireless headphones offer a versatile solution.
Now that you know how to hook up wireless headphones to your Xbox One, you can elevate your gaming experience to new heights. Feel every explosion, hear every footstep, and immerse yourself fully in the virtual worlds of your favorite games. Remember to check the compatibility of your wireless headphones with the Xbox One and ensure they have the necessary features for optimal performance.
So, get ready to enjoy a truly immersive and wireless gaming experience on your Xbox One with the help of wireless headphones. Say goodbye to tangled cables and hello to the freedom and convenience of wireless audio!
FAQs
1. Can I Connect Wireless Headphones to Xbox One?
Indeed, you can connect wireless headphones to Xbox One. The Xbox One supports both Bluetooth and Xbox Wireless technologies, allowing you to seamlessly connect and enjoy an immersive gaming experience with wireless headphones.
2. How Do I Connect Bluetooth Headphones to Xbox One?
To connect Bluetooth headphones to Xbox One, you need to follow these steps:
– On your Xbox One, navigate to the “Settings” menu.
– Select “Devices & connections” and then choose “Connections.”
– Under the “Other devices” section, click on “Add Bluetooth & other devices.”
– Select “Everything else” and then choose “Bluetooth.”
– Put your Bluetooth headphones in pairing mode.
– Select your headphones from the list of available devices on your Xbox One.
3. Do I Need an Adapter to Connect Xbox Wireless Headphones?
If you have an Xbox Wireless headset, you generally do not need an adapter to connect it to your Xbox One. Xbox Wireless headsets can connect directly to Xbox consoles without requiring any additional adapters or dongles.
4. Can I Use Any Wireless Headphones with Xbox One?
You can use any wireless headphones that support either Bluetooth or Xbox Wireless technology with Xbox One. However, it’s essential to ensure that your headphones are compatible and offer the necessary features, such as low latency, to deliver a seamless gaming experience.
5. Can I Use a Gaming Headset as Wireless Headphones for Xbox One?
Yes, you can use a gaming headset as wireless headphones for Xbox One. Many gaming headsets come with wireless capabilities, allowing you to connect them to your Xbox One without the need for additional cables or adapters. Just make sure your gaming headset is compatible with Xbox consoles and follow the manufacturer’s instructions for setup.