
Installing a wireless printer on a Mac can seem like a daunting task for some, but with the right guidance and a few simple steps, you’ll be printing wirelessly in no time. Gone are the days of tangled cords and restrictive printer placement. With a wireless printer, you can print from anywhere within your home or office, without the need for any physical connections.
In this article, we’ll walk you through the process of installing a wireless printer on your Mac. Whether you’re a tech-savvy individual or a beginner, our step-by-step instructions will ensure that you can easily set up and start using your wireless printer. Say goodbye to the hassle of dealing with cables and hello to the convenience of wireless printing on your Mac. Let’s dive in and get started on this printer installation journey!
Inside This Article
- Prerequisites
- Step 1: Check hardware compatibility
- Step 2: Connect the printer to your Mac
- Step 3: Install printer software
- Step 4: Add the wireless printer
- Troubleshooting common issues
- Conclusion
- FAQs
Prerequisites
Before you begin the process of installing a wireless printer on your Mac, there are a few prerequisites that you need to fulfill. These requirements will help ensure a smooth and hassle-free installation process.
1. A compatible wireless printer: Ensure that you have a wireless printer that is compatible with Mac operating systems. Check the printer’s specifications or consult the manufacturer’s website for compatibility information.
2. A stable Wi-Fi network: Make sure that you have a stable Wi-Fi network available. The printer and your Mac need to be connected to the same network for the installation process to work effectively.
3. Access to the printer’s documentation: Familiarize yourself with the printer’s user manual or documentation. This will provide you with specific instructions and details on how to connect the printer to the Wi-Fi network and locate the necessary drivers for your Mac.
4. Administrator access: Ensure that you have administrative access to your Mac. This is necessary for making system-level changes and installing new software on your device.
With these prerequisites in place, you can proceed with the installation process for your wireless printer on your Mac. Following the steps outlined below will help you successfully set up and connect your printer wirelessly.
Step 1: Check hardware compatibility
Before diving into the process of installing your wireless printer on your Mac, it’s important to ensure that the printer is compatible with your Mac device. Here are a few steps you can follow to check the hardware compatibility:
- Check the printer’s documentation: Start by reviewing the printer’s manual or documentation to determine if it supports Mac operating systems. Look for any specific system requirements or compatibility notes.
- Visit the manufacturer’s website: Go to the website of the printer’s manufacturer and search for the model of your printer. Look for compatibility information or a list of supported operating systems. Ensure that your Mac’s operating system is listed.
- Check the Mac system requirements: On your Mac, click on the Apple menu in the upper left corner and select “About This Mac.” Verify that your Mac’s operating system version meets the requirements specified by the printer manufacturer.
- Ensure network compatibility: If your printer connects wirelessly to your Mac, make sure that your Mac device supports the same Wi-Fi network specifications. Check for compatibility with common Wi-Fi standards such as 802.11ac or 802.11n.
By taking the time to check the hardware compatibility, you can save yourself from potential compatibility issues and ensure a smooth installation process for your wireless printer on your Mac.
Step 2: Connect the printer to your Mac
After successfully connecting your printer to the Wi-Fi network, the next step is to establish a connection between the wireless printer and your Mac. This will allow you to send print commands directly from your computer to the printer without the need for any physical cables.
To connect the printer to your Mac, follow these simple steps:
- Make sure your printer is turned on and discoverable. Some printers have a dedicated button or a touchscreen display that allows you to enable the Wi-Fi connection. Consult your printer’s manual for specific instructions if needed.
- On your Mac, click on the Apple menu in the top-left corner and select “System Preferences.”
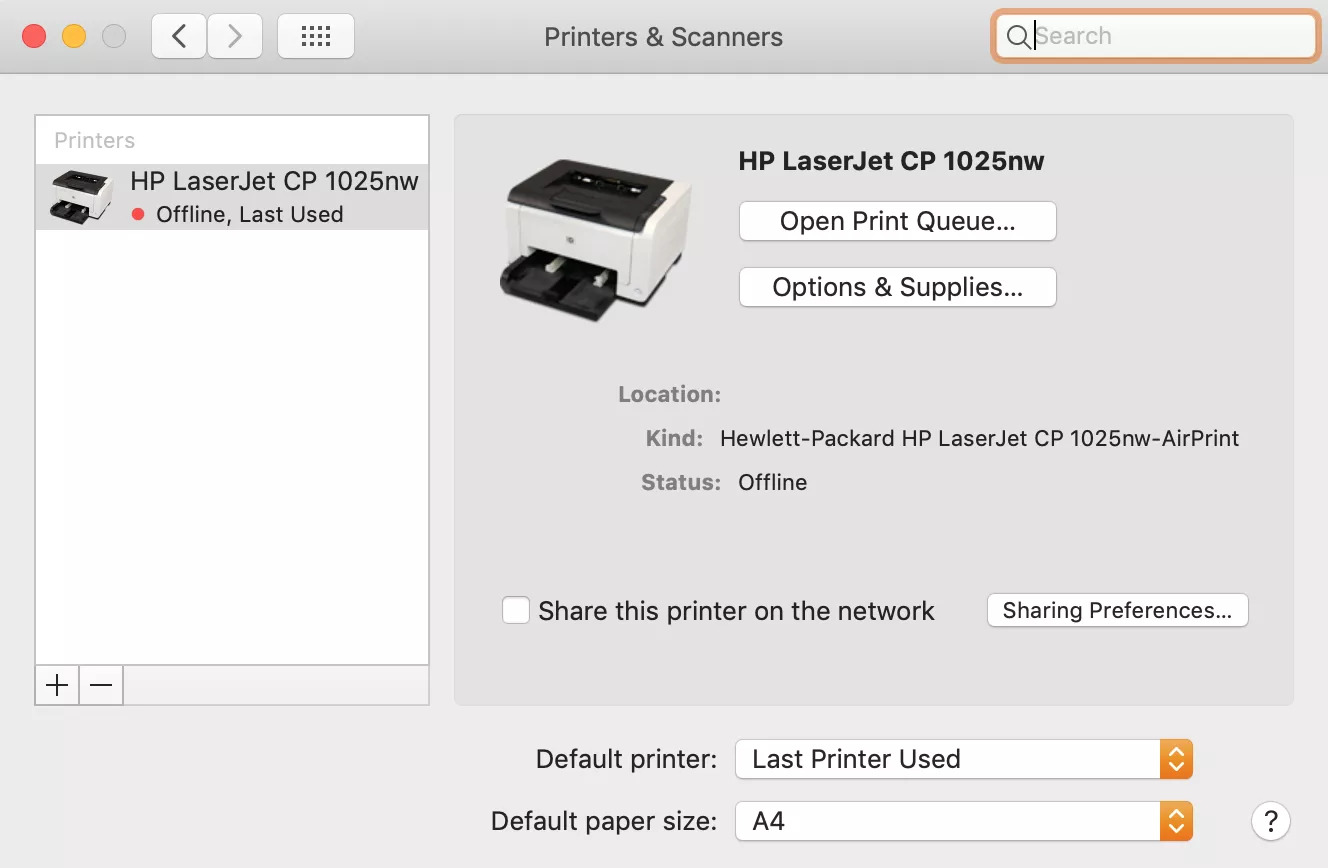
- In the System Preferences window, click on “Printers & Scanners.”
- Click on the “+” button at the bottom of the printer list to add a new printer.
- A new window will appear, listing the available printers on your network. The wireless printer you just connected should be displayed in the list. Click on it to select it.
- Click on the “Add” button to add the printer to your Mac.
- Your Mac will now download and install the necessary drivers for the printer. This process may take a few minutes, so be patient.
- Once the drivers are installed, you will see a confirmation message indicating that the printer has been added successfully.
- Close the Printer & Scanners window, and now you should be able to print wirelessly from your Mac to the connected printer.
It’s worth noting that some printer models may require additional setup steps or the installation of specific software. Refer to your printer’s manual or the manufacturer’s website for detailed instructions tailored to your specific printer model.
Step 3: Install printer software
After establishing the wireless connection between your printer and Mac, the next step is to install the necessary software. This software, also known as printer drivers, allows your computer to communicate with the printer and control its functionality.
To begin installing the printer software, follow these steps:
- Locate the installation CD that came with your printer. If you don’t have the CD, don’t worry—you can usually download the latest software from the printer manufacturer’s website.
- Insert the installation CD into your Mac’s CD/DVD drive. If your Mac doesn’t have a built-in CD/DVD drive, you can skip to the next step and download the software from the website.
- Once the CD is inserted, an installation wizard may automatically launch. If it doesn’t, navigate to the CD drive icon on your desktop and double-click to open it.
- Look for a file named something like “setup,” “installer,” or “driver.” Double-click on this file to start the installation process.
- Follow the on-screen instructions to complete the installation. This may involve agreeing to terms and conditions, choosing a language, and selecting the installation location.
- If you are downloading the software from the website, visit the printer manufacturer’s support page and search for your specific printer model.
- Locate the latest software or driver for your operating system (in this case, Mac) and click the “Download” button.
- Once the download is complete, double-click on the downloaded file to start the installation process.
- Follow the on-screen instructions to complete the installation, just like you would with a CD.
Once the installation is finished, your printer software should be properly installed on your Mac. It’s important to keep the printer software updated to ensure compatibility and access to the latest features and improvements.
Remember to restart your Mac after the installation to ensure that the changes take effect. Now you’re ready to move on to the final step: adding the printer to your Mac and testing the wireless connection.
Step 4: Add the wireless printer
After successfully connecting the printer to your Wi-Fi network and installing the necessary drivers, the next step is to add the wireless printer to your Mac. This process allows your computer to recognize and communicate with the printer wirelessly, enabling you to print documents, photos, and more without the need for any physical connections.
To add the wireless printer, follow these simple steps:
- Open the System Preferences on your Mac. You can do this by clicking on the Apple icon located in the top left corner of your screen and selecting “System Preferences” from the dropdown menu.
- In the System Preferences window, locate and click on the “Printers & Scanners” option. This will open a new window where you can manage your printer settings.
- At the bottom left corner of the Printers & Scanners window, you will find a “+” (plus) button. Click on it to initiate the process of adding a new printer.
- Your Mac will now search for available printers on the network. Wait for the search to complete.
- Once the search is complete, a list of available printers will be displayed. Look for your wireless printer in the list and select it.
- If your printer requires a specific driver that is not already installed on your Mac, you will be prompted to download and install it. Follow the on-screen instructions to complete the driver installation process.
- After the driver installation, your wireless printer will be added to the list of available printers on your Mac. It will also be set as your default printer.
- You can now start printing wirelessly from your Mac using the newly added wireless printer. Simply select the printer when you want to print a document, photo, or any other file, and enjoy the convenience of wireless printing.
Adding a wireless printer to your Mac is a straightforward process that allows you to take full advantage of the convenience and flexibility that wireless printing offers. Once added, you can easily print from any application that supports printing, without the hassle of connecting cables or physically moving your Mac to the printer. So go ahead, follow the steps above, and enjoy the seamless wireless printing experience on your Mac.
Troubleshooting common issues
If you’ve encountered any issues while attempting to install a wireless printer on your Mac, don’t worry! This section will guide you through troubleshooting some common problems.
No wireless network connection: If your printer isn’t connecting to your Wi-Fi network, ensure that the printer is within range of the wireless router and that the Wi-Fi signal is strong. You may also want to restart your router to resolve any connectivity issues.
Printer not found during setup: If your Mac is unable to detect the wireless printer during the installation process, double-check that the printer is turned on and connected to the same Wi-Fi network as your Mac. Restarting both your Mac and printer can also help resolve the issue.
Incompatible printer drivers: If you’re experiencing trouble with your printer after installing the drivers, it’s possible that the drivers you’ve downloaded are incompatible with your Mac’s operating system. Visit the manufacturer’s website to ensure you have the correct and up-to-date printer drivers for your Mac.
Firewall or security software: Sometimes, firewall or security software on your Mac can interfere with the printer installation process. Temporarily disabling these programs or adjusting the settings may help establish a connection between your Mac and the wireless printer.
Printer offline or not responding: If your printer shows as offline or unresponsive on your Mac, ensure that it is powered on and connected to the Wi-Fi network. You can also try removing the printer from your Mac’s printer list and adding it again to reestablish the connection.
Print jobs stuck in queue: If your print jobs are getting stuck in the print queue and not being processed, you can try resetting the printing system on your Mac. This will clear any pending print jobs and allow your Mac to reestablish communication with the printer.
Slow printing speed: If you’re experiencing slow printing speeds, make sure that your wireless network is functioning properly and not experiencing any congestion. Additionally, check if there are any firmware updates available for your printer that can improve its performance.
Insufficient ink or toner: If your printouts are coming out faded or incomplete, it could be due to low ink or toner levels. Check the ink or toner cartridges in your printer and replace them if necessary to ensure optimal print quality.
Hardware malfunction: In the rare case that none of the above troubleshooting steps resolve your issue, it’s possible that there may be a hardware malfunction with your printer. Contact the manufacturer’s customer support for further assistance or consider getting the printer serviced or replaced if it’s still under warranty.
Hopefully, these troubleshooting steps help you overcome any issues you encounter while installing or using a wireless printer on your Mac. If you’re still facing problems, it’s always a good idea to reach out to the manufacturer’s support team for personalized assistance specific to your printer model.
Conclusion
Installing a wireless printer on your Mac can greatly enhance your printing experience by providing convenience and flexibility. With the step-by-step instructions provided in this article, you can easily set up your wireless printer and start enjoying the benefits.
Remember to ensure that your Mac and printer are on the same network, and have the necessary drivers installed. Take your time to carefully follow the manufacturer’s instructions and troubleshoot any issues that may arise.
By setting up a wireless printer on your Mac, you can easily print documents, photos, and other materials without the hassle of physical connections. Enjoy the freedom of wireless printing and make your work or personal printing tasks a breeze.
If you have any more questions or need further assistance, don’t hesitate to refer to the printer’s user manual or contact the manufacturer’s support team. Happy printing!
FAQs
1. Can I connect a wireless printer to my Mac?
Absolutely! Mac computers are equipped with built-in wireless capabilities, allowing you to easily connect a wireless printer. Simply follow the printer manufacturer’s instructions for connecting the printer to your Wi-Fi network. Once connected, your Mac will be able to detect and print to the wireless printer.
2. Do I need any additional software to install a wireless printer on my Mac?
In most cases, you do not need any additional software to install a wireless printer on your Mac. Mac computers come with built-in printer drivers that support a wide range of printers. However, if your printer requires a specific driver or software, you can usually download it from the printer manufacturer’s website.
3. How do I find and add a wireless printer on my Mac?
To find and add a wireless printer on your Mac, follow these steps:
- Make sure your printer is connected to your Wi-Fi network.
- Open the System Preferences on your Mac.
- Click on the “Printers & Scanners” option.
- Click the “+” button to add a new printer.
- Your Mac will search for available printers on your network. Once your wireless printer is detected, select it and click “Add.”
Your Mac is now connected to and ready to print to the wireless printer.
4. What should I do if my Mac is not detecting my wireless printer?
If your Mac is not detecting your wireless printer, try the following troubleshooting steps:
- Make sure your printer is turned on and connected to your Wi-Fi network.
- Check that your Mac and printer are on the same network.
- Restart your Mac and printer.
- Update your Mac’s software to the latest version.
- If the issue persists, consult the printer manufacturer’s support documentation or contact their customer support for further assistance.
5. Can I use a wired USB printer with my Mac?
Yes, you can use a wired USB printer with your Mac. Simply connect the printer to your Mac using a USB cable. In most cases, your Mac will automatically detect the printer and install the necessary drivers. You can then select the connected printer as the default printer for printing.