
Are you struggling to install a wireless printer on your Windows 8 computer? Don’t worry, we’ve got you covered! In this article, we will guide you through the step-by-step process of installing a wireless printer on your Windows 8 operating system. Whether you’re a tech-savvy individual or a newbie when it comes to technology, our easy-to-follow instructions will ensure a seamless installation experience. With a wireless printer, you can conveniently print documents from any device connected to your Wi-Fi network without the hassle of dealing with cables. So, let’s get started and have your wireless printer up and running in no time on your Windows 8 computer!
Inside This Article
- Step 1: Check Compatibility
- Step 2: Connect the Printer to your Windows 8 Device
- Step 3: Install the Printer Driver
- Step 4: Set up the Wireless Connection
- Step 5: Test the Wireless Printer Connection
- Troubleshooting Tips
- Conclusion
- FAQs
Step 1: Check Compatibility
Before you begin the process of installing a wireless printer on your Windows 8 device, it’s important to ensure that the printer is compatible with your operating system. Compatibility issues can prevent proper installation and functionality of the printer.
Here are a few things to check for compatibility:
- Operating System Compatibility: Verify whether the printer supports Windows 8. Most modern printers are designed to be compatible with the latest operating systems, but it’s always a good idea to double-check.
- Hardware Requirements: Check if your Windows 8 device meets the hardware requirements specified by the printer manufacturer. Some printers may require specific USB ports or network capabilities.
- Software Updates: Ensure that your Windows 8 device is up to date with the latest software updates. This can help resolve compatibility issues and improve overall printer performance.
By checking the compatibility of your printer and Windows 8, you can ensure a smooth installation process and optimal functionality of your wireless printer.
Step 2: Connect the Printer to your Windows 8 Device
After ensuring that your wireless printer is compatible with Windows 8, the next step is to connect it to your device. Here’s how you can do it:
1. Start by turning on your printer and make sure it is in the range of your Wi-Fi network.
2. On your Windows 8 device, open the “Settings” menu by swiping in from the right side of the screen or by pressing the Windows key + C. Then, click on “Change PC settings”.
3. In the PC settings menu, select “Devices” and then click on “Add a device”. Your Windows 8 device will start searching for nearby printers.
4. On your wireless printer, locate the “Wi-Fi” or “Network” button and press it. This will initiate the printer’s Wi-Fi connection process.
5. On your Windows 8 device, you should see your printer listed under “Printers & scanners” in the “Devices” menu. Click on your printer’s name to start the connection process.
6. Follow the on-screen prompts to complete the connection. You may be asked to enter a passcode or confirm the connection on your printer’s control panel.
7. Once the connection is established, your Windows 8 device will automatically detect the necessary drivers for your printer and install them.
8. After the driver installation is complete, you are now ready to start printing wirelessly from your Windows 8 device to your wireless printer.
Remember, each printer model may have slight variations in the connection process, so it’s always a good idea to refer to your printer’s user manual for specific instructions.
Step 3: Install the Printer Driver
Installing the printer driver is an essential step to ensure that your wireless printer works seamlessly with your Windows 8 device. The printer driver is a software program that allows your computer and printer to communicate effectively. Here’s how you can install the printer driver:
- Start by connecting your printer to your Windows 8 device using a USB cable. This will enable Windows to detect the printer and automatically install the basic driver.
- Once the basic driver is installed, open the “Devices and Printers” settings on your Windows 8 device.
- Locate the newly installed printer in the list of available devices. It will be labeled with the printer’s name or model number.
- Right-click on the printer and select “Properties” from the context menu.
- In the printer properties window, navigate to the “Hardware” or “Driver” tab.
- Click on the “Update Driver” or “Update Software” button, depending on the version of Windows 8 you have.
- Windows will now search for the latest driver software online. If it finds a newer version, it will automatically download and install it. If not, it will inform you that the best driver software for your device is already installed.
- Once the driver installation is complete, you may be prompted to restart your computer. Follow the on-screen instructions to do so.
After following these steps, your printer driver should be successfully installed, and your wireless printer will be ready to use with your Windows 8 device. It’s important to note that if you encounter any issues during the installation process, you can visit the printer manufacturer’s website for additional support and to download the correct driver specifically designed for your printer model.
Step 4: Set up the Wireless Connection
Once you have connected your printer to your Windows 8 device, the next step is to set up the wireless connection. This will allow you to print wirelessly from any device connected to your Wi-Fi network.
Here’s how to proceed:
1. Start by ensuring that your printer is turned on and connected to your Wi-Fi network. Check the printer’s manual or settings menu for instructions on how to do this.
2. On your Windows 8 device, click on the Start button and select “Settings” from the menu.
3. In the Settings menu, click on “Devices”. This will open the Devices settings page.
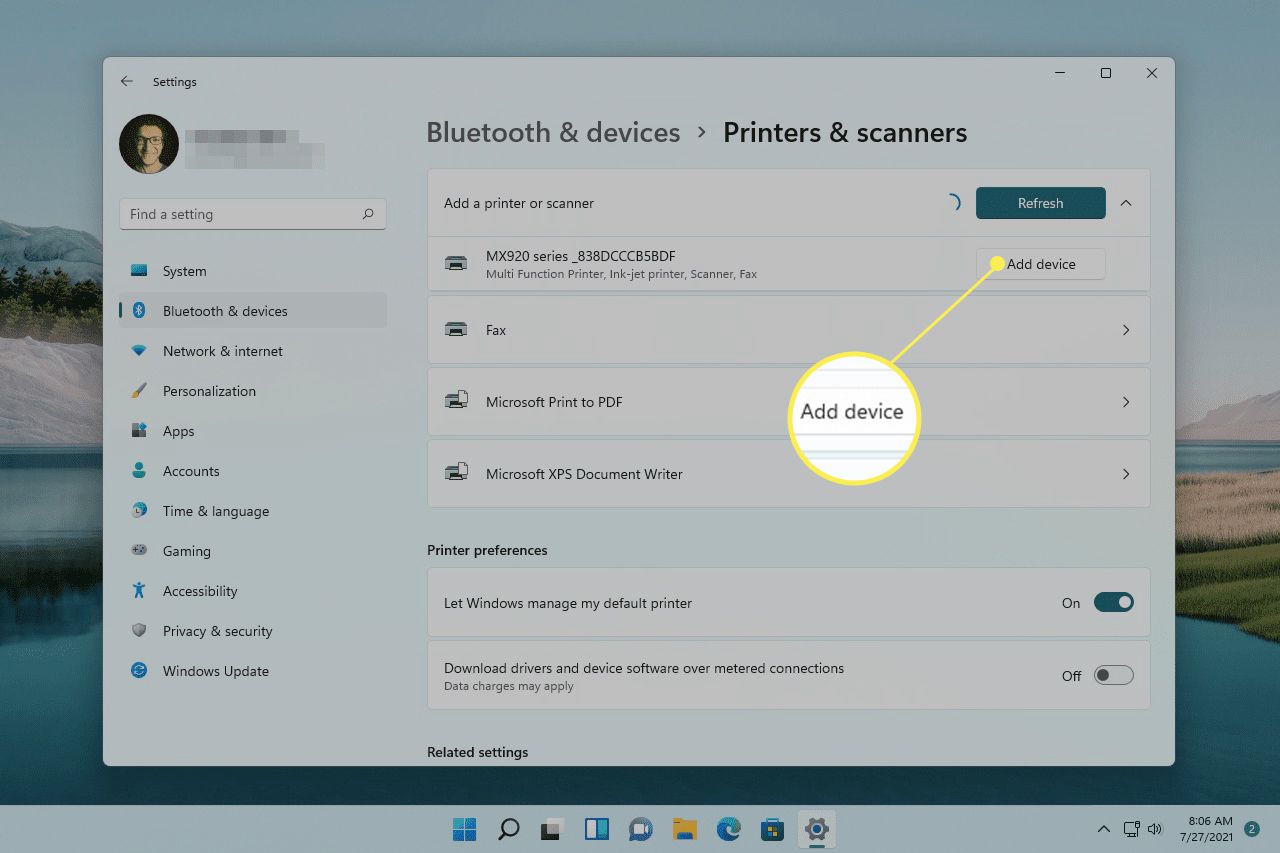
4. On the Devices settings page, click on “Printers & Scanners” from the left-hand menu. This will display a list of printers and scanners connected to your device.
5. Select your wireless printer from the list. If your printer is not listed, click on the “Add a printer or scanner” button to search for and add your wireless printer.
6. After selecting your wireless printer, click on the “Manage” button. This will open the printer’s settings menu.
7. In the printer’s settings menu, click on “Printer properties”. This will open a new window with additional printer settings.
8. In the printer properties window, click on the “Ports” tab. Here, you will see a list of printer ports.
9. Look for a port with the name of your wireless printer or the term “Wireless” in it. Select this port and click on the “Configure Port” button.
10. In the Configure Port window, make sure the IP address or hostname of your wireless printer is entered correctly. If not, edit the field to match the correct IP address or hostname.
11. Click on the “OK” button to save the changes and close the Configure Port window.
12. Finally, click on the “Apply” button in the printer properties window to apply the settings.
That’s it! You have now successfully set up the wireless connection for your printer on Windows 8. You can now enjoy the convenience of wireless printing from any device on your Wi-Fi network.
Step 5: Test the Wireless Printer Connection
After completing the installation and setup process, it’s important to test the wireless printer connection to ensure its functionality. By following the steps below, you can verify if the printer is successfully connected to your Windows 8 device:
- Open a document or file that you would like to print.
- Click on the “File” tab at the top left corner of the application or program.
- Choose the “Print” option from the dropdown menu. Alternatively, you can use the shortcut “Ctrl + P” to open the print menu.
- From the printer options, select your wireless printer. It should appear in the list of available printers.
- Customize the print settings according to your preferences, such as page orientation, color or black and white printing, and paper size.
- Click on the “Print” button to initiate the printing process.
- Monitor the printer closely to ensure that it receives the print job and starts printing the document.
- If the document is successfully printed, congratulations! Your wireless printer connection is working correctly.
- If the document does not print or encounters any errors, try the following troubleshooting tips:
You may need to restart your printer and Windows 8 device to refresh the connection.
Verify that your wireless printer is within range of the Wi-Fi network and that it is connected to the correct network.
Check if the printer driver is up to date by visiting the printer manufacturer’s website and downloading the latest driver version for your printer model.
Ensure that the printer is set as the default printer in the Windows 8 settings.
If the issue persists, consult the printer’s user manual or contact the manufacturer’s customer support for further assistance.
By following these steps and troubleshooting tips, you can easily test and ensure the functionality of your wireless printer connection on Windows 8. Now you can enjoy the convenience of wireless printing and effortlessly print your documents and files.
Troubleshooting Tips
Even with a successful installation and setup, there may be occasions when you encounter issues with your wireless printer on Windows 8. Don’t worry, as there are some troubleshooting tips you can try to resolve these problems.
1. Restart both your printer and Windows 8 device. Sometimes, just a simple restart can help clear any temporary glitches and restore the connection.
2. Check your Wi-Fi connection. Make sure that your Windows 8 device is connected to a stable Wi-Fi network. Also, ensure that your printer is within range of the Wi-Fi signal and that it is connected to the same network as your device.
3. Disable firewall or antivirus programs temporarily. Sometimes, the firewall or antivirus software on your Windows 8 device can interfere with the wireless connection between your printer and computer. Temporarily disabling these programs can help determine if they are causing the issue.
4. Update printer drivers. Outdated or incompatible printer drivers can cause problems with the wireless connection. Visit the printer manufacturer’s website and download the latest drivers for your printer model compatible with Windows 8.
5. Verify printer settings. Double-check the printer settings on your Windows 8 device to ensure that it is set as the default printer and is not on offline mode. You can access the printer settings by going to the Control Panel and selecting “Devices and Printers.”
6. Reset the printer’s network settings. If the wireless connection is still not working, you can try resetting the network settings on your printer. Consult the printer’s manual or manufacturer’s website for instructions on how to do this.
7. Reinstall the printer software. If none of the above solutions work, uninstall and reinstall the printer software on your Windows 8 device. This can help refresh the settings and resolve any software-related issues.
8. Contact customer support. If you have exhausted all troubleshooting options and are still experiencing issues with your wireless printer on Windows 8, it is best to reach out to the printer manufacturer’s customer support for further assistance.
By following these troubleshooting tips, you should be able to resolve most wireless printer issues on Windows 8. Remember to stay patient and take one step at a time. Happy printing!
Conclusion
In conclusion, installing a wireless printer on Windows 8 is a straightforward process that can greatly enhance your printing experience. By following the steps outlined in this guide, you can ensure that your wireless printer is seamlessly integrated with your Windows 8 device.
Remember to carefully choose a compatible wireless printer and connect it to your Wi-Fi network before beginning the installation process. Use the manufacturer’s provided software or let Windows 8 automatically detect and install the necessary drivers.
With a wireless printer, you can conveniently print documents from any location within the range of your Wi-Fi network, eliminating the need for cumbersome cords and cables. Whether you’re working from home, in the office, or on the go, a wireless printer on Windows 8 offers flexibility and convenience.
So, why wait? Upgrade your printing setup today and enjoy the freedom and ease of wireless printing on your Windows 8 device!
FAQs
Q: Can I install a wireless printer on Windows 8?
A: Absolutely! Windows 8 offers built-in support for wireless printers, making it easy to connect and install these devices on your computer.
Q: How do I know if my wireless printer is compatible with Windows 8?
A: Before installing a wireless printer on Windows 8, it’s important to check if the printer is compatible with the operating system. You can find this information in the printer’s user manual or on the manufacturer’s website.
Q: What steps do I need to follow to install a wireless printer on Windows 8?
A: The process for installing a wireless printer on Windows 8 is relatively straightforward. Here are the general steps you can follow:
- Ensure your wireless printer is powered on and connected to the same Wi-Fi network as your Windows 8 computer.
- Open the Control Panel on your computer by searching for it in the Start menu.
- Click on the “Hardware and Sound” option.
- Under the “Devices and Printers” section, click on “Add a printer” to start the installation wizard.
- Windows will search for available printers on your network. Select your wireless printer from the list and click “Next”.
- Follow the on-screen prompts to complete the installation process, which may include downloading and installing the necessary printer drivers.
- Once the installation is complete, your wireless printer should be ready to use on Windows 8.
Q: Can I connect multiple wireless printers to my Windows 8 computer?
A: Yes, you can connect multiple wireless printers to your Windows 8 computer. Simply repeat the installation process for each printer following the steps mentioned earlier.
Q: What should I do if my wireless printer is not showing up during the installation process on Windows 8?
A: If your wireless printer is not appearing in the list during the installation process on Windows 8, there are a few troubleshooting steps you can try:
- Ensure that your printer is connected to the Wi-Fi network and is turned on.
- Restart your printer and computer to refresh the network connections.
- Check if your printer’s firmware is up to date and update it if necessary.
- Temporarily disable any firewall or security software that may be blocking the printer’s connection.
- If all else fails, consult the printer’s user manual or contact the manufacturer’s support for further assistance.
Hopefully, these FAQs have provided you with the answers you were looking for. Happy printing on Windows 8!