
If you’re a proud owner of an Apple wireless keyboard, you probably know how convenient and stylish it is. But if you’re new to using this sleek and minimalistic keyboard, you might be wondering how to pair it with your device. No need to worry, as we’re here to guide you through the process step by step. In this article, we’ll walk you through the easy and straightforward method of pairing your Apple wireless keyboard with any compatible device, whether it’s a Mac, iPad, or iPhone. By the end of this article, you’ll be able to enjoy the seamless wireless typing experience that the Apple wireless keyboard brings to the table. So let’s dive in and get your keyboard paired and ready to go!
Inside This Article
- Step 1: Turn on the Apple Wireless Keyboard
- Step 2: Enable Bluetooth on your device
- Step 3: Put the keyboard in pairing mode
- Step 4: Connect the keyboard to your device
- Troubleshooting common issues
- Conclusion
- FAQs
Step 1: Turn on the Apple Wireless Keyboard
Before you can pair your Apple Wireless Keyboard with your device, you need to ensure that the keyboard is turned on. Follow these simple steps:
1. Check the power switch on the Apple Wireless Keyboard. Look for a small sliding button located on the side or back of the keyboard. Make sure it is in the “on” position.
2. If the keyboard doesn’t have a physical power switch, it may be automatically turned on when you insert the batteries. In this case, make sure the batteries are properly inserted and have enough charge.
3. If your Apple Wireless Keyboard has a power indicator light, check if it is illuminated. A lit light indicates that the keyboard is turned on and ready to be paired.
4. If your keyboard is connected to a Mac, you can also check the Bluetooth settings in the System Preferences. Go to the Apple menu, click on System Preferences, then choose Bluetooth. Ensure that the keyboard is recognized and listed as “Connected.”
By following these steps, you will successfully turn on your Apple Wireless Keyboard and be ready to pair it with your device.
Step 2: Enable Bluetooth on your device
Once you’ve turned on the Apple Wireless Keyboard, the next step is to enable Bluetooth on your device. Bluetooth is a wireless communication technology that allows your device to connect with other compatible devices, such as keyboards, mice, and speakers, without the need for cables.
To enable Bluetooth on your device, follow these steps:
- Go to the settings on your device. This can typically be accessed through the settings icon on your home screen.
- Look for the “Bluetooth” option in the settings menu. This may be located under the “Wireless & Networks” or “Connections” section, depending on your device.
- Toggle the Bluetooth switch to the “On” position. This will activate Bluetooth on your device and make it discoverable to other devices.
After enabling Bluetooth on your device, it will start scanning for available devices to pair with. Keep in mind that the pairing process may differ slightly depending on your device’s operating system.
If you’re using an iPhone or iPad with iOS, go to the “Bluetooth” settings and tap on the device name of your Apple Wireless Keyboard when it appears in the list. Follow any on-screen prompts to complete the pairing process.
On Android devices, go to the “Bluetooth” settings and tap on the “Pair new device” or “Scan” option. Select your Apple Wireless Keyboard from the list of available devices, and follow the instructions to pair it.
Once the pairing is successful, you’ll receive a notification or see a confirmation message on your device. Your Apple Wireless Keyboard is now connected via Bluetooth, and you can start using it to type on your device.
Remember to keep your device within the operational range of the keyboard for optimal performance. In most cases, this range is approximately 30 feet.
If you encounter any issues while enabling Bluetooth or pairing the Apple Wireless Keyboard, refer to the troubleshooting section for tips on resolving common problems.
Step 3: Put the keyboard in pairing mode
Before you can connect your Apple Wireless Keyboard to your device, you need to put it in pairing mode. Pairing mode allows the keyboard to be discoverable by your device and establishes a secure connection between the two. Follow these simple steps to put your keyboard in pairing mode:
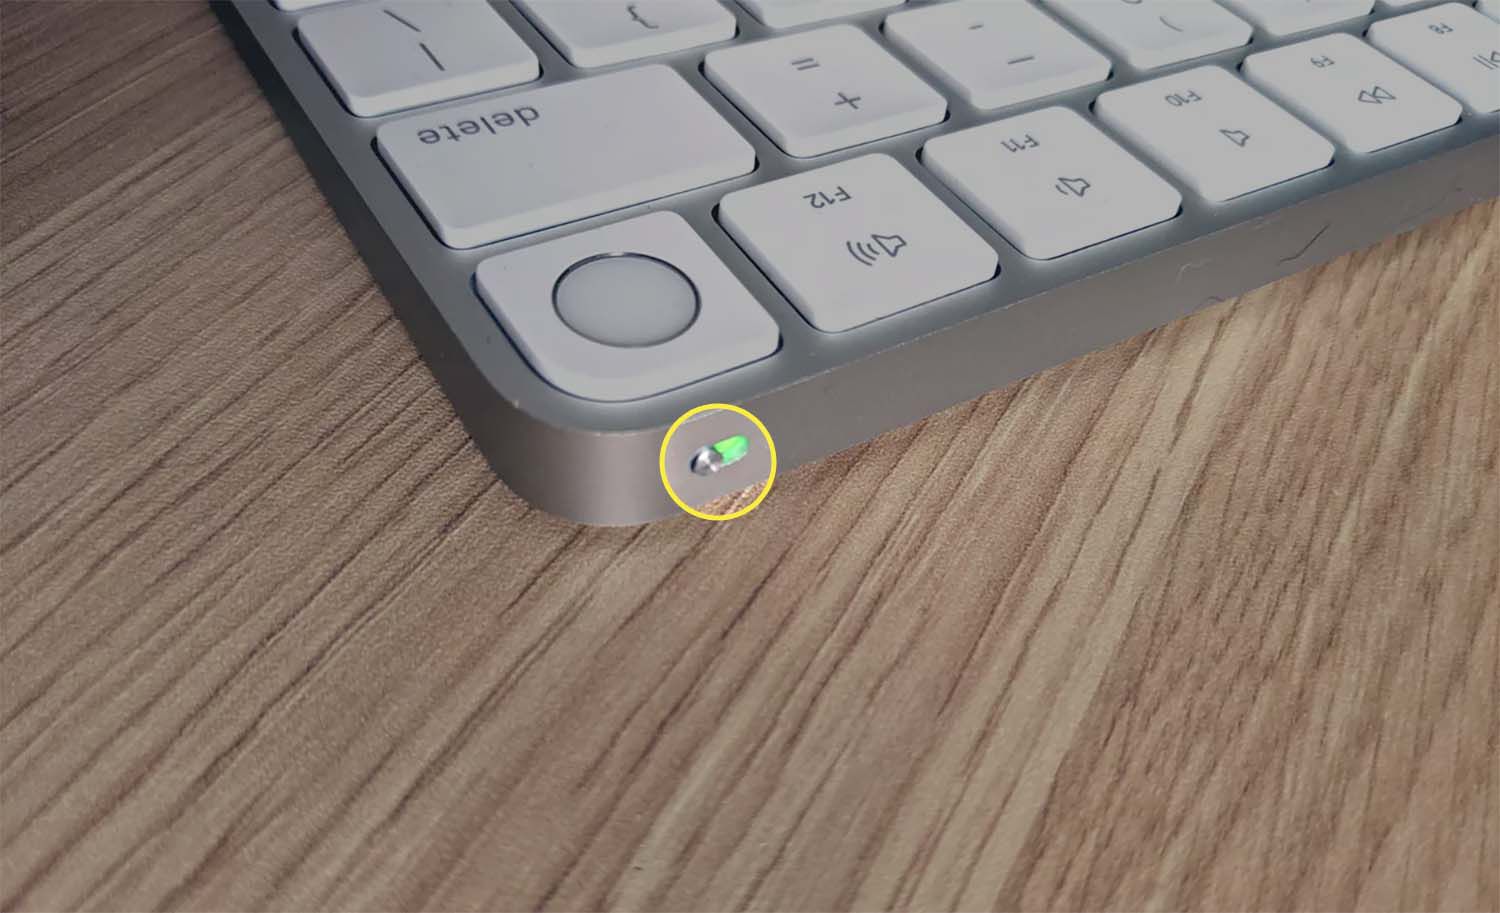
1. Start by ensuring that your keyboard is turned on. You can do this by pressing the power button located on the right-hand side of the keyboard. Once the keyboard is on, you will see a green LED light indicating its power status.
2. Next, locate the small button on the backside of the keyboard. This button is used to put the keyboard in pairing mode. To access the button, you may need to remove the battery cover if it is attached.
3. Press and hold the pairing button for a few seconds. As you press the button, the LED light on the keyboard will start blinking. This indicates that the keyboard is now in pairing mode and ready to be connected to your device.
4. While the keyboard is flashing in pairing mode, proceed to the next step to connect it to your device and complete the pairing process.
Putting your Apple Wireless Keyboard in pairing mode is a straightforward process that ensures your device can detect and connect to the keyboard. By following these steps, you’ll be ready to enjoy the convenience and ease of typing on your wireless keyboard.
Step 4: Connect the keyboard to your device
Once your Apple Wireless Keyboard is in pairing mode, it’s time to connect it to your device. Follow these simple steps to complete the connection:
- On your device, navigate to the “Bluetooth” settings. This can usually be found in the “Settings” app or the system preferences menu.
- In the list of available devices, look for your Apple Wireless Keyboard. It should appear as a device ready to be paired.
- Tap on the name of the keyboard to initiate the pairing process. Your device will display a pairing code on the screen.
- Now, look at your Apple Wireless Keyboard. It may also have a pairing code visible on it, either on the back or inside the battery compartment.
- Using the keyboard, enter the pairing code displayed on your device. Press the Enter key or the Return key to confirm the entry.
- Wait for a moment as your device and the keyboard establish a connection. Once the connection is established, you will see a confirmation message on your device.
That’s it! Your Apple Wireless Keyboard is now connected to your device. You can start using it for typing and navigating your device’s interface. Enjoy the convenience of a wireless keyboard!
Troubleshooting common issues
While pairing an Apple Wireless Keyboard is generally a straightforward process, there may be times when you encounter some common issues. Here are a few troubleshooting steps you can follow to resolve them:
1. Keyboard not detected: If your device is not recognizing the Apple Wireless Keyboard, make sure that Bluetooth is enabled on both the keyboard and your device. Also, check if the keyboard is in pairing mode by following the steps mentioned earlier.
2. Disconnecting or intermittent connection: If the keyboard keeps disconnecting or the connection is unstable, try the following steps:
- Move closer to your device to ensure a strong Bluetooth signal.
- Remove any interference-causing devices or objects, such as other Bluetooth devices or large metal objects, from the vicinity of the keyboard and your device.
- Restart your device and try reconnecting the keyboard.
3. Keys not responding: If certain keys on the Apple Wireless Keyboard are not responding, try the following:
- Check if the keys are physically stuck or damaged. Clean the keyboard or replace the batteries if necessary.
- Disconnect and reconnect the keyboard to your device.
- Reset the keyboard by turning it off and then on again.
4. Keyboard not pairing with multiple devices: If you’re trying to pair the Apple Wireless Keyboard with multiple devices and encountering issues, ensure that you unpair it from one device before attempting to pair it with another. Some devices may have a limitation on the number of Bluetooth devices it can connect to simultaneously.
5. Resetting the keyboard: If all else fails, you can reset the Apple Wireless Keyboard. To do this, turn off the keyboard, press and hold the power button for a few seconds until the green light flashes, and then release the button. The keyboard will be reset and ready to pair with your device again.
If you’re still experiencing issues with the Apple Wireless Keyboard, it’s advisable to refer to the manufacturer’s support documentation or contact their customer support for further assistance.
Conclusion
Pairing your Apple wireless keyboard is a straightforward process that allows you to enjoy the convenience and ease of typing on your mobile device or computer. Whether you’re using it for work, school, or leisure, the Apple wireless keyboard provides a seamless typing experience.
Remember to keep your keyboard and device in pairing mode, and ensure that Bluetooth is enabled on both devices. Take a moment to familiarize yourself with the specific instructions for your Apple device model, as the process may vary slightly.
By following the steps outlined in this article, you have learned how to pair your Apple wireless keyboard hassle-free. Enjoy the freedom of typing without any cords or limitations and enhance your productivity on your Apple device or computer.
Now that you have successfully paired your Apple wireless keyboard, you can type away with ease. Happy typing!
FAQs
1. How do I pair my Apple Wireless Keyboard with my device?
To pair your Apple Wireless Keyboard with a compatible device, follow these steps:
- Ensure that your device has Bluetooth turned on.
- Press the power button on your Apple Wireless Keyboard to turn it on.
- On your device, go to the Bluetooth settings and search for available devices.
- Select your Apple Wireless Keyboard from the list of available devices.
- A pairing code will appear on your device’s screen. Enter this code using the Apple Wireless Keyboard.
- Your Apple Wireless Keyboard should now be paired and ready to use.
2. Can I pair my Apple Wireless Keyboard with multiple devices?
Yes, you can pair your Apple Wireless Keyboard with multiple devices. However, keep in mind that the keyboard can only be actively connected to one device at a time. To switch between devices, you will need to disconnect the keyboard from the current device and pair it with the new device following the same pairing process mentioned in the previous question.
3. How do I disconnect my Apple Wireless Keyboard from a device?
To disconnect your Apple Wireless Keyboard from a device, you can either turn off Bluetooth on the device or manually unpair the keyboard. To manually unpair the keyboard, go to the Bluetooth settings on your device, find the Apple Wireless Keyboard, and select the option to forget or unpair the device. This will remove the keyboard from the list of connected devices and disconnect it.
4. Can I use the Apple Wireless Keyboard with devices other than Apple products?
Yes, the Apple Wireless Keyboard can be used with devices other than Apple products. It is compatible with devices that have Bluetooth functionality, such as PCs, laptops, and smartphones. However, keep in mind that some keyboard shortcuts or specific functions may be optimized for Apple products and may not work in the same way with non-Apple devices.
5. How do I know if my Apple Wireless Keyboard is charged?
The Apple Wireless Keyboard uses batteries for power. To check the battery level, you can go to the Bluetooth settings on your device and find the Apple Wireless Keyboard. The battery level should be displayed next to the keyboard’s name. Additionally, some Apple Wireless Keyboards have a built-in power indicator light that will turn on when the keyboard is turned on and the batteries are in good condition.