
Setting up your LG TV to a wireless network opens up a whole new world of entertainment. The ability to stream your favorite shows, movies, and videos without the need for a physical connection offers convenience and flexibility. However, figuring out how to set up your LG TV to a wireless network can be a bit overwhelming if you’re not familiar with the process.
In this article, we will guide you through the steps to successfully connect your LG TV to your wireless network. Whether you have a smart TV or a traditional TV with wireless capabilities, we’ve got you covered. So, grab your remote and get ready to unlock the full potential of your LG TV!
Inside This Article
- Prerequisites for Setting Up LG TV to Wireless Network
- Step 1: Connect the TV to the Power Source
- Step 2: Turn on the TV and Access the Home Menu
- Step 3: Access the Network Settings
- Step 4: Select the Wireless Network Option
- Step 5: Scan for Available Wireless Networks
- Step 6: Choose the Desired Network and Enter the Password
- Step 7: Complete the Wireless Network Setup
- Troubleshooting Tips for Setting Up LG TV to Wireless Network
- Conclusion
- FAQs
Prerequisites for Setting Up LG TV to Wireless Network
Before you begin setting up your LG TV to a wireless network, there are a few prerequisites you need to consider. Ensuring the following requirements are met will help streamline the setup process and ensure a smooth connection:
1. Stable Wi-Fi Signal: Make sure you have a stable Wi-Fi signal in the location where your LG TV is placed. A weak or erratic Wi-Fi signal could cause connectivity issues and interruptions during the setup process.
2. Wireless Network Name (SSID) and Password: You will need the name of your wireless network (SSID) and its password to connect your LG TV. Locate this information on your router or contact your internet service provider if you’re unsure.
3. LG TV with Built-in Wi-Fi: Ensure that your LG TV has built-in Wi-Fi capabilities. Most modern LG smart TVs come with this feature, allowing you to connect wirelessly to your home network.
4. Updated Firmware: Check if your LG TV has the latest firmware installed. Firmware updates often include bug fixes and improvements that can enhance the functionality and stability of your TV’s wireless connection.
5. Remote Control and Batteries: Make sure you have the TV remote control and fresh batteries to navigate through the setup menus. This will allow you to easily access the necessary settings and enter the password when required.
6. Network Safety: Take necessary precautions to ensure the safety of your network. Implementing security measures such as using a strong password, enabling network encryption, and activating the firewall on your router can help protect your network from unauthorized access.
By satisfying these prerequisites, you’ll be well-prepared to set up your LG TV to a wireless network without any hiccups. Now, let’s dive into the step-by-step process of connecting your TV to the wireless network.
Step 1: Connect the TV to the Power Source
Before you can begin setting up your LG TV to a wireless network, the first step is to ensure that the TV is properly connected to a power source. Follow these steps to connect your TV to the power source:
- Locate the power cable that came with your LG TV.
- Connect one end of the power cable to the back of the TV.
- Find a nearby power outlet and plug the other end of the power cable into it.
- Make sure that the power cable is securely plugged in on both ends, with no loose connections.
- Once the TV is connected to the power source, you can proceed to the next step of the setup process.
By ensuring a proper power connection, you provide the necessary electricity for the TV to function. This step establishes the foundation for setting up the wireless network connection, allowing you to enjoy a seamless streaming experience on your LG TV.
Step 2: Turn on the TV and Access the Home Menu
After connecting your LG TV to the power source, it’s time to turn it on and access the home menu. This is where you can customize various settings and navigate through the different features of your TV.
To turn on your LG TV, locate the power button on either the TV itself or the remote control. Press the power button to initiate the boot-up process. You might need to wait for a few moments while the TV powers on.
Once the TV is turned on, you will be greeted with the home menu. The home menu serves as the central hub for accessing various applications, settings, and features of your LG TV. It’s designed to provide an intuitive and user-friendly interface that allows you to navigate effortlessly.
To access the home menu using the remote control, look for the home button. The location of the home button may vary depending on the remote model, but it is typically represented by an icon resembling a house. Press the home button, and the home menu will appear on your TV screen.
If you prefer to access the home menu directly from the TV itself, look for the menu or home button located on the side or bottom of the TV. Press the button, and the home menu will be displayed on the screen.
Once you have successfully accessed the home menu, you can now start exploring the different options and settings available to personalize your LG TV experience. From adjusting the picture and sound settings to accessing streaming services and apps, the home menu provides a convenient starting point to make the most of your LG TV.
Step 3: Access the Network Settings
Once you have turned on your LG TV and accessed the Home Menu, the next step is to access the Network Settings. This will allow you to connect your TV to your wireless network and enjoy various online streaming services and other internet-related features.
To access the Network Settings, use your TV remote to navigate to the Settings option in the Home Menu. This option is usually represented by a gear icon. Once you have located the Settings option, press the “Enter” or “OK” button on your remote to access the settings menu.
Within the settings menu, you will find various options and submenus related to different settings on your LG TV. Look for the option labeled “Network” or “Network Settings” and select it. This will take you to the network settings submenu, where you can configure the wireless connection for your TV.
Once you are in the network settings menu, you may encounter different options depending on the model and firmware version of your LG TV. Look for options such as “Connection Type,” “Wi-Fi Settings,” or “Network Setup.” Select the appropriate option to proceed with the wireless network setup.
If your TV has multiple network connection options (e.g., Wi-Fi and Ethernet), make sure to select the Wi-Fi option to set up a wireless connection. If you prefer a wired connection, you can choose the Ethernet option and connect your TV directly to the router using an Ethernet cable.
Once you have selected the appropriate network connection option, you will be prompted to scan for available wireless networks. The TV will search for nearby networks and display a list of available networks on the screen. This process may take a few seconds to complete.
Using your TV remote, scroll through the list of available networks and select your desired network. If your network is not visible in the list, you may need to move the TV closer to the router or ensure that the wireless network is enabled and broadcasting its SSID. Some routers also support a feature called WPS (Wi-Fi Protected Setup), which simplifies the connection process. If your router has WPS functionality, you can choose the “WPS” option on your TV and follow the on-screen instructions to connect automatically.
Once you have selected your network, you will be prompted to enter the network password. Use your remote control’s arrow keys to navigate to the password field and enter your wireless network’s password using the on-screen keyboard. Take care to enter the password correctly as it is case-sensitive.
After entering the password, select the “Connect” or “OK” button to proceed with the connection. Your LG TV will attempt to establish a connection with the selected wireless network. This process may take a few moments as the TV negotiates with the router and obtains an IP address.
Once the connection is established, you will see a confirmation message indicating that your TV is now connected to the wireless network. You can now enjoy the various online features and streaming services available on your LG TV.
It is important to note that the steps and menu options may vary slightly depending on the model and firmware version of your LG TV. However, the general process for accessing the network settings and setting up a wireless connection remains consistent across different LG TV models.
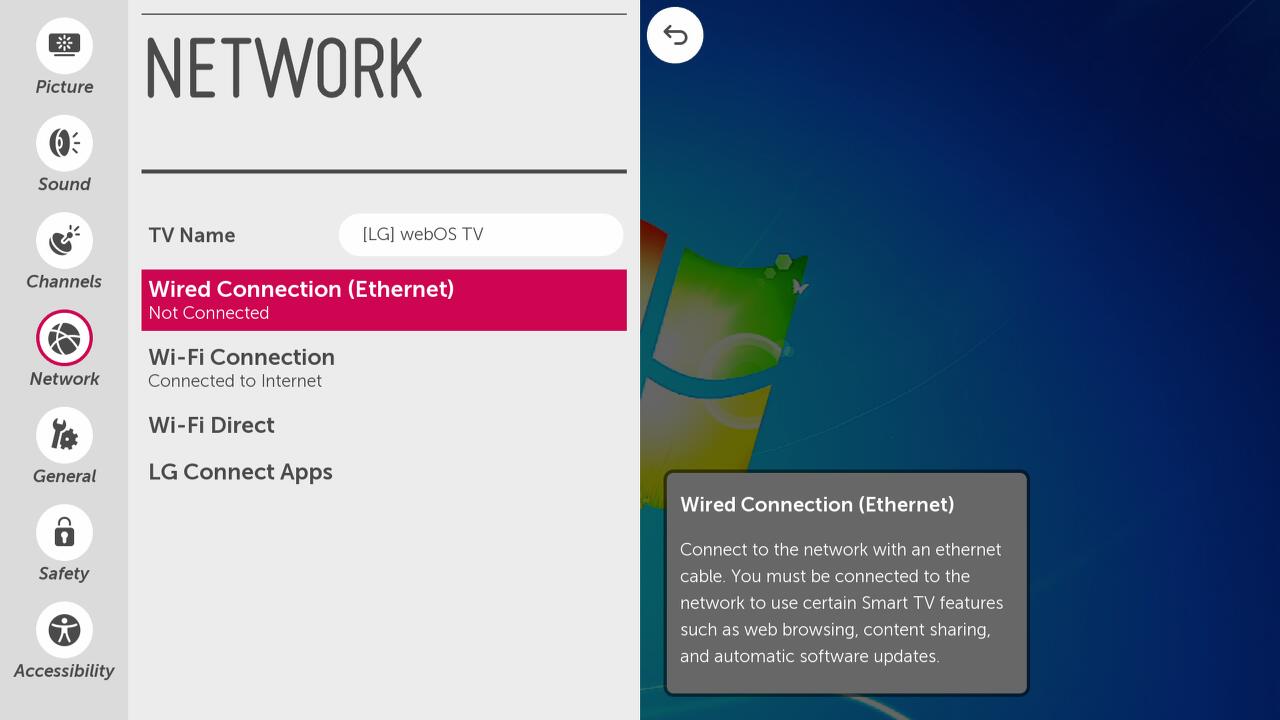
Step 4: Select the Wireless Network Option
Now that your LG TV is connected to the power source and turned on, it’s time to navigate to the network settings. Follow these simple steps to select the wireless network option:
1. Using your LG TV remote, press the “Home” button to access the home menu. The Home button is usually marked with a house icon.
2. Once the home menu appears on the screen, navigate to the “Settings” icon. This icon is often represented by a gear or a wrench and can usually be found at the top-right or bottom-right corner of the screen.
3. Within the settings menu, locate and select the “Network” option. It may be labeled as “Network Settings” or simply “Network.”
4. After selecting the “Network” option, you will be presented with various connection types. Choose the “Wireless” or “Wi-Fi” option to connect your LG TV to a wireless network.
5. If prompted, you may need to confirm your selection or provide a password to continue the setup process. Follow the on-screen instructions to proceed.
That’s it! You have successfully selected the wireless network option on your LG TV. You are now ready to scan for available networks and connect to your preferred one.
Note: The options and interface may vary slightly depending on the model and software version of your LG TV. However, the overall process should be similar across different devices.
Step 5: Scan for Available Wireless Networks
After selecting the “Wireless Network” option in the previous step, your LG TV will automatically scan for available wireless networks in the vicinity. This process allows your TV to detect nearby Wi-Fi hotspots and display a list of networks to choose from.
During the scanning process, your TV may take a few moments to complete the search. You will see a progress indicator on the screen as the TV searches for available networks. Be patient while it scans, as the duration may vary depending on the strength of the Wi-Fi signal and the number of networks in the area.
Once the scan is complete, your LG TV will display a list of available wireless networks. This list will typically include the network names (also known as SSIDs) and the signal strength of each network. The signal strength is usually represented by bars or a percentage value, giving you an idea of the network’s reliability and range.
Take your time to review the list and evaluate the available networks. Look for your own wireless network name (SSID) in the list. If you don’t see your network listed, it’s possible that your TV is out of range or there may be signal interference. In such cases, consider moving closer to the wireless router or troubleshooting any potential issues with your network setup.
It’s important to note that if you have multiple SSIDs or separate networks on different frequency bands (like 2.4GHz and 5GHz), they may appear as separate entries in the network list. Make sure you choose the right network that corresponds to the one you wish to connect your TV to.
Once you have identified your wireless network in the list, proceed to the next step to connect your LG TV to the selected network by entering the password.
Step 6: Choose the Desired Network and Enter the Password
Once you have scanned for available wireless networks on your LG TV, it’s time to choose the network you want to connect to. Follow these simple steps to select your desired network and enter the password:
1. Using the TV’s remote control, navigate to the list of available networks displayed on the screen. This list may vary depending on the number of networks in your vicinity.
2. Use the up and down arrow keys on the remote control to highlight the network you wish to connect to. Pay attention to the network names (SSID) and select the one that corresponds to your home network.
3. Once you have highlighted the desired network, press the “Enter” or “OK” button on the remote control to proceed.
4. At this point, you will be prompted to enter the network password. If your wireless network is protected, you will need to type in the password using the TV’s on-screen keyboard. Make sure to enter the password accurately, as it is case-sensitive.
5. To enter the password, use the arrow keys on the remote control to navigate through the letters, numbers, and other characters on the on-screen keyboard. Select each character by pressing the “Enter” or “OK” button after selecting it. Repeat this process until you have entered the complete password.
6. Once you have entered the password, review it to ensure it is correct. If you need to make any corrections, use the arrow keys to navigate back to the incorrect character and overwrite it with the correct one.
7. After confirming that the password is correct, press the “Enter” or “OK” button on the remote control to proceed with the network connection process.
8. Your LG TV will now attempt to connect to the selected wireless network and authenticate the password. This process may take a few seconds to complete.
9. If the entered password is correct and the network connection is successful, you will receive a confirmation message indicating that your LG TV is now connected to the wireless network. You can now enjoy seamless streaming and access online content right from your television.
Step 7: Complete the Wireless Network Setup
After selecting the desired wireless network and entering the password, it is time to complete the wireless network setup on your LG TV. This step will ensure that your TV is successfully connected to the wireless network and ready to access the internet and online content.
Once you have entered the correct password for the wireless network, you will need to confirm your selection and proceed with the setup process. Depending on your LG TV model, you may be prompted to perform a network test to ensure a stable and reliable connection.
During the network test, the TV will analyze the signal strength and speed of your wireless connection. This test helps identify any potential issues and ensures optimal performance when streaming or downloading content on your TV.
Once the network test is complete, your LG TV will display a confirmation message indicating that the wireless network setup is successful. At this point, you can proceed to enjoy all the online features and benefits that your LG TV has to offer.
It is important to note that if your TV fails the network test or encounters any connectivity issues, you may need to double-check the network settings and make sure you have entered the correct password. Additionally, you may need to troubleshoot any wireless network problems or consult your internet service provider for further assistance.
Completing the wireless network setup on your LG TV is a crucial step in ensuring a seamless and connected entertainment experience. By following the previous steps in this guide, you should be able to establish a secure and stable wireless connection for your LG TV. Now, you can access a wide range of streaming services, browse the internet, and enjoy an enhanced viewing experience with the convenience of wireless connectivity.
Troubleshooting Tips for Setting Up LG TV to Wireless Network
Setting up your LG TV to connect to a wireless network can sometimes be a little tricky. However, with the right troubleshooting tips, you can easily overcome any challenges that may arise during the setup process. Here are a few troubleshooting tips to help you successfully set up your LG TV to a wireless network:
1. Check Wi-Fi Signal Strength: Ensure that your LG TV is within range of your wireless router. Weak or intermittent Wi-Fi signal strength can cause connectivity issues. Position the TV closer to the router or consider using a Wi-Fi extender to boost the signal if necessary.
2. Restart your Devices: Sometimes a simple restart can resolve connectivity issues. Restart your LG TV, wireless router, and any other devices that are part of your network. This can help refresh the network settings and resolve temporary glitches.
3. Update Firmware: Ensure that your LG TV has the latest firmware installed. Outdated firmware can cause compatibility issues and hinder the wireless network setup. Check for firmware updates through the TV settings menu or the manufacturer’s website and install any available updates.
4. Double-Check Network Settings: Make sure that the wireless network name (SSID) and password you entered are correct. Typos or incorrect information can prevent your LG TV from connecting to the network. Carefully enter the network details again and ensure they match the information provided by your internet service provider.
5. Disable MAC Address Filters: Some wireless routers have MAC address filtering enabled, which only allows specific devices to connect to the network. Check if MAC address filtering is enabled and disable it temporarily during the setup process to ensure your LG TV can successfully connect.
6. Reset Network Settings: If you’ve tried everything else and still can’t connect your LG TV to the wireless network, consider resetting the network settings. This will restore all network configurations to their default state. Check your TV’s user manual or the manufacturer’s website for specific instructions on how to reset the network settings.
7. Contact Technical Support: If you have exhausted all troubleshooting options and are still unable to connect your LG TV to the wireless network, it’s recommended to reach out to the manufacturer’s technical support team or consult with a professional. They can provide further guidance and assist in resolving any complex issues.
Remember, setting up your LG TV to a wireless network should be a seamless process. By following these troubleshooting tips, you can troubleshoot and overcome any obstacles that may come your way, ensuring a smooth and reliable wireless network connection.
Conclusion
In conclusion, setting up your LG TV to a wireless network is a convenient and straightforward process that allows you to enjoy a wide range of streaming content from the comfort of your couch. By following the steps outlined in this guide, you can easily connect your LG TV to the internet and access popular streaming platforms, browse the web, and even stream media from your personal devices. Whether you’re a movie enthusiast, a sports fan, or simply enjoy staying up-to-date with the latest shows, connecting your LG TV to a wireless network opens up a world of entertainment possibilities. So, go ahead, grab your remote, and dive into a seamless and immersive streaming experience with your LG TV connected to a wireless network.
FAQs
1. Can I connect my LG TV to a wireless network?
Yes, LG TVs come with built-in Wi-Fi capabilities, allowing you to connect them to your home wireless network. This enables you to stream content, access online services, and use smart features on your TV.
2. How do I set up my LG TV to a wireless network?
To set up your LG TV to a wireless network, follow these steps:
– Press the Home button on your LG TV remote.
– Navigate to the Settings menu and select Network.
– Choose the network connection option (either Wi-Fi or Wireless) and select it.
– Find your wireless network from the available list of networks, and enter the Wi-Fi password if prompted.
– Once connected, a confirmation message will appear, indicating that your LG TV is now connected to the wireless network.
3. What if I can’t find my wireless network on the LG TV?
If your LG TV can’t find your wireless network, try the following troubleshooting steps:
– Ensure that your wireless router is turned on and working properly.
– Make sure that your LG TV is within range of your wireless router.
– Restart your LG TV and try scanning for wireless networks again.
– If your network is hidden, select the option to manually enter your network’s information and enter the SSID (network name) and password.
4. Can I connect multiple LG TVs to the same wireless network?
Yes, you can connect multiple LG TVs to the same wireless network. Each TV will require its own network connection setup, but they can all be connected using the same Wi-Fi network.
5. Why is my LG TV losing the wireless connection?
There could be several reasons why your LG TV is losing its wireless connection. Some possible causes include:
– Poor Wi-Fi signal strength in the area where your TV is located.
– Interference from other devices or appliances that are disrupting the wireless signal.
– Firmware or software issues on your LG TV that may require an update.
– Problems with your wireless router or network configuration.
If you’re experiencing frequent disconnections, try moving your TV closer to the wireless router or consider using a Wi-Fi range extender to improve the signal strength.