
In today’s digital age, our cellphones have become an essential tool for capturing precious moments through photos. Whether it’s a stunning sunset or a funny selfie, we often find ourselves wanting to transfer these photos from our cellphones to our computers for safekeeping, sharing, or editing purposes.
However, figuring out how to transfer photos from cellphone to computer can be a daunting task for some. With different operating systems and device models, it’s easy to feel overwhelmed and unsure about the best method to use.
But fear not! In this article, we’ll guide you through some simple and effective methods to transfer your photos hassle-free. So, grab your cellphone and get ready to unlock the secrets of bridging the gap between your cellphone and computer!
Inside This Article
- Introduction
- Required Equipment
- Method 1: Using a USB Cable
- Method 1: Using a USB Cable
- Method 3: Using Cloud Storage
- Method 4: Using a Memory Card Reader
- Conclusion
- Conclusion
- FAQs
Introduction
Transferring photos from your cellphone to a computer is a common task that many individuals need to do. Whether you want to free up storage space on your phone, edit your photos on a larger screen, or simply create a backup of your precious memories, knowing how to transfer photos is essential.
In this article, we will explore different methods of transferring photos from your cellphone to a computer. We will cover everything from using a USB cable to utilizing cloud storage options. So, let’s dive in and find the method that works best for you!
Before we begin, it’s important to note that the methods described here are applicable to various types of cellphones and computers. Whether you have an iPhone, Android device, or any other smartphone, and whether you’re using a Windows PC or a Mac, there is a solution for you.
Now, without further ado, let’s get started with the different methods you can use to transfer photos from your cellphone to your computer and enjoy the convenience and flexibility it offers.
Required Equipment
Before you can begin transferring photos from your cellphone to your computer, there are a few essential pieces of equipment that you will need to gather. These items will vary depending on the method you choose to use, but here are some common options:
- USB Cable: This is the most straightforward and commonly used method for transferring photos. You will need a USB cable that is compatible with your cellphone model and computer.
- Bluetooth: If your cellphone and computer both have Bluetooth capabilities, you can use this wireless technology to transfer photos without the need for any cables.
- Cloud Storage Account: To transfer photos using cloud storage, you will need an account with a cloud service provider such as Google Drive, Dropbox, or iCloud.
- Memory Card Reader: If your cellphone uses a removable memory card, you can transfer photos by removing the card from your phone and using a memory card reader to connect it to your computer.
These are the basic equipment options for transferring photos from your cellphone to your computer. Make sure you have the necessary equipment before proceeding with any of the methods mentioned in this article.
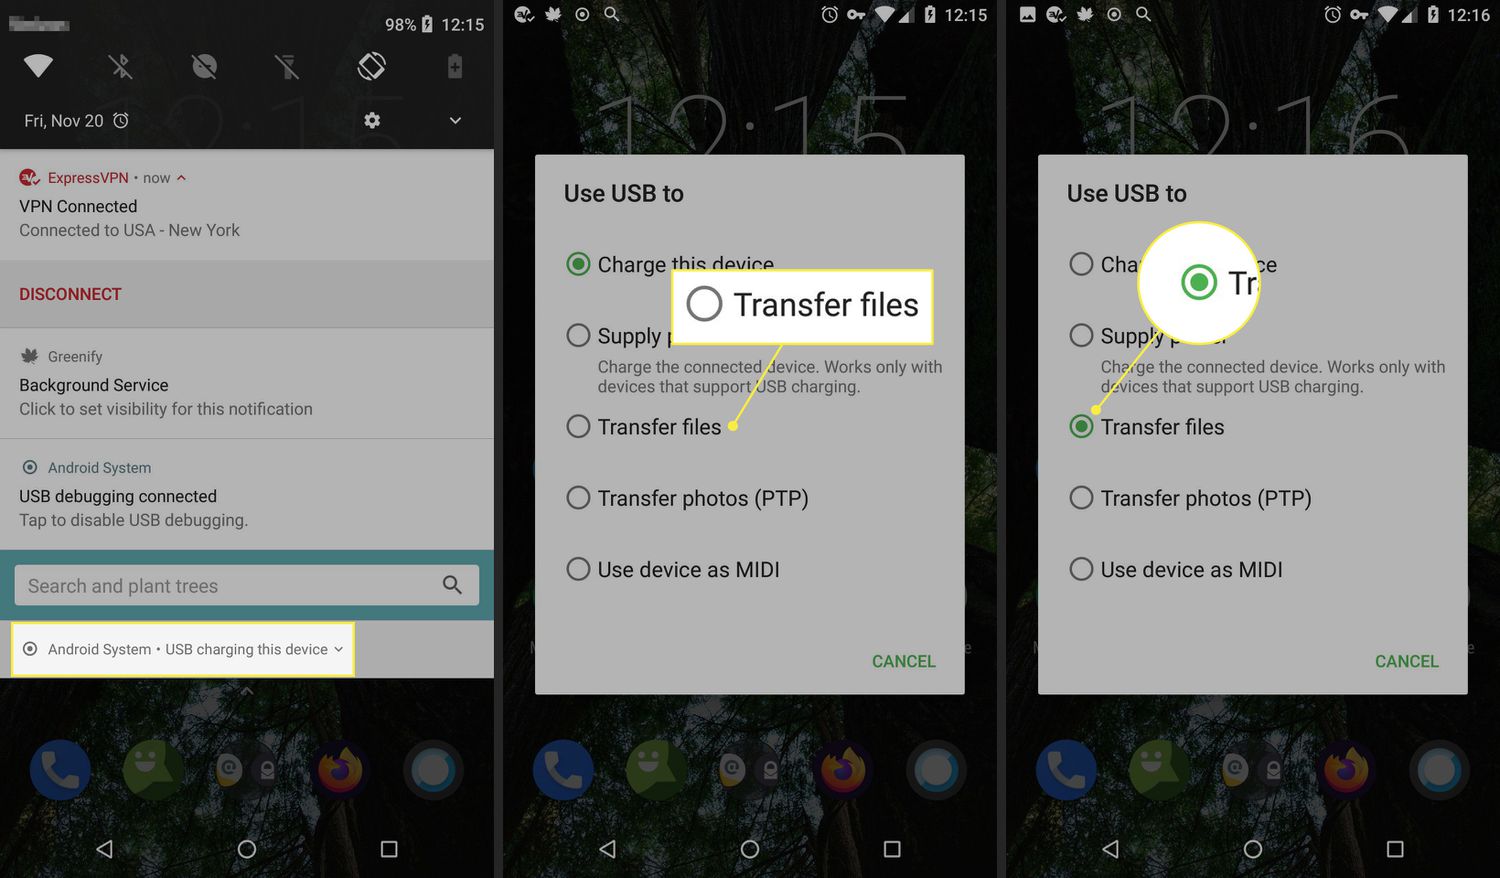
Method 1: Using a USB Cable
One of the most common and straightforward ways to transfer photos from your cellphone to your computer is by using a USB cable. This method allows for a direct and secure connection between the two devices. Here’s how you can do it:
- Connect your cellphone to your computer using a USB cable. Make sure both devices are turned on.
- On your cellphone, you may need to check the notification panel for any prompts related to the USB connection. Select the option that allows for file transfer or media transfer.
- On your computer, open a file explorer or a folder where you want to save the transferred photos.
- Navigate to the storage location of your cellphone. In most cases, it will appear as a separate device or drive.
- Open the folder that contains your photos on your cellphone.
- Select the photos you want to transfer to your computer. You can do this by individually clicking on each photo or using key combinations like “Ctrl+A” to select all.
- Drag and drop the selected photos into the desired location on your computer. Alternatively, you can right-click on the selected photos and choose the “Copy” option. Then, navigate to the desired location on your computer and right-click again, selecting the “Paste” option.
- Wait for the transfer process to complete. The time required may vary depending on the number and size of the photos being transferred.
- Once the transfer is finished, safely disconnect your cellphone from your computer by ejecting it from the system tray or following the appropriate procedure for your operating system.
Using a USB cable is a reliable and efficient method for transferring photos from your cellphone to your computer. It offers a direct connection, ensuring that the transfer is secure and accurate. However, it does require you to have a compatible USB cable and may not be as convenient if you need to transfer large amounts of data.
Method 1: Using a USB Cable
Transferring photos from your cellphone to your computer using a USB cable is one of the most straightforward methods. Here’s how to do it:
- Start by connecting your cellphone to your computer using a USB cable. Make sure to use the appropriate USB cable for your cellphone model.
- Your computer will detect the connected device and may prompt you to allow access. Follow the on-screen instructions and grant the necessary permissions.
- Once the connection is established, you can open the file explorer on your computer and navigate to the connected device. It will usually appear as a removable storage device.
- Locate the folder where your photos are stored on your cellphone. This is commonly found in the “DCIM” folder or a specific folder labeled “Pictures” or “Photos.”
- Open the folder and select the photos you want to transfer to your computer. You can either drag and drop the selected photos to a folder on your computer or use the copy-paste function.
- Wait for the transfer to complete. The speed of the transfer will depend on the size of the photos and the USB connection speed.
- Once the transfer is finished, you can safely disconnect your cellphone from the computer by safely ejecting or removing the USB cable.
Using a USB cable to transfer photos provides a direct and reliable connection between your cellphone and computer. It ensures faster transfer speeds and avoids any reliance on internet connectivity. However, it may require you to have the correct USB cable and a compatible USB port on your computer.
Method 3: Using Cloud Storage
Another convenient method to transfer photos from your cellphone to your computer is by using cloud storage services. Cloud storage allows you to store your photos and other files online, making them accessible from any device with an internet connection. Here’s how you can use cloud storage to transfer photos:
- Choose a cloud storage service: There are several popular cloud storage services available, such as Google Drive, Dropbox, and iCloud. Select the one that suits your needs and preferences.
- Create an account: Sign up for an account with the cloud storage service of your choice. This usually involves providing some basic information and setting up a username and password.
- Install the app: To easily upload and access your photos, install the app provided by the cloud storage service on your cellphone.
- Upload your photos: Open the app on your cellphone and find the option to upload files. Select the photos you want to transfer and start the upload. Depending on the size and number of photos, this process may take some time.
- Access your photos on your computer: Once the upload is complete, you can access your photos on your computer by signing in to your cloud storage account through a web browser or by installing the desktop client.
- Download your photos: From your cloud storage account on your computer, find the folder where you uploaded your photos. Select the photos you want to transfer and choose the option to download them to your computer. The photos will be saved to your designated download location.
Using cloud storage for transferring photos provides a convenient and seamless experience. It allows you to easily access your photos from any device, simplifying the process of transferring them to your computer.
Method 4: Using a Memory Card Reader
If you have a memory card in your cellphone, transferring photos to your computer can be as simple as using a memory card reader. A memory card reader is a small device that can read the data on your memory card and transfer it to your computer.
Here’s how you can use a memory card reader to transfer your photos:
- Remove the memory card from your cellphone. Depending on your device, you may need to consult the user manual or look for a small slot or compartment where the memory card is located. Carefully remove the memory card and keep it in a safe place.
- Plug the memory card reader into an available USB port on your computer. The memory card reader will typically come with a USB cable that you can connect to your computer. Once connected, your computer will recognize the memory card reader as a removable storage device.
- Insert the memory card into the memory card reader. The memory card reader will have slots or compartments where you can insert different types of memory cards. Make sure to align the memory card with the appropriate slot and gently push it in until it clicks into place.
- Your computer will automatically detect the memory card and display its contents. You can now navigate to the location where your photos are stored on the memory card.
- Select the photos you want to transfer. You can either select individual photos by clicking on them or use the Ctrl or Shift keys to select multiple photos at once.
- Copy the selected photos to your computer. Right-click on the selected photos and choose the “Copy” option. Then, navigate to the desired location on your computer and right-click again, this time choosing the “Paste” option to transfer the photos.
- Wait for the transfer to complete. The time it takes to transfer the photos will depend on the number and file size of the photos. Once the transfer is finished, you can safely remove the memory card from the memory card reader.
Using a memory card reader is a convenient way to transfer photos from your cellphone to your computer, especially if you don’t have access to a USB cable or Bluetooth connection. It allows you to quickly and easily transfer photos directly from the memory card, without the need for any additional software or external devices.
Remember to safely eject the memory card reader from your computer before unplugging it to avoid any data corruption or loss. With this method, you can have your photos transferred and ready to be edited, shared, or backed up on your computer in no time.
Conclusion
Transferring photos from your cellphone to your computer is a simple and straightforward process. Whether you choose to use a USB cable, Bluetooth, cloud storage, or a memory card reader, each method offers its own set of advantages and convenience. By understanding the various options available, you can easily transfer your precious memories from your cellphone to your computer and enjoy them on a larger screen, make edits, or simply keep them safe as a backup.
Remember to choose the method that best suits your needs and equipment availability. If you have a USB cable readily available, it is a popular and efficient choice for transferring photos. Bluetooth offers wireless convenience, making it a great option if your devices support it. Cloud storage is a reliable and secure method that allows you to access your photos from any device with an internet connection. A memory card reader is an excellent choice for those who prefer physical storage and direct transfer.
Regardless of the method you choose, it is worth noting the importance of keeping your photos organized and regularly backing them up. This will ensure that you never lose those precious moments captured on your cellphone. Remember to delete any unwanted photos from your device to free up storage space and keep your phone running smoothly.
With the knowledge and understanding of how to transfer photos from your cellphone to your computer, you can now embrace the freedom to manage and enjoy your photo collection in a way that suits you best. So go ahead, select the method that appeals to you, and start preserving and sharing your moments with ease!
Conclusion
Transferring photos from a cellphone to a computer is a simple and convenient process that allows you to easily back up your precious memories and share them with others. Whether you prefer to use a USB cable, cloud storage, or third-party applications, there are various methods available to suit your needs.
By following the step-by-step guides outlined earlier, you can confidently transfer photos from your cellphone to your computer in no time. Remember to organize your files and keep them in a safe place to avoid any accidental loss or deletion.
Now that you know the different ways to transfer photos from your cellphone to your computer, you can free up space on your device for more pictures and videos. Take control of your digital content and ensure that none of your captured moments are lost.
So, go ahead and start transferring your photos today. Enjoy the convenience and peace of mind that comes with having your precious memories safely stored on your computer.
FAQs
1. Can I transfer photos from my cellphone to my computer?
Yes, you can transfer photos from your cellphone to your computer. There are several methods available, depending on the type of cellphone and computer you have.
2. How do I transfer photos from an iPhone to a computer?
To transfer photos from an iPhone to a computer, you can use iTunes, iCloud, or connect your iPhone to your computer using a USB cable. Once connected, you can select the photos you want to transfer and save them on your computer.
3. What options do I have for transferring photos from an Android phone to a computer?
There are multiple options for transferring photos from an Android phone to a computer. You can connect your phone to the computer using a USB cable, use cloud storage services like Google Drive or Dropbox, or even use third-party apps like AirDroid or SnapBridge.
4. Is it possible to wirelessly transfer photos from my cellphone to my computer?
Yes, it is possible to wirelessly transfer photos from your cellphone to your computer. For iPhones, you can use AirDrop or iCloud Photo Sharing. Android users can utilize apps like Google Photos, which allows wireless syncing and access to your photos on any device.
5. Are there any online services or platforms for transferring photos from a cellphone to a computer?
Yes, there are online services and platforms that can facilitate the transfer of photos from a cellphone to a computer. Google Photos, Dropbox, and iCloud are popular options that allow you to upload your photos from your cellphone and access them from your computer.